


See Details
GAT+ is a Google Workspace Audit tool that by default can be installed only by the Super Admin of the Domain.
Install GAT+
How to install GAT+ Video
Step 1:
First login to your domain with Super Admin Account.
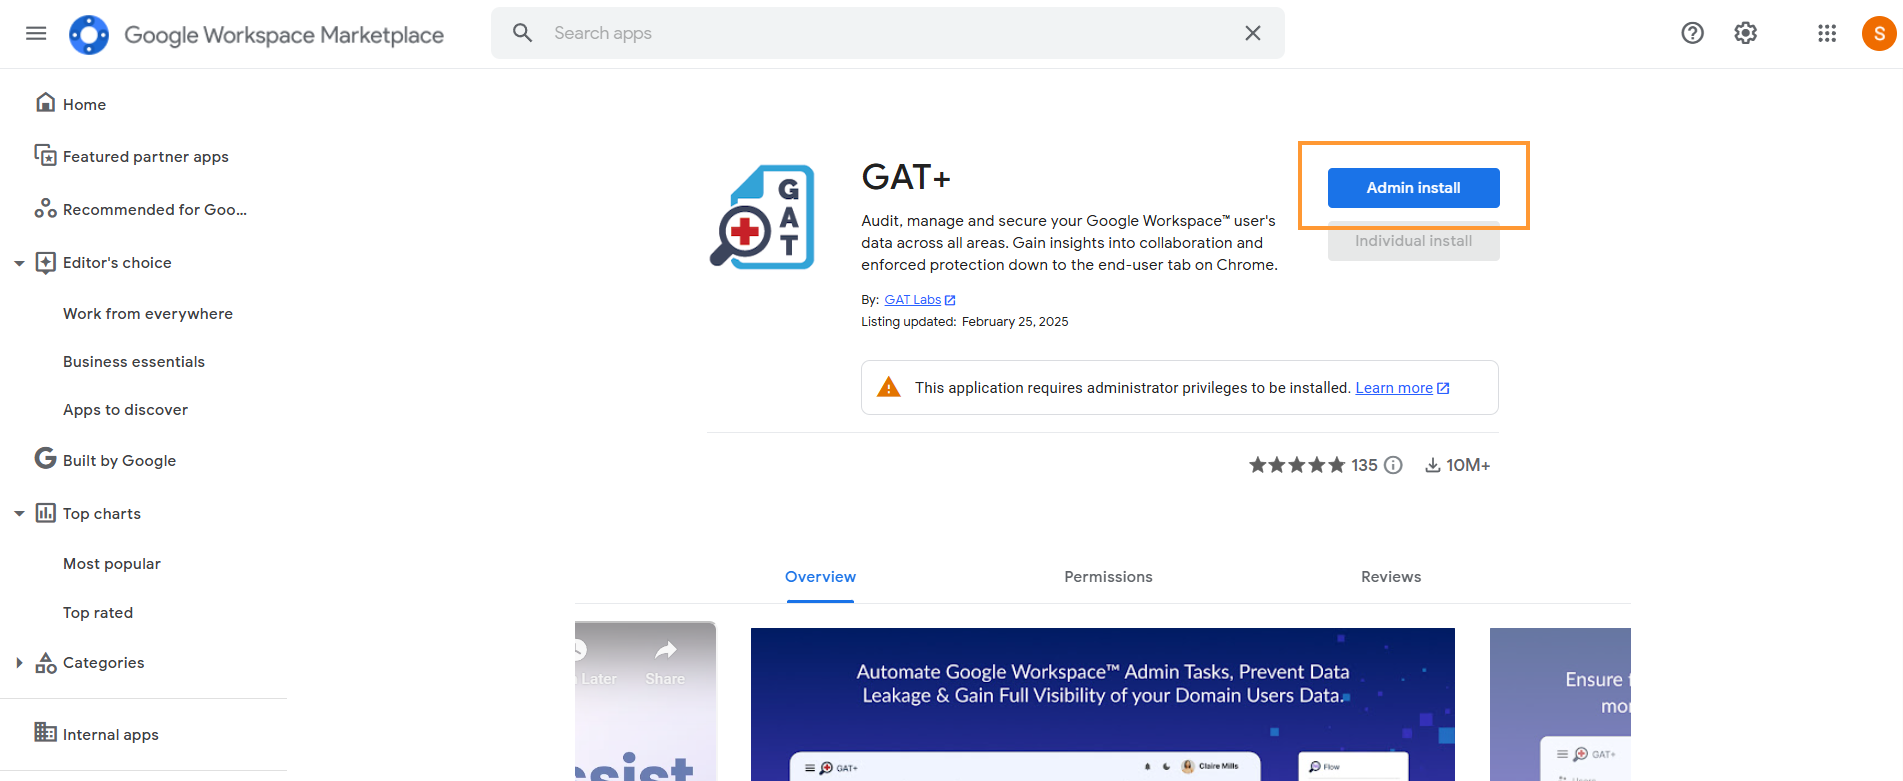
Navigate to > Google Workspace Marketplace > You can also search for GAT+ in the search bar.
When GAT+ is selected click on Admin install
A pop-up window will be displayed by clicking on “Continue“.
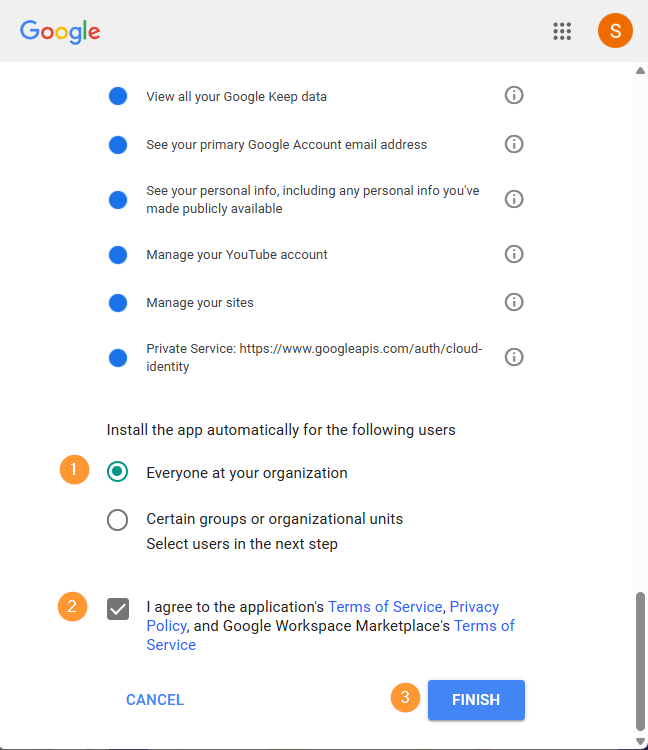
Then a new pop-up will be shown with all the permissions required.
Scroll down to the bottom.
- Under: Install the app automatically for the following users
- Select “Everyone at your organization”
- Note: installing on certain groups or org. units will not give clear and accurate data stats of the domain data
- Enable the checkmark – “I agree to the application’s terms…”
- Select “Everyone at your organization”
- Click on Finish
Note: You can not install it from an incognito window unless you are signed in to your Super Admin account.
Result
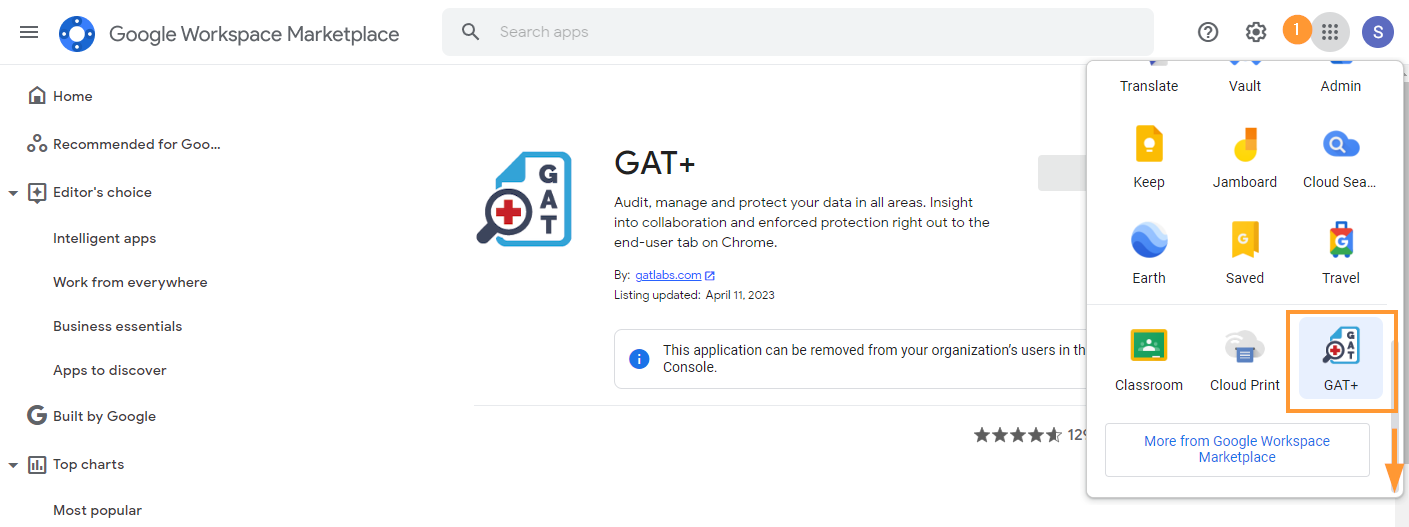
GAT+ will be installed.
When installed, click on the Goole apps button and scroll down to the GAT+ icon
Select Region
When you launch GAT+ for the first time you will have to select a region where data will be stored.
This selection is permanent.
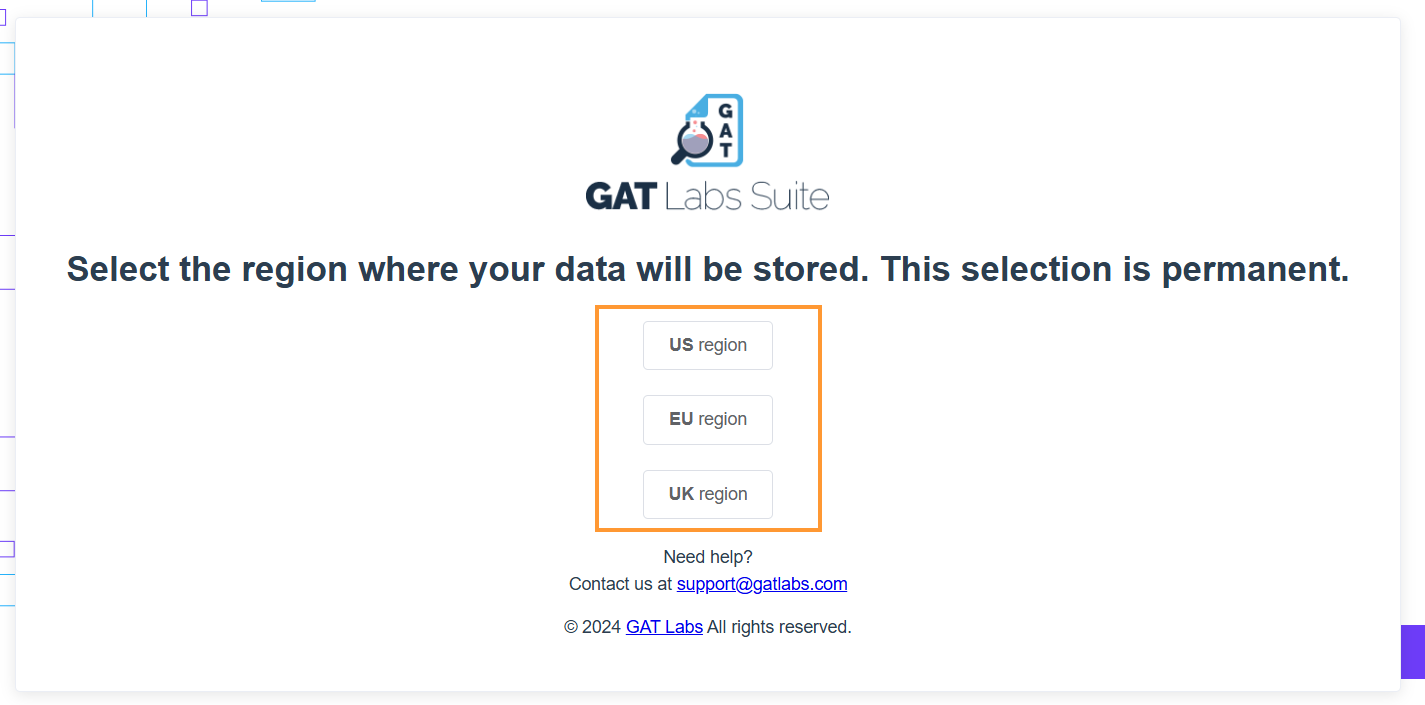
Select the Region where the data will be stored.
- US Region –
- EU Region –
- UK Region –
Once the region is selected GAT+ will be opened up for you.
This will be the initial login and the initial scan will be started.
The time for the initial scan to complete will depend on the size of the domain.
- The number of users
- The number of Drive files etc
Estimate time of the initial scan
We estimate the initial scan to take 30 min per 1 million files. When the scan is completed an automatic email will be sent to the Admin account.
Note: Subsequent scans will be faster.
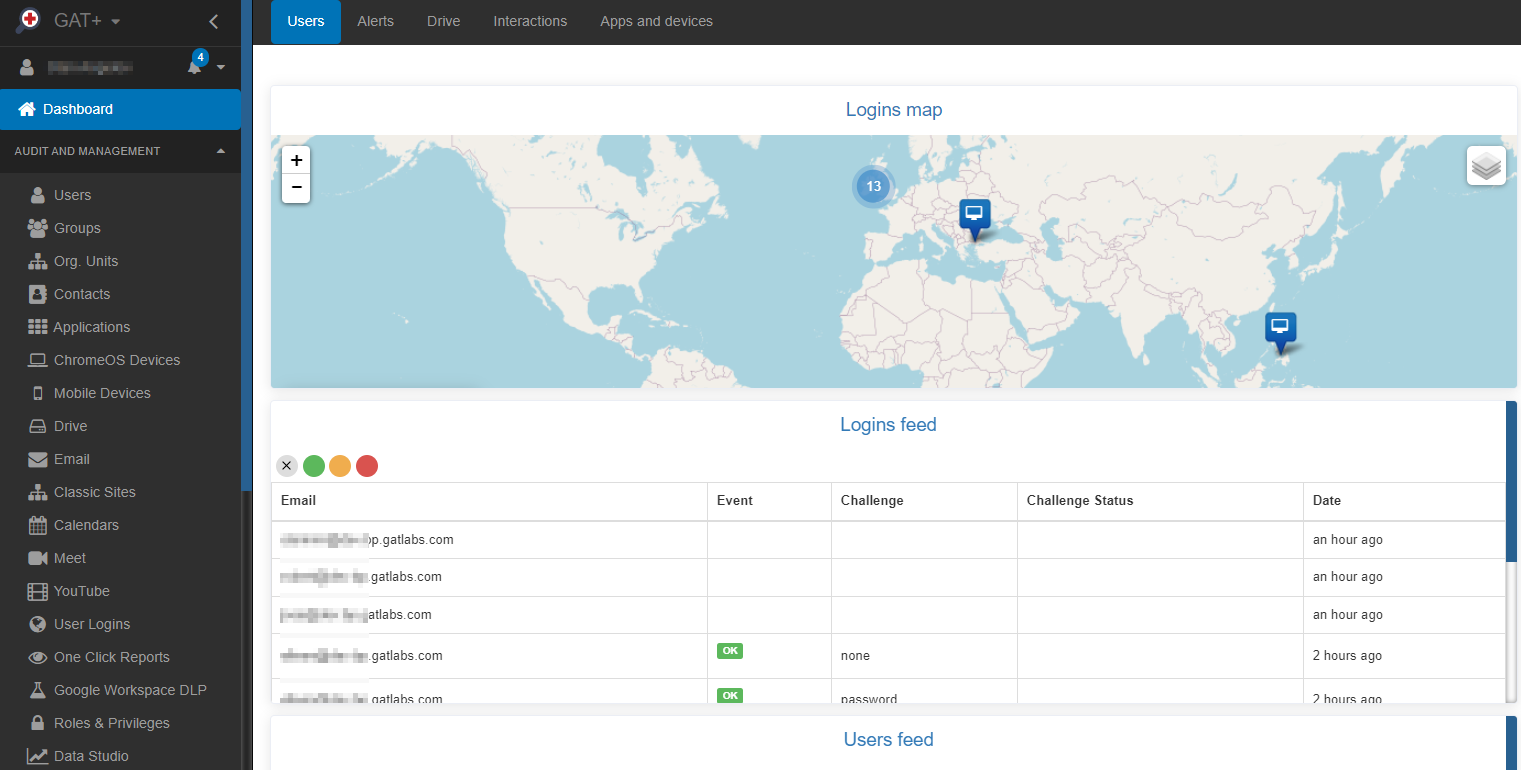
When the initial scan has been completed, the data from your domain will be displayed in the GAT+ console.
Data access
To view and access the full domain data (metadata), we recommend that GAT+ be installed domain-wide and all permissions be granted.
Access GAT+ by Super Admins only
By default, the tool can be accessed ONLY by Super Admins of the domain.
Non-admin accounts can see the GAT+ application under their Google Apps option, but CANNOT launch the tool itself.
When the tool is installed domain-wide, it can be launched from the Google Apps menu.
Click on the Google Apps menu button scroll down to third-party apps and click on GAT+

This will launch GAT+ into a new window on your browser.
See Details
Is GAT+ failing to run? Check these options in your Admin Console
How to make sure GAT+ is running correctly and showing correct information from your domain?
Navigate to the Google Admin console
Click the Google Apps menu button on the top right corner of your Chrome session and click on the Admin button

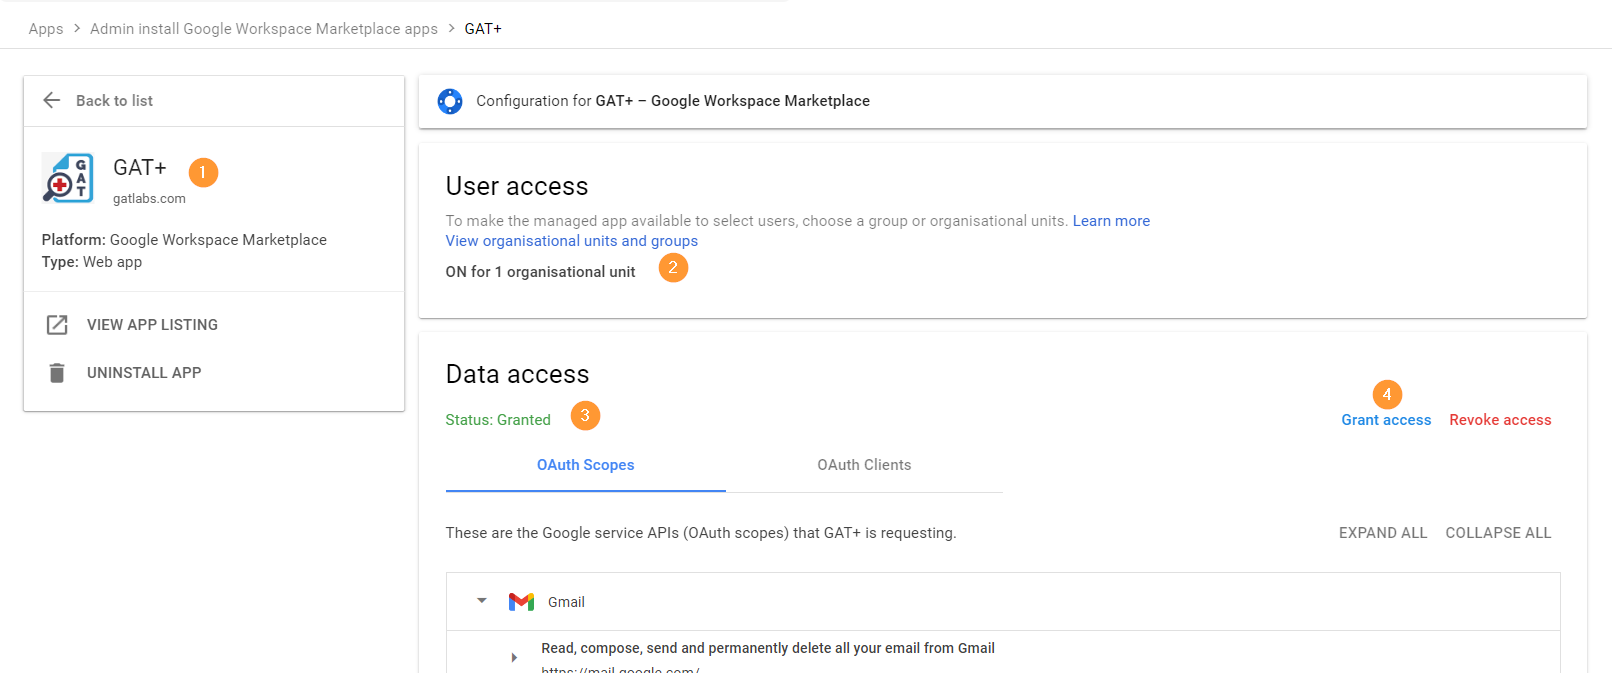
In the Google Admin console navigate to Apps > Google Workspace Marketplace apps > Apps list

Click on the GAT+ app
You will need to click and grant access to GAT+
- Distribution – it has to be Enabled for all organizational units and groups
- Data Access – status Granted
- Grant access – click to grant access to GAT+
IMPORTANT NOTE: As Google has deprecated their ‘Google Sites’ product, GAT cannot be granted access to that. You may see that the status is only ‘Partially Granted’ during this step. However, once you have clicked the ‘Grant access’ button you can consider this step finished.
Access by Super Admin Only
By default, the tool can be accessed ONLY by the domain’s super admins. Non-admin accounts cannot log in.
Context-Aware Access
If your domain has Context-Aware Access consider enabling and allowlisting GAT+.
Navigate to Security > Context-Aware Access > Assign access levels and enable the allowlist

Follow the steps required and explained by Google: https://support.google.com/a/

Navigate to Admin console > Security > Access and data control > API control > Manage third-party app access to Google services and then expand “configure new app”.
.
To enable Classroom auditing
Navigate to Apps > Google Workspace > Classroom > Data Access
Make sure that Classroom API – is turned on: ‘Users can authorize apps to access their Google Classroom data’

See Details
Typically, these issues are straightforward to resolve. Don’t panic – fixing them is usually simple.
HAS A SUPER ADMIN FROM YOUR DOMAIN EVER USED GAT+?
To check if GAT+ is already installed click on your Google Apps button and navigate to the 3rd party apps section, you should see the GAT+ logo.
Alternatively, you can navigate to your Google Workspace Admin Console.
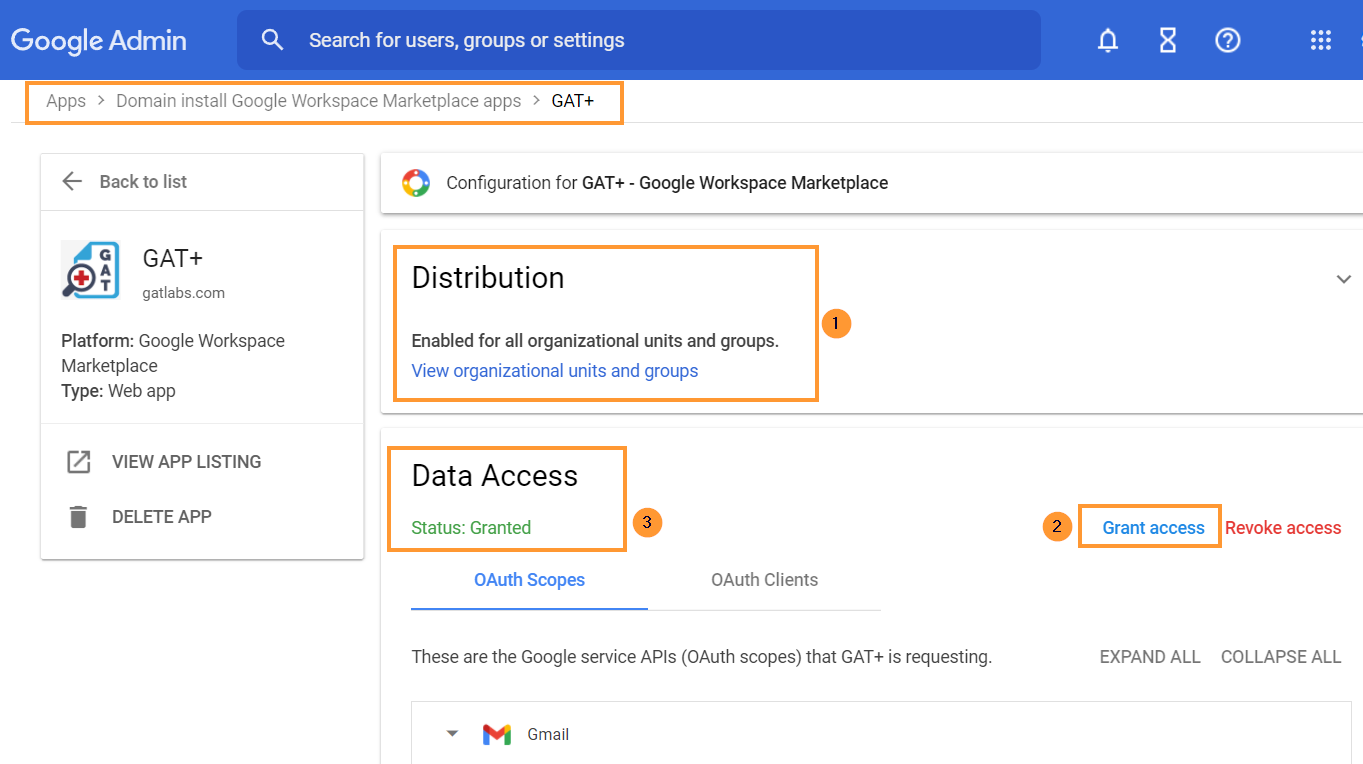
Navigate to Apps > Google Workspace Marketplace Apps > Apps list > GAT+
You will need to click and grant access to GAT+
- Distribution – it has to be Enabled for all organizational units and groups
- Data Access – status Granted
- Grant access – click to grant access to GAT+
Make sure it’s enabled for everyone and Data access is granted, this post will guide you through the process.
Still, having problems? do you need a fresh trial license?
IS YOUR DOMAIN TRYING GAT+ FOR THE FIRST TIME?
Navigate to the Google Workspace Marketplace the tool can only be installed by a Google Workspace Super Admin via the ADMIN INSTALL button.
Remember, for addressing GAT+ Initial Run Problems, installation from an incognito window is not possible unless you’re logged into your Super Admin account.
Important Note: To ensure optimal functionality and avoid any GAT+ Initial Run Problems, install GAT+ in the root Organization Unit (marked as ‘On for Everyone’).
Access by Super Admin Only
By default, the tool can be accessed ONLY by Super Admins of the domain.
Non-admin accounts cannot log in to the tool.
Are Some Auditing Areas in GAT+ Empty?
To check this, go to the Security section in your Google Workspace Admin console.

Navigate to Apps > Google Workspace > click on Drive and Docs then click on Features and Applications
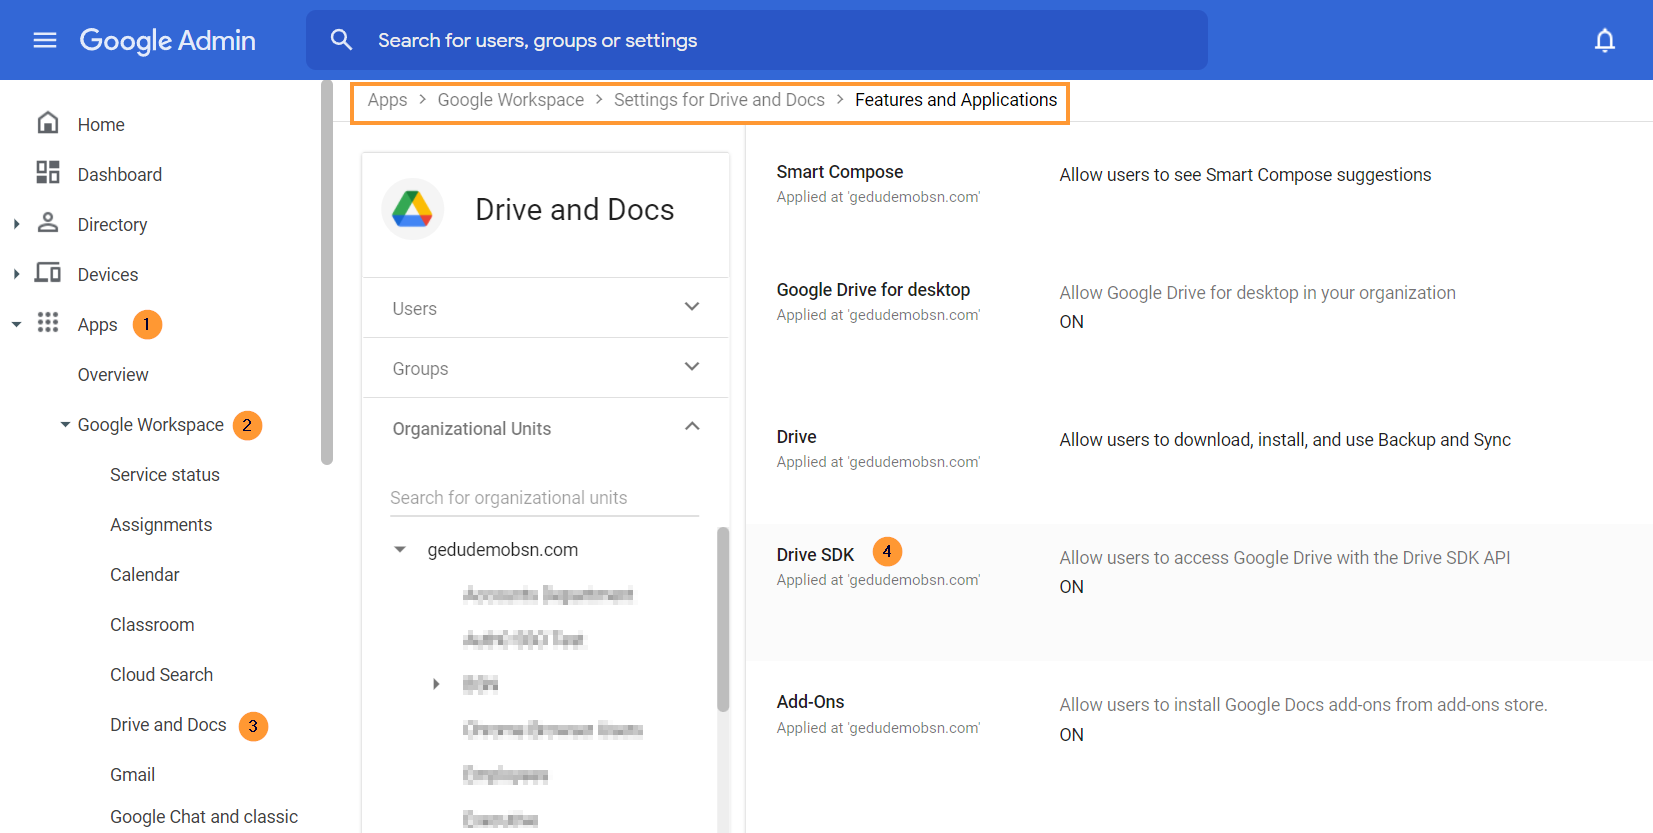
Select the root Org. Unit and make sure the Drive SDK is ON
PLANNING ON USING EMAIL DELEGATION WITH GAT UNLOCK?
You can use GAT Unlock to remotely set mail delegation for any user account.
As a Super Admin, you can give any user mail delegation access to another user’s account.
Navigate to Apps > Google Workspace > click on Gmail > then click on User settings
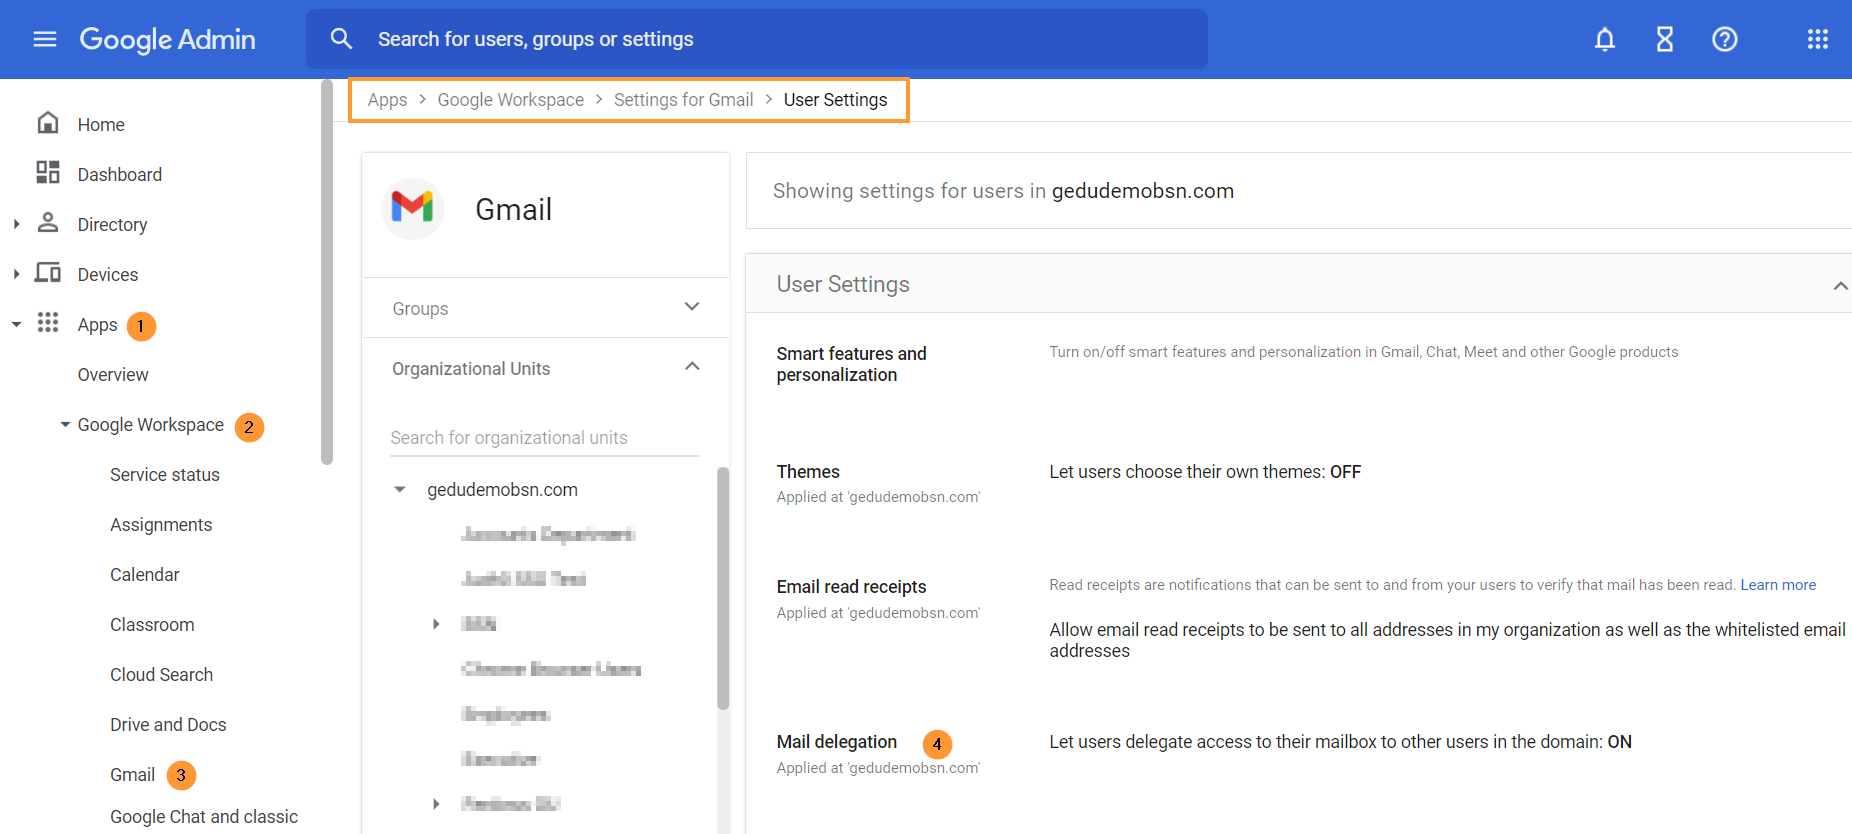
Turn ON the option to set Mail Delegation.
HAVE YOU ENABLED GOOGLE CLASSROOM AUDITING?
Navigate to Apps > Google Workspace > click on Classroom > then click on Data access
Click on to enable Classroom API then Save
See Details
 Once you are in GAT+ to access other tools click on the GAT+ logo at the top left corner.
 Each tool will be opened on a new browser tab.
See Details
Each Google Workspace Super Admin or Delegated Auditor within GAT+ can have their own user profile settings and preferences configured.
Configuring Settings
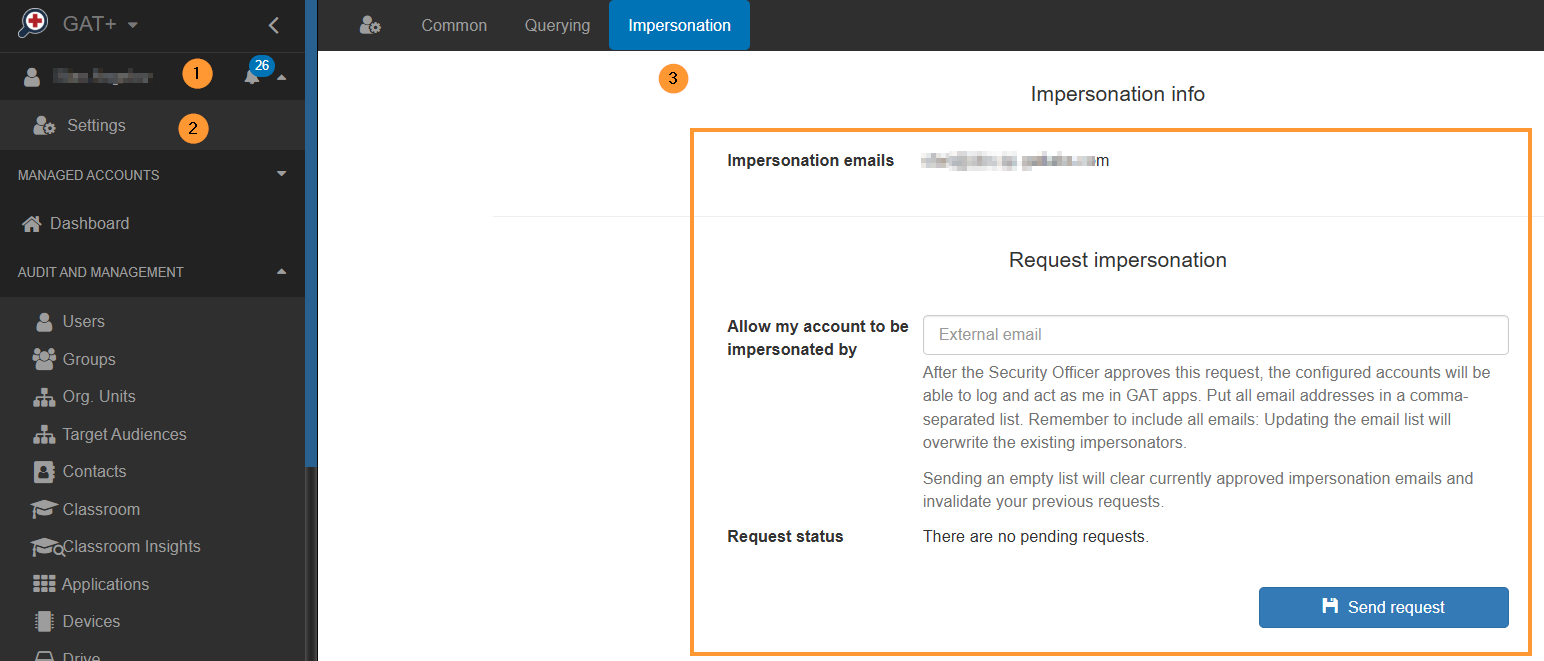
To configure your settings, navigate to GAT+, and click on your user name at the top right corner of the side menu.

Within the Settings area, you will see the Common, Querying, and Impersonation tabs.
Common
- Change Timezone – set up timezone
- Import/Export date format – select date format for exports
- UI date format – select the date format to be shown in the UI
- View the format preview
- Records Shown per page
Querying – Timeout settings
- General time-out settings
- Drive audit time-out setting
- Gmail/Email audit time-out setting
The above settings influence the waiting time for filter searches within the Drive or Email sections. A time-out error will be shown if time expires while waiting for a search to complete.
Impersonation – Multi-tenancy management for GAT+ Admins
- Multi-tenancy management for GAT+ Admins – GAT+ empowers Admins to manage multiple domains within a single account seamlessly.
- This new Multi-Tenancy Management feature streamlines administration by allowing one Admin to oversee various external domains effortlessly.
Here’s how it works:
- Centralized Control:
- A single Admin account serves as the central hub for managing multiple domains.
- Simplified navigation and oversight for efficient administration.
- Manager Account Access:
- Admins of individual domains grant access to Manager accounts for GAT+ control.
- Collaborate seamlessly with managers without compromising security.
- Impersonation Feature:
- External users cannot access a domain unless are granted permission by the Admin using the Impersonation feature.
- Ensures secure and controlled access to domain-specific functionalities.
This streamlined Multi-Tenancy Management feature in GAT+ enhances efficiency, security, and collaboration for Admins overseeing diverse domains.
Experience the ease of unified administration with GAT+.
More information can be found here.
See Details
GAT+ audit tool can help admins identify files using all sorts of criteria using the ‘Filtering‘ feature available throughout every audit.
In this example, we are looking to identify all of the video files that are duplicated and shared with external users and then manage their access and ownership.
The scenario is to find the duplicate files, remove the external shares, and then delete the duplicate files.
To achieve this, we can break down the task into steps.
Step 1. Identify duplicated video files that are shared externally
Starting the Drive Clean Up:
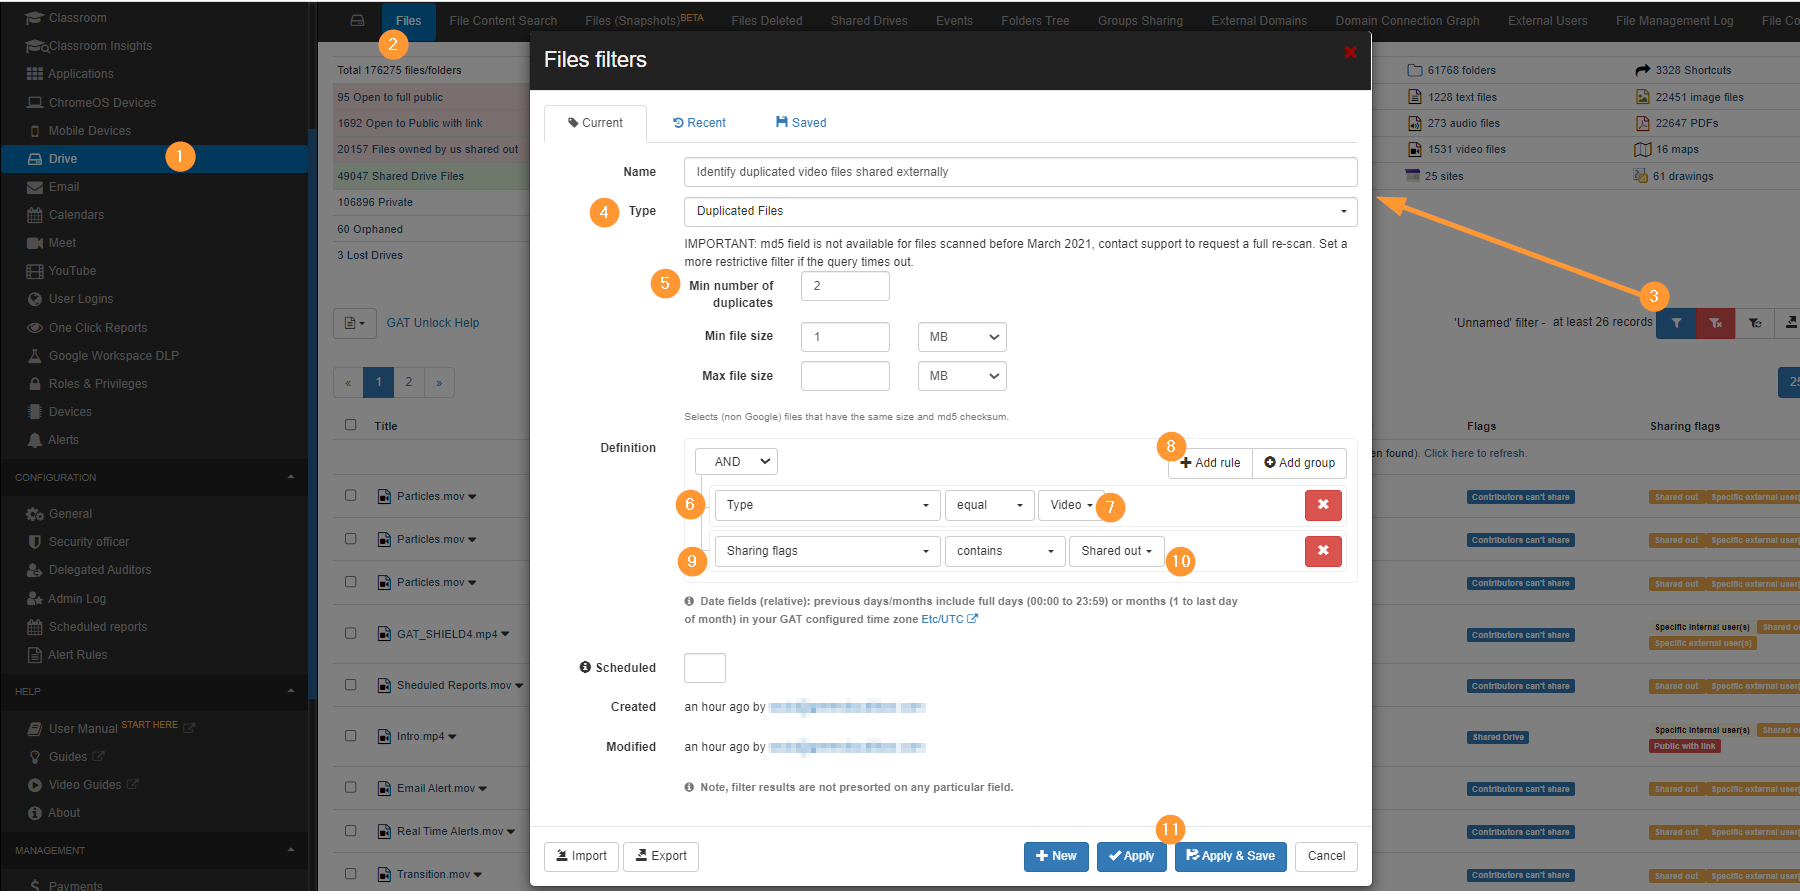
- First, navigate to the Drive audit (1)
- And then to the Files tab (2).
- Next, run the filter to find files, select the filter icon (3).
- Now the filter needs to be defined, select the Type to be Duplicated Files. (4)
- Select the minimum number of duplicates you are looking for, so ideally this is 2 and cannot be anything under, because at least 2 files are duplicates.(5)
- Now we can add more criteria to the definition of the filter to target the files we want.
- Select the field to be ‘Type’ (6)
- Select the type to be video (7)
- Add a rule to the rule definition block (8)
- Now we want to find these files that are externally shared, select the field to be ‘Sharing flags’ (9)
- Select the ‘Sharing flags’ to be ‘Shared out’ (10)
- Apply the filter (11)
Result of filter
As a result, all the video files that are duplicates and shared externally will be displayed.

Shared Drive result
Some files might be part of Shared Drives, where you cannot change ownership, as Shared Drives do not have owners.
You can exclude Shared Drive files by adding a simple additional filter.
- Flags – “doesn’t contain” – Shared Drive

Step 2. Take action to change ownership and delete duplicates
As an Admin or Delegated auditor, you can now change the ownership of those files and then delete them from the Google Drive UI.
For example, remove the permissions of all external shares on the files and transfer ownership to delete the duplicate files.
- Select all files to be deleted and leave the copies you want to remain
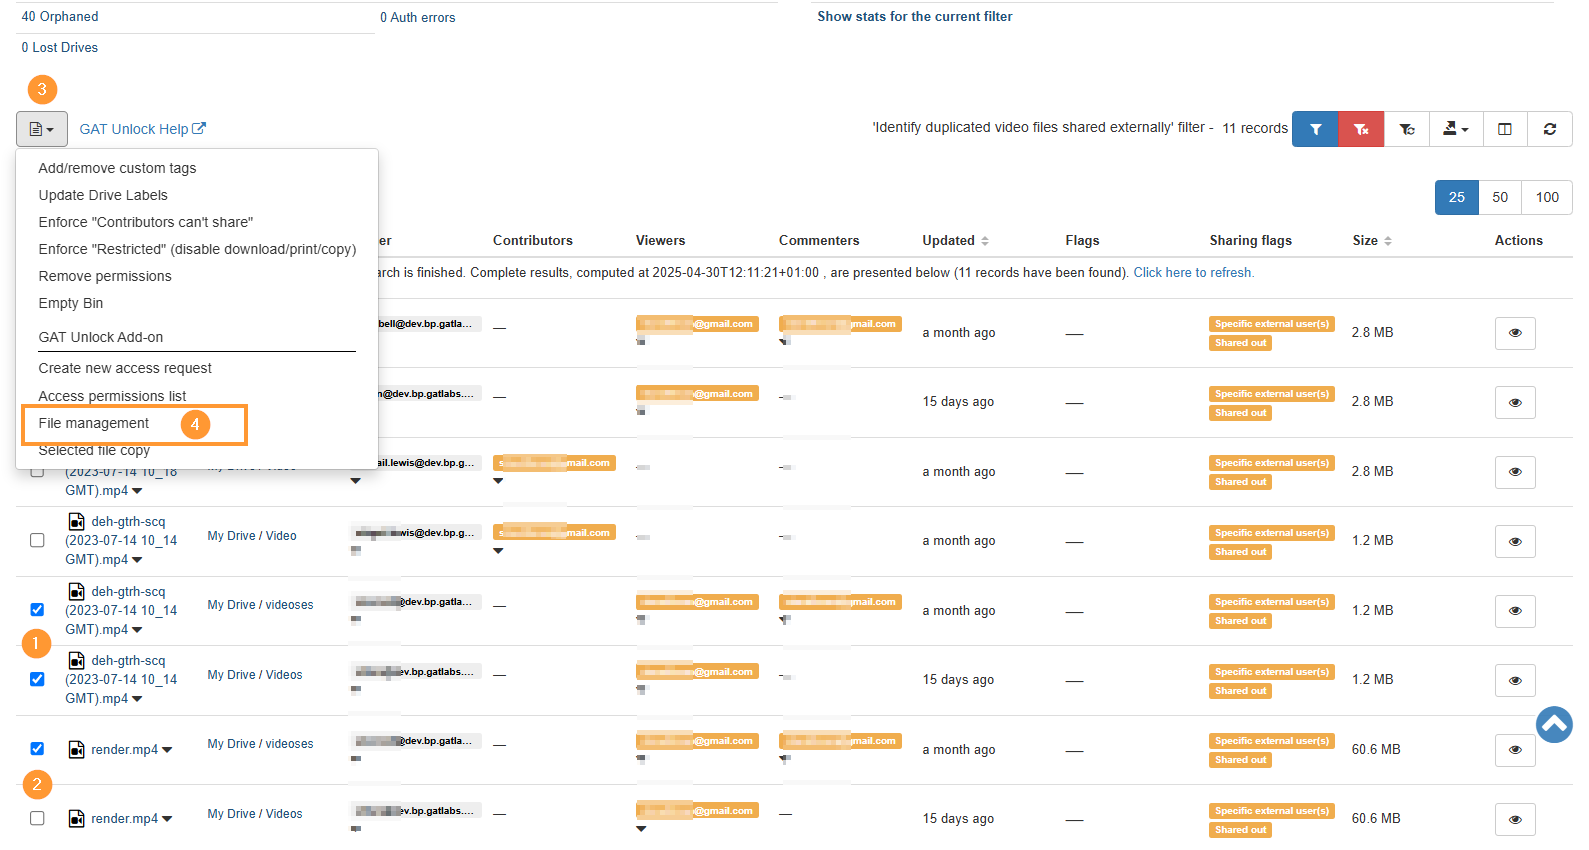
- Select ‘File management‘. This operation will allow us to change ownership of the files and remove their permissions in the same File management Job.
- A new window will be displayed with the actions that can be taken
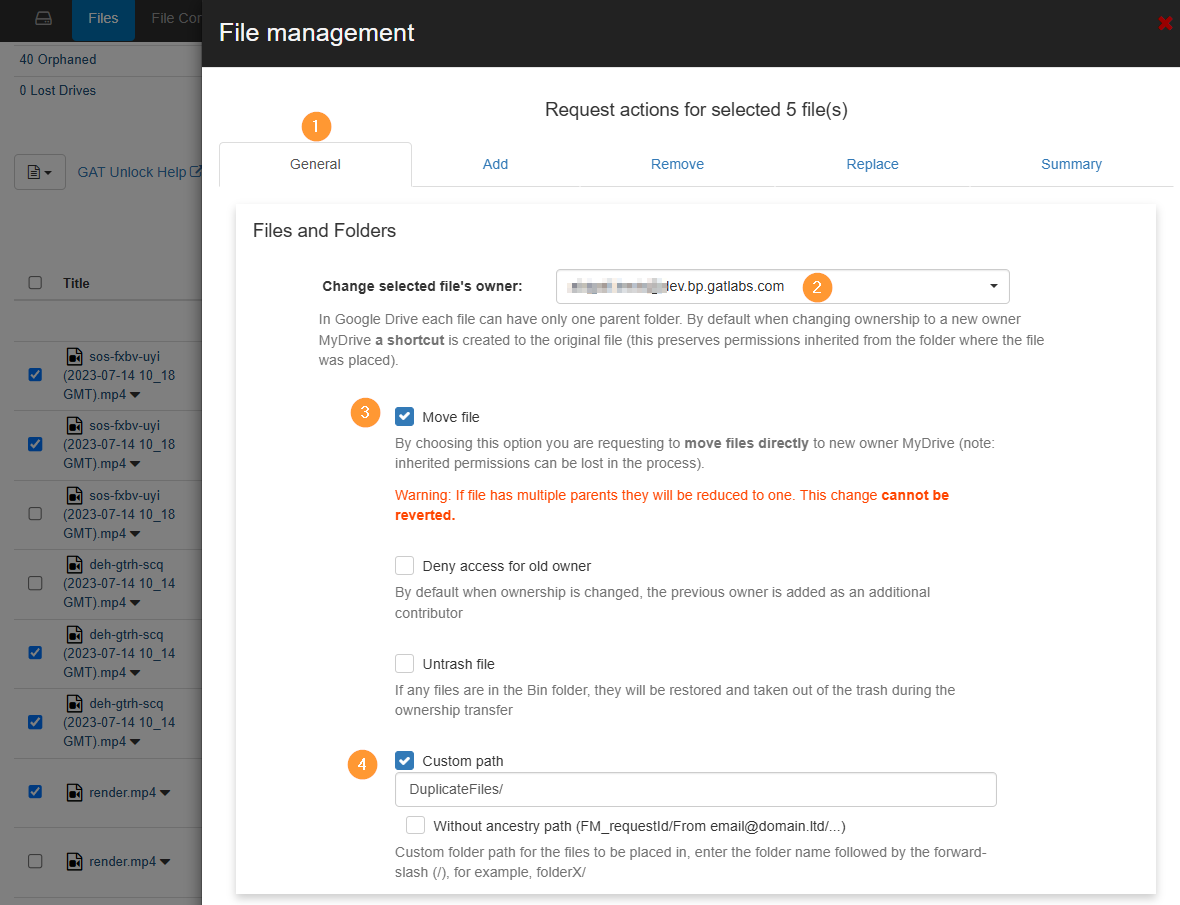
- Fill in the details for the ownership change
- General –
- Change the selected files’ owner – enter the new owner’s email
- Move file – select to move the files directly, rather than creating shortcuts
- Custom path – select location where the files will be placed when ownership change occur
- General –
- Next, proceed to the ‘remove permissions‘ tab and choose the option to Remove all external permissions.
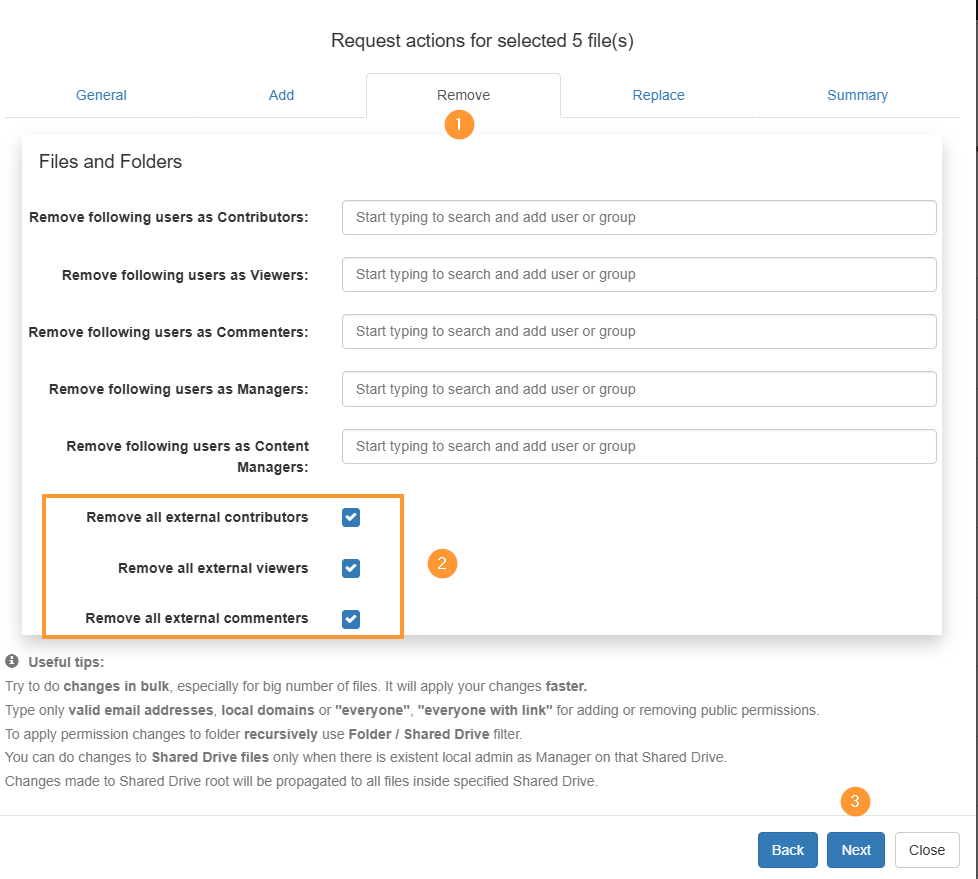
- Next, go to the summary tab and select ‘send request’

Approval of action
The security officer will receive an email to approve the Unlock request.
The email will lead them to GAT+ > Security Officer > File Management

Result in the File management log
When the job is finished, it’s possible to check the status of every file where action was taken by checking the job in the File Management Log tab in the Drive audit.

Step 3. Drive Clean Up- Delete duplicate files
When the change of ownership has finished, as part of the File management, we selected where the files will be located when the ownership change happens.
Because of the change, the files will be located in the new owner’s My Drive under the added folder.
From there, the new owner can delete the duplicate files.

Related Posts
How to find any duplicate files in Google Drive
See Details
GAT+ is a third-party Google Workspace app — It offers Super Admins powerful Google Workspace auditing and reporting for their domain.
What Google Plans are covered by GAT+?
By default GAT+ audit covers every Google Workspace plan.
Features not available based on the Google plan
The only feature that is not available in GAT+ based on Google plans is the Drive Events.
The Drive Events feature is not available for Google’s most basic plans – Business Starter and Education Fundamentals.
The Drive Events (Drive Log Events) are supported in:
- Business Standard
- Business Plus
- Enterprise
- Education Standard
- Teaching and Learning Upgrade
- Education Plus

Why are Drive Events not available?
This audit is not available because Google does not report on those events and therefore GAT+ cannot report them either.
More information can be found on Google’s end here.
See Details
What is GAT Unlock?
GAT Unlock is a Multi-Party Approval system for Google Workspace that controls access to sensitive data and high-risk admin actions.
It is designed so that actions such as accessing documents, viewing email content, or changing file ownership cannot be performed by a single admin alone. Every request requires approval from a second authorised role, typically a designated Security Officer or Verification Officer, formally approved within the organisation.
GAT Unlock is an additional service available across the GAT suite. For non-Education domains, it is offered as a paid add-on. It is not enabled by default and cannot be self-configured, ensuring activation and access are tightly controlled from the start.
Policy
Due to security reasons, we do not enable GAT Unlock during the trial version of the app.
From the introduction, the service will be visible to domains and each domain Admin can apply to have it enabled. To avail of this service please email unlock@generalaudittool.com with your request. The requesting email must contain the following 4 items.
- The contact details of the Google Apps Administrator applying.
- The name of the Security Officer(s), her/his position(s), email and phone number.
- The contact details (email and phone number) for the person from whom the GAT team must seek confirmation before enabling this feature (See the list below for the minimum level of organization officer we expect to have to request approval from. Please send us their full contact details also and inform them they may receive contact from us.) This is required to verify the separate identities of both the Administrators and Security Officers.
- The PO details for the requested service, see the price list below. (Not required for education domains that have purchased GAT.)
There can be many Security Officers, and the service will be available to all Super Admins once enabled.
| Number of users in the domain | Verification Requirements or job position to approve the enablement of the product |
| 1- 49 | Owner, CEO, CFO |
| 50 – 99 | CEO, CFO, Head of HR, CIO |
| 100 – 499 | CEO, CFO, Head of HR, CIO |
| 500 – 999 | CFO, Head of HR, CIO |
| 1,000 – 4,999 | Head of HR, CIO, CSO |
| 5,000 – 9,999 | Head of HR, CIO, CSO |
| 10,000+ | Head of HR, CIO, CSO |
You can add as many Security Officers as needed, all of them will receive the Super Admins or delegated auditors requests and any of the designated Security Officers will be able to approve or deny.
The Security Officer list for all domains is maintained by generalaudittool.com staff. Only Security Officers and Approvers can request changes to the list via unlock@generalaudittool.com
When the ‘GAT Unlock’ service is enabled Administrators can generate access or change requests, but only Security Officers can approve them. An individual can be a member of both lists but cannot approve their own requests. Only a Super Admin or delegated auditor can request permission to change files/folders or access to contents. The Security Officer’s sole purpose is to approve requests sent.
By design a Security Officer cannot self approve their own requests, you would need a second Security Officer to perform changes.
For easier management, it is recommended to have at least two Security Officers in the domain.
Administrators and Security Officers should remember the verification process is there to protect you, your domain data and your user’s privacy and rights, while also enabling you to act in the organization’s best interests.
Why all this effort?
We really respect your data security. We respect your company’s right to be protected. This is the highest security model available within Google for the Work Environment.
How to Use GAT Unlock
File Management – Changing ownership or file access rights
GAT Unlock is tightly integrated with the powerful search and filter options available in GAT+. This means you only have to do things once.
In this example we are going to find all the spreadsheets owned by the group ‘sales’ that are shared externally, then we will remove the external sharing and change the ownership (on all the selected files at once).
💡 TIP: Always narrow the file request with a search first, saving time and simplifying approval.
Step 1: Click on the ‘Apply custom filter’ button in Drive Audit.
Select the following option:
- For the filter Type select User/Group/OU search, we will enter the ‘Sales’ group in this field ‘Local User/Group’, make sure to enter the full email address.
- Under the Ownership option select ‘Owned’, this will show all the files owned by the ‘Sales’ group. Otherwise, it would show all of the files associated with the ‘Sales’ group, were Sales shows up as Owner, Editor or Reader.
- In the filter Definition area, select the parameter Type equal to Spreadsheets and to add another search parameter click on the ‘Add rule’ button and select ‘Sharing Flag’ contains ‘Shared Out’. Selecting shared out will only focus on files leaving your domain.

Step 2: Next select the Files you want to act upon, clicking beside ‘Title’ will select all files from the search, or you can select individual files, by clicking beside the files. Click on the button File operation and then select the File Management option. NOTE: The transfer will work on both Active and Suspended accounts.

Step 3: In this example, we are making the account manager the new owner of the selected files.
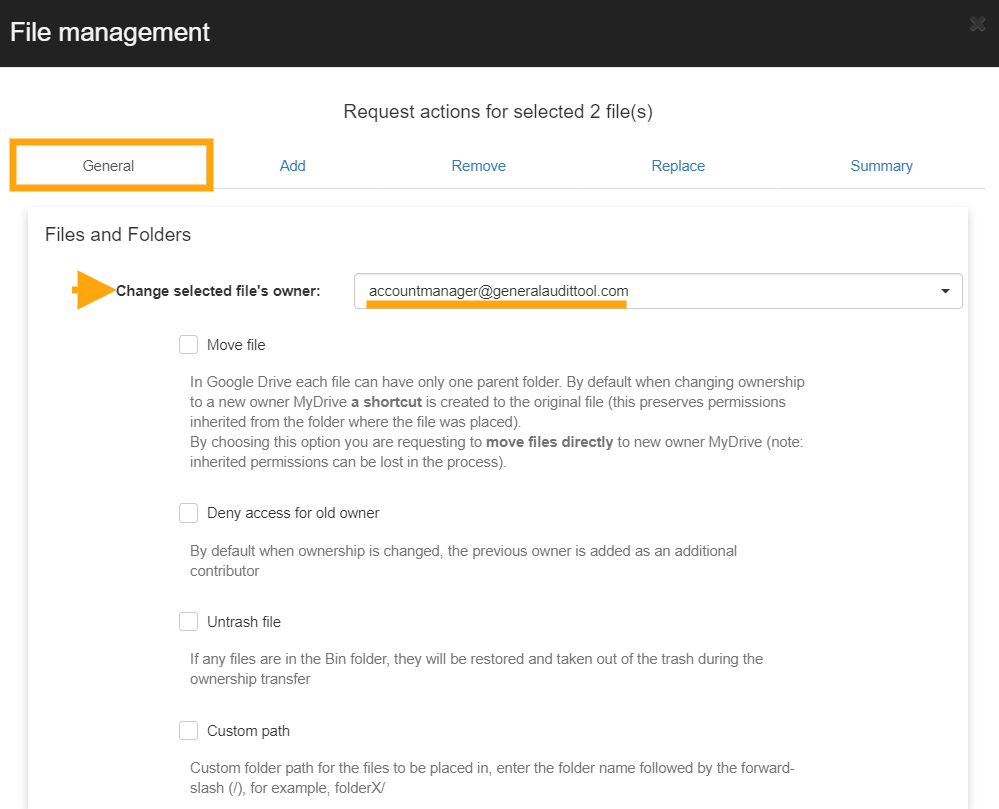
We can also remove external access to the spreadsheets and add or replace the sharing permissions.


Then click on Send request.
An email is going to be sent to your security officer. Click here to see and approve the request.

If the security officer approves your actions, they will be executed and you will be notified.
If permission is not granted by the security officer, you will also be notified and no actions will be taken.
Access Permissions Granted – How to Silently Copy or View Files
We are going to use a powerful search feature inside of the GAT+ Drive audit to identify the contents of the documents we’re going to investigate. This feature is called the ‘Full content text search’. It allows admins/delegated auditors to use a word or sentence to search through all of the files across the domain and to return documents that contain them.
Step 1: Click on the ‘Apply custom filter’ button.
Step 2: Enter the word or sentence to return files that contain them. Select the user’s account you want to search through you can leave this field blank to search your entire domain’s Drive or enter a user, Google Group, or Org Unit to search through them only.

You can also use multiple rules in the Definition section of the (Query builder) Apply custom filter. I used the Updated search parameter. Once you click on the Apply button the search will begin.
It might take some time depending on how many files you have across your domain.
Step 3: Select the files you are interested in, remember that these files contain the sentence “private and confidential”.
Click on the ‘Files operation’ button and then select ‘Create new access request’.

Step 4: Next we will select a date in the future, we will have access to these files until this date. You have an option to write to your security officer explaining why you need access to these files.

Send the request to the Security Officer(s) for approval.
The following email will be sent to the Security Officer.

The Security Officer can click on the link in the email and will be taken to the approval area (Access Permissions) in GAT+.

When the Security Officer approves access an email will be sent to the requesting Administrator/delegated auditor informing them. The Admin then opens the ‘Access Permissions list’ menu again and can see the full list of their Access requests along with the time left for each request to remain valid.


Once the request is selected a new window will open with the results, on the right-hand side those files will have a new tab called ‘Actions‘ under that the requestor can Download or Show file the contents silently without the owners’ awareness.

Pre-approved Access for Admins to All Files for a Range of Users
If your Super admins wish not to get Security Officer approval every time they want to make file permission changes or to view file contents, a security officer can give them pre-approval.
In the Security Officer section on the GAT+ sidebar menu, select ‘Preapproved Access’ and then click on the ‘+’ button to add a new Preapproved admin.
Once clicked a new ‘pop-up’ screen will appear.

Here the security officer can add the email address of the Super Admin, the OU over which they will have access, they can select a full OU tree and set approval access until a certain future date. In the above screenshot, I gave Alex (super admin) access to the Support OU
Multiple different approvals can be given by the security officer, including several to the same Super Admin, each covering different scopes.
Changing Ownership of an Entire Folder Tree
Another feature of ‘Unlock’ is that it enables an often requested task of moving an entire folder tree, root folder and sub-folders, from one or many owners to a new owner.

This task is completed with the File Management tab. Use the drop-down menu button next to the folder name to see the options. Click on Apply permission change to this folder (recursive). When the File Management option menu appears, enter the new owner’s email address. And make sure to remove the previous owner as editor.
Note: When changing ownership, the previous owner is added automatically as an editor. You can “deny access for the old owner” if you choose that option.

This is an ideal feature for consolidating a shared folder structure, or handling leaving staff or students.
Delegating Access to an email account
GAT+ allows Admins to delegate access for a User account to another User for a certain period of hours. This may be for business purposes but it also facilitates the fast search and viewing of all the account emails via another user’s browser.
BEFORE USING: Please ensure email delegation is allowed for users in your domain. Go to the Google Workspace Admin Console and under Apps > Google Workspace Apps > Settings for Gmail > User settings check if the email delegation box is allowed for your domain.

Launch the GAT+ tool, enter the User Audit section and click on the Email Info Tab.
In the Email Info Tab, select any user and click on the Actions button to add an email delegate to their account.
You have the ability to remove existing mail delegation which is already in place as well.

Here the Admin can select the account they wish to gain access to, then select the account they want to give this access to and finally select the number of hours they would like delegated access to be approved for. Once the request is sent, the Security Officer will still have to approve before the delegation is created.

Once approved the delegated account appears in the accounts drop-down list when the profile picture is selected in Gmail.

The delegation will automatically be revoked after the requested time period.
Note: If during the period of delegation, the account under audit, logs into their Google account and goes to their email settings, then under ‘Accounts’ the account owner will see that the Admin has granted delegated access to the account.
In addition, if the delegated user reads any unopened email in the audited account, this email will be marked as ‘read’.
Delete Spam, Inappropriate or Accidental Emails
There are multiple reasons to have the ability to identify and remove emails that have been received by all or any of your domain users. Here are some unwanted scenarios:
- An email is sent to the wrong user or group
- An email contains inappropriate content
- An email that contains sensitive information
- An email that has gone past spam filtering or is a phishing email.
GAT+ allows Admins to delete these emails from all accounts at once.

We recommend using ‘Email Content Search’ for tracking down these emails. It is a ‘real-time’ search that is highly configurable (see ‘search tips’ link beside the search box). In the screenshot above we use the example search parameters
“SEO proposal” in:anywhere newer_than:90d
This tells GAT+ to search in all emails, for all users and look for emails that contain the words “SEO proposal” which are also newer than 90 days. When the results come back to select the emails you wish to view/download/delete then click the “Email operations” button and select “Access permissions list”.
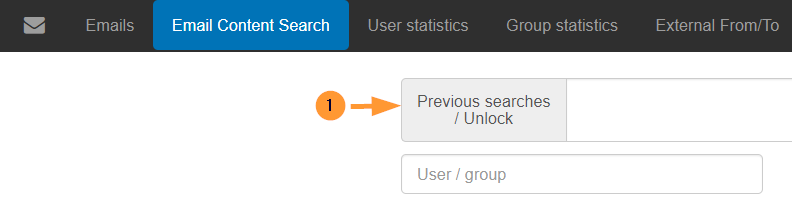
When you search if the result cannot be displayed in a timely manner, the search goes into Background search.
You can access those searches by selecting ‘Previous searches‘.
All older or background searches will be displayed there.
Once completed, under the ‘Actions’ tab select the green checkmark to display the results.

Once the emails are selected, click on the ‘Access permissions list’ button and send a request to your SO (security officer). Your SO will have to approve your request.
Before sending the request if you intend to delete the emails rather than just view or download them then check the ‘Allow removing emails’ box.

As an option, you can send a message to the Security officer giving a reason for the investigation.
After performing those steps please select and click ‘send request’ and wait for approval to be returned from the Security Officer.
You can check all the requests to the SO in the “Security officer” section in GAT+.
Note: You can not self-approve your own request. An admin sends the request the Security officer approves.

Once your request has been approved, you will receive an email notification stating that.

Note: While you wait for the approval, you might use the tool for other searches. When you come back to “Email Content search” click on the Previous searches/Unlock button.
You can then delete one or all of the emails using the drop-down option in the Emails Operation button.

By default, you can send the emails to the user’s Trash folder on their Gmail but if you wish to permanently delete these emails then select ‘Delete permanently.

Pre-approved Access for Super Admins to all Emails
To enable pre-approval for Super Admins navigate to the Configuration section of GAT+ and enter the security officer area.
Once there click on the Preapproved Access Tab and click on the plus icon “Add new pre-approved access”.
Your security officer will have to select you (super admin) to have pre-approval over users across your domain.

This is ideal for situations where Admins do not need to get constant approval to view/download or remove emails.
An example would be in an education domain where the Super Admin would have full open access (view/download or remove emails) for all Student OU’s but would still have to get selective approval from the security officer to access an in the Staff or HR OU.
For a single OU, level adds value like /Staff (Note, this will not grant access to the OU /Staff/IT unless “Sub Org. Units equals Yes!).
In the above screenshot, I put Ferdows (Super Admin) to have pre-approved access to the entire domain by selecting / for the Org Unit and I made sure to cover all Sub-Org Units. / means the root User Org. Unit.
They have access to remove and add email delegations as well because I enabled the last two option which is “Can remove?” and “Can add email delegation”.
Non-Super Admin Auditors
This feature is ideal where Super Admins want to delegate the audit function to local managers or regional security personnel.
GAT+ allows the Admin to select the scope of users that will be covered by the Auditor.
The admin can also select what audit areas to be included.
Auditors will have access to Audit areas and for the scope, they are given only.

See Details
The Security Officer is a user from your domain that is responsible for approving or denying the changes requested by any Admin.
What do I need to enable my Security Officers?
To enable Security Officers you would need to have a paid licence with the Admin Plan or higher for Enterprise and is included in all the plans for Education.
How can I configure my Security Officers?
To configure your Security Officers you would need to firstly have a paid licence as per the previous question and secondly email us at unlock@gatlabs.com
Only the GAT Labs team can add, remove or change the Security Officers in your domain.
For easier management, it is recommended to have at least two Security Officers in the domain. If you don’t have a second person you can create a service account such as unlock@yourdomain.com
Who can be a Security Officer?
The Security officer can be any user of the domain, it does not matter what Google Workspace privileges they have.
What products require a Security Officer approval?
GAT Unlock within GAT+ and GAT Flow
What type of actions require a Security Officer?
- Allow setting up Email delegation within GAT+
- Allow setting Email auto-forwarding within GAT+
- Allow change of ownership of Drive files within GAT+
- Allow altering Drive files by adding and replacing existing permissions
- Allow copying Drive files
- Allow viewing File content
- Allow download of the File content
- Allow viewing Email content
- Allow download of Email content
- Allow Admins to onboard offboard and modify users within Flow
How does the Security Officer workflow approval works in GAT+?
When the Admin sends a request for any action that requires Security officer approval, an email will be sent to the officer.
The email will look similar to the screenshot below, depending on what is the request for.

Clicking on the link ‘click here’ will lead to the Security officer tab in GAT+.

By default selecting the link from the email will lead to the exact field from where the request can be approved or denied.
In each of the section, the Security officer just selects the request and approve or deny it.

File management will have the file permission changes required, Folder copy for copying folders, Grants is for view or downloading of files and emails. More information can be checked in the Dashboard section.
How does the Security Officer workflow approval works in GAT Flow?
When the Admin creates a workflow and sends it to the Security Officer for verification, an email will be sent to the officer.
The Security Officer will receive an email notification that the workflow is waiting for verification.

By default selecting the link from the email will lead to the exact field from where the request can be reviewed and then approved or denied.

During the approval process, a message will appear confirming that the approval is indeed intended.

Once approved, the workflow is scheduled to run.

The workflow Requester receives an email notification about the approval.
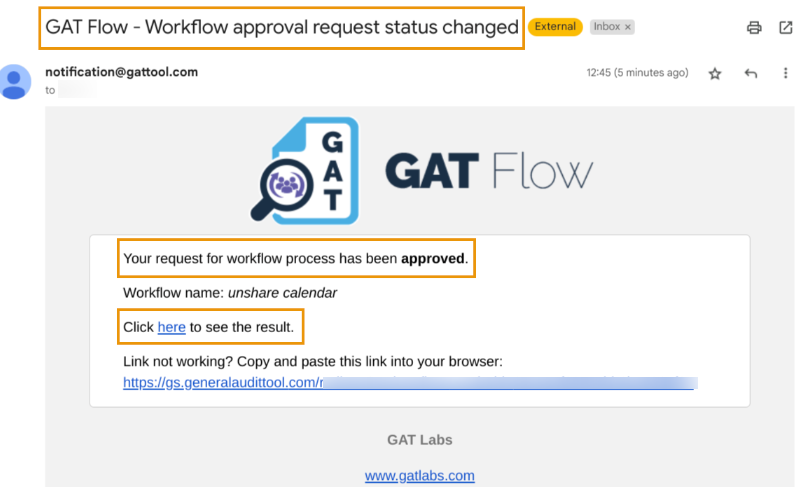
Once completed successfully, another email is sent to the Requester informing them about workflow completion.

By default selecting the link from the emails will lead the workflow Requester to the exact field of GAT Flow from where the results can be reviewed.

NOTE:
- Only the GAT Labs Staff can enable Security Officers. Please contact us at unlock@generalaudittool.com for more information.
- For easier management, it is recommended to have at least two Security Officers in the domain.
- GAT Unlock is not activated during trials for security reasons.
See Details
What is a Security Officer in GAT?
Security Officers are users of the domain who can approve or deny any requests from any Admin or Delegated Auditor in GAT+ and GAT Flow.
A Security Officer does not necessarily need to be a Google Super Admin or a Delegated Auditor. They can also be a regular user in your domain.
How can I add a Security Officer?
To add a Security Officer you must have a paid licence that includes GAT Unlock and/or GAT Flow
Security Officers can be added, edited, and removed only by GAT+ staff.
For easier management, it is recommended to have at least two Security Officers in the domain.
Check out this document to better understand the enablement process.
Can I test GAT Unlock and/or GAT Flow?
Yes, you can run a trial on a test domain. Otherwise, you’d need a paid licence with a plan that includes these products.
Check out our pricing plans for Enterprise and Education.
Please contact sales@gatlabs.com for more information.
How can I check my Security Officers’ list?
In GAT+ you can check who are the users who are set up as Security Officers.
Navigate to GAT+ > Configuration > General > Domain info > Security officers

How can I update my Security Officers?
Security Officers can be added, edited, and removed only by GAT+ staff.
To make updates to the current list, an existing Security Officer in your domain or the Approver (Senior Manager) can contact us at unlock@generalaudittool.com. We’ll gladly take care of your request from there.
What happens if my Security Officers or Approver left the organisation?
Please contact us at unlock@generalaudittool.com. We’ll need to run the approval process again then.
Check out this document to better understand the enablement process.
See Details
GAT Flow is a user management tool. It allows Google Workspace Admins to set conditional workflows for the nesting of actions that will execute when a certain specified condition is met. This paves way for complex workflows that might consider multiple conditions and actions. For such use cases, there is the option to align overlapping actions to tidy up the visual complexity explained in the example below. Let’s see how to set a workflow to add users to an OU depending on their department.
Step 1.
To add users to an OU, it’s best to set a recurring workflow that will run according to the time set by the workflow creator. Every time the workflow runs it will check the department conditions specified and run the following actions.

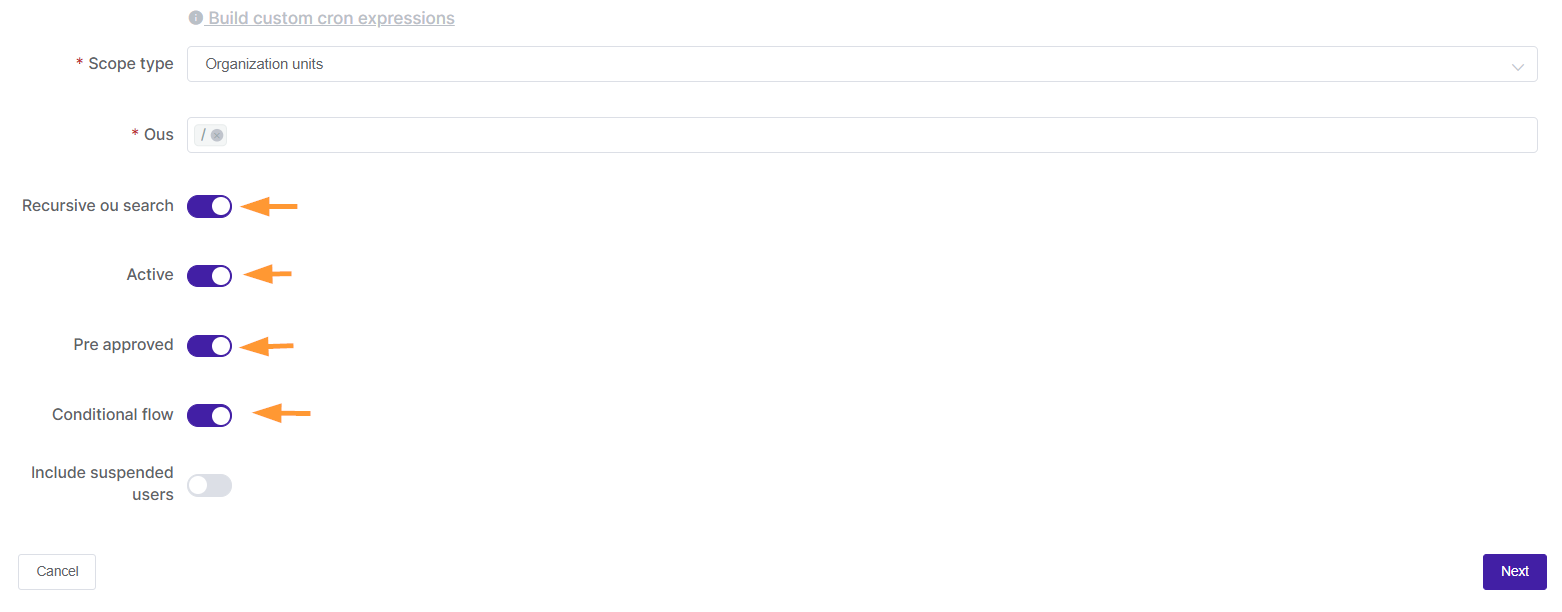
Step 2.
For this example, we enable the following options:
- Recursive OU search – capturing all sub-OUs of selected OU.
- Active – enable workflow.
- Preapproved – select to avoid needing the Security Officer’s approval after every time the report runs. A security officer has to only approve initially when this is selected.
- Conditional Flow – This will enable the conditional functionality in the actions menu.
Step 3.
Clicking Next will take you to the Choose Actions subtab.

Here you can add a Department condition.

Add action in case the condition is true. For this example, we are adding the action Change organization unit to the /Sales OU.

Repeat the steps until all the departments and relevant OU’s are captured in the Workflow. There may be many actions and conditions added, notice the align overlapping actions icon at the top right, this can be toggled and will align the view.
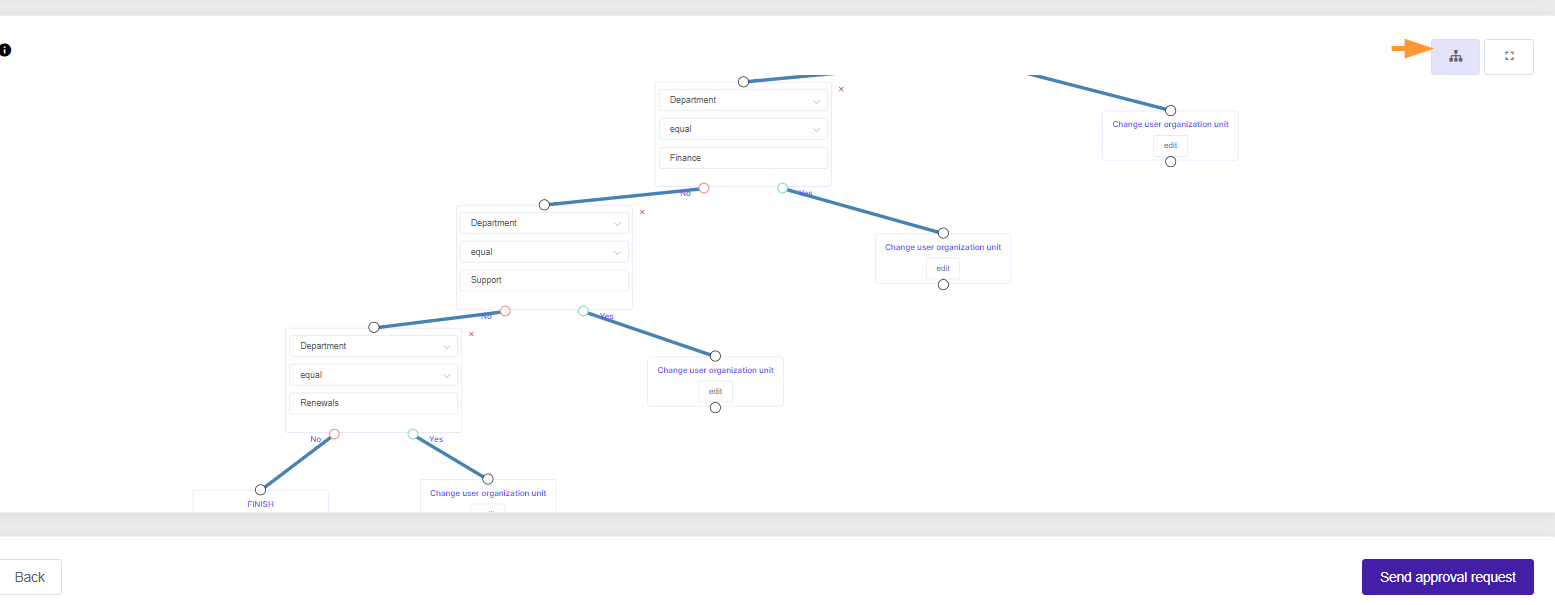
Remember to end the line graph for each node and then send the approval request.
Results
Once the workflow is approved, it will execute at the set time. To check the actions executed, toggle the results button next to the workflow.

The tool will navigate you to the workflow Results in the Workflow module. Select the eye icon next to the workflow to see in detail exactly the actions and users affected.

Selecting the figures will show in further detail the status of the actions executed for each user.


Related Posts
See Details
The GAT Flow Configuration section is available only for domain Administrators of Google Workspace and helps configure the tool to be as user-friendly as possible.
A domain Administrator can set up several options according to each domain’s needs under Configuration > Settings > Workflow.

Workflow Settings
You can configure the following available GAT Flow settings accordingly under the Workflow tab:
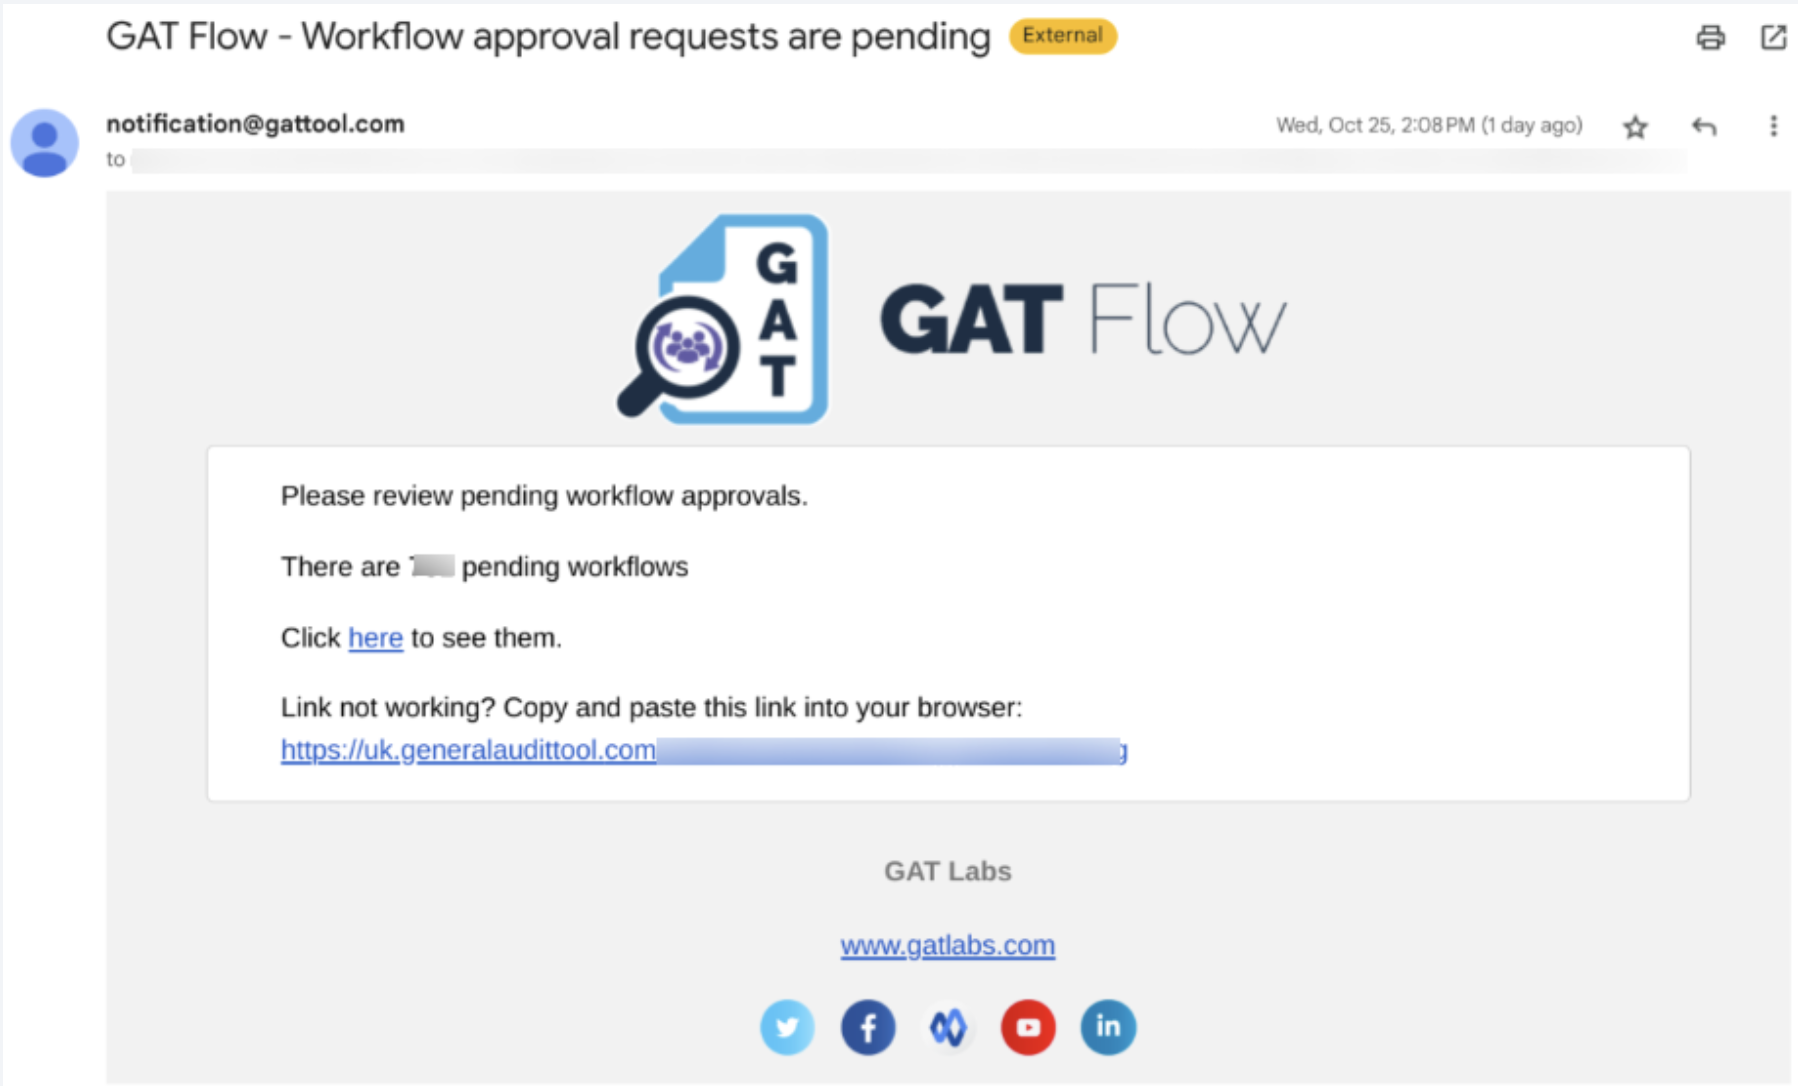
Send approval reminder
- Send approval reminder – this option allows an Admin to decide whether the reminder email for the workflows awaiting approval needs to be sent to all of the Security Officers, a reminder will be sent once a day if enabled

An email notification that each of the Security Officers will receive:
Enable workflow auto-save
- Enable workflow auto-save – an Admin can decide whether workflows should be automatically saved during the creation process to avoid losing them when the page is refreshed (useful for complex/advanced workflows that require longer preparation time)

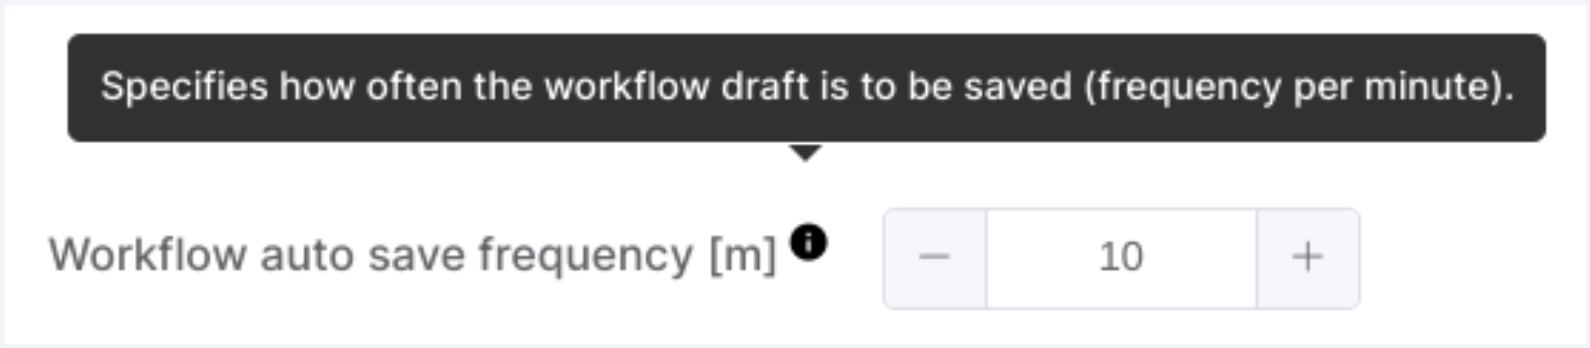
Workflow auto-save frequency
- Workflow auto-save frequency – set the workflow auto-save frequency in minutes to automatically save the workflow after that time elapses.
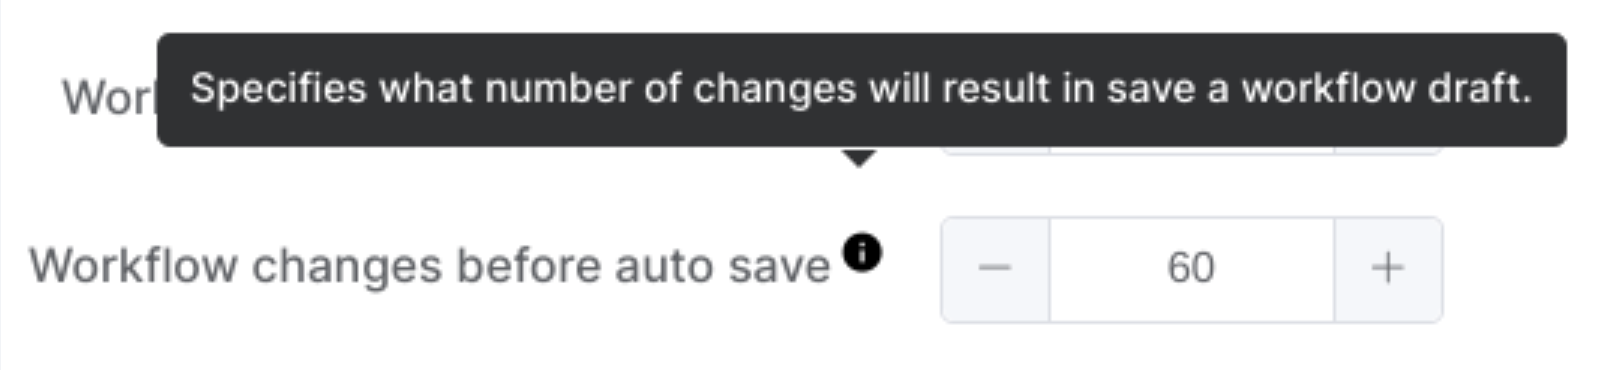
Workflow changes before auto-save
- Workflow changes before auto-save – Set the number of changes to the workflow that will trigger an automatic save.
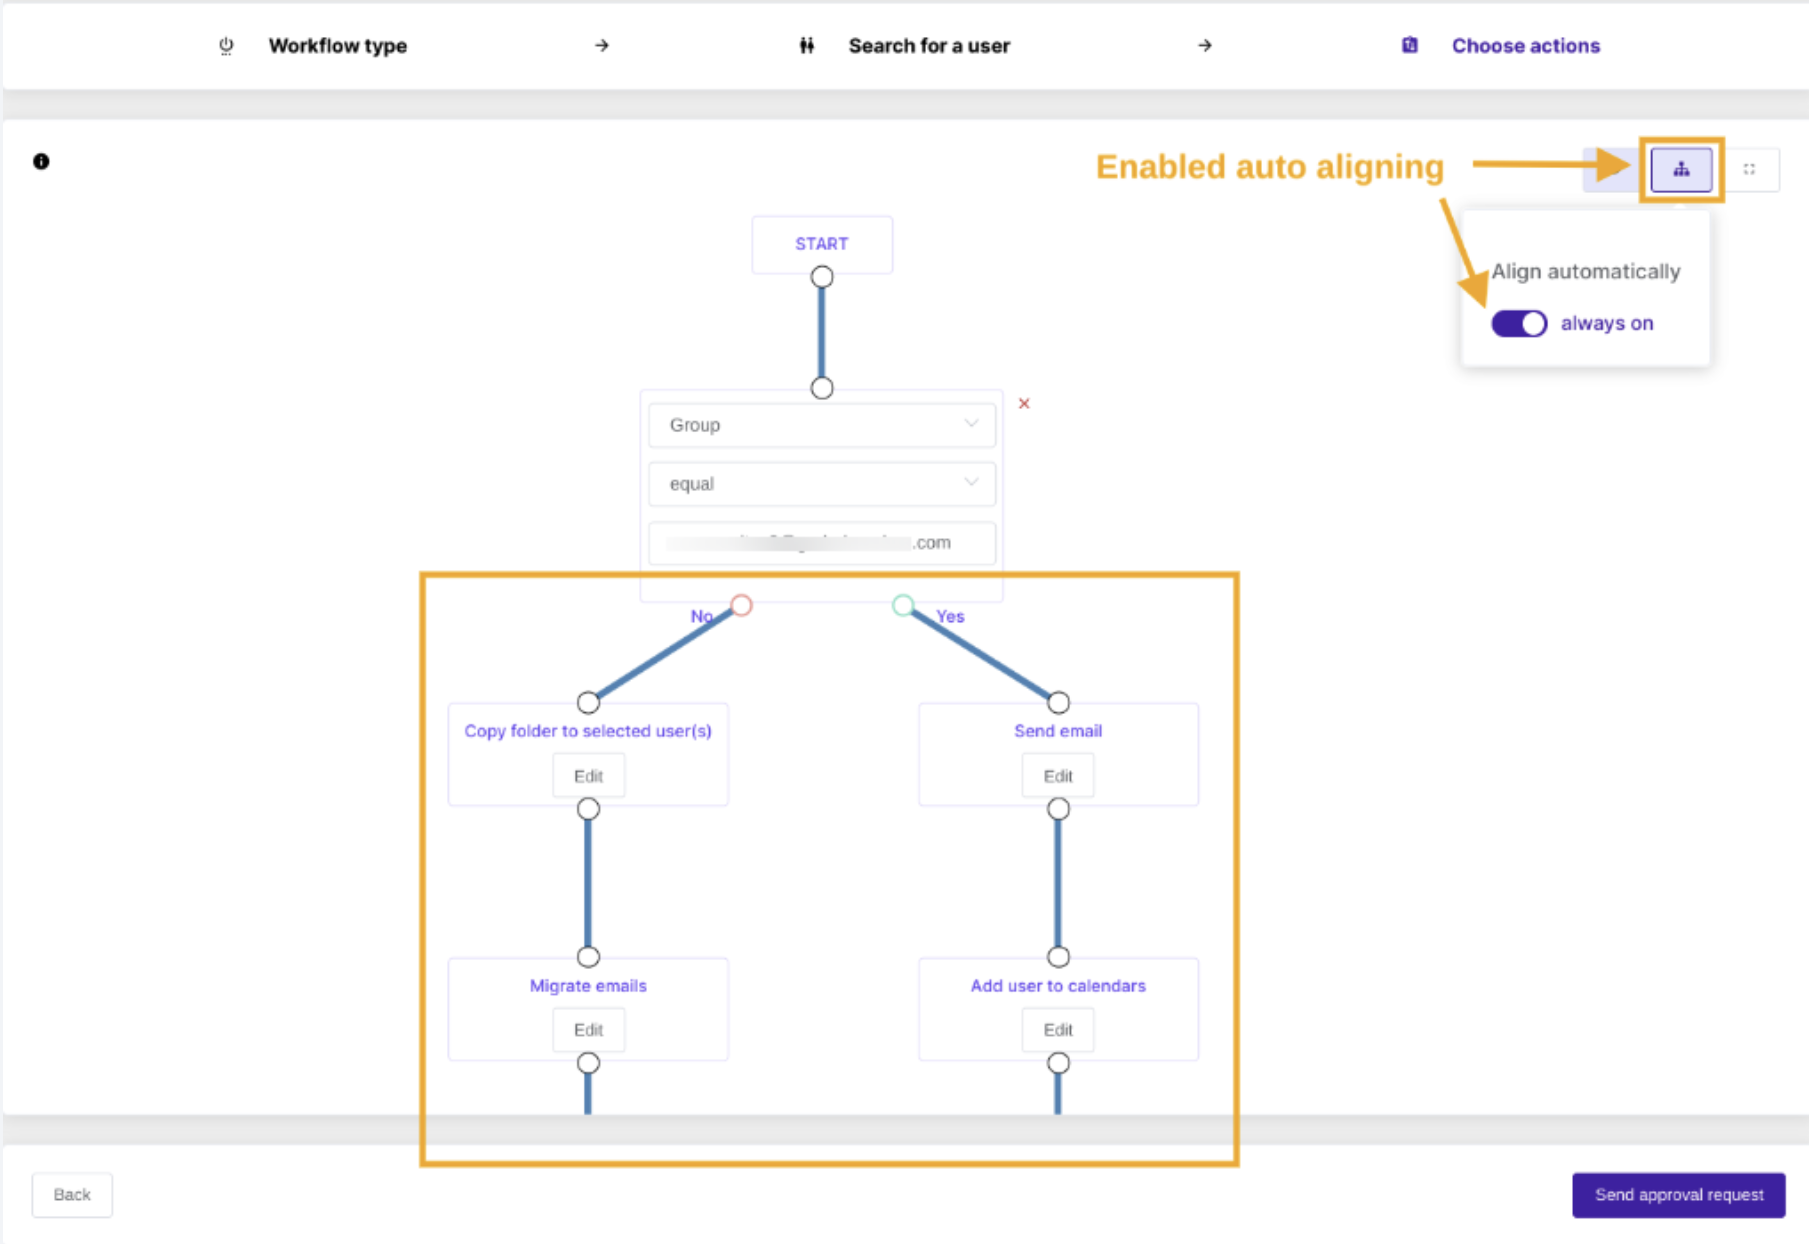
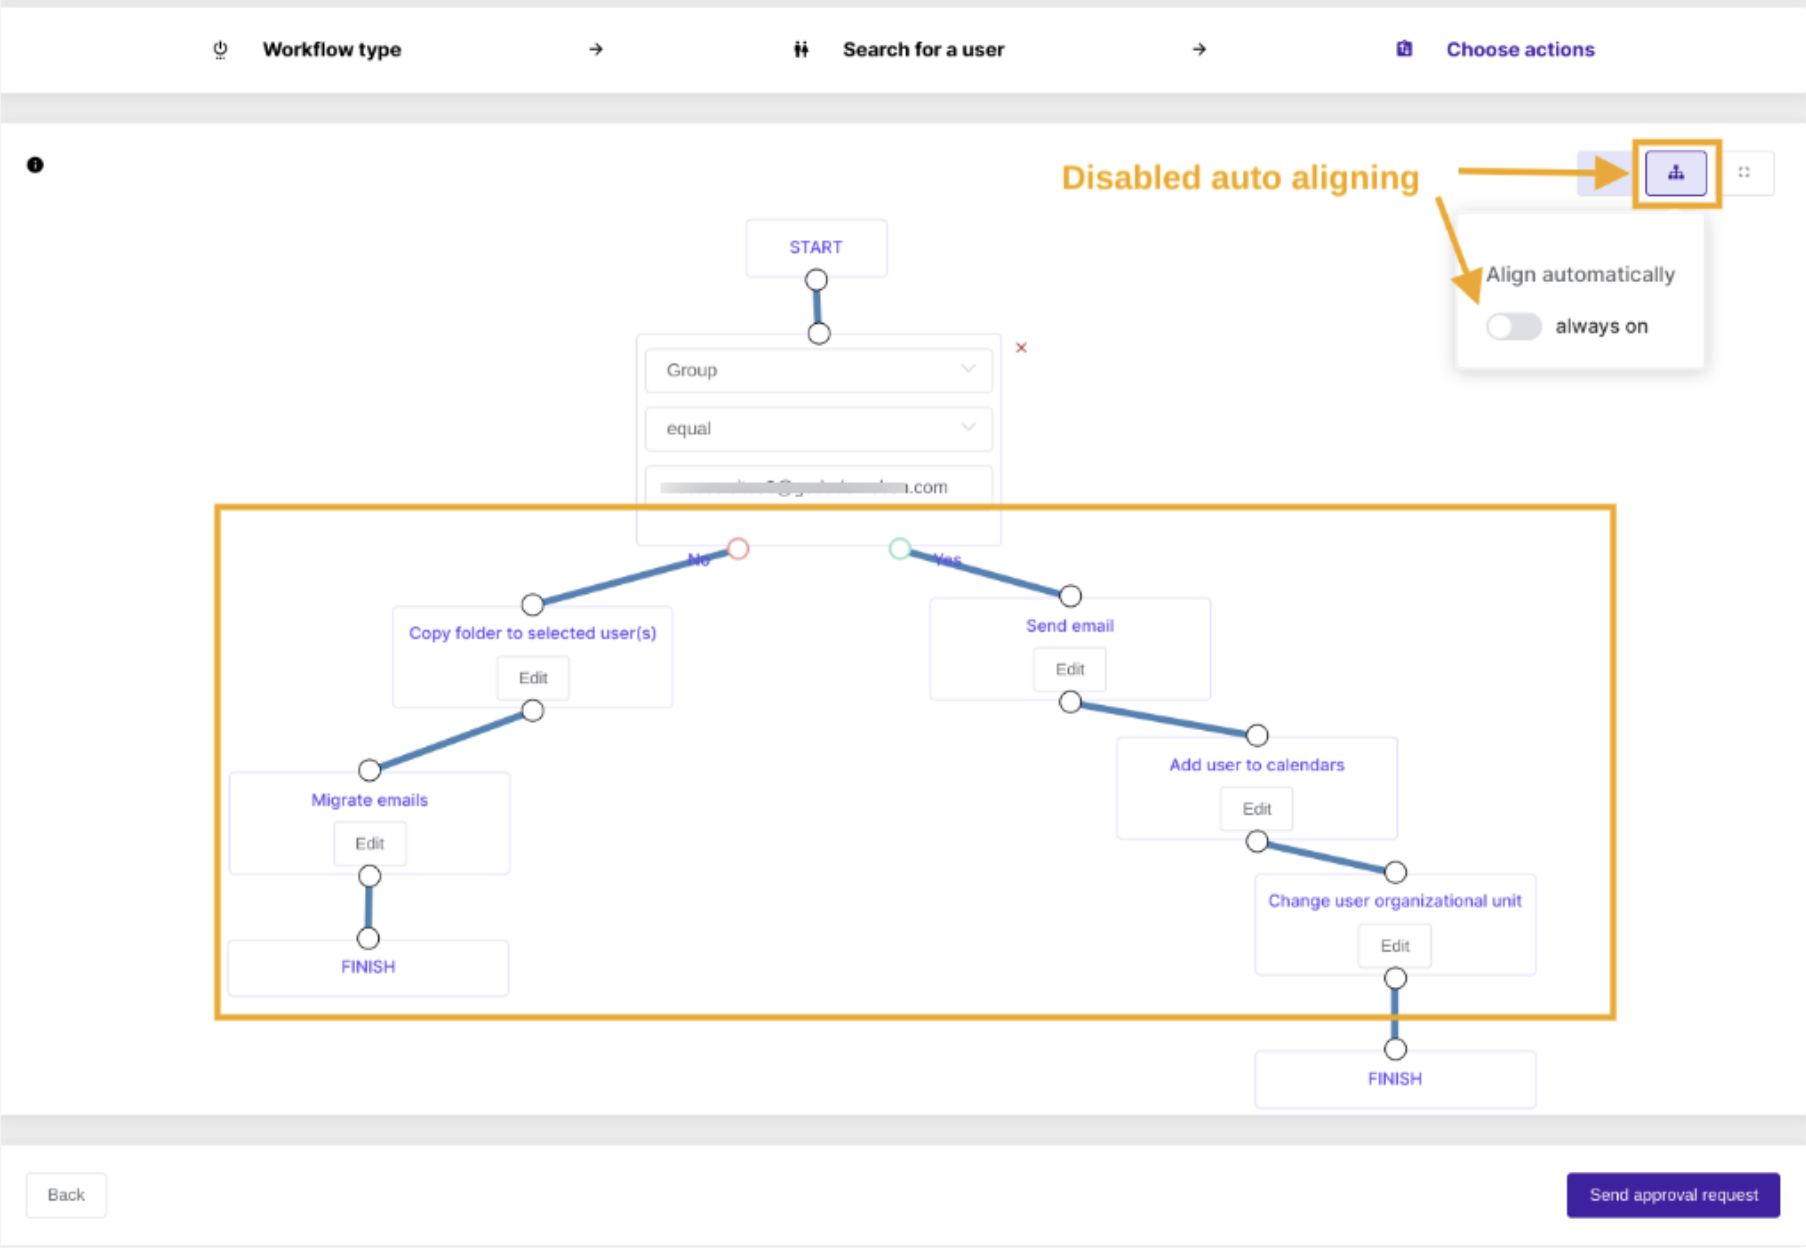
Enable advanced workflow auto alignment by default
- Enable advance workflow auto alignment by default – an Admin can decide whether to enable by default auto aligning of the nodes in the conditional/advanced workflow

When you turn on auto-alignment, the system places all nodes in their default position.
When you turn off auto-alignment, you can arrange all nodes according to the workflow creator’s needs.
Enable advanced workflow node preview by default
- Enable advanced workflow node preview by default – an Admin can decide whether the node preview of the conditional/advanced workflow will be available

By default, enabling this option allows you to preview each node in the conditional workflow by hovering over its ‘Edit’ button.
Send notification about “Done” workflow to
- Define the person who will receive the email notification once the workflow is finished successfully; the workflow requester receives it by default


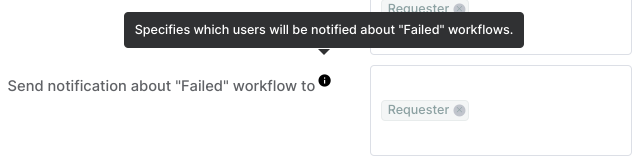
Send notification about “Failed” workflow to
- Define the person who will receive the email notification once the workflow is finished unsuccessfully; the workflow requester receives it by default

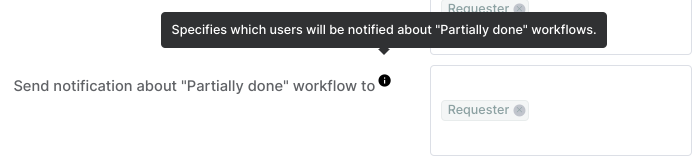
Send notification about “Partially done” workflow to
- Define the person who will receive the email notification once the workflow is partially done; the workflow requester receives it by default

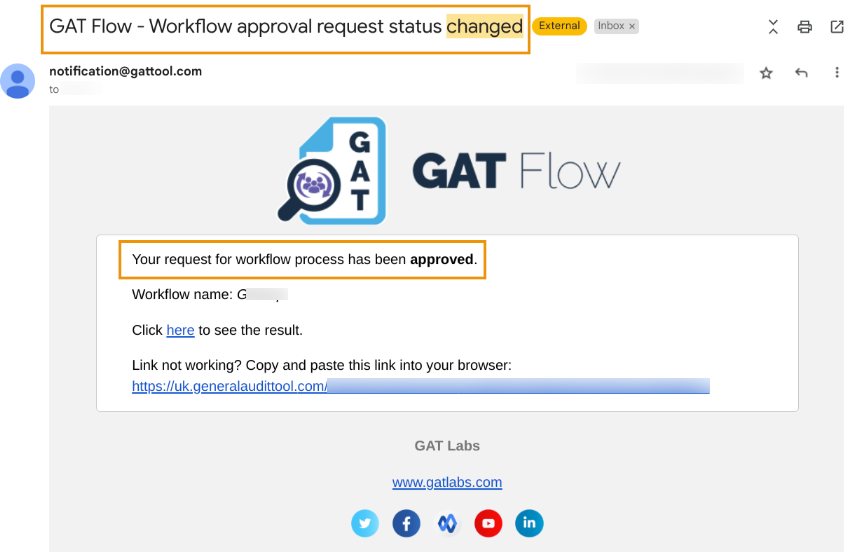
Send approval status change notification to
- Define the person who will receive the email notification once the workflow approval status is changed; the workflow requester receives it by default

Workflow Tags
An Admin can create custom Workflow tags that help with identifying and sorting out workflows.
The default tags are as follows:
- Workflow – generated automatically by the system for the regular workflow
- Event – generated automatically by the system for Event-triggered workflow
- Recurring – generated automatically by the system for Recurring workflow
On top of the above default tags, an Admin can create a tag of their choice to be able to identify the workflows in a quick-for-them way (examples of custom tags are shown in the below screenshot).

Relevant posts
See Details
Managing numerous workflows in your domain can be challenging. GAT Flow introduces a tagging system to simplify this process, allowing you to see what’s happening at a glance.
Creating Workflow Tags in GAT Flow
To create a tag, first go to the Settings section in GAT Flow.
Click the Workflow tags in the top right corner and Create tag.
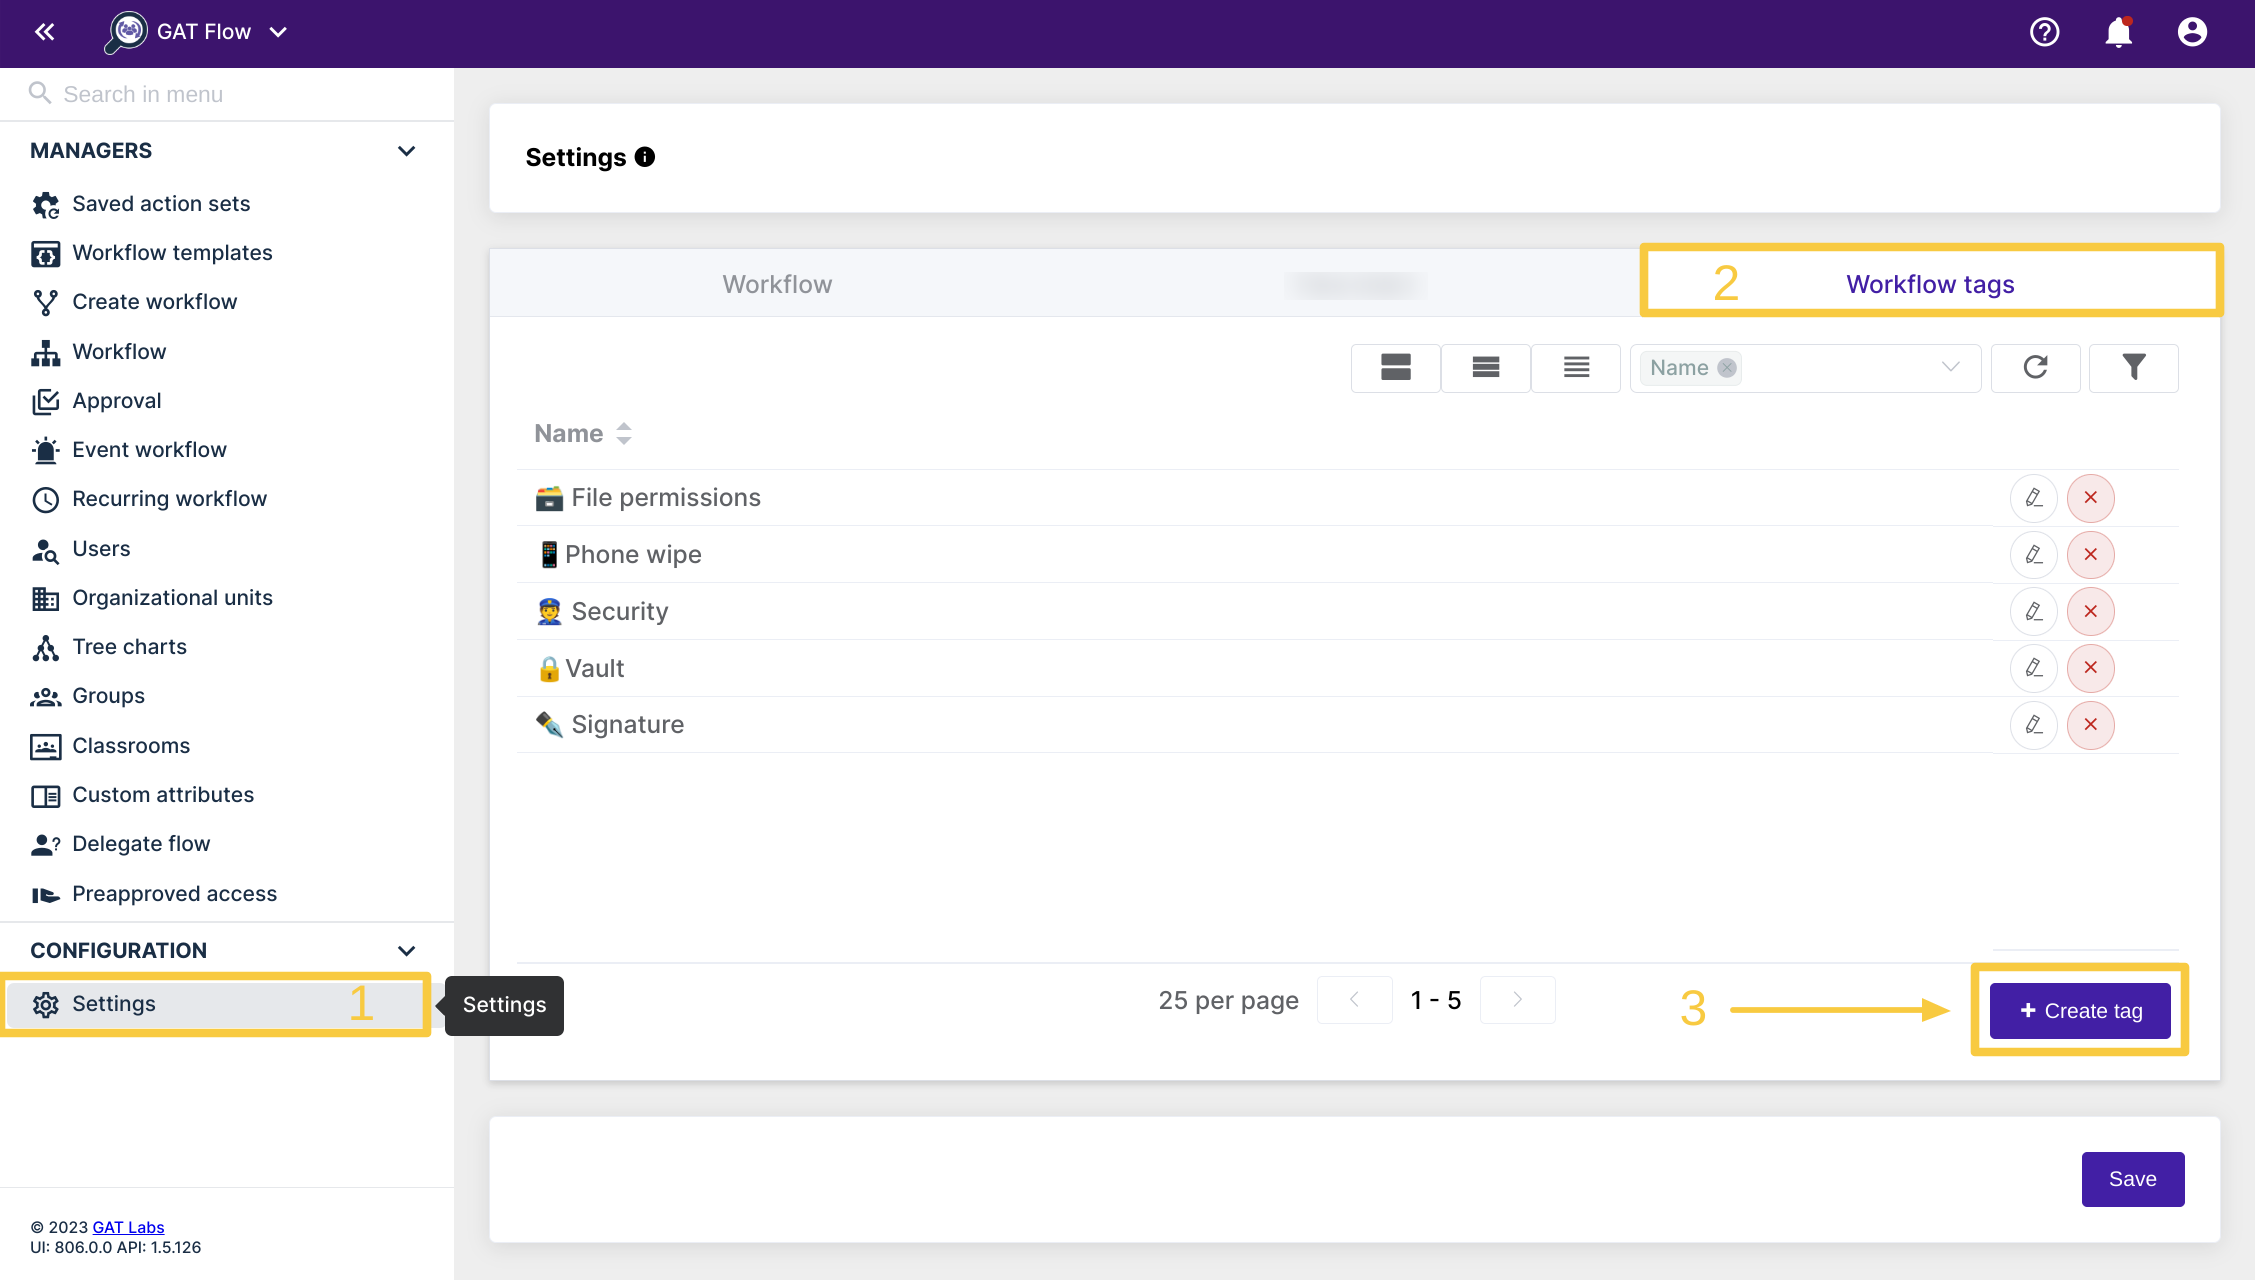
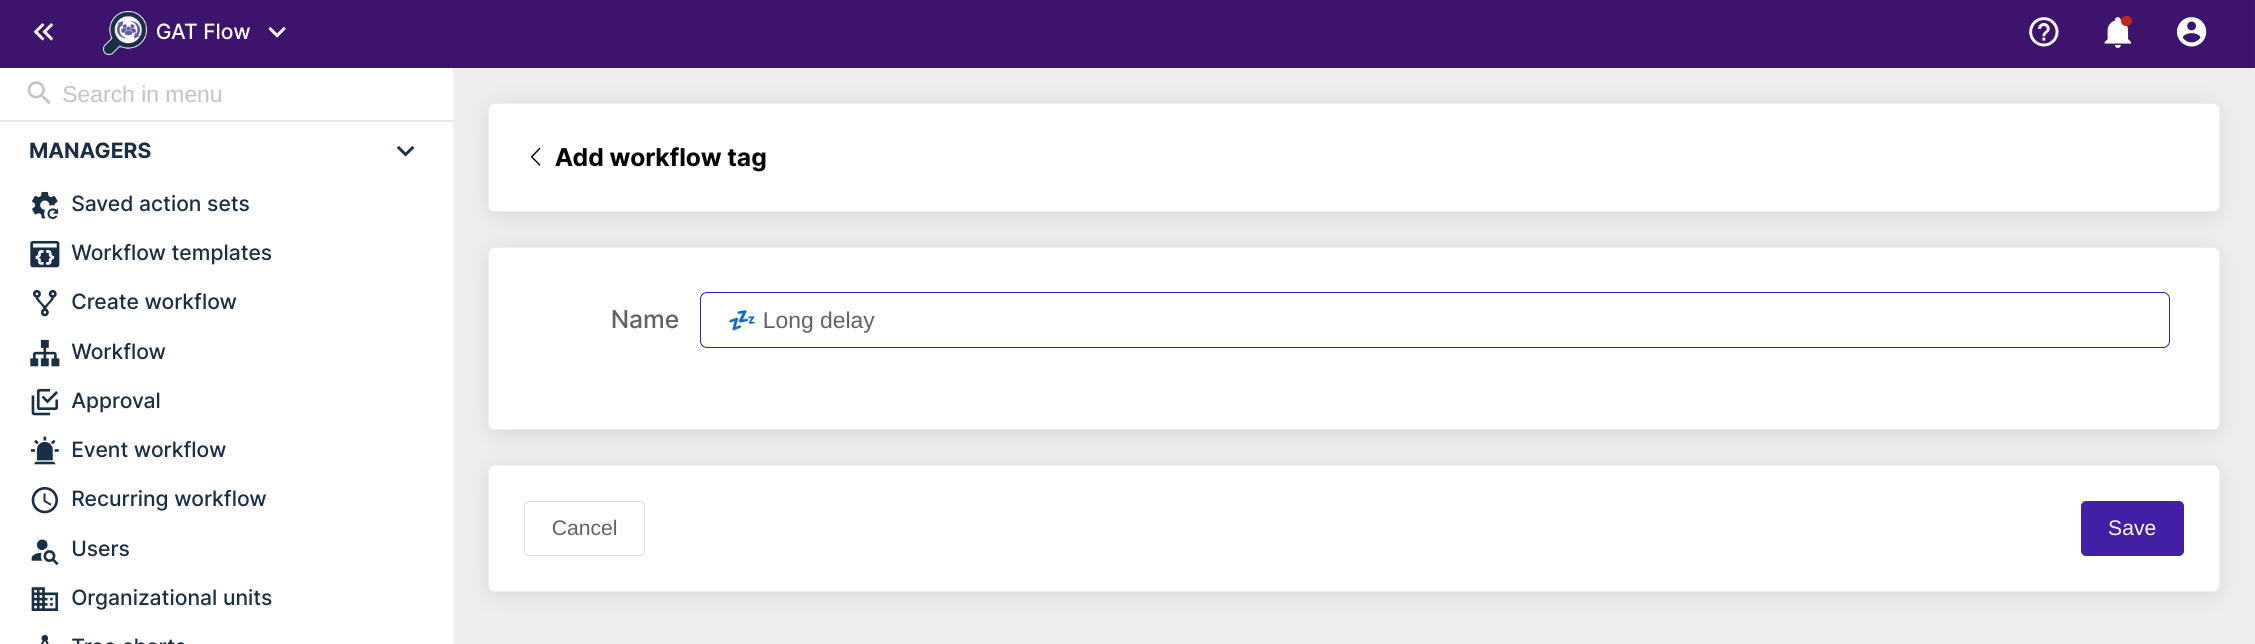
Enter a name for your tag and click Save.
That’s it! You have created your new tag and it is ready for immediate use.

Using your custom tag
You can apply your new tag to any new workflow you create. Just click on the ‘Workflow tags’ field when creating any workflow to see your available tags.
You can add multiple tags to a single workflow if you wish.

In the Workflow section, you will see all the previously run workflows, alongside the draft workflows. The column labeled workflow tabs will show you the tags that each workflow is given.

Each workflow receives one tag by default.
Standard manual workflows that were made from the ‘Create workflow’ section will be given the green label ‘Workflow’
If the workflow is an Event workflow, it receives a red ‘Event’ label.
Recurring workflows will receive a yellow label that reads ‘Recurring’.
Finding workflows from a specific tag
In the Workflow section, use the filter icon to select the applied tag, helping you quickly find previously tagged workflows.

Finally, click ‘Apply’ to display the results.

See Details
Deploying the GAT Shield Chrome Extension
In this document, we will cover the deployment steps of the GAT Shield extension.
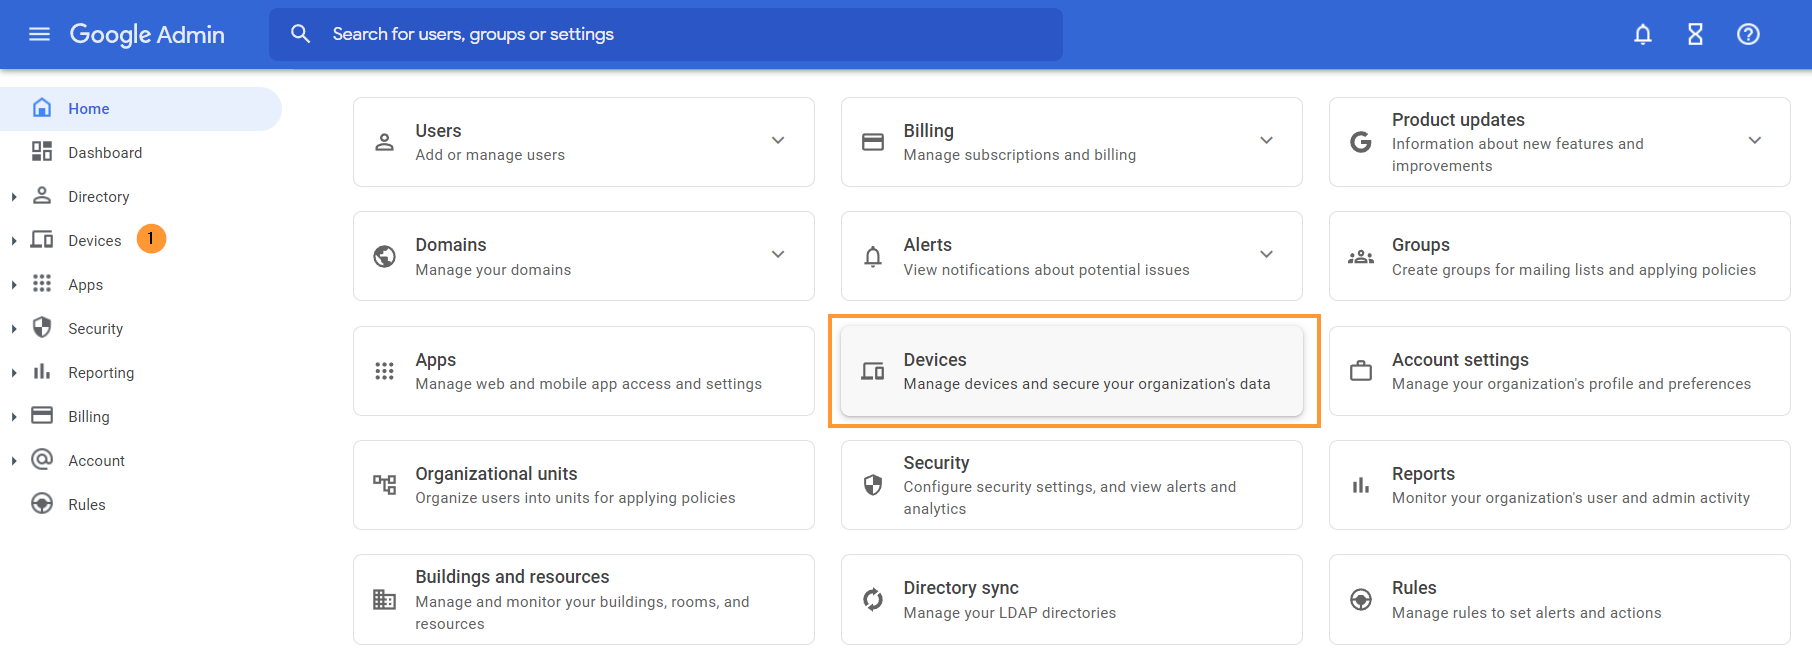
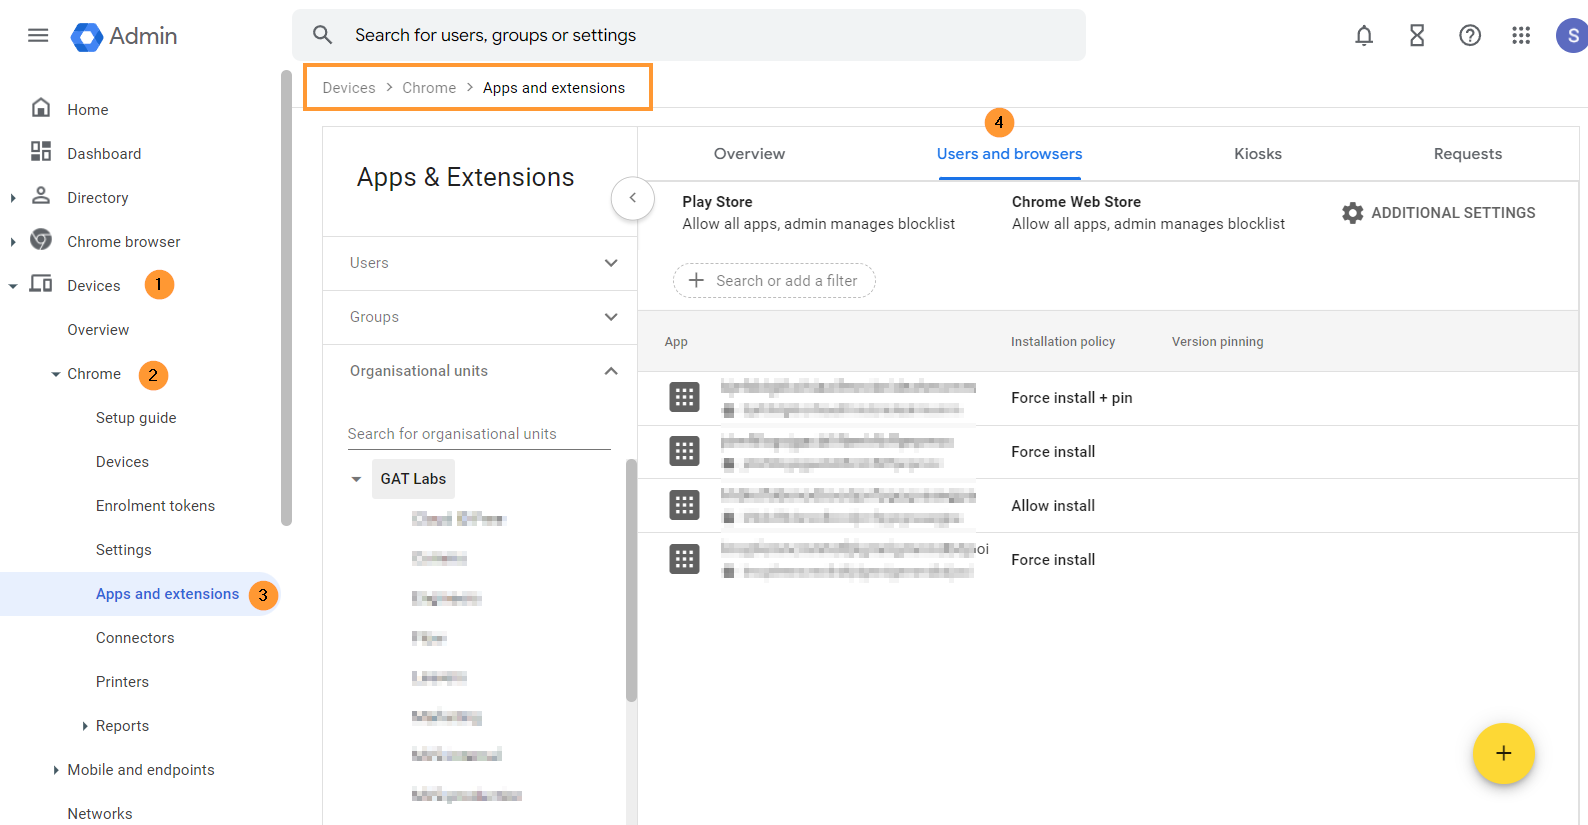
To start navigate and login into the Google Admin console
In the Admin Console click on Devices
From the menu on the left navigate down to Devices >Chrome >Apps & extensions > click on Users & browsers
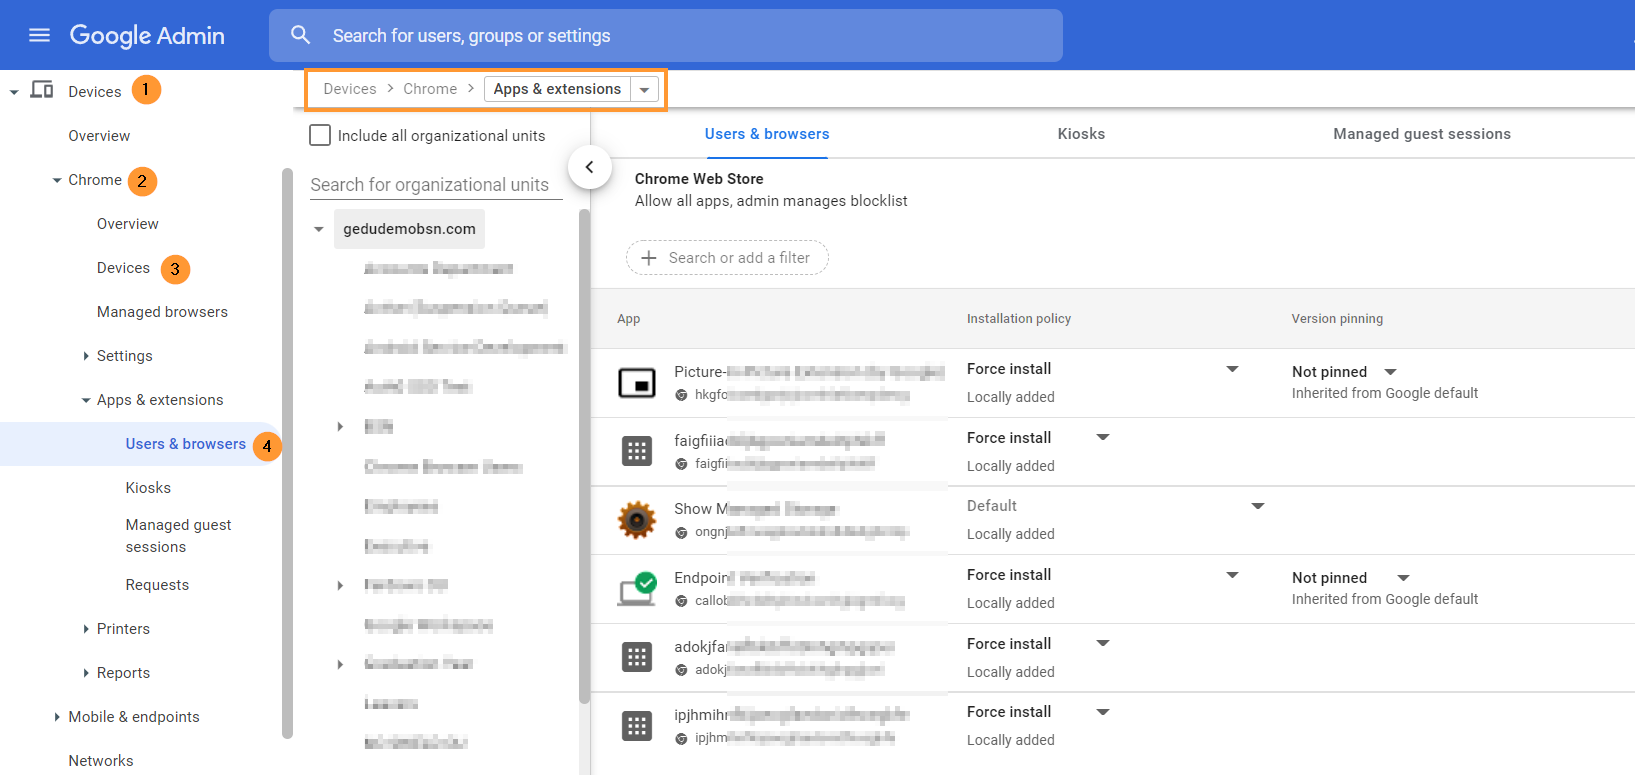
A new page will be displayed.
Install
To install the GAT Shield extension, choose the root Org Unit or a sub-OU where you want to deploy Shield into.
On the bottom right side, click on the Yellow + button
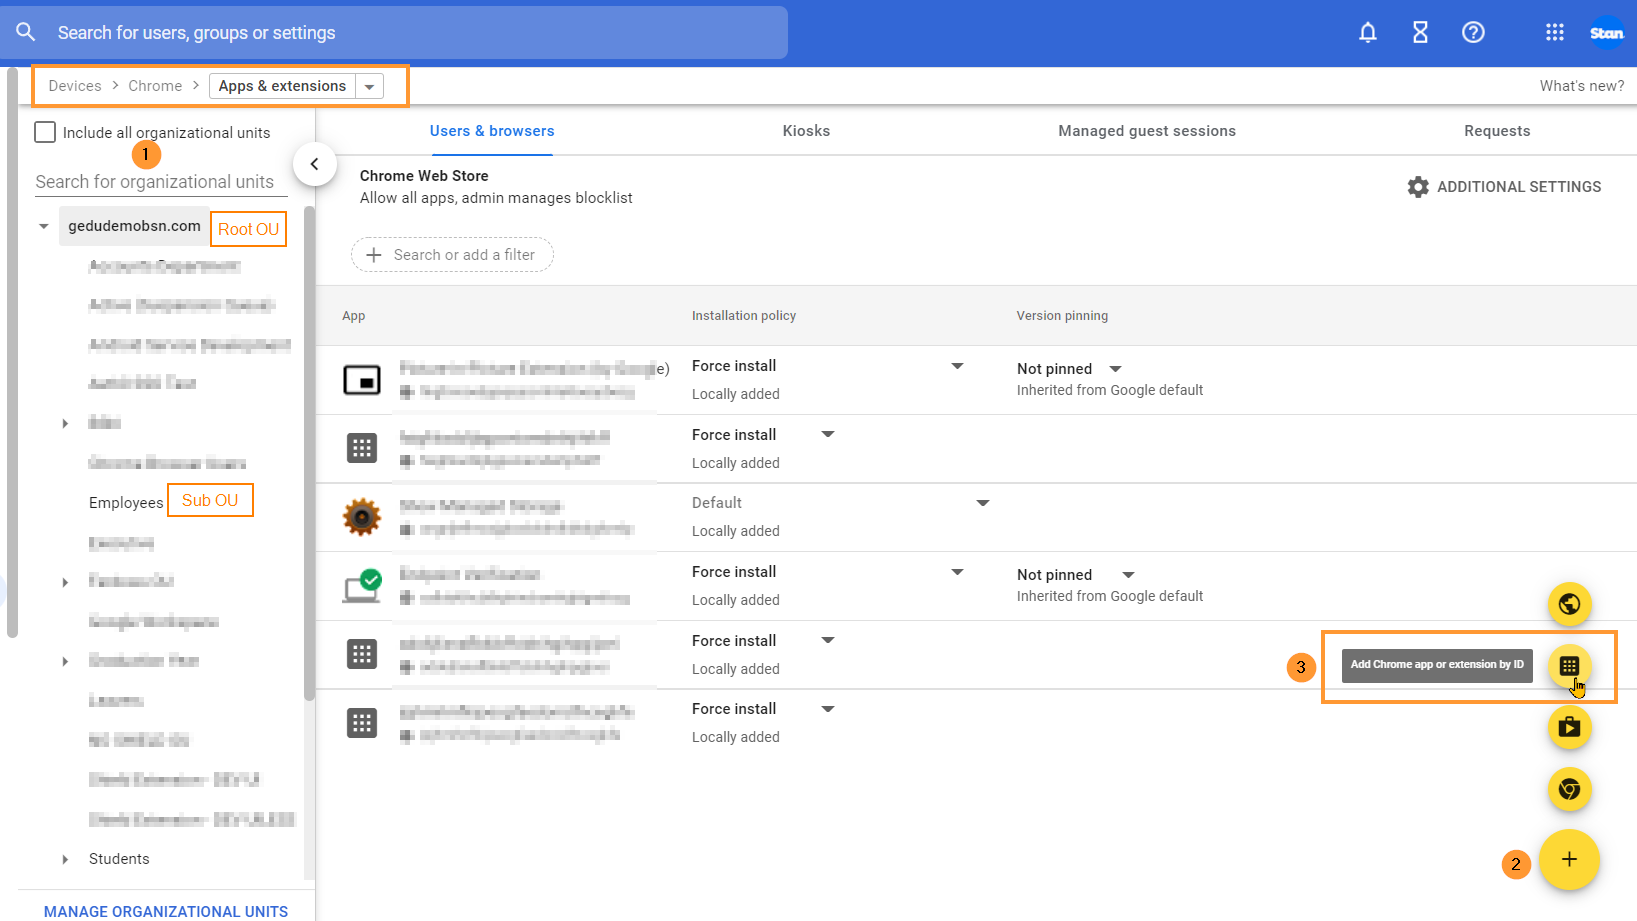
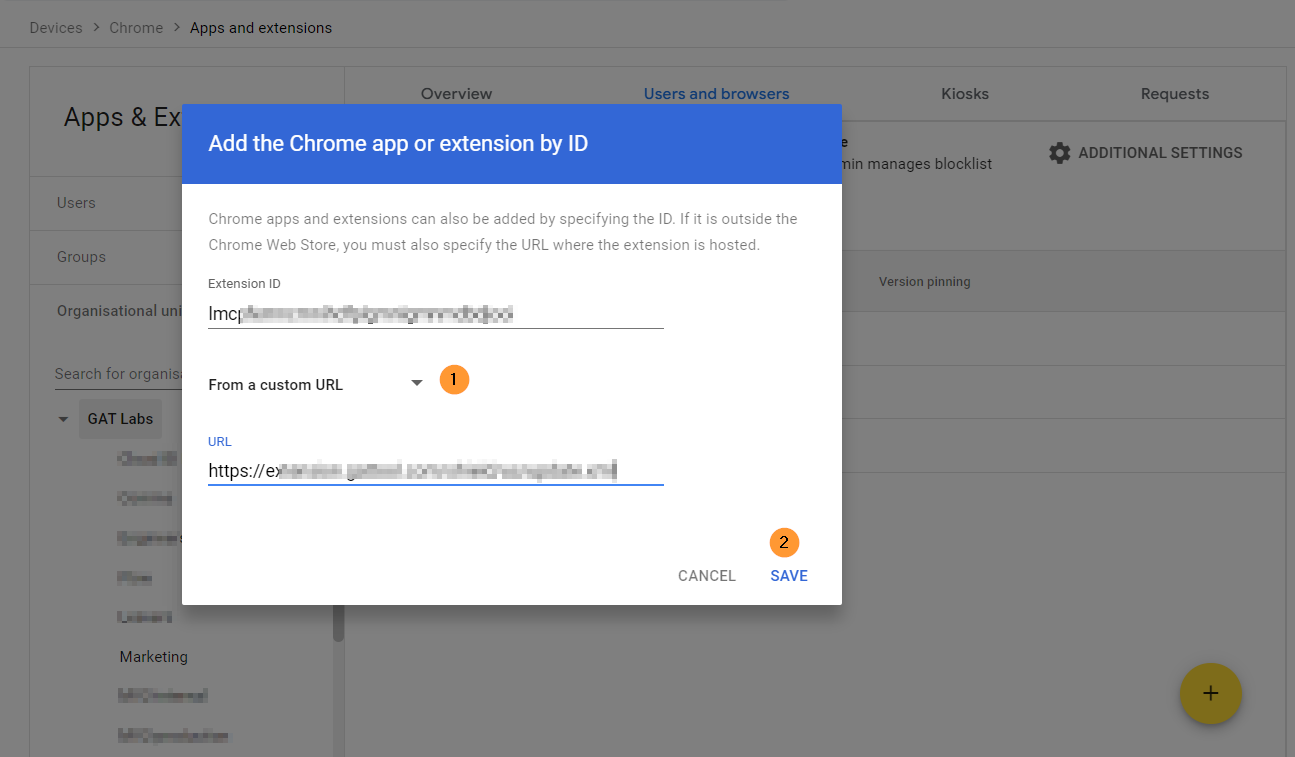
Select the Add the Chrome app or extension by ID option.
NOTE: A pop-up window will be displayed, select the From a custom URL option.
You’ll find both the ID and the URL required for this step in the GAT Shield application under the Extension deployment section.
Enter the Extension ID and URL of the extension.
To access and view the Extension ID and URL, navigate to GAT Shield > Configuration > Extension deployment.

Click Save.
The Shield Extension is now installed.
Click on the newly installed extension. You will see a pop-up window on the side. In the Installation policy, click and select Force install.

Scroll down on the same window to the bottom of the page to find the Policy for extensions.

Enter the Secret key – taken from GAT Shield under Configuration – Extensions deployment.
Under the Permissions and URL access field, click on and select Allow all permissions (2).

After doing all the changes, click the Save button on the top right.
Result
Shield will be installed for the users of the selected Org. Unit. It would depend on Google when the extension will appear on the end-user accounts.
Given that the users are logged in on Chrome browser with their Google Account, it should take a few minutes to be propagated to the end users.
Deploying GAT Shield Extension using Microsoft Group Policy Objects (GPO)
First, apply the Chrome ADMX Group Policy using the steps found at this Google support article.
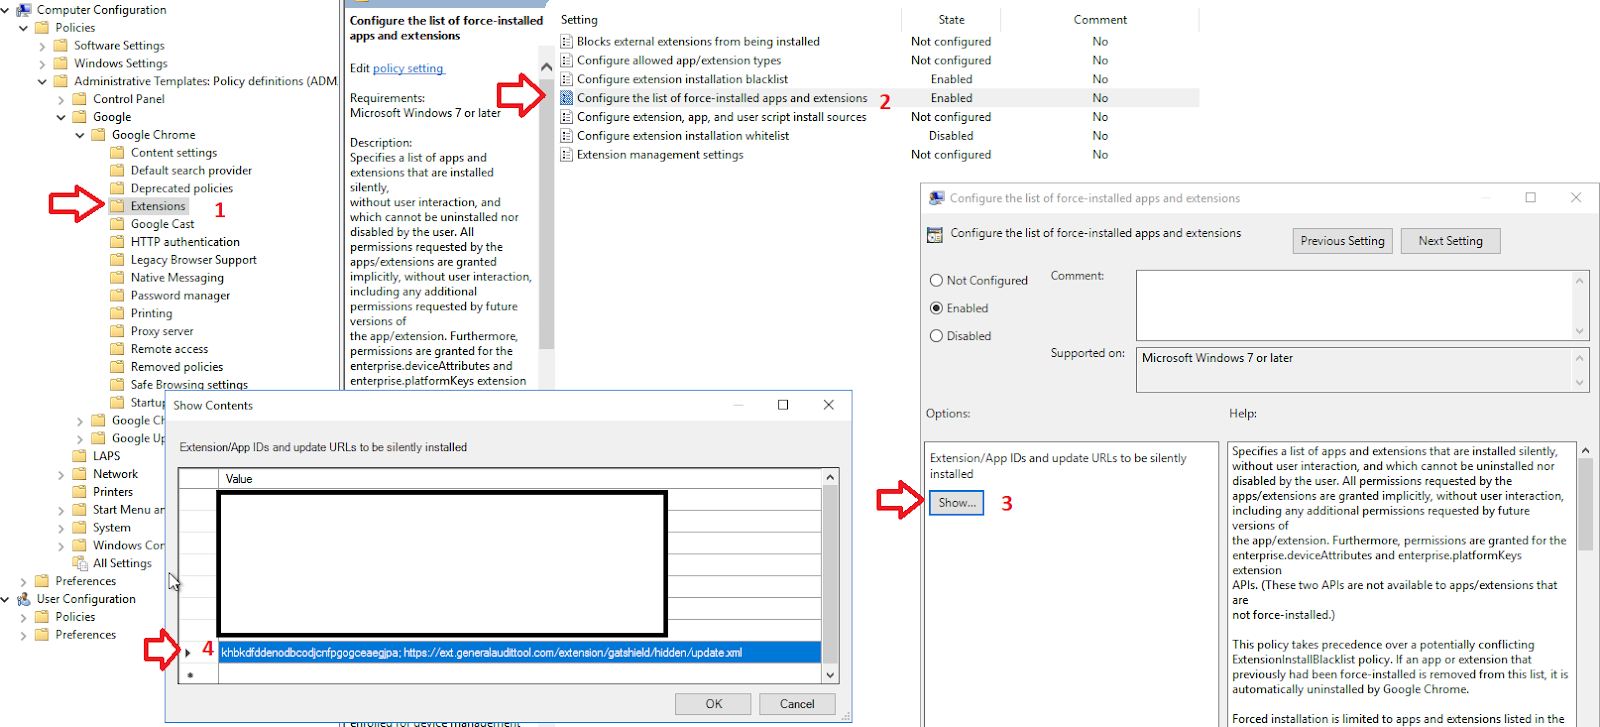
Navigate to Computer Configuration> Policies> Extension > Configure the list of force-installed apps and Extension
You are required to specify which Chrome extensions should be automatically installed (force-installed) for the users via Group Policy settings.
Next, you need to enter each extension ID and installation URL into the Group Policy setting.
You’ll find both the ID and the URL in the GAT Shield application under the Extension deployment section.
After you have configured the Chrome policy to force install the extension in Group Policy, you can assign this policy to particular groups of computers or users within your organization.
Recommended settings
User & Browser settings
We recommend enabling some settings on the domain to prevent Users (students) from interfering with Shield and any extensions.
Enable these settings in Devices > Chrome > Settings > Users & browsers

Some of these settings are mandatory.
Apps and Extensions
On the above-selected page, scroll down and navigate to the Apps and Extensions area, find the Task Manager setting,s and switch it to Block users from ending processes with the Chrome Task Manager.
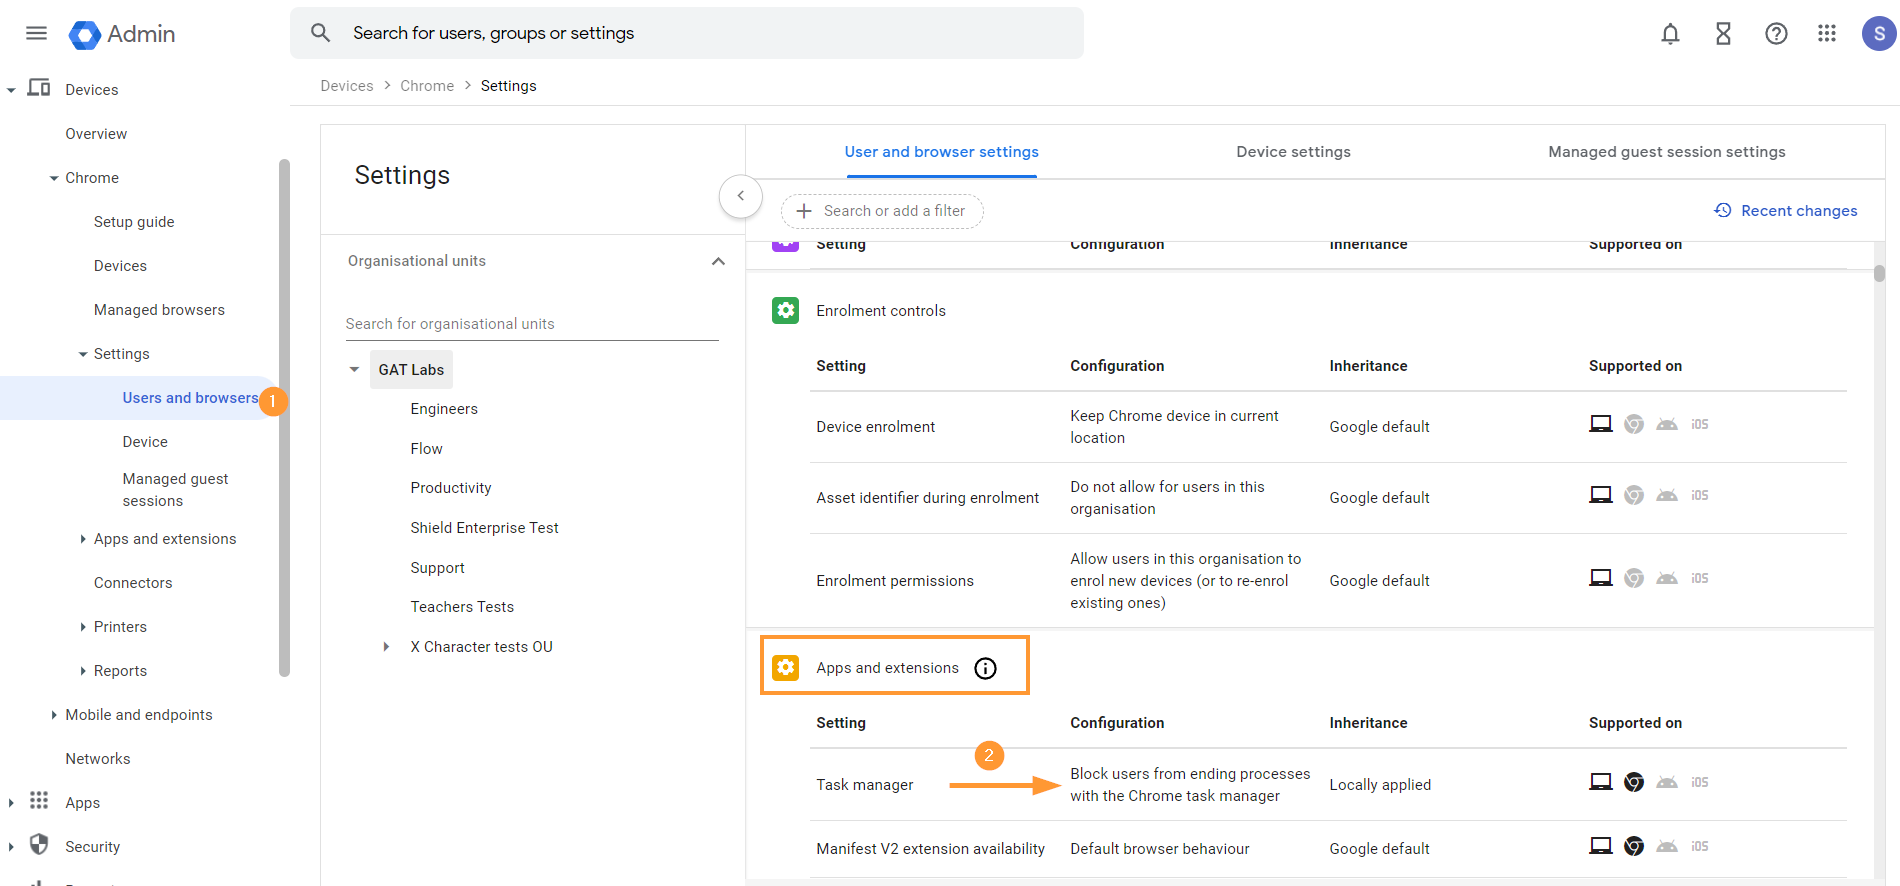
Description: Task Manager can be used to tamper with the Chrome browser’s normal operations.
User experience
On the same page, scroll down to User Experience
User & Browser settings > User Experience

The following settings are highly recommended for schools using enrolled Chromebooks.
These settings prevent students from bypassing the network firewall and installing Android apps like VPNs and other web browsers on their Chromebooks.
- Multiple Sign-in access – Block multiple sign-in access for users in this organization
- Sign in to secondary accounts – Block users from signing in to or out of secondary Google accounts
In User experience, scroll also to Developer tools and set it to “Never allow use of built-in developer tools”

Description: Developer tools can be used to disable extensions. Google also recommends disabling these tools in most cases.
Security
The following three options are recommended for schools with enrolled Chromebooks. These settings prevent students from bypassing or tampering with the GAT Shield extension.
Scroll down to the Security tab
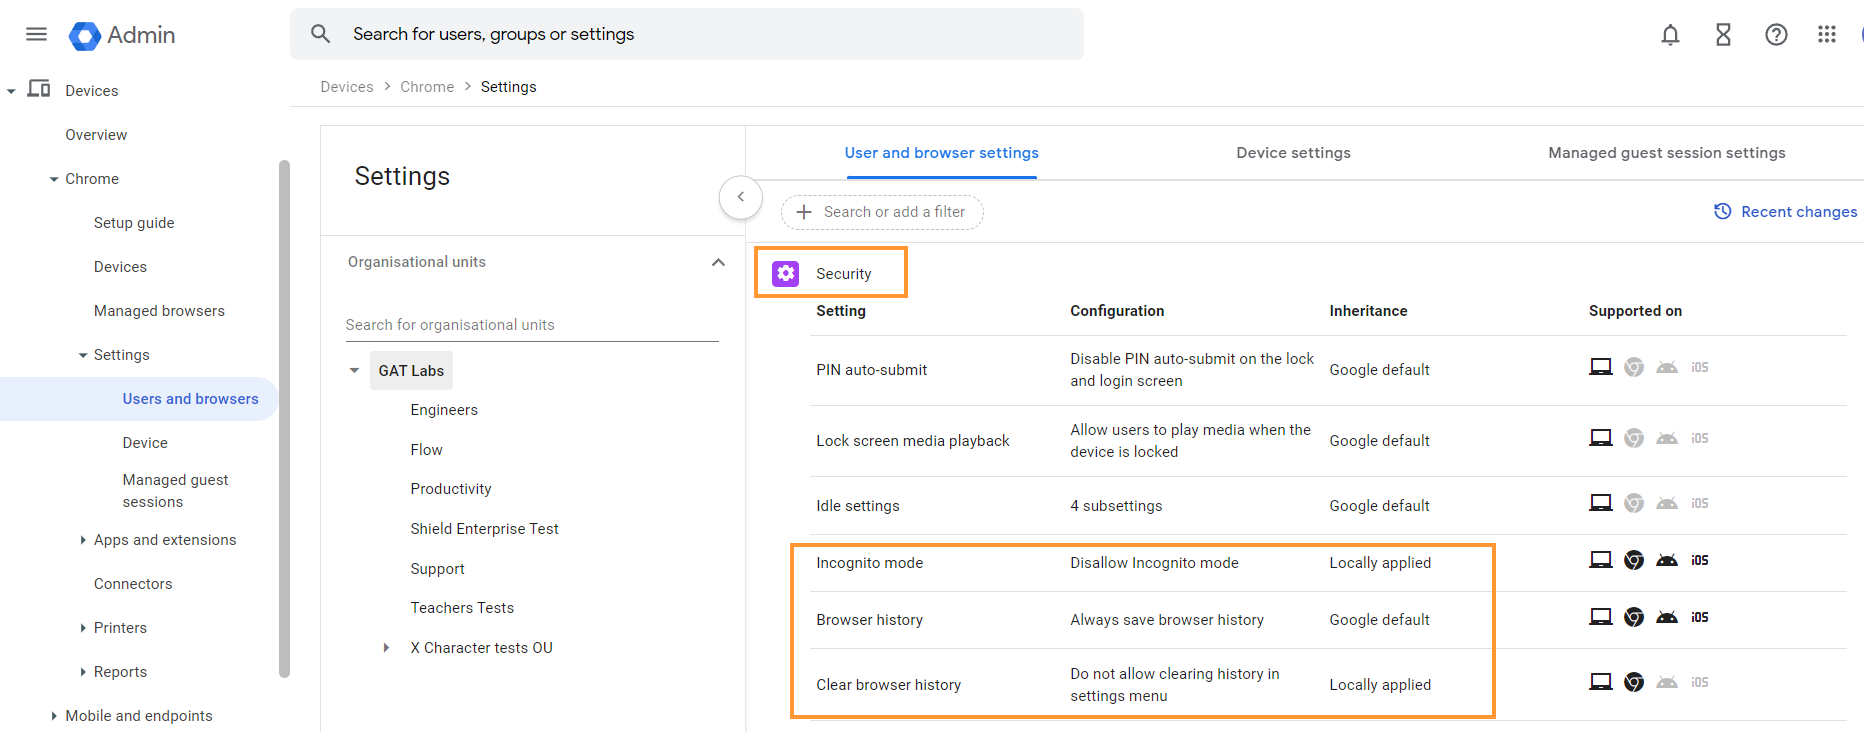
Find and apply the settings
- Incognito Mode – Disallow Incognito mode.
- Description: In incognito mode, the extensions do not work
- Browser history – Always save browser history.
- Description: Saving browser history is recommended so that when incidents occur, there is an audit trail that can be investigated by staff members.
- Clear Browser History – Do not allow clearing history in the settings menu.
- Description: The ability to clear browser history on the Chrome Browser may allow users to tamper with GAT Shield Browser reporting features.
Content
Scroll down further to the Content tab
- Screenshot – set it to Allow users to take screenshots.
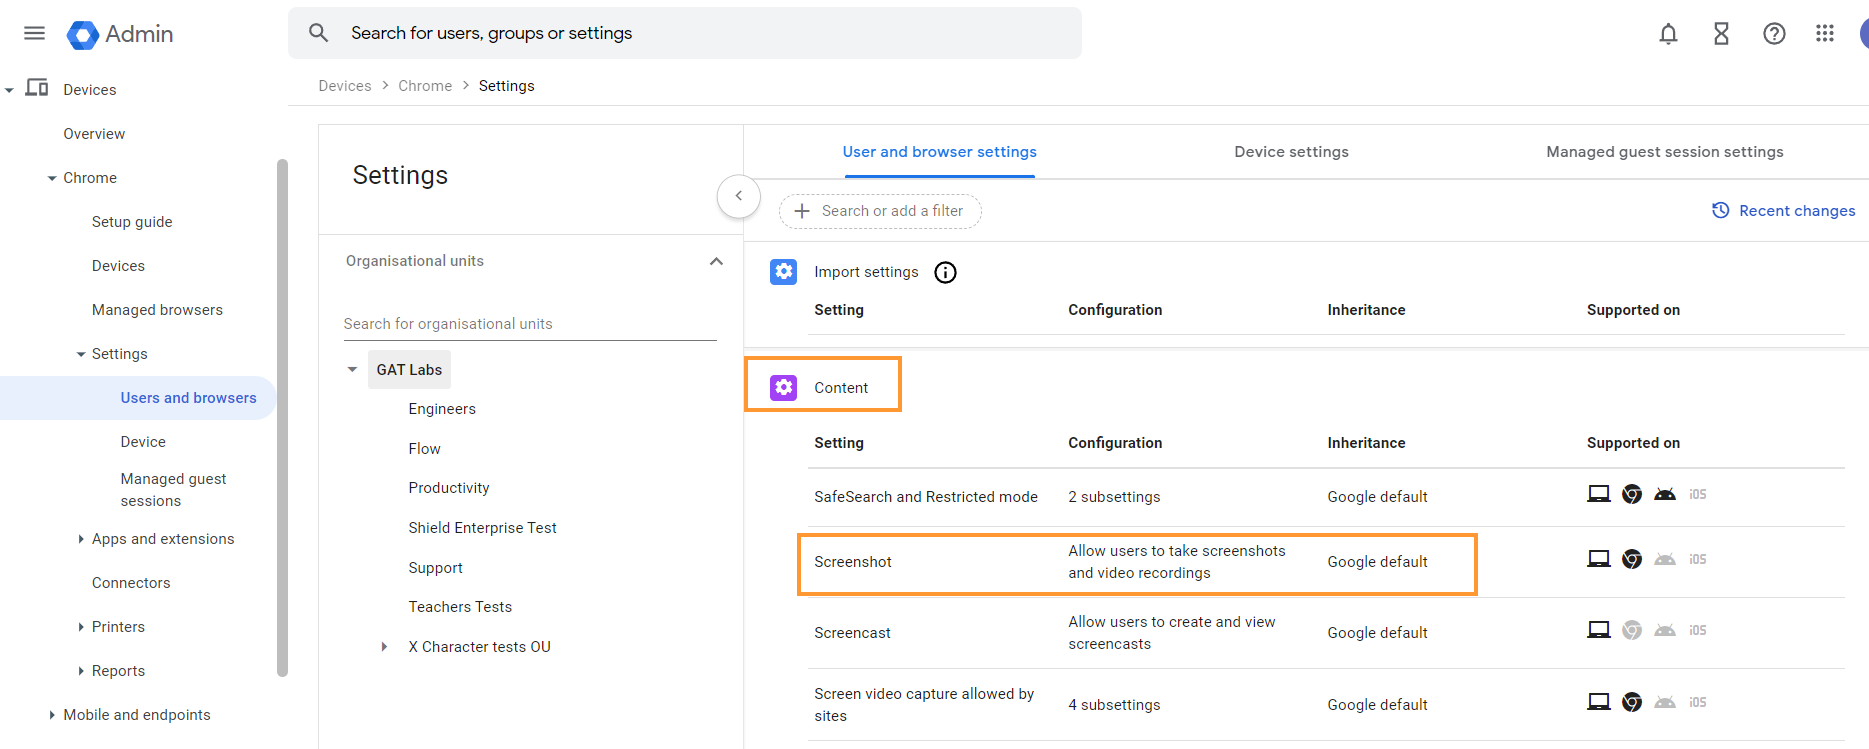
Description: Disabling screenshots will cause problems with the GAT Shield Alerting functionality.
When all of the settings are set up, make sure they are saved by clicking on the “Save” button on the top right.
Configure Device Settings
We recommend that these options be configured on your domain for your Chrome devices. Not all are mandatory.
From the Google Admin console, navigate to.
Devices > Chrome > Settings > Devices

In the left sidebar, select the OU that contains your Chromebooks, then configure the following policies to match these values.
Enrollment and access
- Configure the Enrollment and access
- Set Forced re-enrollment – automatically re-enroll after a wipe
- Set Verified access to Enable for content protection.
- Set Verified mode to require verified mode boot for verified access.

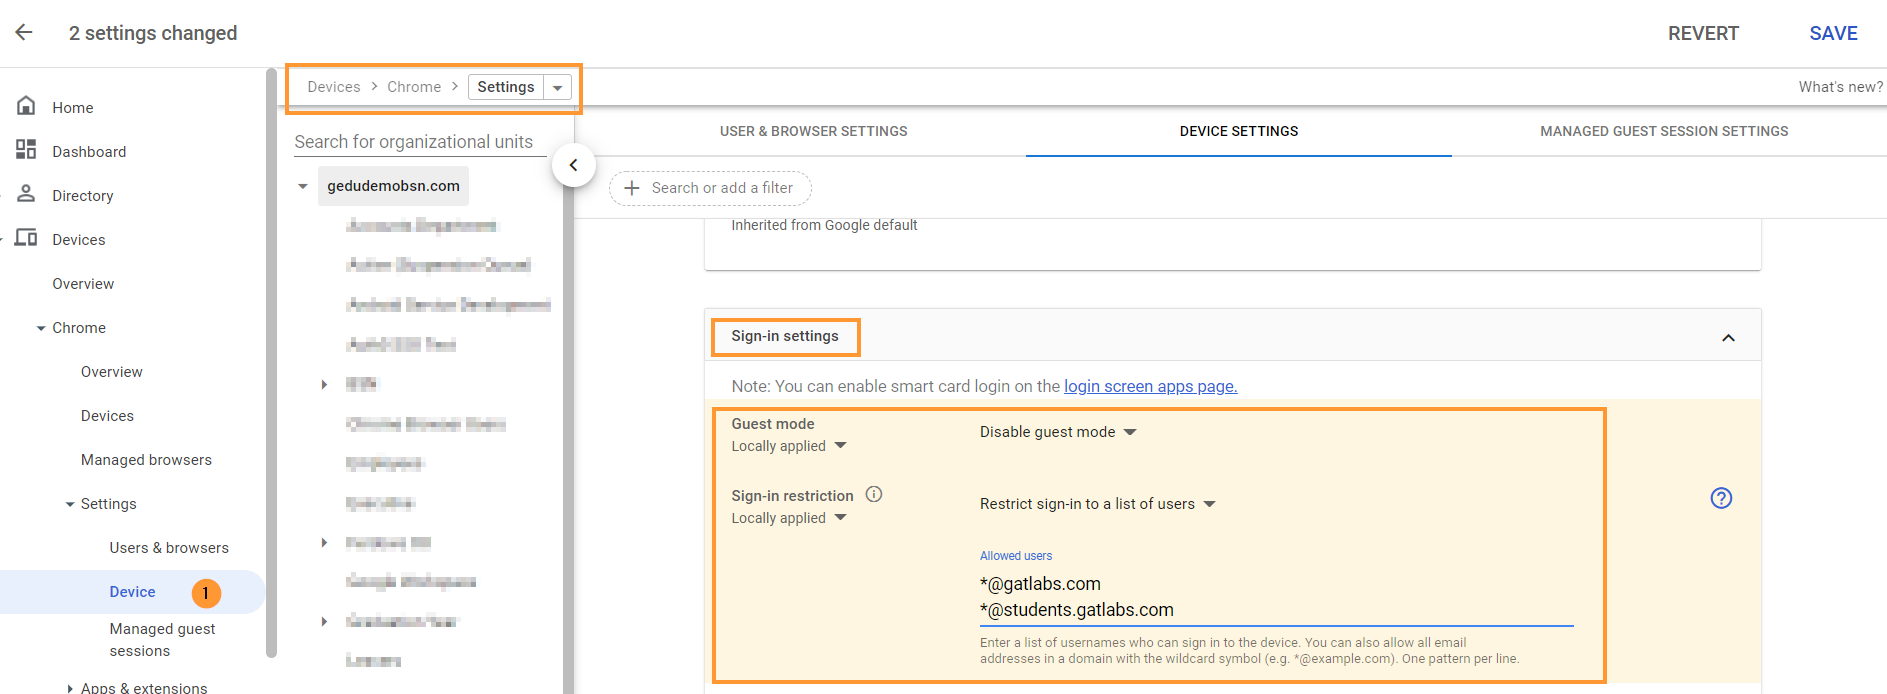
Sign-in settings
On the same page, scroll down to Sign-in settings
- Guest mode – Disable guest mode
- Sign-in restrictions – Restrict sign-in to a list of users
- Add an allowed list
When done with the changes, click on the “Save” button on the top right.
Shield is deployed to all, but only ChromeOS devices are seen?
It could be a case where Shield is deployed domain-wide to all users, and yet the data is only shown on ChromeOS devices. You can check this setting.
Adjust the settings for Chrome management for signed-in users
Navigate to Devices > Chrome > Settings > Users and browsers > Chrome management for signed-in users

Set it up to: Apply all user policies when users sign in to Chrome, and provide a managed Chrome experience.
Referring to: Manage user profiles on Chrome browser, and View and configure apps and extensions
When the Shield extension is deployed, every user who logs into their Chrome Browser with their domain credentials will have the extension automatically synchronized.
The Chrome user cannot override this setting.
WebCam capture – Extension URL
If you wish to capture webcam images when Shield rules are triggered, then you will need to enable Video-input-allowed URLs and add the Shield URLs
This setting can be enabled in Devices > Chrome > Settings > Users & browsers
Then scroll down and navigate to Hardware, then to Video-input-allowed URLs

Add the WebCam URL, then click Save on the top right.
The unique ID and URLs are displayed in the GAT Shield Console – see below (GAT Shield extension ID and URL)
Remove the old WebCam extension
The old Webcam extension is no longer needed. Please remove
- webcamID: lncmmomdcmcilmblgmnlinenbinjklgg
Find the extension above and remove
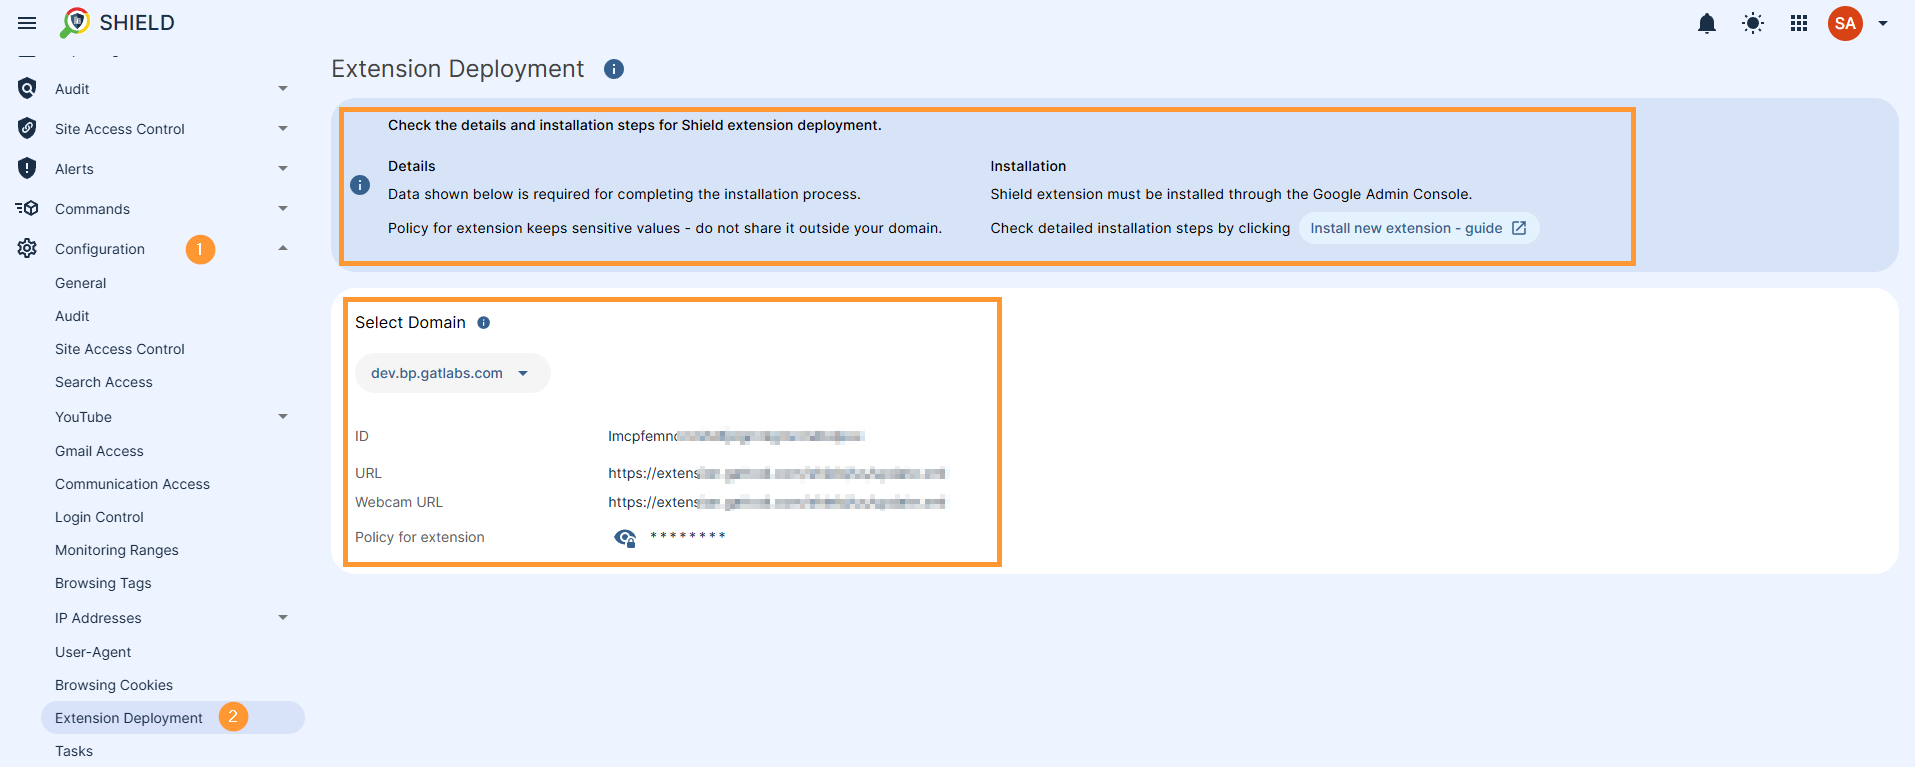
GAT Shield Extension ID and URL
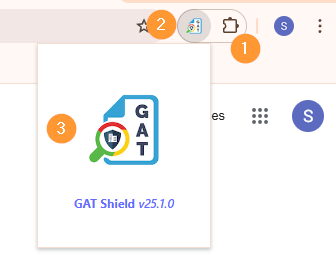
The GAT Shield extension ID and URL information are displayed in the GAT Shield Console that is launched from GAT+
See instructions below
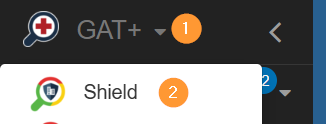
Launch GAT+ on the top left, click on the GAT+ icon, a menu will be displayed – then select GAT Shield
To access and view the Extension ID and URL, navigate to GAT Shield > Configuration > Extension deployment.
Allow GAT Shield Extension via Firewall
Note: Depending on your Firewall setup, there might be restrictions set up and not allow traffic to Shield.
Please check your Firewall settings and allow the following URLs:
To install the extension, you need to whitelist the following domain: https://extension.gattool.com
Additionally need to whitelist domains based on region.
For US (Global) domains (no prefix) – US (default) region
- https://alert-shield.generalaudittool.com
- https://urlaccess-shield.generalaudittool.com
- https://activeid.generalaudittool.com
- https://shield.generalaudittool.com
For EU domains (eu-prefix) – EU region
- https://eu-alert-shield.generalaudittool.com
- https://eu-urlaccess-shield.generalaudittool.com
- https://eu-activeid.generalaudittool.com
- https://eu-shield.generalaudittool.com
Lastly, for UK domains (uk- prefix) – UK region
- https://uk-alert-shield.generalaudittool.com
- https://uk-urlaccess-shield.generalaudittool.com
- https://uk-activeid.generalaudittool.com
- https://uk-shield.generalaudittool.com
These URLs must be reachable and not blocked by the Firewall.
Force Install Extension Org Unit inheritance explained
Note: If you install Shield on “sub.. ou”, make sure it is – ‘Force install Inherited from the domain‘.
You can click on the extension ID, select “Force install,” and Save.
When it is set up as ‘Default – Inherited from Google default‘, Shield might not be active on the selected OU.
Finally, displaying Serial Numbers within the GAT Shield Console is available only for licensed enterprise-enrolled devices.
See Details
In this document, we will cover the steps to install the GAT Shield extension. It’s an audit, reporting, and security Chrome Extension for your Google Workspace environment.
Google Changes to Chrome
This June 2024, Google is making major changes to Chrome. They are moving from a standard called Manifest Version 2 (MV2) to one called Manifest Version 3 (MV3). These changes are major architectural changes that Google says will improve performance and security.
GAT Labs has been preparing for these changes for the last 2 years. This change is mandatory and will affect nearly all extensions that are deeply integrated with Chrome, including GAT Shield.
What does this mean for GATShield customers?
Firstly, and this is unavoidable, you will have to deploy a new version of GAT Shield.
We are making this process as seamless as possible and are providing a migration tool to help you move any configuration you may have in your existing GAT Shield to the new GAT Shield.
Install GAT Shield – MV3 extension
GAT Shield is a Chrome extension that the Super Admin of the domain must install via the Google Admin console. Below, we will cover how to deploy the GAT Shield extension to your users.
Step 1.
First, navigate to the Google Admin console.
In the Admin console, from the menu on the left, click on Devices > Chrome > Apps and extensions.
From the top menu, select Users and browsers.
A new page will be displayed with all the Chrome extensions deployed to the domain.
Step 2.
To install the GAT Shield extension, choose the root Org Unit (1) or a sub-OU where you want to deploy Shield (2).
On the bottom right side, click on the Yellow (+) button.

From the options shown, select Add the Chrome app or extension by ID (3).
Step 3.
Then, you will see a pop-up window. Select the From a custom URL option (1).
You can find the ID, URL, Webcam URL, and Policy for an extension in Shield under Help – Extensions deployment.
Click Save.
The Shield Extension is now installed.
Step 4.
Click on the newly installed extension. You will see a pop-up window on the side. In the Installation policy, click and select Force install.
Scroll down on the same window to the bottom of the page to find the Policy for extensions.
To access and view the Security Key, navigate to GAT Shield > Configuration > Extension deployment.
Under the Permissions and URL access field, click on and select Allow all permissions (2).
After doing all the changes, click the Save button on the top right.
Step 5.
To access and view the Extension ID and URL, navigate to GAT Shield > Configuration > Extension deployment.
Copy the ID, URL, Webcam URL, and Policy for an extension from here and use them in the Google Admin Console
Sentential One users see Note 1
Result
When the Shield extension is deployed, the end-users must be logged into the Google Chrome browser with their domain accounts.
The extension will appear under their Google extensions.
The browsing activity will then be reported to the GAT Shield console for the Admins to manage.
Note 1
Note that SentinelOne Antivirus blocks access to the GAT Shield plugin. To solve the problem related to that, uncheck the box – visible in Deep visibility, in the SentinelOne console:

Related Posts
See Details
What happens when your GAT Shield license expires?
GAT Shield consists of two components: the GAT Shield Console and the GAT Shield extension.
If your trial license expires or your paid license is discontinued, we recommend removing the GAT Shield extension from all locations where it was deployed.
Remove the Extension
Log in to Google Admin Console as a Super Admin.
Navigate to Devices > Chrome > Apps & Extensions > Users & browsers > Overview

In the Overview tab – search for ID – enter a few letters of the Shield ID and Apply.
The result will show all the organization units where this extension is installed.

You can systematically remove it from each Org Unit if you have identified where the GAT Shield extension is deployed.
Clicking on the extension ID (2) – will display the extension details.
Click on the “bin icon” (3) – it will remove the app from the current org. unit.
NOTE: This must be done on each of the Org. Units where Shield is deployed, as it could be individually deployed to OUs and not inherited from the top OU etc.

Result
The Shield extension will be removed from your domain org. units and your end-users.
See Details
Our first go-to place to get the information is from the browser.
The location is given to the browser by Google, which utilises a variety of methods to determine the location. These methods are based on the WiFi hotspots the device sees.
Google learns this either from mobile devices that have geolocation enabled and are seeing WiFi hotspots or through the Google mapping cars that drive around, picking up WiFi hotspots and matching them to GPS data in the car.

See Details
What is Shield+
Shield+ is a Chrome extension paired with the SaaS service. Built as an enhanced evolution of GAT Shield, Shield+ acts as a frontline defense and monitoring hub directly within the user’s browser. Powered by sophisticated Machine Learning (ML) models and continuous identity verification, it bridges the gap between traditional endpoint security and real-time user behavior analytics.
How it Works
Once deployed across your domain via Google Workspace or Chrome Enterprise management, Shield+ runs seamlessly on the user’s Chrome browser. It works by continuously evaluating security telemetry without disrupting the user experience:
- Continuous Identity Verification (ActiveID): It analyzes the behavioral timing characteristics of a user’s typing patterns (never the actual words) to ensure the person behind the keyboard is the legitimate account owner.
- Proactive Policy Enforcement: It monitors device performance, blocks phishing attempts via localized browser banners, and regulates copy/paste behavior based on organizational compliance rules.
- Real-Time Visibility: It feeds live browser data, alerts, and system health metrics directly back to the admin dashboard, allowing for instant incident response and session management.
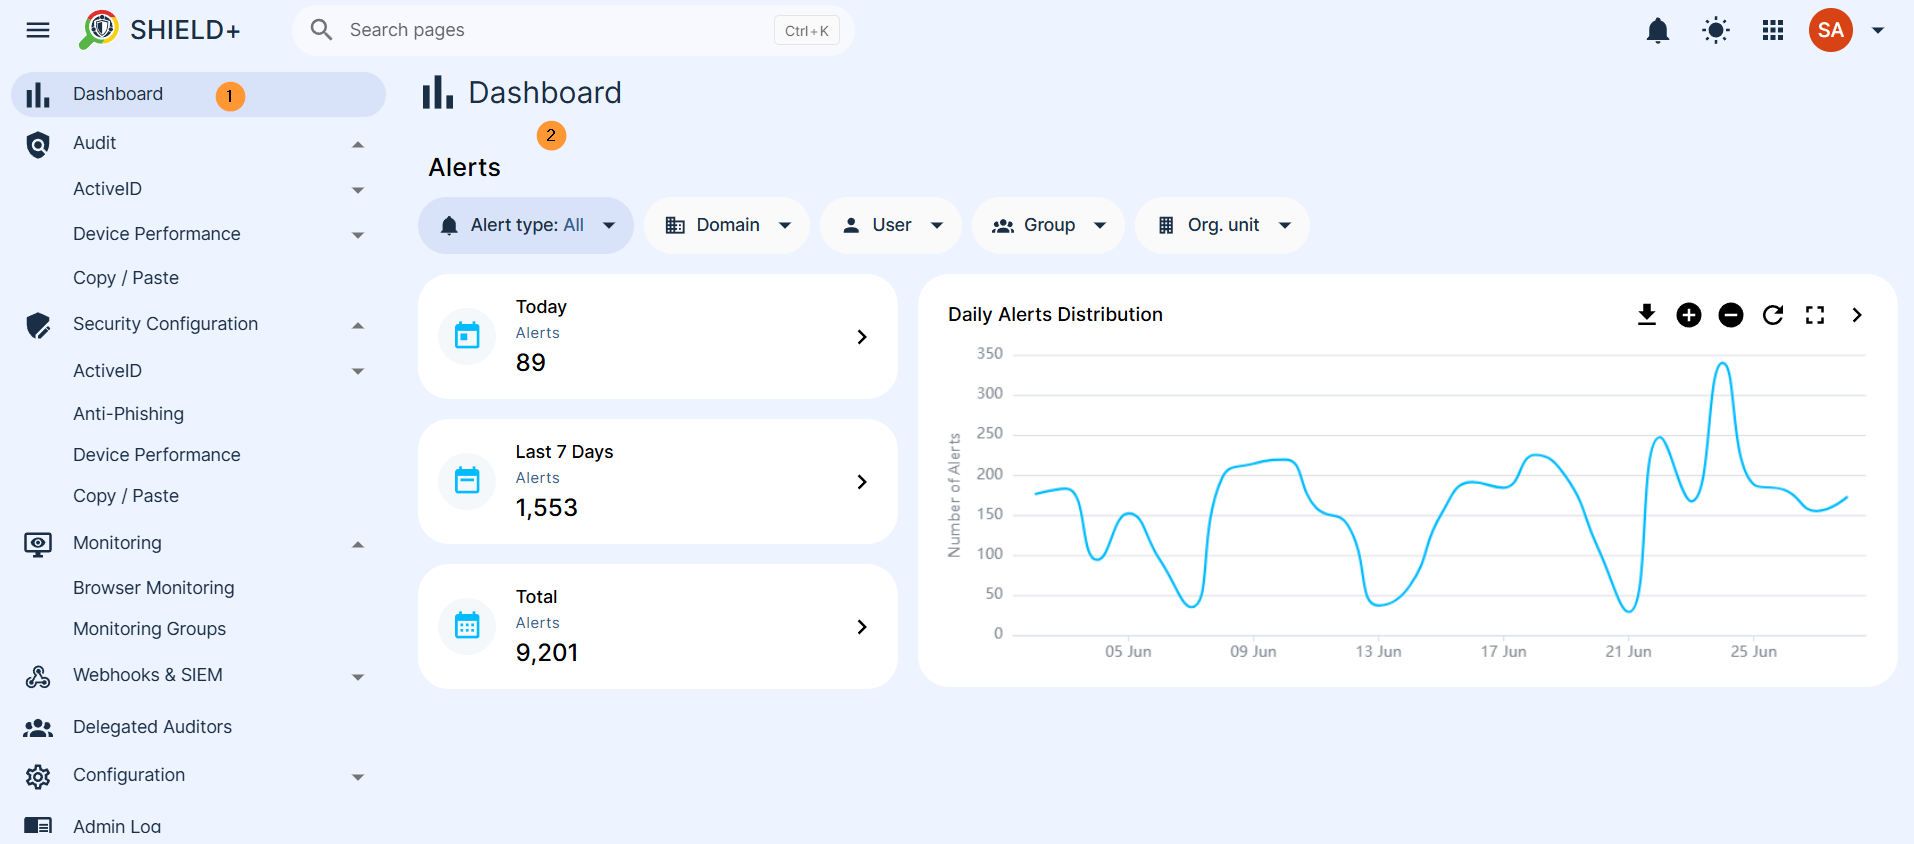
Dashboard
Navigate to Shield+ and click on Dashboard (the default view). It presents a summary of security alerts raised by the system’s Machine Learning models – the most important signal in the platform.
Time alerts – Three cards show alert counts for
- Today – alerts from today
- Last 7 Days – alerts from the last 7 days
- All Time (Total) – overall total alerts
Alert types – The alert types can be filtered for
- All – all types of alerts combined
- ActiveID/TypingID – alerts for ActiveID/TypingID only
- Inactivity Lock – Inactivity lock only
- Anti-Phishing – Anti-phishing alerts only
- Device Performance – Device performance alerts only
Scope
The scope is used to select the users you want to view the dashboard for.
- Domain – select domain
- User – select a specific user
- Group – select a specific group
- Organization unit – select a specific org. unit
Daily Alerts Distribution
The daily alert distribution line chart shows alert volume over the past 30 days.
Clicking any point on the chart navigates directly to the matching filtered alerts list. It can be expanded by zooming in/out as well as downloaded as PNG, JPEG, or CSV. It can also be expanded to full screen and downloaded as such
Navigate to Shield+ > Dashboard
Audit
The Audit section is a read-only section for logs and alert tables for every detection module for ActiveID, Device performance, and Copy and Paste
The ActiveID has typing and inactivity alerts
- TypingID
- TypingID Alerts – A paginated table of every TypingID alert – events where the Machine Learning model determined, with confidence above the rule’s threshold, that the person typing is likely not the legitimate account owner. Each alert records the user, timestamp, confidence percentage, and current status.
- Severity can be updated, and alerts can be acknowledged individually or in bulk.
- Clicking an alert opens its details, which may include a screenshot, webcam capture, or the URL visited at the time, depending on the alert rule’s attachment configuration.
- TypingID Patterns – The raw typing patterns collected from users and processed by the AI models. This view lets admins monitor how actively patterns are being generated per user, which directly reflects how well each user’s identity model is trained.
- We collect 2 types of typing patterns. In this section, we present how many typing patterns were verified by our system on a daily basis.
- 1st type patterns – Full Typing Pattern – A detailed profile pattern of your typing style based on 100–150 keystrokes.
- View daily numbers – for the last 24 hrs
- View daily average – for the last 30 days
- 2nd type patterns – Key-Pair Pattern – faster profiles built from the timing of consecutive letter pairs like “TH” or “AE”)
- View daily numbers – for the last 24 hrs
- View daily average – for the last 30 days
- TypingID Alerts – A paginated table of every TypingID alert – events where the Machine Learning model determined, with confidence above the rule’s threshold, that the person typing is likely not the legitimate account owner. Each alert records the user, timestamp, confidence percentage, and current status.
- Filter by scope of users, domain, group, or org. unit.
-
- Users protected – successfully built model means that the user is being actively protected. AI model checks if the generated text matches the user’s previous typing behaviour
- Users without protection – list of users where this model is not built yet
-
Navigate to Shield+ > Aduit > ActiveID > TypingID > Alerts or Patterns

- Inactivity Lock
- Alerts are raised when an inactivity lock challenge is triggered, but the user failed to respond, responded incorrectly, or let the request time out. Each record shows the user, trigger time, and the specific failure reason (e.g., verification failed, timed out, credential not found).
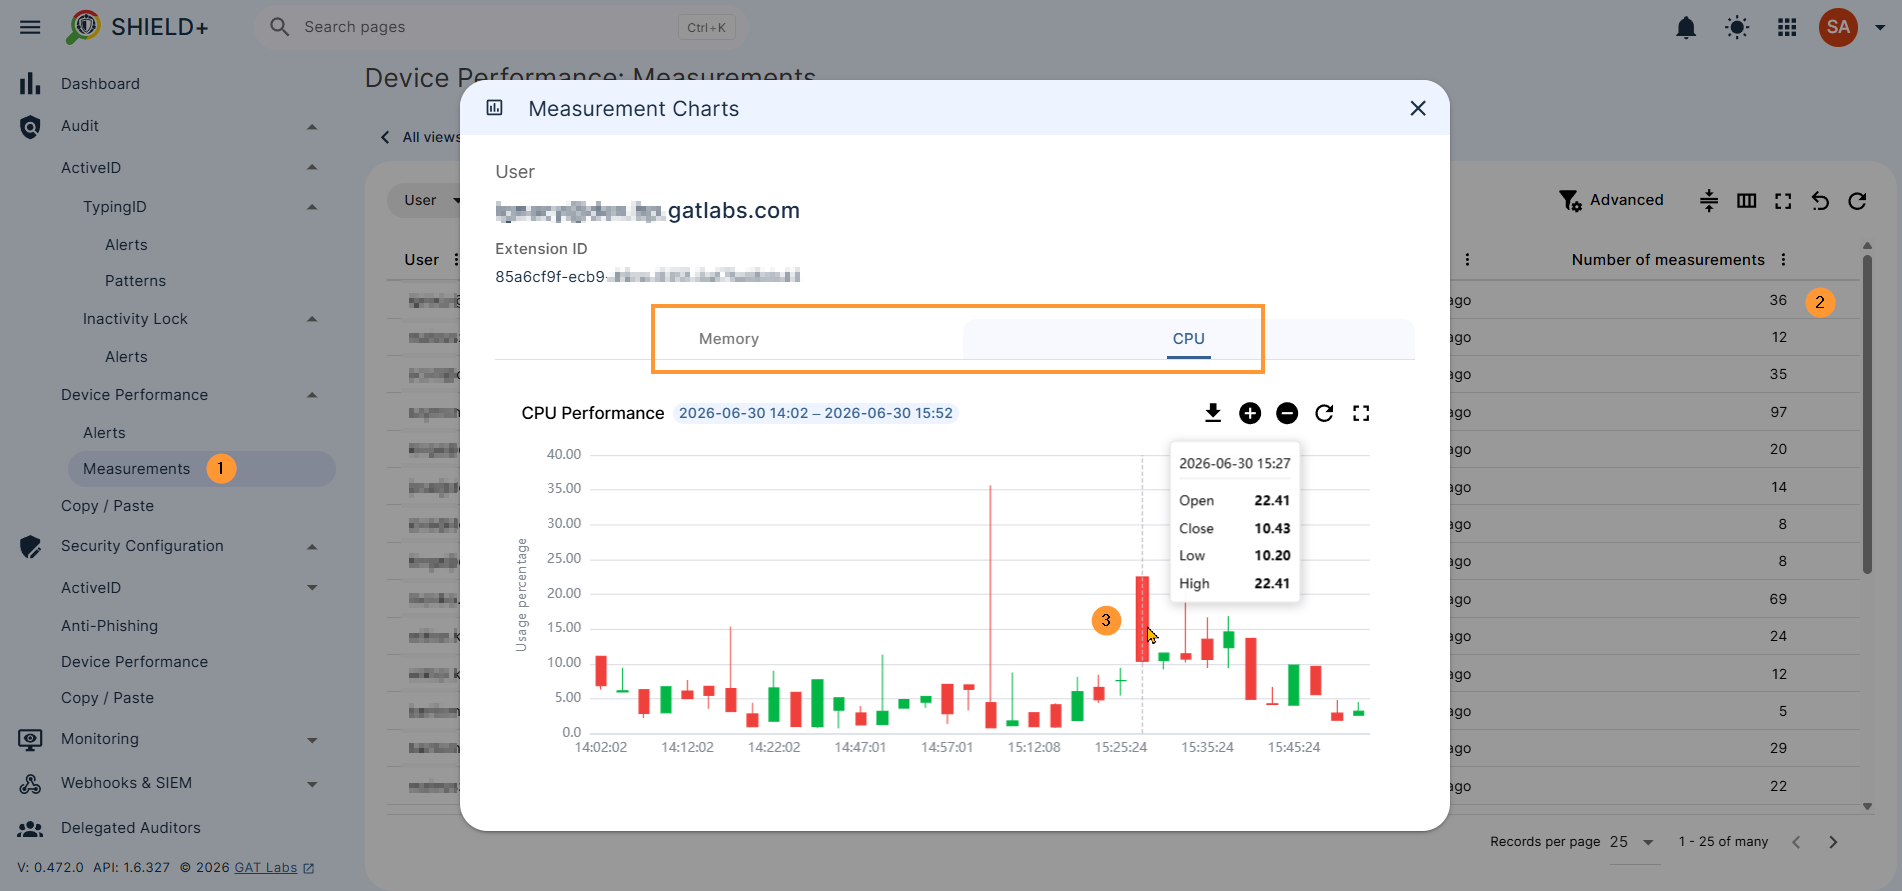
- Device performance
- Device performance is measured by the stats of alerts raised when a user’s device CPU or memory usage exceeded a configured threshold for a sustained period. Each alert records the affected user, the resource (CPU or Memory), the metric (Maximum or Average), and the duration.
- Alerts – Alerts are raised when a user’s device CPU or memory usage exceeds a configured threshold for a sustained period. Each alert records the affected user, the resource (CPU or Memory), the metric (Maximum or Average), and the duration.
- Measurements – Raw performance readings collected from user devices over time. Individual records can be expanded to view CPU and memory measurement charts for a detailed history of a device’s resource usage.
- Device performance is measured by the stats of alerts raised when a user’s device CPU or memory usage exceeded a configured threshold for a sustained period. Each alert records the affected user, the resource (CPU or Memory), the metric (Maximum or Average), and the duration.
Navigate to Shield+ > Audit > Device performance > Alerts or Measurements
Copy / Paste
A log of all copy and paste events captured from users’ browsers.
Each entry shows the URL where the event occurred, the event type (Copy Allowed, Copy Blocked, Paste Allowed, Paste Blocked), and the user who triggered it.
Navigate to Shield+ > Audit > Copy/Paste
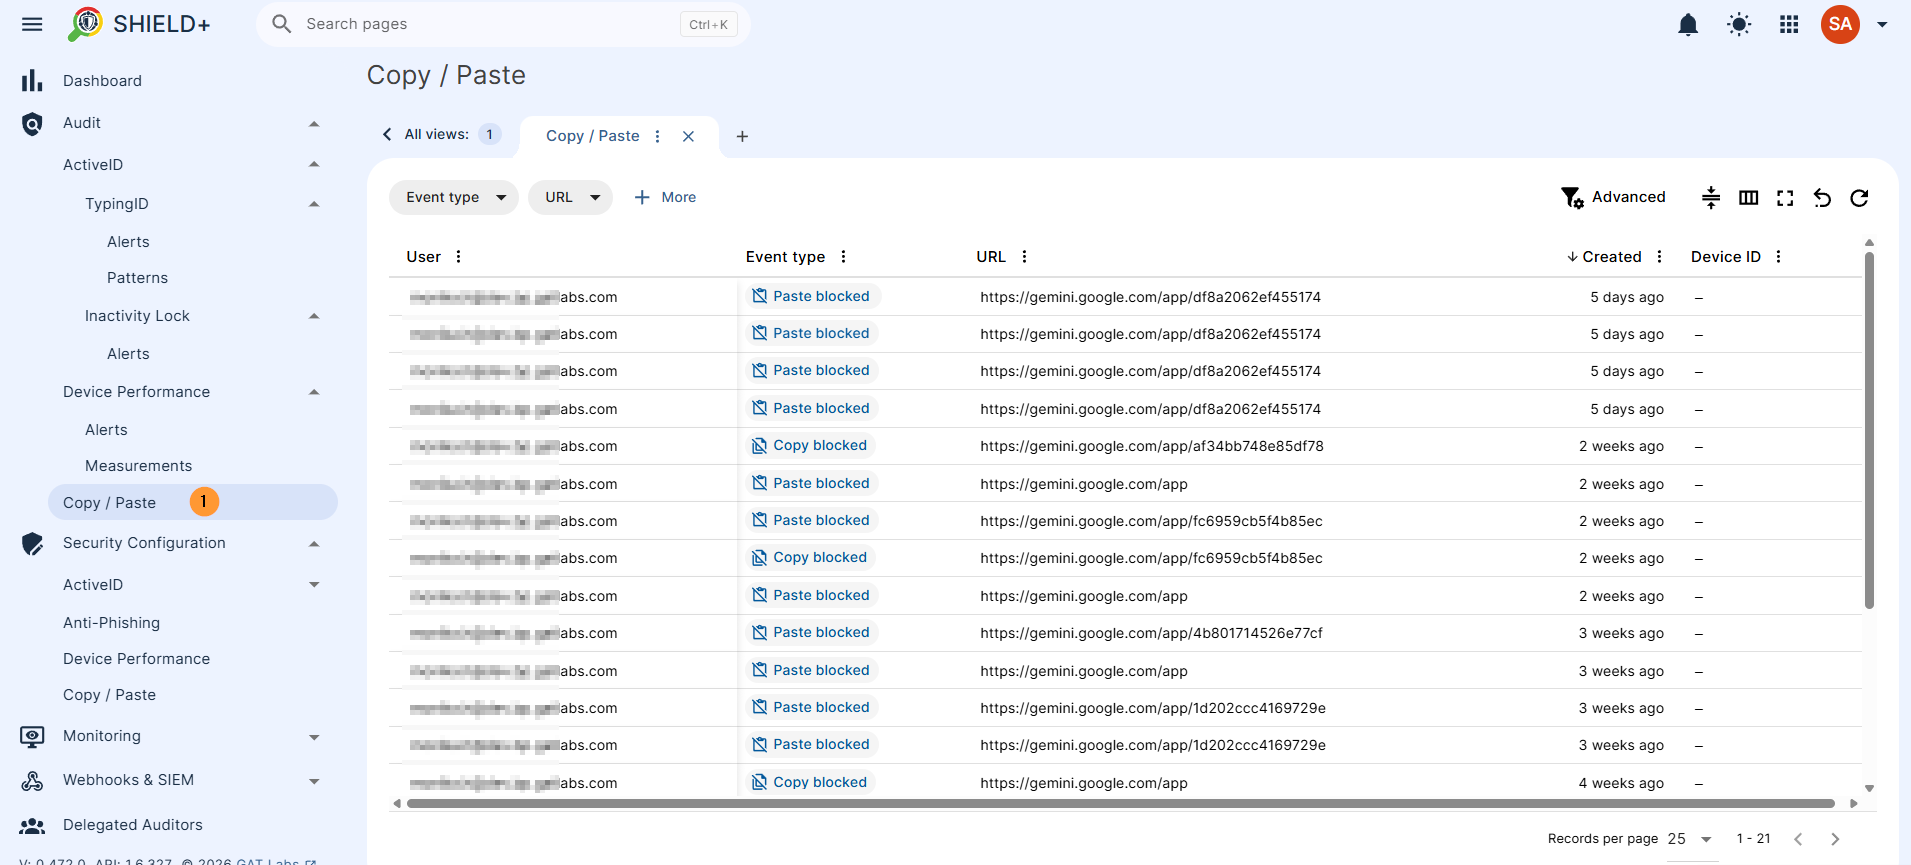
The Admins can review flagged events, inspect details, and acknowledge alerts from these views.
Security Configuration
Where admins create and manage rules, policies, and lists that control how Shield+ detects threats and enforces actions. Changes here directly affect what gets flagged and what happens to users when a violation is detected.
ActiveID
ActiveID is a feature of continuous typing verification. It creates a profile of a user based on typing characteristics. In order to create a profile, it will have to record the user’s typing patterns (but only timing characteristics, no actual words typed are recorded) for some time. Then it starts to verify every new pattern that comes to the app and decides whether it matches the profile or not. Based on the advanced logic of Machine Learning algorithms, it can decide whether the person who is typing is the actual user logged into their account or an imposter who gained unauthorised access to the account. In the latter case, the GAT Shield+ ActiveID feature will raise an alert, notifying the admin of the domain and (optionally) logging out the person who is typing from the account.
TypingID Rules
Create and manage the alert rules that govern when TypingID alerts fire. Each rule defines: the scope (which users it applies to), the prediction threshold (confidence level above which an alert is triggered), alert recipients and notification settings, optional alert attachments (screenshot, webcam capture, visited URL), and the action on violation – either no session action, a Passkey challenge (screen locked until the user verifies their identity), or clearing browser cookies (effectively ending all active sessions). Rules can be activated or deactivated without deleting them.
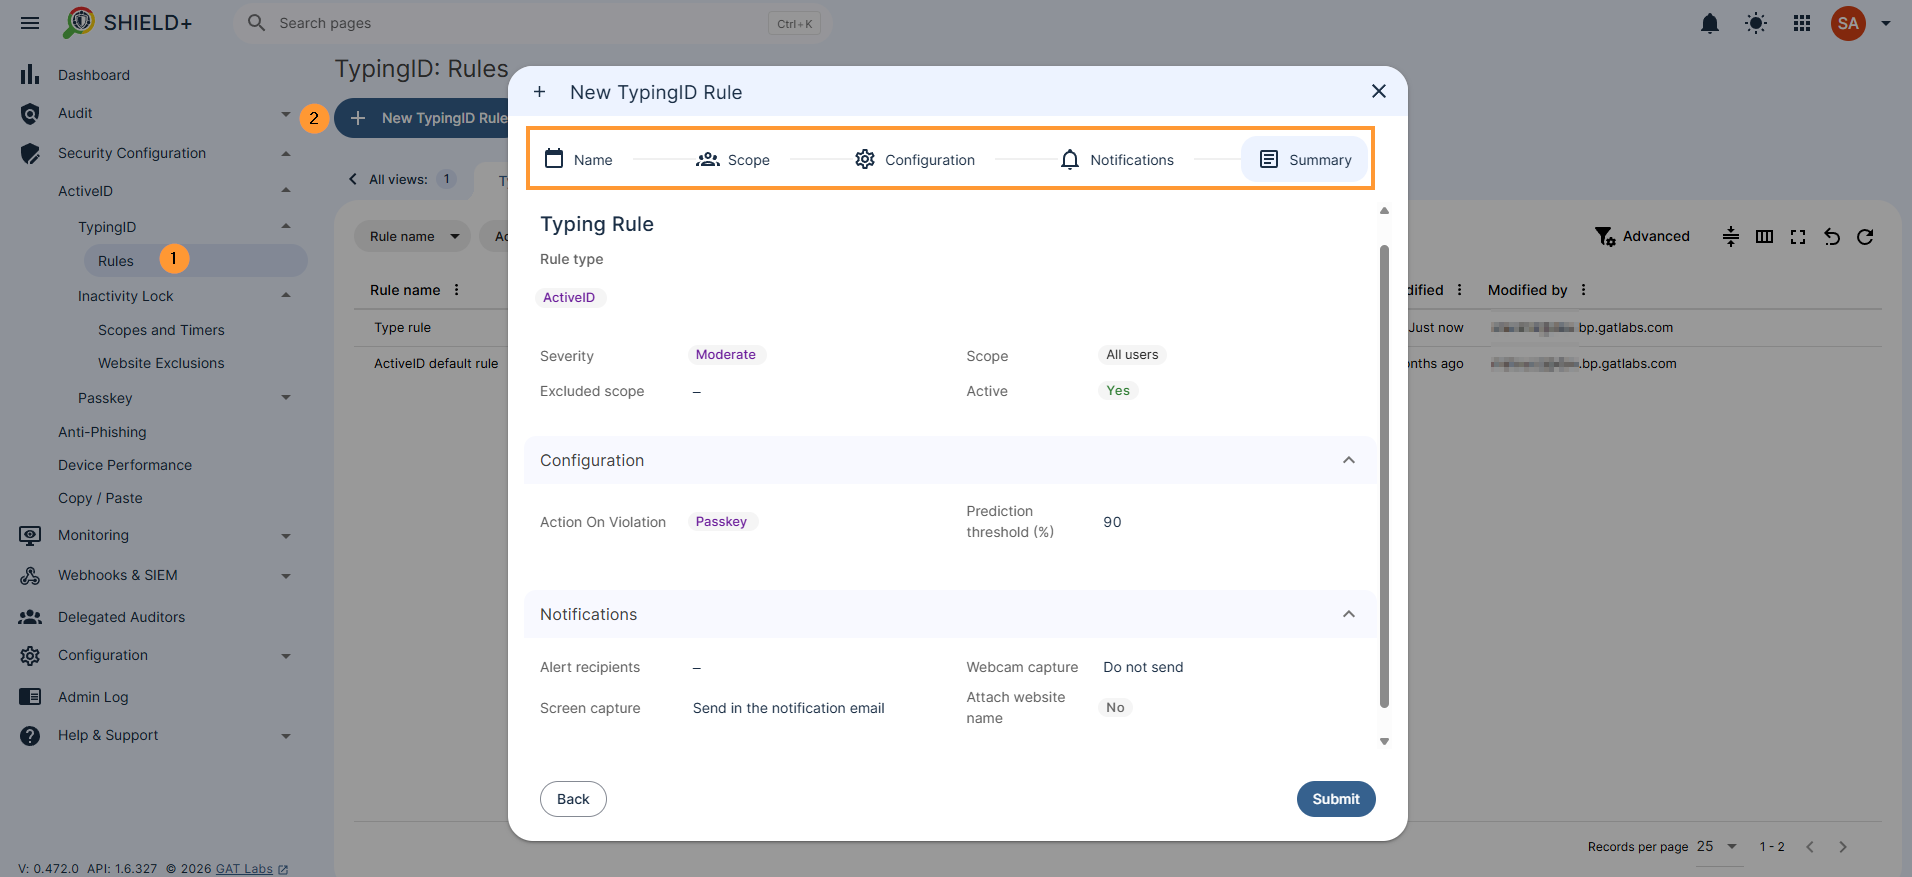
Create a typingID rule
Navigate to Shield+ > Security configuration> ActiveID > TypingID > Rules > + New typingID rule
- Name – enter the name for the rule
- Default severity – select severity for the rule
- Unspecified
- Low
- Moderate
- High
- Critical
- Default severity – select severity for the rule
- Scope – pick and select the scope for the alert
- Pick user, group, or org. unit of users
- Excluded scope – Specify users, groups, or OUs that should be excluded from the scope of the defined rule.
- Add: excluded scope
- Excluded scope – Specify users, groups, or OUs that should be excluded from the scope of the defined rule.
- Pick user, group, or org. unit of users
- Configuration – Confidence level at which ActiveID will send an alert.
- Enter the prediction threshold (%) – add percentile
- Action on violation – Select one of the user logout actions to be executed when a role is violated:
- None – No user session action will be taken.
- Passkey -Locks the screen. Success resumes access; cancel or failure keeps the screen locked.
- Clear cookies -Clears browser cookies.
- Notifications – fill in the details
- Alert recipients – enter alert recipients
- Webhooks & SIEM – select option
- Elastic Search
- Generic receiver
- Splunk
- Webcam capture – select option
- Do not send
- Send in the notification email
- Send in the notification email and save to the rule creator’s Drive
- Send in the notification email, save to the rule creator’s Drive, and share with other alert recipients
- Screen capture – select option
- Do not send
- Send in the notification email
- Send in the notification email and save to the rule creator’s Drive
- Send in the notification email, save to the rule creator’s Drive, and share with other alert recipients
- Attach website name – enable or disable the option
- Summary – view all the options that are selected
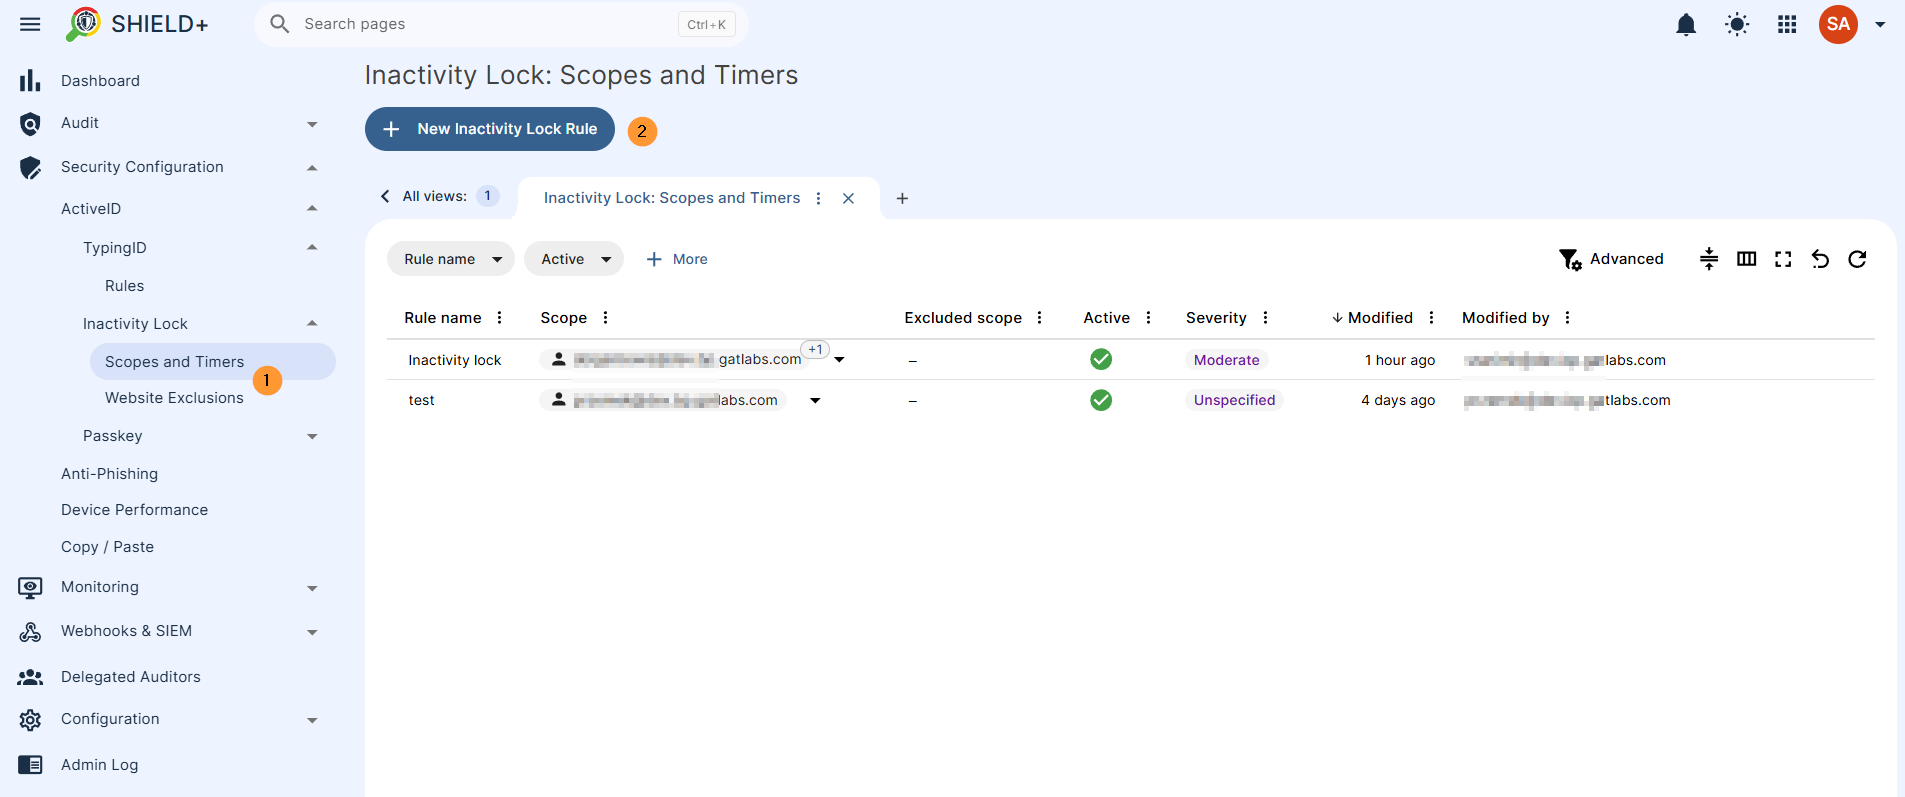
Inactivity Lock
Scopes and Timers
Configure policies that define how long a user must be inactive before an inactivity lock is applied. Each policy specifies the inactivity period in minutes and the scope of users it covers. Can be configured to trigger either a screen lock or a Passkey verification challenge.
Navigate to Shield+ > Security configuration > ActiveID > Inactivity Lock > Scopes and Timers
- Name – enter the name for the rule
- Default severity – select severity for the rule
- Unspecified
- Low
- Moderate
- High
- Critical
- Default severity – select severity for the rule
- Scope – pick and select the scope for the alert
- Pick user, group, or org. unit of users
- Excluded scope – Specify users, groups, or OUs that should be excluded from the scope of the defined rule.
- Add: excluded scope
- Excluded scope – Specify users, groups, or OUs that should be excluded from the scope of the defined rule.
- Pick user, group, or org. unit of users
- Configuration – Triggers an inactivity lock in the browser after a set period of user inactivity, such as 30 minutes away from the device. Unlike fixed schedules, it adapts to real behavior and activates only when the laptop is truly unattended.
- Defines the time period (in minutes) of screen inactivity before the inactivity lock is applied
- Notifications – fill in the details
- Alert recipients – enter alert recipients
- Webhooks & SIEM – select option
- Elastic Search
- Generic receiver
- Splunk
- Webcam capture – select option
- Do not send
- Send in the notification email
- Send in the notification email and save to the rule creator’s Drive
- Send in the notification email, save to the rule creator’s Drive, and share with other alert recipients
- Screen capture – select option
- Do not send
- Send in the notification email
- Send in the notification email and save to the rule creator’s Drive
- Send in the notification email, save to the rule creator’s Drive, and share with other alert recipients
- Attach website name – enable or disable the option
- Summary – view all the options that are selected
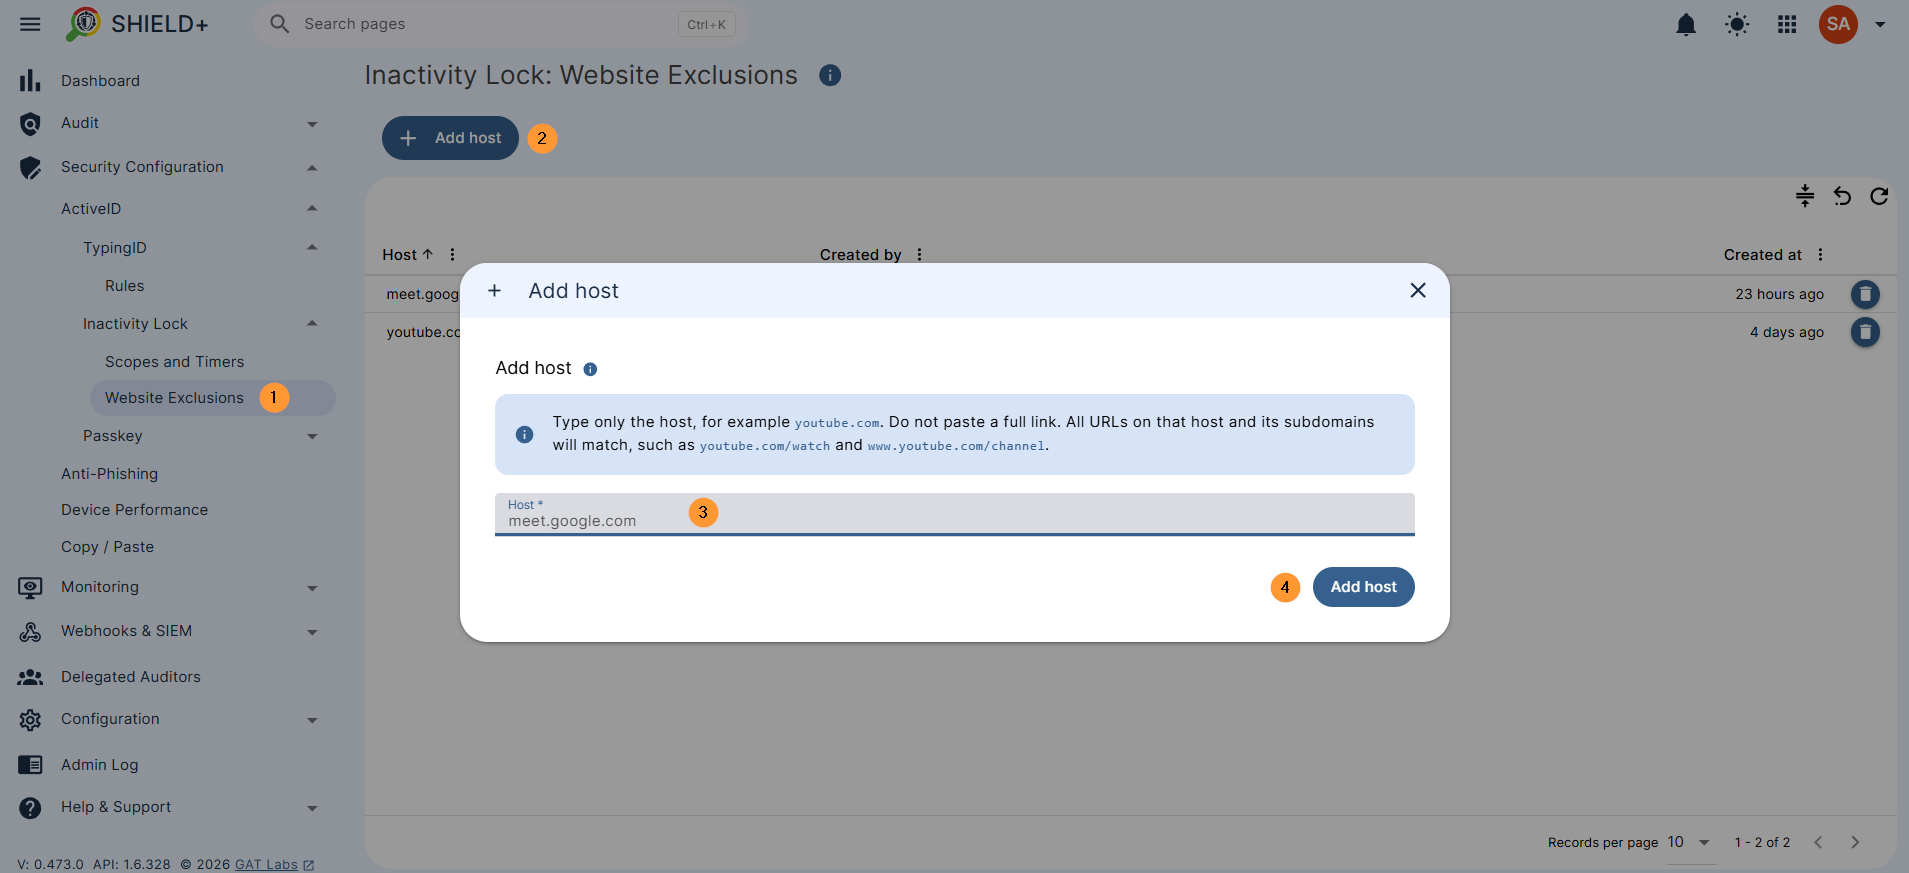
Website Exclusions
A list of website hosts excluded from the inactivity lock – intended for sites like video meetings (e.g. meet.google.com) where users are present but not actively typing.
When a user on an excluded site reaches their inactivity period, Shield+ prompts them to confirm they’re still there instead of locking immediately. If confirmed, the lock is deferred for up to 30 minutes.
Navigate to Shield+ > Security configuration > ActiveID > Inactivity Lock > Website exclusions
Passkey
Passkey adds an extra identity check inside the Shield+ browser extension. It is used when the organization wants to make sure the person using the browser is still the correct user.
For the user, it works like this:
- The user is asked to set up a passkey.
- They can create it on this device, with a phone, or with a hardware security key.
- When Shield+ needs confirmation, the browser opens a security check screen.
- The user verifies with their passkey, device PIN, fingerprint, face unlock, phone, or security key.
- After successful verification, Shield+ returns the user to the page they were using.
Shield+ does not store the user’s password or biometric data. The device keeps the private part of the passkey. GAT/Shield+ stores the registered credential information needed to check that future passkey responses are valid.
When Passkey Is Used
Passkey can be required in two main situations:
- Inactivity Lock
If the user has been inactive for a configured number of minutes, Shield+ locks browsing and asks for passkey verification before the user can continue.
- ActiveID Check
If ActiveID detects unusual typing behavior, an administrator can configure the response to require passkey verification. This helps reduce false positives: instead of immediately treating the activity as unauthorized, the user can prove they are really present.
There is also an administrator-forced security check path in the extension, but the main user-facing configuration is Inactivity Lock and ActiveID Passkey action.
Administrator Configuration
Admins configure this in Shield Plus (+)
Use Inactivity Lock Rules to decide when inactivity should trigger a passkey check. The important setting is the inactivity period in minutes. The rule also has the usual rule setup around name, scope, and notifications.
Use ActiveID rules to choose what happens when ActiveID detects suspicious typing. The available actions include:
- None: no browser action
- Passkey: lock the browser until passkey verification succeeds
- Clear cookies: clear browser cookies/site data
Inactivity Lock: Website Exclusions for sites where the inactivity lock should be less disruptive. Admins add hostnames such as example.com;
URLs, paths, ports, and wildcards are not accepted. The current UI limits this list to 100 hosts.
Passkey: Credentials Management:
To see which users have registered passkeys. The table shows the user’s email, the number of credentials, and the last used time. Admins can revoke all passkeys for a user. After revocation, that user must register a passkey again the next time verification is required.
First-Time User Experience:
If a user is asked to verify but has no passkey yet, Shield+ sends them to the passkey setup page. After setup, they can use the passkey for future security checks. If the user later adds another passkey, Shield+ may ask them to verify first.
What the Admin Controls
From the admin console, you manage the passkeys.
- Visibility: You can see a list of all Passkeys registered by your users, along with exactly when they were last used to unlock a browser.
- Revoking Access: If a user loses a hardware key or if you suspect a security breach, you can instantly revoke an individual passkey or wipe all passkeys for that user.
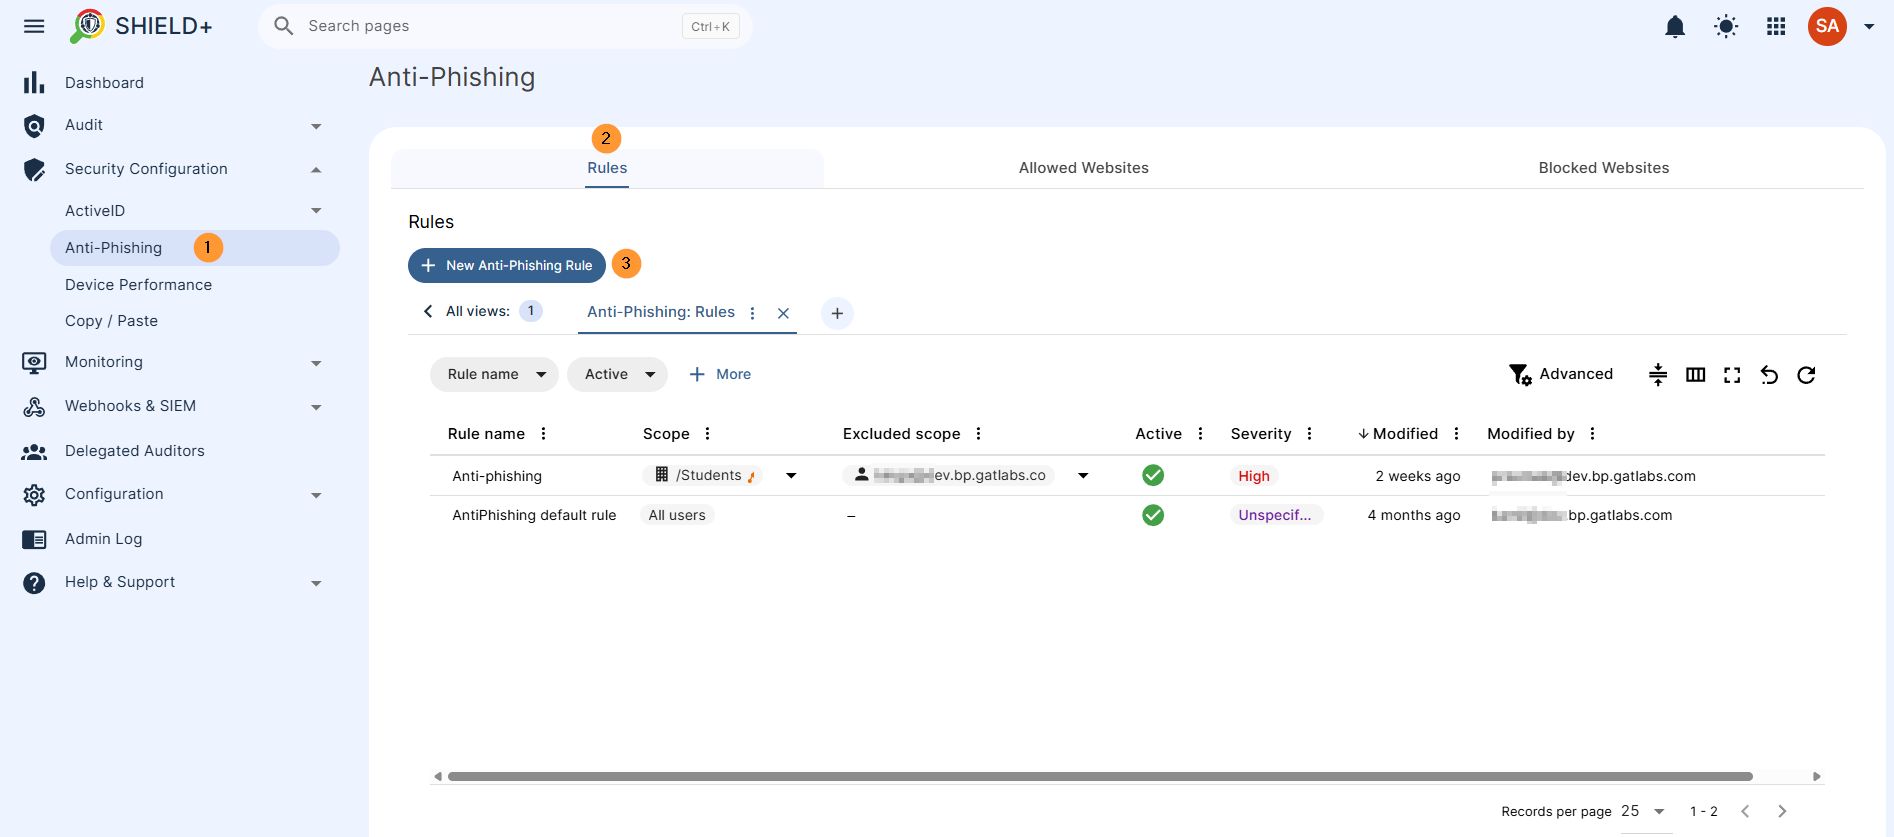
Anti-Phishing
Rules – Define and create new anti-phishing rules.
Alert rules that fire when a phishing event occurs (site blocked, user override, or a managed-list change). Each rule defines the scope, notification recipients, and whether the site-blocking UI (an Alert Banner Message) is shown to the user. If the event severity is Critical, the site is blocked outright with no option to override; lower-severity events show the banner and allow the user to proceed.
Navigate to Shield+ > Security configuration > Anti-Phishing > New anti-phishing rule
- Name – enter the name for the rule
- Default severity – When the Alert Rule is triggered, a notification is created. The severity of the notification is decided by the software and indicates its level of importance. The values are Low, Moderate, High and Critical. “Alert Level Threshold” is the “notification threshold”. If you set the default severity to “Low,” it means that “all alerts with severity level Low and higher will be sent”.
- Unspecified
- Low
- Moderate
- High
- Critical
- Default severity – When the Alert Rule is triggered, a notification is created. The severity of the notification is decided by the software and indicates its level of importance. The values are Low, Moderate, High and Critical. “Alert Level Threshold” is the “notification threshold”. If you set the default severity to “Low,” it means that “all alerts with severity level Low and higher will be sent”.
- Scope – pick and select the scope for the alert
- Pick user, group, or org. unit of users
- Excluded scope – Specify users, groups, or OUs that should be excluded from the scope of the defined rule.
- Add: excluded scope
- Excluded scope – Specify users, groups, or OUs that should be excluded from the scope of the defined rule.
- Pick user, group, or org. unit of users
- Configuration – Admin will be alerted by default; in addition, Shield+ can block the site inside the user’s browser if the setting below is enabled.
- Alert banner message – When Alert Banner Message is enabled, the user will see a banner displayed at the top of the opened site, explaining why the site was considered suspicious and providing a button to proceed with the visit. If the severity of the event is Critical, then the site is blocked without the possibility of overriding. If severity is less (Low, Medium, High), the user can override.
- Notifications – fill in the details
- Alert recipients – enter alert recipients
- Webhooks & SIEM – select option
- Elastic Search
- Generic receiver
- Splunk
- Webcam capture – select option
- Do not send
- Send in the notification email
- Send in the notification email and save to the rule creator’s Drive
- Send in the notification email, save to the rule creator’s Drive, and share with other alert recipients
- Screen capture – select option
- Do not send
- Send in the notification email
- Send in the notification email and save to the rule creator’s Drive
- Send in the notification email, save to the rule creator’s Drive, and share with other alert recipients
- Attach website name – enable or disable the option
- Summary – view all the options that are selected
Allowed Websites / Blocked Websites
Domains and URLs are manually added to the denylist/allowlist by admins. Shield+ also maintains an internal threat database updated daily from external sources; manually added entries supplement that list. Both entire domains and specific page paths can be blocked/allowed.
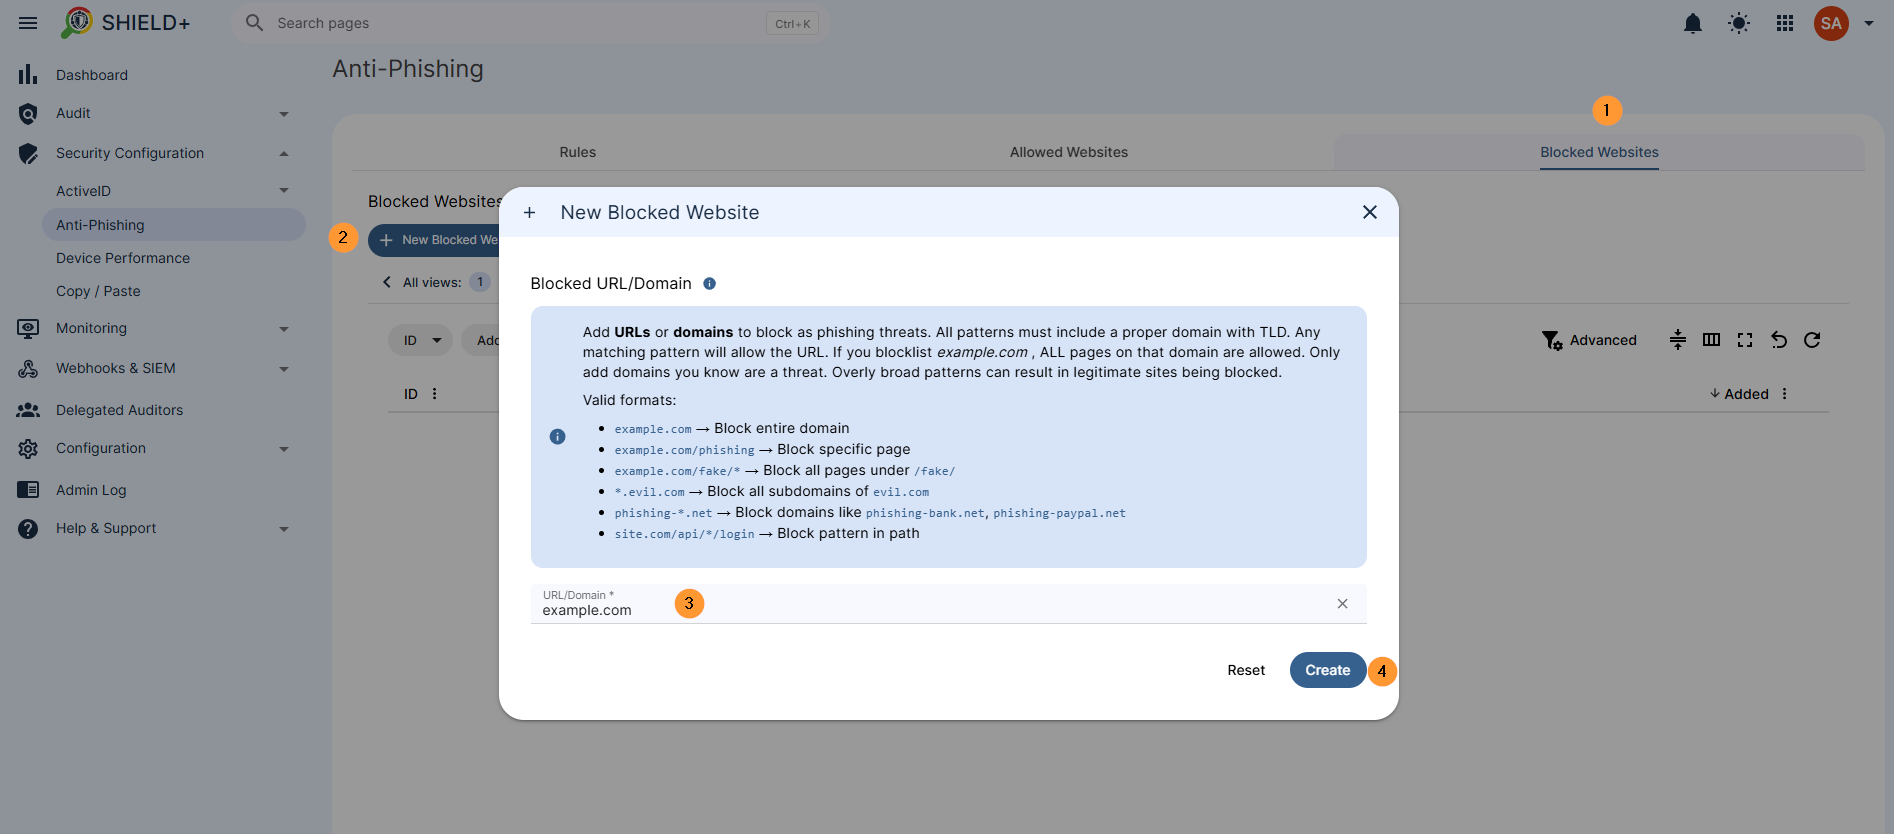
Allowed websites
Add domains to allow through phishing protection. Use wildcards (*) to match multiple domains. Allowlisted domains bypass ALL phishing checks. Only add domains you absolutely trust. Overly broad patterns can compromise security.
example.com→ Exact domain (also matcheswww.example.com)*.example.com→ All subdomains (mail.,app.,login., etc.)trusted-*.com→ Domains starting withtrusted-in.comTLDcompany-*.net→ Domains starting withcompany-in.netTLD*.google.*→ All Google domains across all TLDs
Enter the allowed domain.
Blocked websites
Add URLs or domains to block as phishing threats. All patterns must include a proper domain with a TLD. Any matching pattern will allow the URL. If you blocklist example.com, ALL pages on that domain are allowed. Only add domains you know are a threat. Overly broad patterns can result in legitimate sites being blocked.
example.com→ Block the entire domainexample.com/phishing→ Block specific pageexample.com/fake/*→ Block all pages under/fake/*.evil.com→ Block all subdomains ofevil.comphishing-*.net→ Block domains likephishing-bank.net,phishing-paypal.netsite.com/api/*/login→ Block pattern in path
Device Performance – Performance Rules
Set up a performance rule for the device resource monitoring. Each rule can specify a performance source; it can be CPU or Memory, the metric (Maximum or Average readings), the timeframe the condition must hold (15, 30, or 60 minutes), the threshold percentage, and notification recipients.
Navigate to Shield+ > Security configuration > Device performance > New perormance rule
Fill in the required details such as Source, Metric, and Time condition
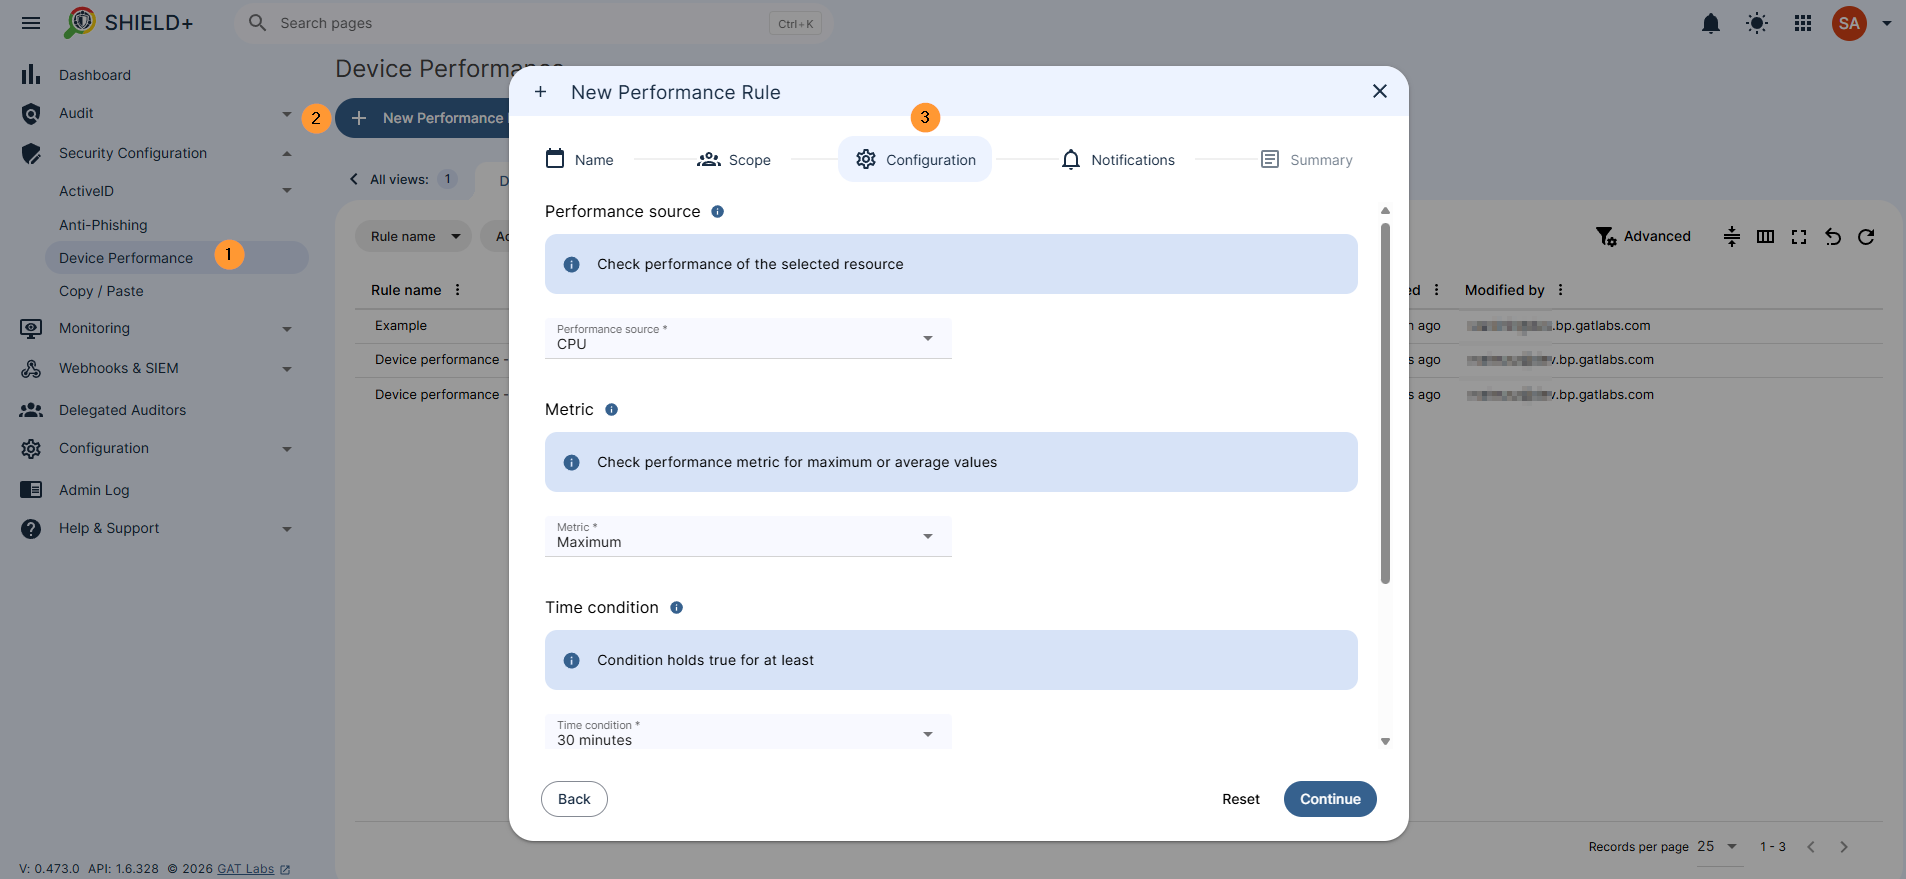
Copy / Paste
Configure copy and paste restrictions across the domain.
Two modes: Allow All (copy/paste permitted everywhere by default – specific URLs can be added to block) or Block All (copy/paste denied everywhere by default – specific URLs can be added to allow).
URL entries support wildcards ending with `/*` to cover child paths.
Navigate to Shield+ > Security configuration > Copy / Paste > New copy/paste rule
- Allow all – by default, all URLs are allowed by default
- Add websites so the block of copy/paste is enabled only on those websites.
- Block all – you can block all and allow copy/paste on some sites
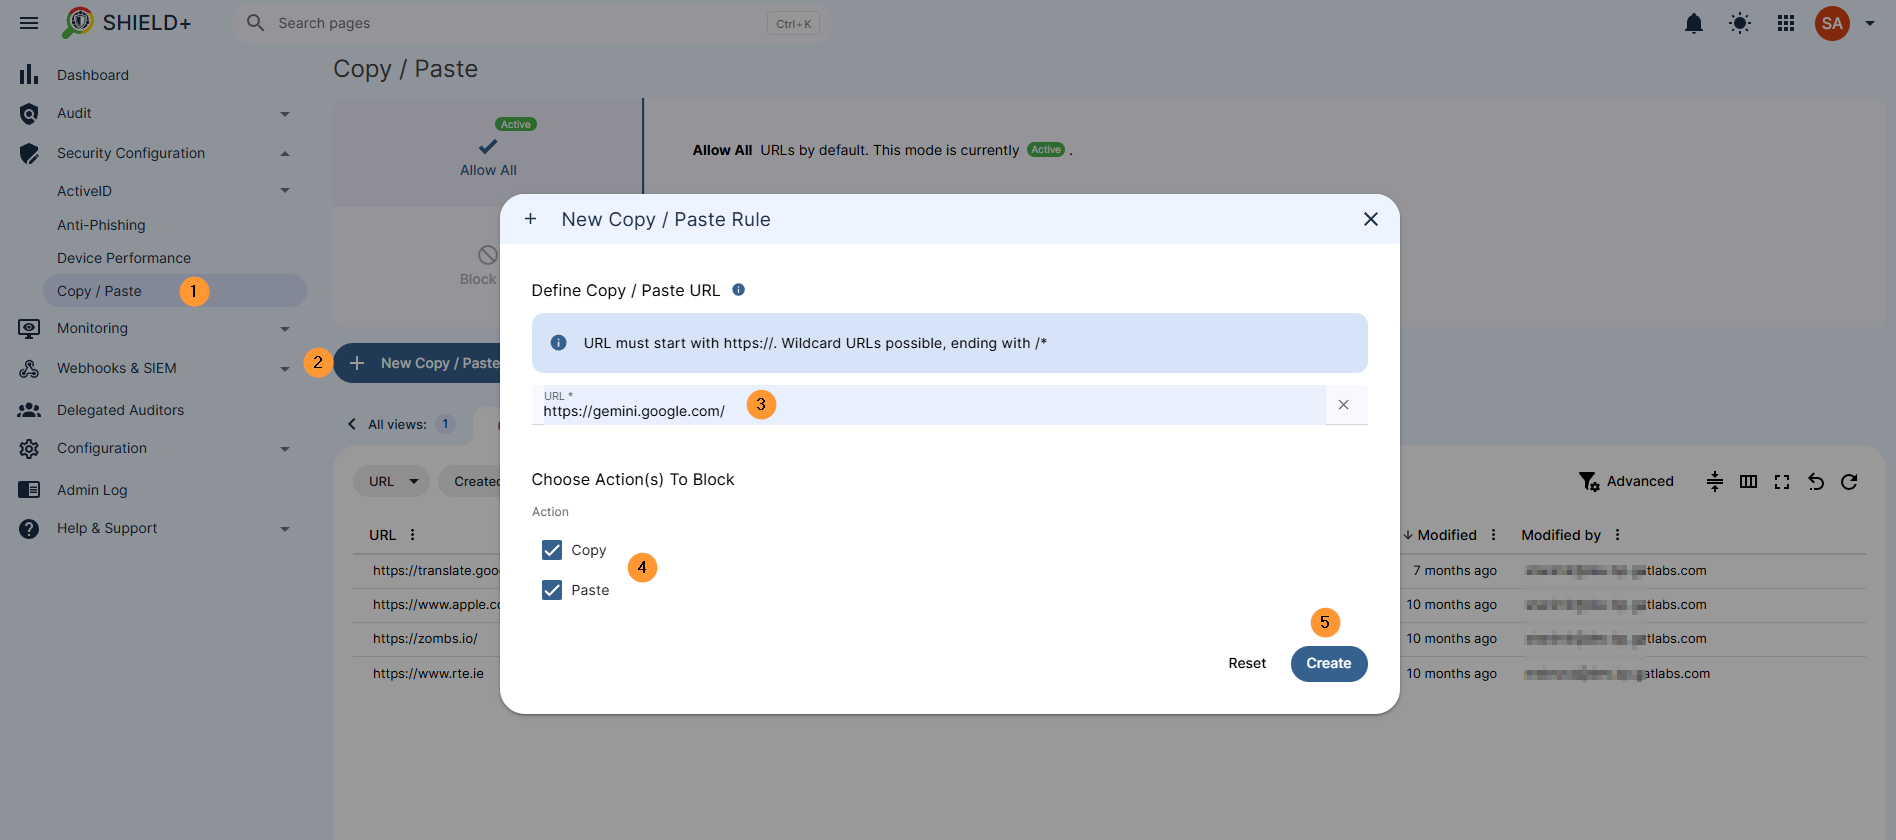
Monitoring
Real-time visibility into users’ Chrome browser activity. The monitored user’s browser always displays a visible indicator that monitoring is active.
(Note, the user browser will indicate that it is being actively monitored.)
Browser Monitoring
The Admin can view one or more users’ live browser screens in real time. After selecting a monitoring target (user, group, or OU), the admin sees thumbnails of all open tabs and windows. Available tab actions: switch the user to a specific tab, open a new tab for the user at a given URL, close a tab on the user’s behalf, or open a copy of the tab in the admin’s own browser.
Navigate to Shield+ > Monitoring > Browser monitoring > Scope – select the scope of users to monitor
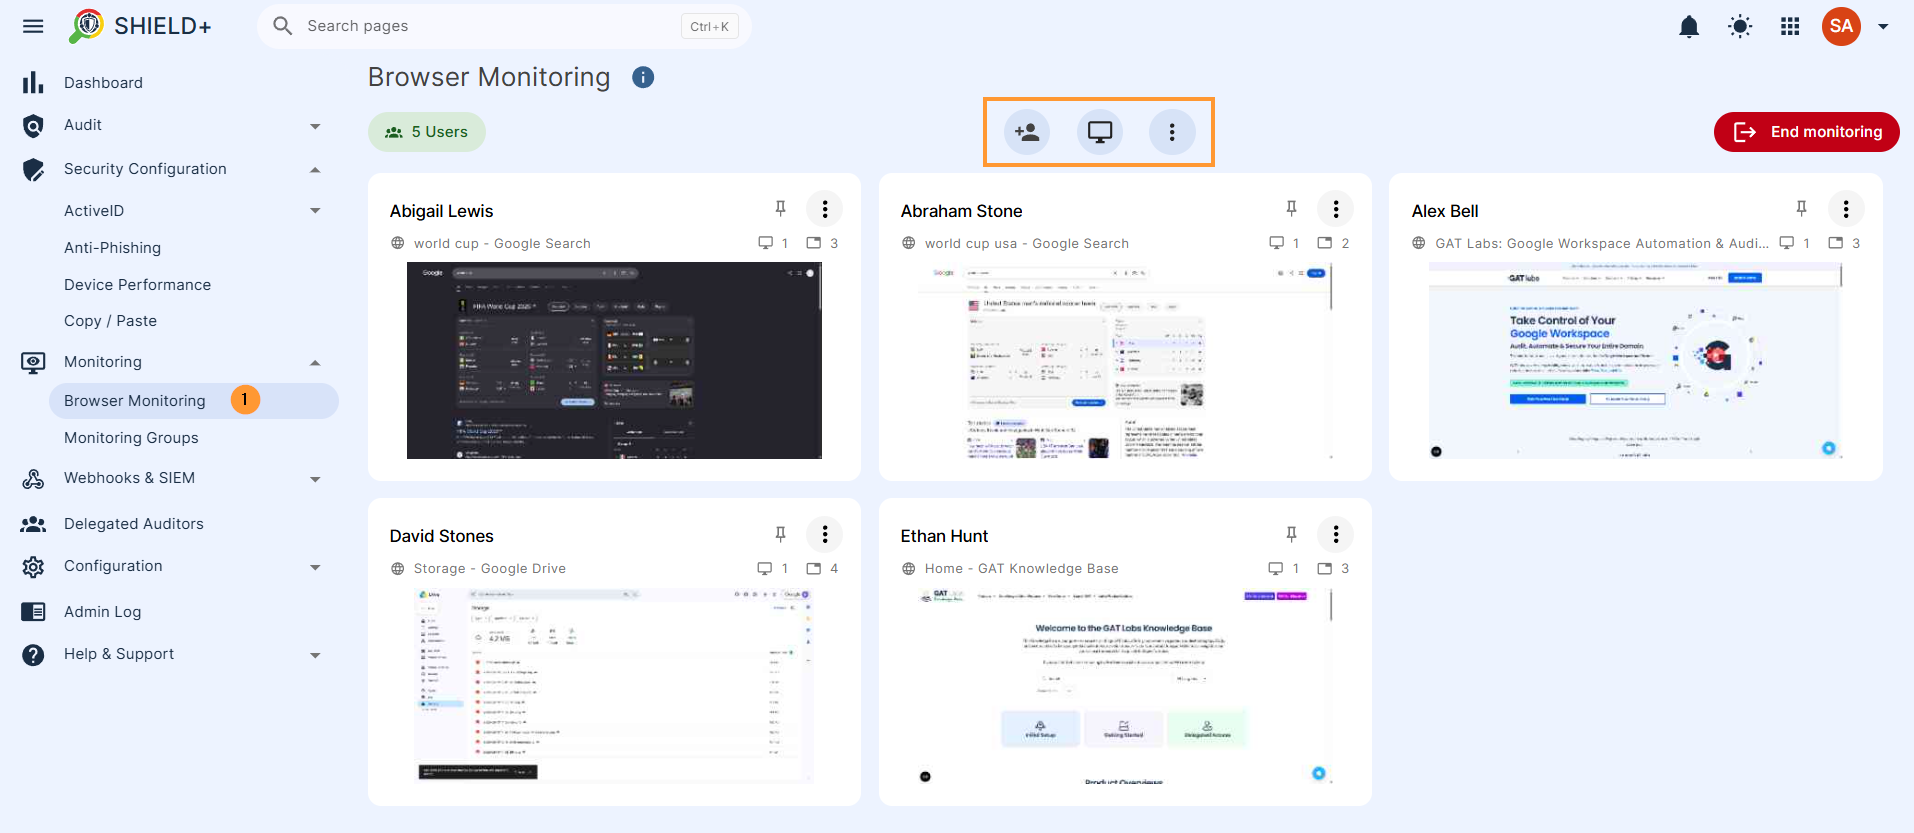
Monitoring Groups
Pre-configured groups that delegate browser monitoring authority to supervisors or managers without requiring admin involvement each time.
Each group defines Targets (users whose browsers can be monitored) and Auditors (people permitted to start monitoring sessions). Once a group is set up, any assigned auditor can initiate monitoring directly from the group’s page.
Navigate to Shield+ > Monitoring > Monitoring groups > New monitoring group

Webhooks & SIEM
Forwards Shield+ security events to external systems such as SIEM platforms, log aggregators, or custom webhook endpoints.
- Sinks – Configure the outbound destinations where Shield+ delivers event payloads. A Sink is a named endpoint (webhook URL or SIEM receiver) that accepts incoming events.
- Triggers -Rules that map specific Shield+ event types (e.g., TypingID alert, anti-phishing block, inactivity lock) to specific Sinks. Controls which events get forwarded where.
- Logs – A delivery log of all outbound SIEM and webhook events: what was sent, the destination Sink, and the timestamp.
Navigate to Shield+ > Webhooks & SIEMs > New Sink > New Sink
Fill in the details. Choose the receiving Sink system (e.g., SIEM) and configure credentials. Depending on the type of the receiver system, you need to provide the full URL and either an authorization token or a set of HTTP headers to be included in every request.
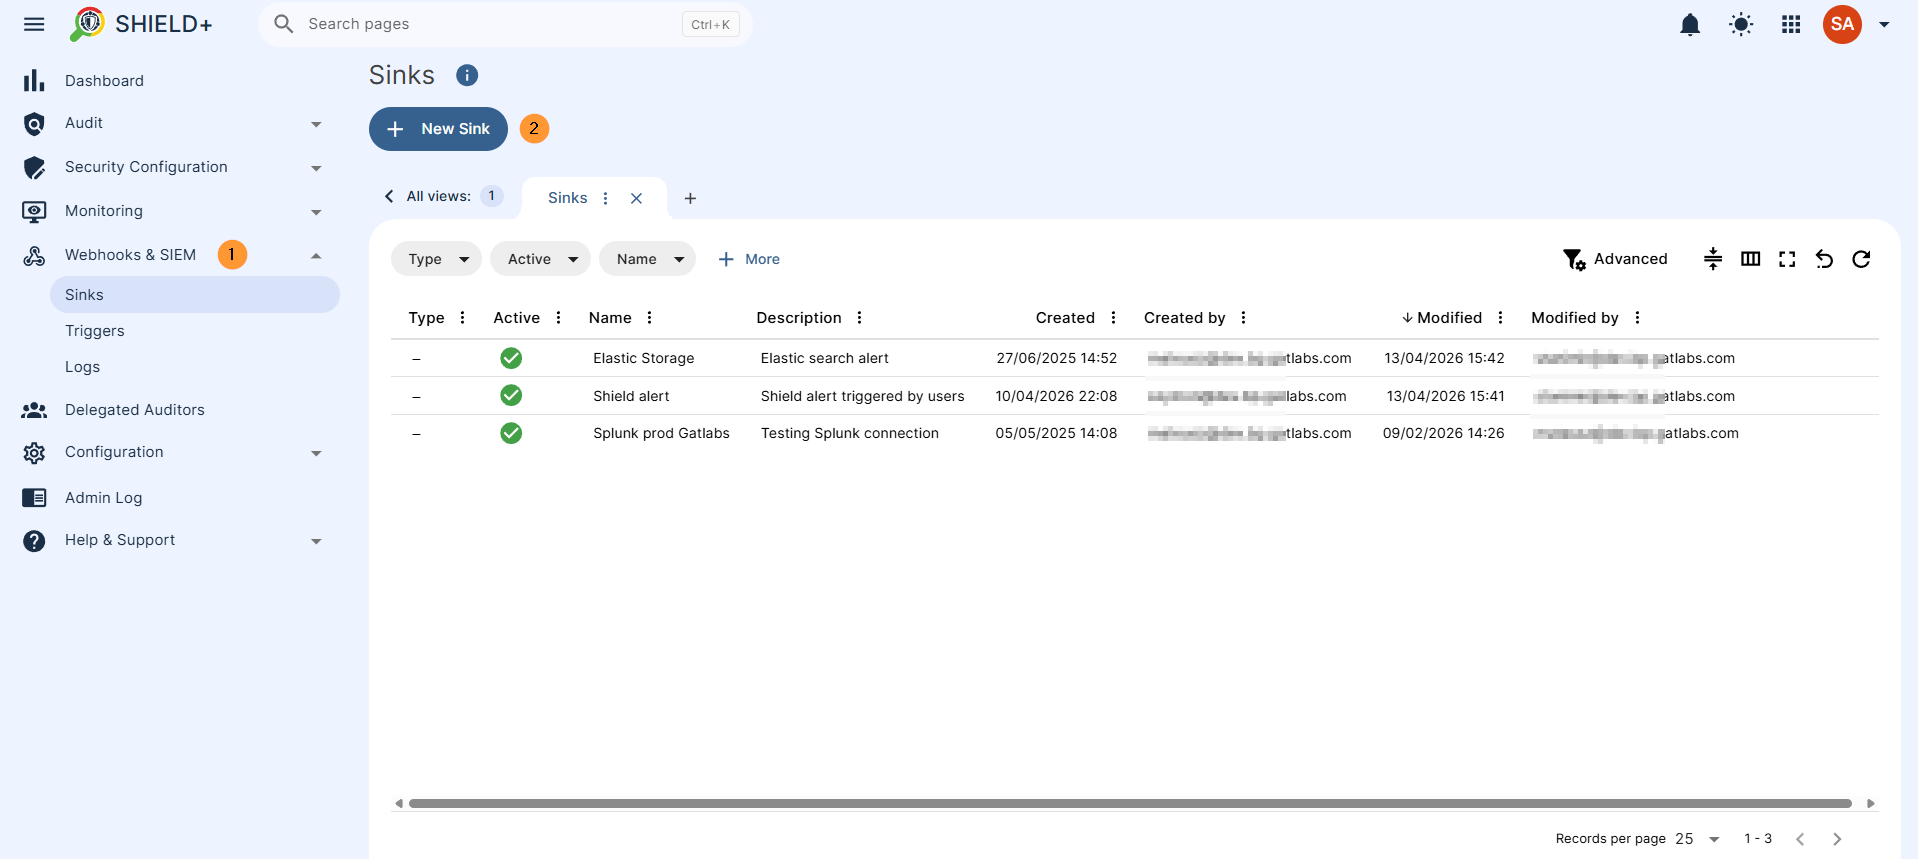
Delegated Auditors
Delegate Shield+ audit access to users who are not domain administrators. Auditors can be granted access to specific feature areas – ActiveID, Anti-Phishing, Device Performance, Copy/Paste, Browser Monitoring, or Webhooks & SIEM – and optionally scoped to a specific set of users, groups, or organizational units, so each auditor sees only the data relevant to their team.
Navigate to Shield+ > Delegated auditor
Fill in the details, select the scope type, who will be the auditor, and the scope – what users will be monitored
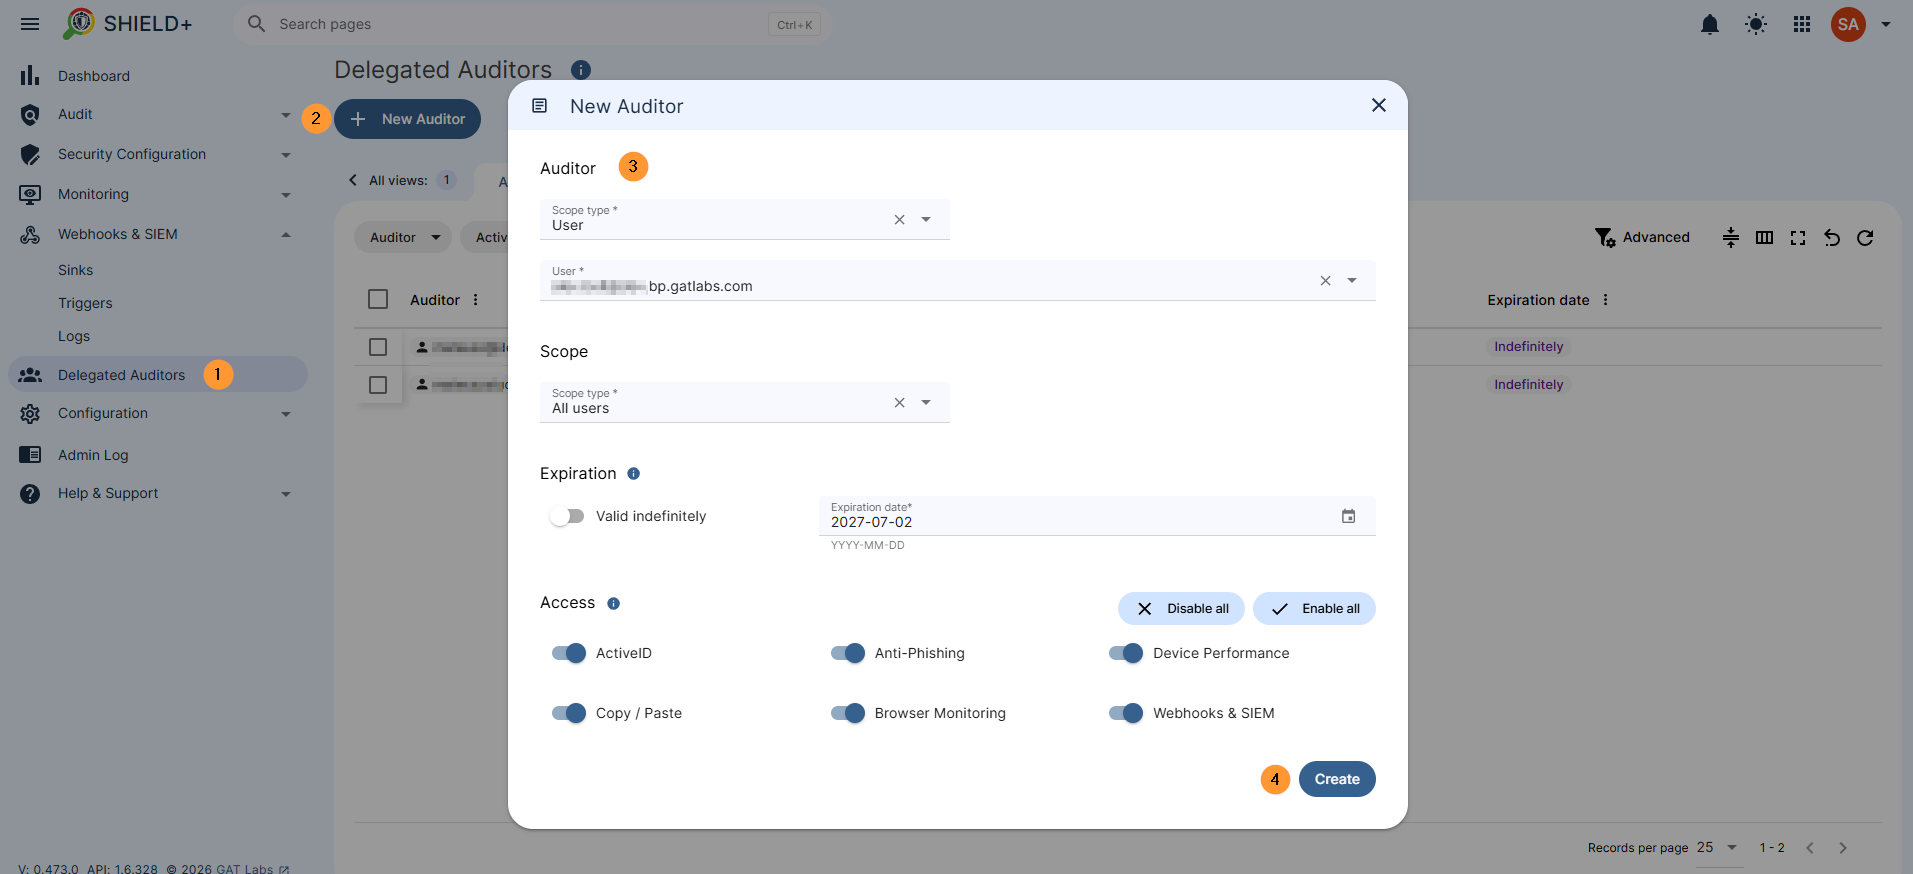
Configuration
Admin-only settings for the Shield+ deployment.
Manage the deployment of the Shield+ browser extension across the domain. The extension is installed on user machines and is the component that collects typing patterns, enforces copy/paste policies, enables browser monitoring, and displays anti-phishing blocking pages.
Admin Log
A complete audit trail of all administrative actions taken within Shield+: logins, creation, update, and deletion of alert rules and policies, browser monitoring session starts and stops, configuration changes, and data exports.
Each entry records the responsible administrator, the timestamp, and the full details of every change, including before-and-after comparisons where applicable.
Conclusion: Why Shield+ is Essential for Your Enterprise
Managing security across a distributed enterprise domain requires visibility that goes beyond static firewalls and standard login prompts. Shield+ delivers this exact layer of deep, behavioral protection right at the edge – inside the browser where your users spend their workday.
Key Benefits for Enterprise Admins
- Zero-Trust Identity Protection: By utilizing Machine Learning to flag anomalous typing patterns and enforcing Passkey or session-termination challenges, Shield+ stops active session hijacking and insider threats in their tracks.
- Granular Data & Compliance Control: From blocking malicious URLs out-of-the-box to restricting copy/paste data leaks on sensitive websites, you have complete control over data movement.
- Operational Efficiency: The platform shifts your team from reactive auditing to proactive management. With real-time browser monitoring, automated alerts, delegated access for team managers, and seamless SIEM/Webhook integration (Splunk, Elastic Search, etc.), security incidents are localized, logged, and mitigated instantly.
By deploying Shield+, you aren’t just monitoring your enterprise domain; you are actively hardening it against the modern threat landscape while maintaining full visibility and administrative control.
Related Posts
See Details
Shield+ is an audit, reporting, and security Chrome extension for your Google Workspace environment.
Before you begin, make sure you’ve completed the prerequisite below.
Shield Requirement
GAT Shield is a prerequisite extension that must be installed alongside GAT Shield+
Shield Plus is a Chrome extension that the Super Admin of the domain must install via the Google Admin console.
Below, we will cover how to deploy the Shield+ extension to your Google Workspace users.
Important: Shield Plus can be installed only for specific Organization Units.
Step 1. Open Chrome Apps and Extensions
First, navigate to the Google Admin console.
In the Admin console, from the menu on the left, click on Devices > Chrome > Apps and extensions.
From the top menu, select Users and browsers.
A new page will be displayed with all the Chrome extensions deployed to the domain.
Step 2. Add the GAT Shield+ Extension
To install the GAT Shield extension, choose the root Org Unit (1) or a sub-OU where you want to deploy Shield Plus (2).
On the bottom right side, click on the Yellow (+) button.
From the options shown, select Add the Chrome app or extension by ID (3).
Step 3. Enter the Extension Details
Then, you will see a pop-up window. Select the From a custom URL option (1).
You can find the ID, URL, Webcam URL, and Policy for an extension in Shield under Help – Extensions deployment.
Click Save.
Step 4. Configure the Installation Policy
Click on the newly installed extension. You will see a pop-up window on the side.
In the Installation policy, click and select Force install.
Scroll to the bottom of the page in the same window to find the Policy for extensions.
Access security key
To access and view the Security Key, navigate to GAT Shield Plus > Configuration > Extension deployment.
Under the Permissions and URL access field, click Allow all permissions (2).
After making all the changes, click the Save button on the top right.
Step 5. Copy the Extension ID and Policy
To access and view the Extension ID and URL, navigate to GAT Shield+ > Configuration > Extension deployment.
Copy the ID, URL, Webcam URL, and Policy for an extension from here and use them in the Google Admin Console
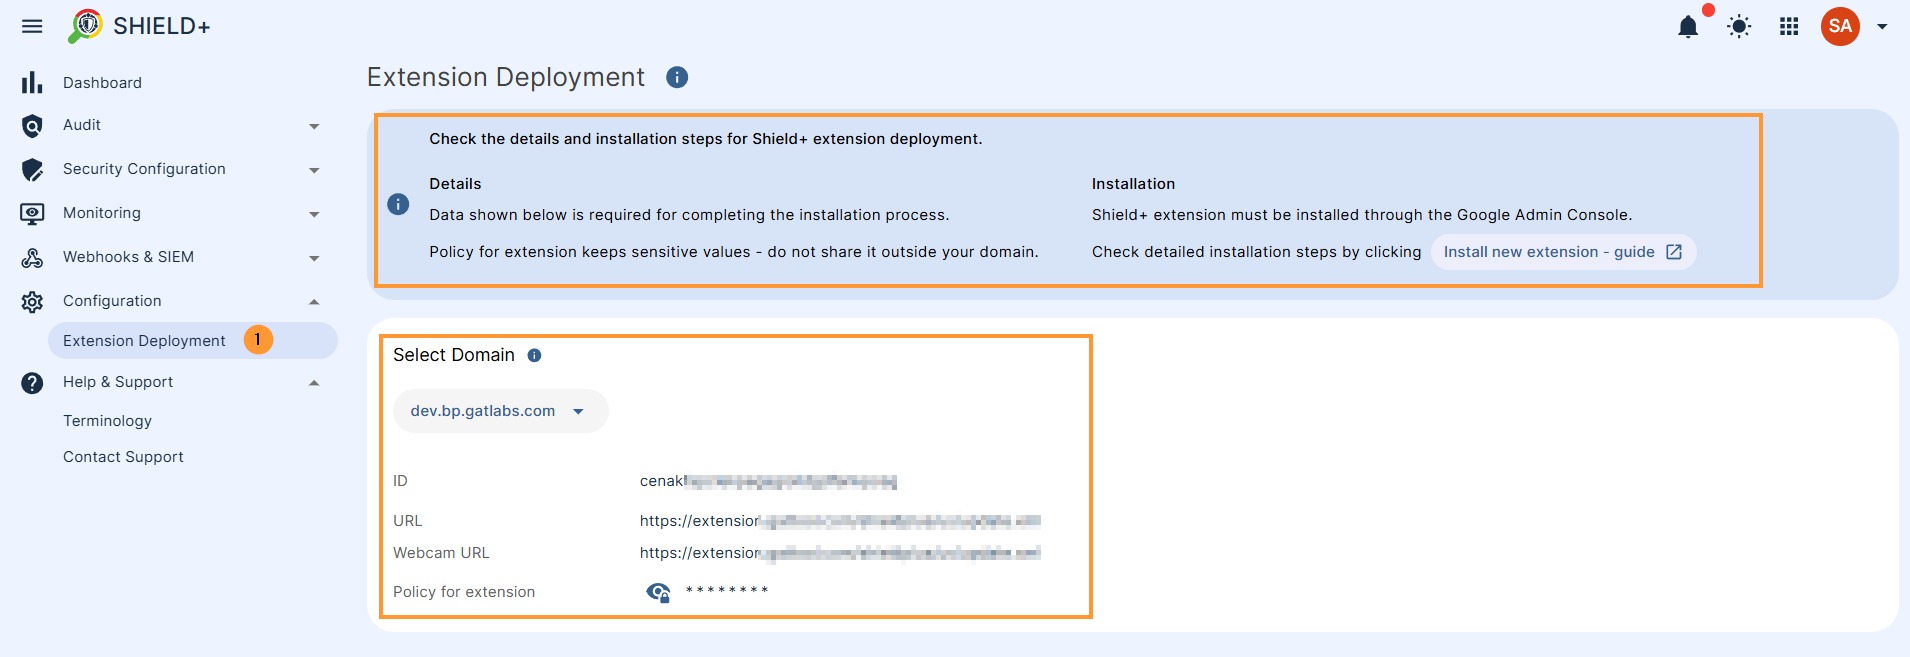
Result
When the Shield+ extension is deployed, the end users must be logged into the Google Chrome browser with their domain accounts.
The extension will appear under their Google extensions.
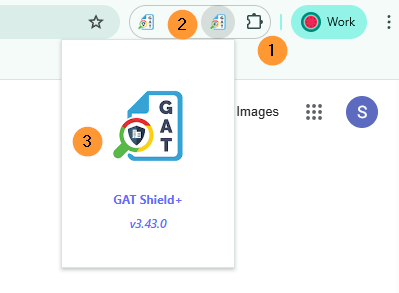
The browsing activity will then be reported to the GAT Shield console for the Admins to manage.