

GAT Flow is the user management tool for Google Workspace Admins to create workflows to take a single or bulk action to Onboard (create), Offboard (delete), or Modify (update) user accounts.
Flow can also handle conditional use cases.
This article will demonstrate how a more complex conditional case can be handled.
Objective #
Consider the following example
A new Employee has been hired by your company. He is being put into the position of Manager of the Accounts department. The new manager has been onboarded already, though the employees need to be introduced to the new hire. Before leaving, the old accounts manager started a project but didn’t pass the project to the rest of his team. The Accounting team needs access to this folder. The old accounts manager has been suspended.
You as the admin have been tasked with the following:
- Introduce everyone in the company to the new hire
- Allow everyone to see the new hire’s calendar as a ‘free/busy reader’, except the CEO.
- Ask the company CEO to introduce the new hire to the accounts department and let him know you removed the old manager.
And for the people in the accounts department:
- Set the new hire as Manager for everyone in the accounts department
- Allow ‘write’ access to the new manager’s calendar for the accounts department
- Transfer a project folder from the old accounts manager to the rest of the accounts department
- Remove access to all folders from the old accounts manager and wipe his old devices
We will use GAT Flow to do all of this in one fell swoop!
Set up a Conditional Workflow #
Firstly, launch GAT Flow, select ‘Create workflow’ and switch on the slider for Conditional Flow.

Everyone in the company is going to be affected by this workflow, as we need to introduce them to the new hire, so we will filter by OU, select the root OU (/) and click ‘Recursive’ to include all child OU’s below that and users within them.

The next screen will display all the users on your domain, you can deselect some if you want, though, for this case, we are using them all.
When you are finished selecting the users, click ‘Add’.
Click ‘Next’ to continue to the workflow.
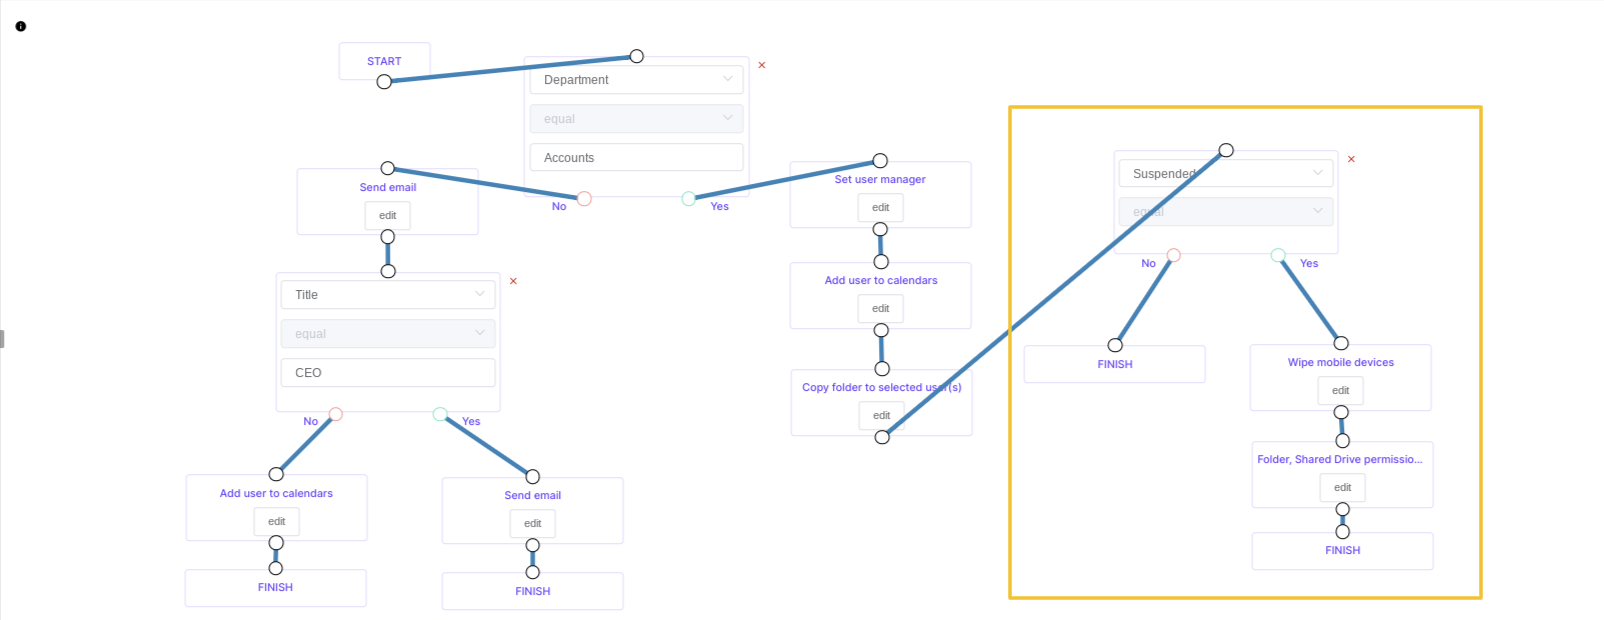
The full workflow we are going to create is outlined below. We will break this down in the next section.

Setting up the workflow #
First off, we have two sets of actions to achieve, one set of actions has to deal with the accounts department, and the other is for everyone else, so we will start with a condition.
Hover over the ‘Start’ button with your mouse, and the ‘Add Condition’ button will appear.

Click the button and another box will appear connected to the start button.
We have a different set of tasks for the Accounts department, so select ‘Department’ from the dropdown menu and type ‘Accounts’ into the field below.
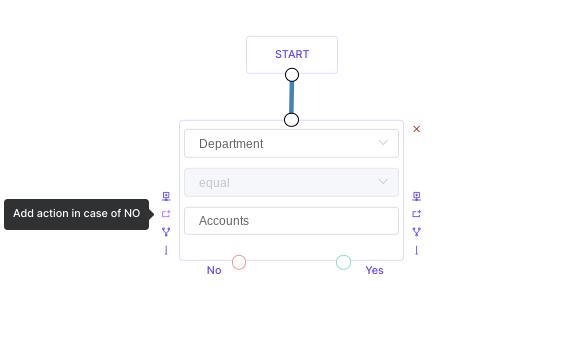
The ‘No’ side #
The first task is to introduce everyone else to the new manager, we will do this by sending an email. Click the ‘Add action in case of NO’ button. (ie. the users that are not in the accounts department)
We want to send the users an email. So choose ‘send an email’ from the list of actions that appears.

Daisy-chaining from the ‘Send email’ box we need to add another condition to differentiate the CEO from everyone else.
Hover over the Send email box and click ‘Add condition’.

This time we are going to select ‘Title’ from the dropdown menu and enter ‘CEO’ in the field below, as is his job title.

Now we can add an action for the CEO only.
We want to send the CEO an email, so click the ‘Add action in case of YES’ button and select ‘send email’ again.

That’s all we need to do on the CEO side, but we need to put an end to the workflow so that it knows to stop there.
On the bottom right corner of the ‘Send email’ box, you will see the ‘End graph here’ button. Click that button to end that part of the workflow.

We still need to add everyone else to the new managers’ calendar.
Go to the previous condition box and ‘Add action in case of NO’.

Select ‘Add user to calendars’ from the list. Choose ‘free/busy reader’.
We have finished with this part of the workflow now too, so click the ‘End graph here’ button again, this time on the ‘Add user to calendars’ box.

What we have now is as follows:
If a user is not in the accounts department, one set of actions will be triggered for those users. (The ‘No’ side)
This set of actions is outlined in the screenshot below.

The ‘Yes’ side #
Moving onto the second part of the workflow.
For the people in the accounts department:
- Set the new hire as Manager for everyone in the accounts department
- Allow ‘write’ access to the new managers’ calendar for the accounts department
- Transfer a project folder from the old accounts manager to the rest of the accounts department
- Remove access to all folders from the old accounts manager and wipe his old devices
We will work on the first three tasks first, they are outlined in the yellow box below.

To start the second set of actions for the accounts department.
Click the ‘Add action in case of ‘YES’ button closest to the ‘yes’ side of the first conditional box (Department equal Accounts).
Click ‘Set user manager’.
Click the ‘edit’ button, for this example, we will choose adam@gedudemobsn.com and click outside the dialogue box to ‘save’ and go back to the workflow.

From the Set user manager box, click the ‘Add action’ button, and select ‘Add user to calendars’.
Again, we will type adam@gedudemobsn.com in the ‘Add to’ box for this example and select ‘writer’ from the dropdown menu.
The rest of the Accounts department still needs access to the Project folder from the objective
Following on from the ‘Add user to calendars’ box, click ‘Add action’.
Select ‘Copy folder to selected users’.
In this example, we are copying the folder from the old manager (paul@gedudemobsn.com).

Clicking outside the dialogue box will save the settings and bring us back to the workflow.
The Last Part #
We have one final step to achieve.
Remove access to all folders from the old accounts manager and wipe his old devices.
As the old manager is the only suspended user in the Accounts department, we will continue with this same workflow.
Click the ‘Add condition’ button, this time on the Copy folder to selected users box.
We will add a condition for Suspended users. Click the dropdown menu and choose ‘Suspended’
The final part of the workflow is outlined in the yellow box below.
We have no other actions to take on the rest of the accounts department, so on the ‘No’ side of the condition click the ‘End graph here’ button. The active users in the accounts department will not be affected.
On the Yes side of the condition select ‘Add action’ and ‘Wipe mobile devices’. For this assignment, we will choose ‘Remote wipe’ and click outside the dialogue box to save the settings.
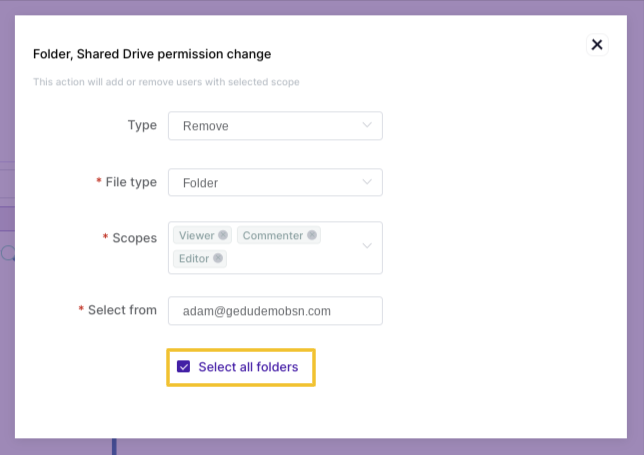
- Next, click ‘Add action’ and choose ‘Folder, Shared Drive permission change’.
- For the ‘Type’ field select ‘remove’ from the dropdown menu.
- Select ‘Folder’ from the file type dropdown menu.
We are removing all permissions, so click each scope from the dropdown menu (Viewer, Commenter, Editor).
Enter the old manager’s email address (paul@gedudemobsn.com).
You can then select the individual folders you’d like to remove permissions from. Though for this example we will be removing them all with the ‘select all’ button.
We have come to the very end of the workflow, so click the ‘End graph here’ button from the last action box to finish it off.
Click ‘Send approval request’ and a request will be sent to the security officer for approval via email.
NOTE: The last part of this example works because the old manager is the only suspended user in the accounts department, so it singles him out. If there were other suspended users, these actions would be executed on them also.
Always be careful with more complex workflows and read over what is going to happen.
Ensure that your workflow makes sense and will have the desired results.
There is no ‘Undo’ button and workflows cannot always easily be reversed!


