- What is GAT Unlock?
- Policy
- How to Use GAT Unlock
- File Management – Changing ownership or file access rights
- Access Permissions Granted – How to Silently Copy or View Files
- Pre-approved Access for Admins to All Files for a Range of Users
- Changing Ownership of an Entire Folder Tree
- Delegating Access to an email account
- Delete Spam, Inappropriate, or Accidental Emails
- Pre-approved Access for Super Admins to all Emails
- Non-Super Admin Auditors
What is GAT Unlock? #
GAT Unlock is a Multi-Party Approval system for Google Workspace that controls sensitive admin actions through enforced oversight and accountability.
It operates on the principle that accessing documents, viewing email content, or changing file ownership without the owner’s knowledge can only occur with the active involvement of at least two authorised people within the organisation. One is the requesting Administrator, and the other is a designated Security Officer or Verification Officer, approved and verified by senior management.
GAT Unlock is an additional service that works on top of the GAT product suite. For non-Education domains, it is available as a paid add-on. It is not enabled by default and cannot be self-configured; activation and role assignment must be formally approved.
Policy #
Due to security reasons, we do not enable GAT Unlock during the trial version of the app.
From the introduction, the service will be visible to domains and each domain Admin can apply to have it enabled. To avail of this service please email unlock@generalaudittool.com with your request. The requesting email must contain the following 4 items.
- The contact details of the Google Apps Administrator applying.
- The name of the Security Officer(s), her/his position(s), email and phone number.
- The contact details (email and phone number) for the person from whom the GAT team must seek confirmation before enabling this feature (See the list below for the minimum level of organization officer we expect to have to request approval from. Please send us their full contact details also and inform them they may receive contact from us.) This is required to verify the separate identities of both the Administrators and Security Officers.
- The PO details for the requested service, see the price list below. (Not required for education domains that have purchased GAT.)
There can be many Security Officers, and the service will be available to all Super Admins once enabled.
| Number of users in the domain | Verification Requirements or job position to approve the enablement of the product |
| 1- 49 | Owner, CEO, CFO |
| 50 – 99 | CEO, CFO, Head of HR, CIO |
| 100 – 499 | CEO, CFO, Head of HR, CIO |
| 500 – 999 | CFO, Head of HR, CIO |
| 1,000 – 4,999 | Head of HR, CIO, CSO |
| 5,000 – 9,999 | Head of HR, CIO, CSO |
| 10,000+ | Head of HR, CIO, CSO |
You can add as many Security Officers as needed, all of them will receive the Super Admins’ or delegated auditors’ requests and any of the designated Security Officers will be able to approve or deny them.
The Security Officer list for all domains is maintained by generalaudittool.com staff. Only Security Officers and Approvers can request changes to the list via unlock@generalaudittool.com
When the ‘GAT Unlock’ service is enabled Administrators can generate access or change requests, but only Security Officers can approve them. An individual can be a member of both lists but cannot approve their own requests.
Only a Super Admin or delegated auditor can request permission to change files/folders or access to contents. The Security Officer’s sole purpose is to approve requests sent.
By design a Security Officer cannot self-approve their own requests, you would need a second Security Officer to perform changes.
For easier management, it is recommended to have at least two Security Officers in the domain.
Administrators and Security Officers should remember the verification process is there to protect you, your domain data, and your user’s privacy and rights, while also enabling you to act in the organization’s best interests.
Why all this effort?
We respect your data security. We respect your company’s right to be protected. This is the highest security model available within Google for the Work Environment.
How to Use GAT Unlock #
File Management – Changing ownership or file access rights #
GAT Unlock is tightly integrated with the powerful search and filter options available in GAT+. This means you only have to do things once.
In this example, we are going to find all the spreadsheets owned by the group ‘sales’ that are shared externally, and then we will remove the external sharing and change the ownership (on all the selected files at once).
TIP: Always narrow the file request with a search first – saves time and makes approval simpler. #
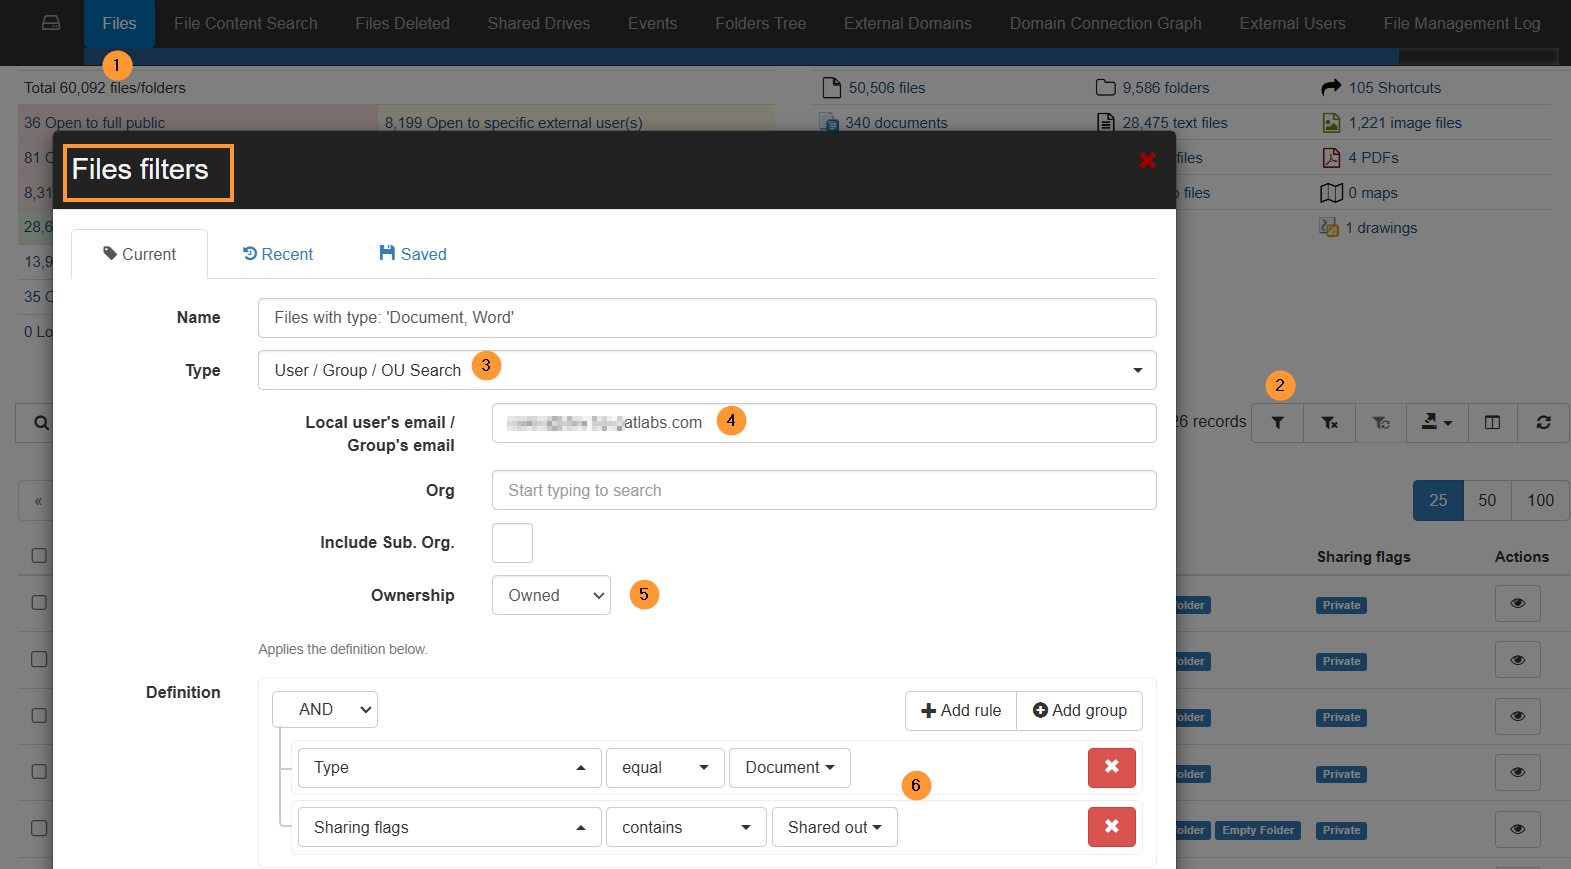
Step 1: Click on the ‘Apply custom filter’ button in Drive Audit.
Select the following option:
- For the filter Type select User/Group/OU search, we will enter the Group you want in this field ‘Local User/Group’, make sure to enter the full email address.
- Under the Ownership option select ‘Owned’, this will show all the files owned by the ‘Sales’ group. Otherwise, it would show all of the files associated with any Google group, where the group shows up as Owner, Editor, or Reader.
- In the filter Definition area, select the parameter Type equal to Document, and to add another search parameter click on the ‘Add rule’ button and select ‘Sharing Flag’ containing ‘Shared Out’.
- Selecting shared out will only focus on files leaving your domain.
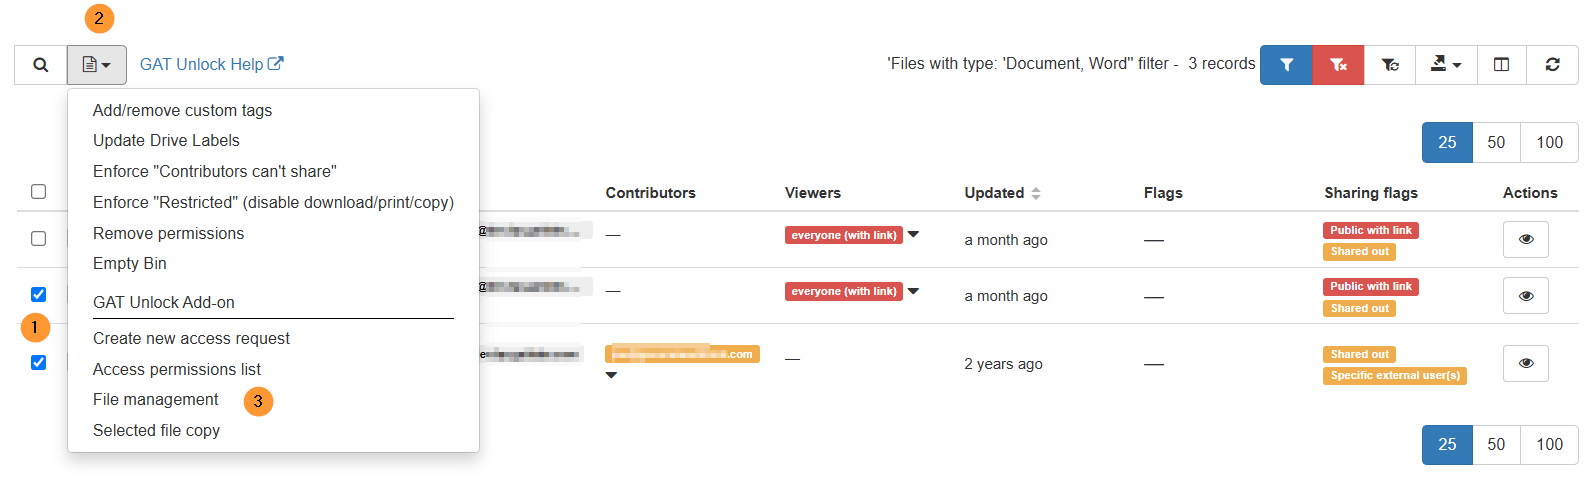
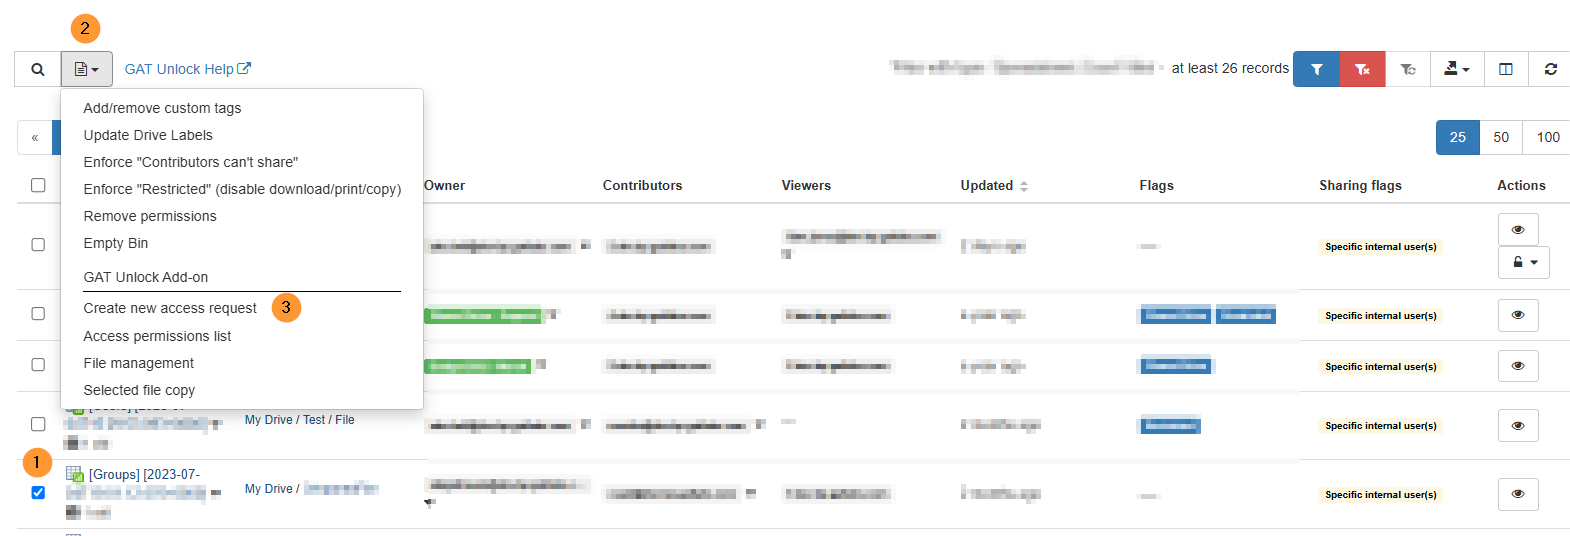
Step 2: Next select the Files you want to act upon, clicking beside ‘Title’ will select all files from the search, or you can select individual files, by clicking beside the files.
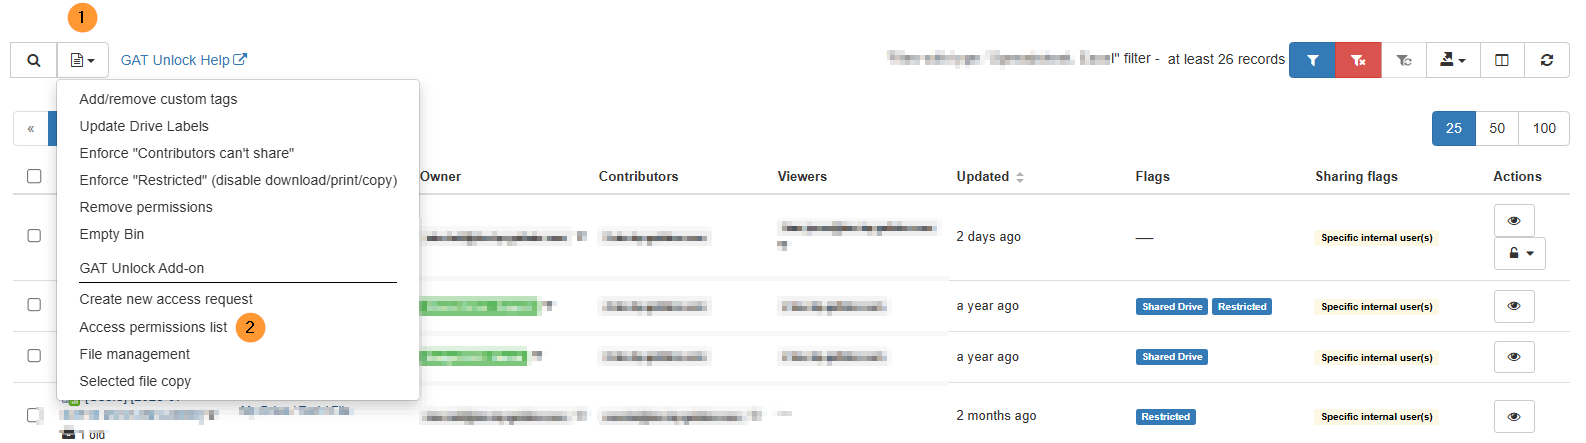
Click on the button File operation and then select the File Management option.
NOTE: The transfer will work on both Active and Suspended accounts.
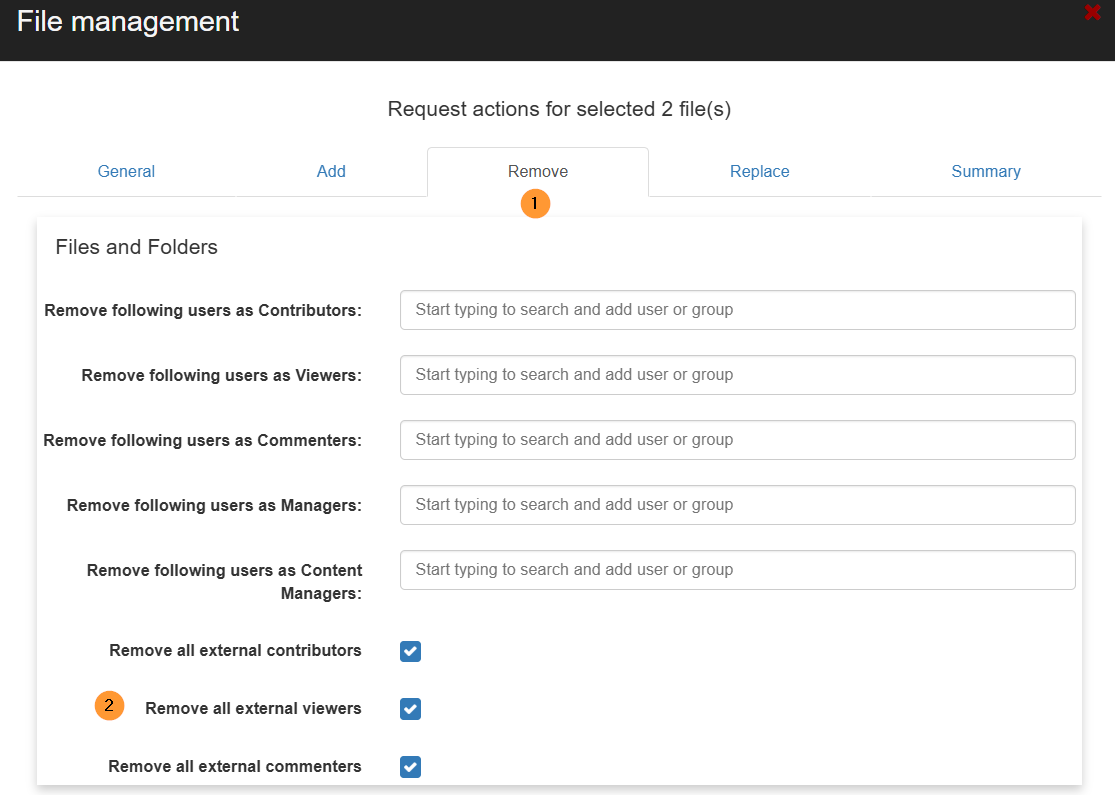
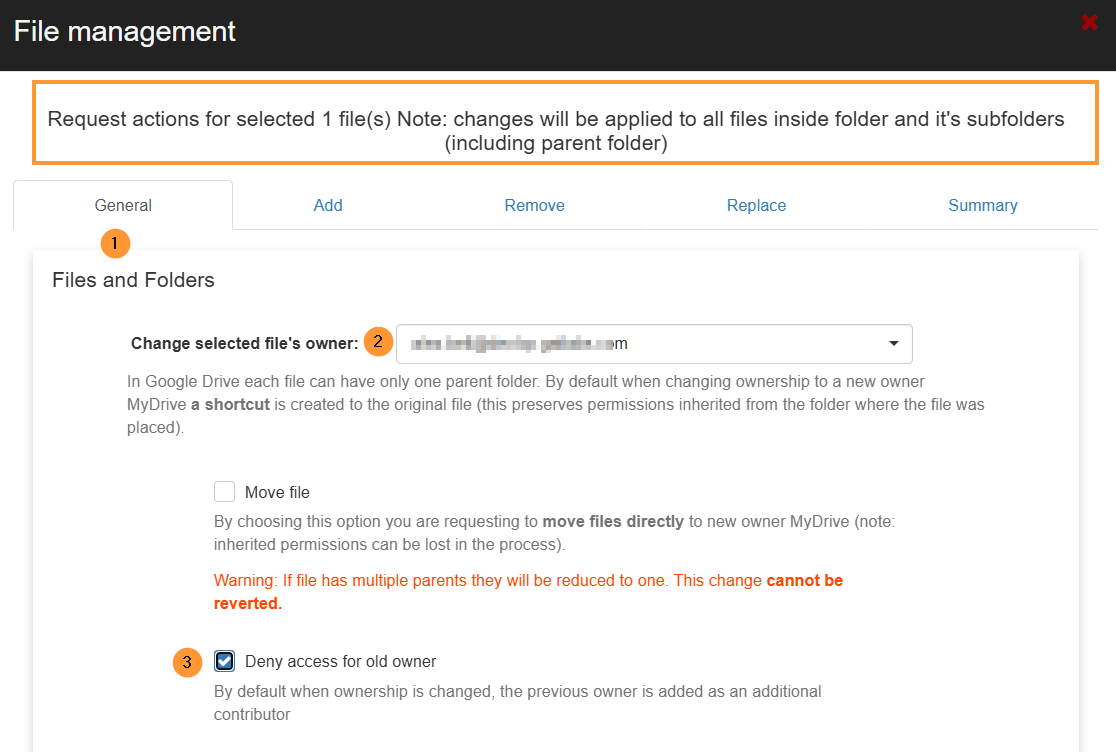
Step 3: In this example, we are making the account manager the new owner of the selected files.
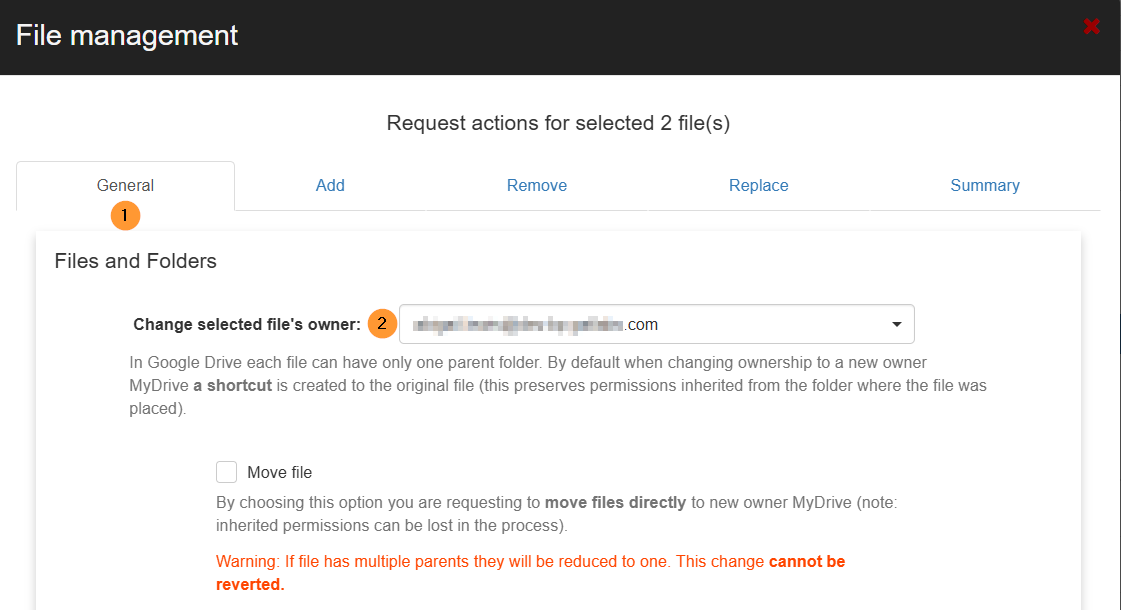
We can also remove external access to the spreadsheets and add or replace the sharing permissions.
As a summary, you will see what actions will be taken on the selected files.
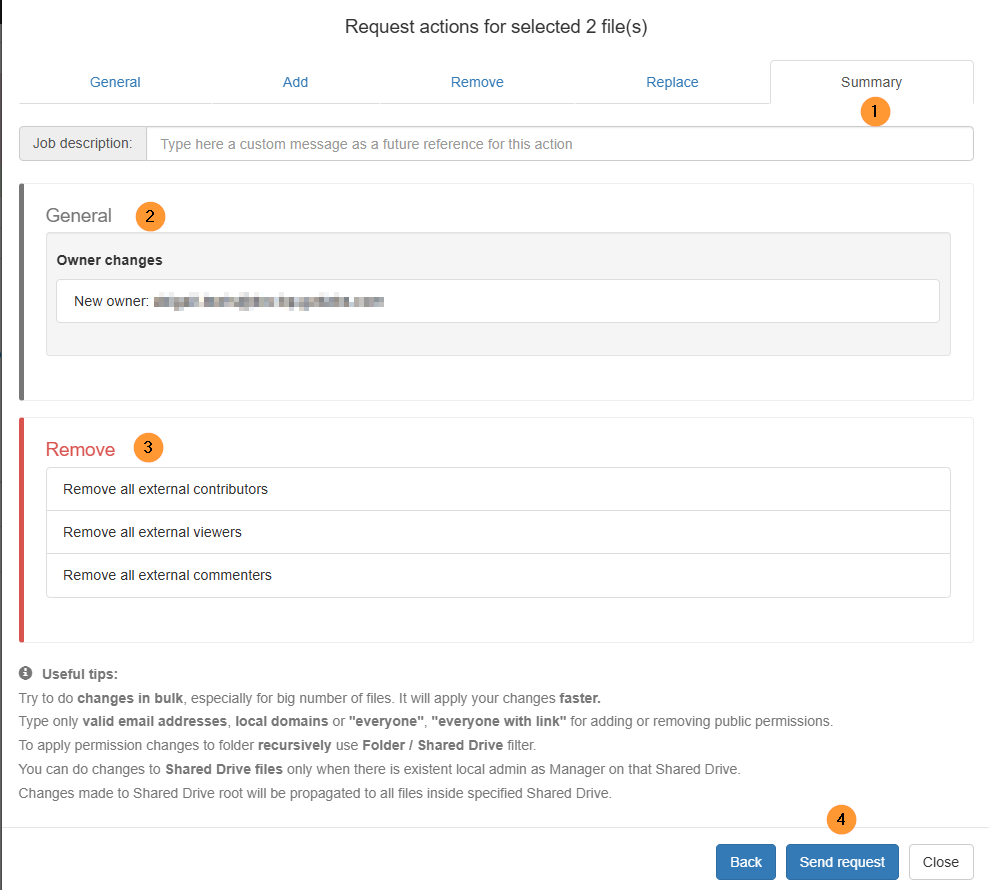
Then click on Send request.
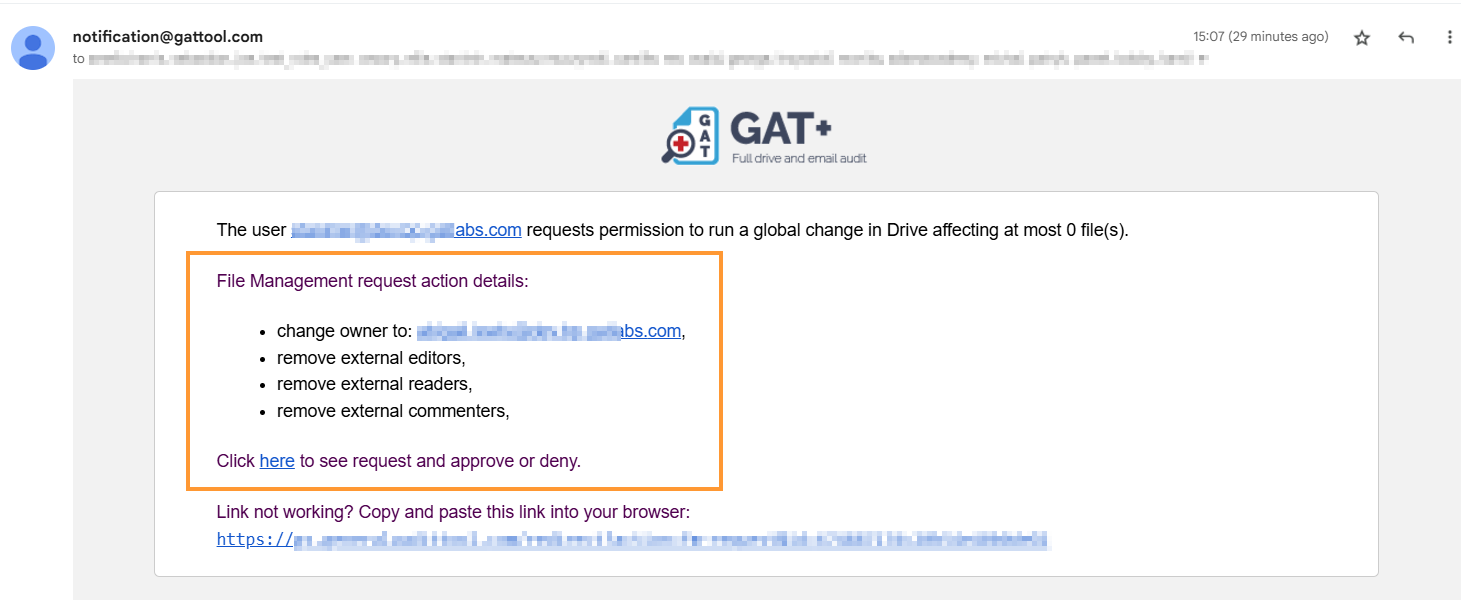
An email is going to be sent to your security officer. Click here to see and approve the request.
If the security officer approves your actions, they will be executed and you will be notified.
If permission is not granted by the security officer, you will also be notified and no actions will be taken.
Access Permissions Granted – How to Silently Copy or View Files #
We are going to use a powerful search feature inside of the GAT+ Drive audit to identify the contents of the documents we’re going to investigate. This feature is called the ‘Full content text search’. It allows admins/delegated auditors to use a word or sentence to search through all of the files across the domain and to return documents that contain them.
Step 1: Click on the ‘Apply custom filter’ button.
Step 2: Enter the word or sentence to return files that contain them. Select the user’s account you want to search through you can leave this field blank to search your entire domain’s Drive or enter a user, Google Group, or Org Unit to search through them only.

You can also use multiple rules in the Definition section of the (Query builder) Apply custom filter. I used the Updated search parameter. Once you click on the Apply button the search will begin.
It might take some time depending on how many files you have across your domain.
Step 3: Select the files you are interested in, remember that these files contain the sentence “private and confidential”.
Click on the ‘Files operation’ button and then select ‘Create new access request’.
Step 4: Next we will select a date in the future, we will have access to these files until this date. You have an option to write to your security officer explaining why you need access to these files.

Send the request to the Security Officer(s) for approval.
The following email will be sent to the Security Officer.
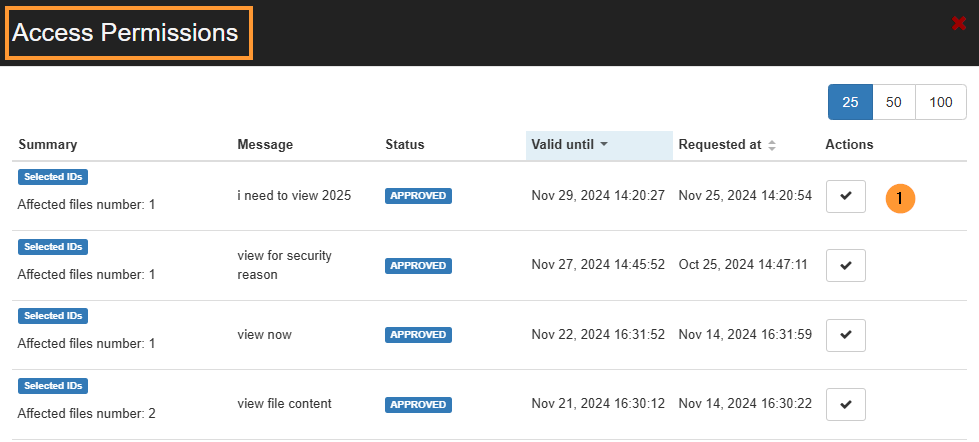
The Security Officer can click on the link in the email and will be taken to the approval area (Access Permissions) in GAT+.

When the Security Officer approves access an email will be sent to the requesting Administrator/delegated auditor informing them. The Admin then opens the ‘Access Permissions list’ menu again and can see the full list of their Access requests along with the time left for each request to remain valid.
Filter in the list for your request.
Once the request is selected a new window will open with the results, on the right-hand side those files will have a new tab called ‘Actions‘ under that the requestor can Download or Show file the contents silently without the owners’ awareness.

Pre-approved Access for Admins to All Files for a Range of Users #
If your Super admins wish not to get Security Officer approval every time they want to make file permission changes or to view file contents, a security officer can give them pre-approval.
In the Security Officer section on the GAT+ sidebar menu, select ‘Preapproved Access’ and then click on the ‘+’ button to add a new Preapproved admin.
Once clicked a new ‘pop-up’ screen will appear.

Here the security officer can add the email address of the Super Admin, the OU over which they will have access, they can select a full OU tree and set approval access until a certain future date. In the above screenshot, I gave Alex (super admin) access to the Support OU
Multiple different approvals can be given by the security officer, including several to the same Super Admin, each covering different scopes.
Changing Ownership of an Entire Folder Tree #
Another feature of ‘Unlock’ is that it enables an often requested task of moving an entire folder tree, root folder and sub-folders, from one or many owners to a new owner.
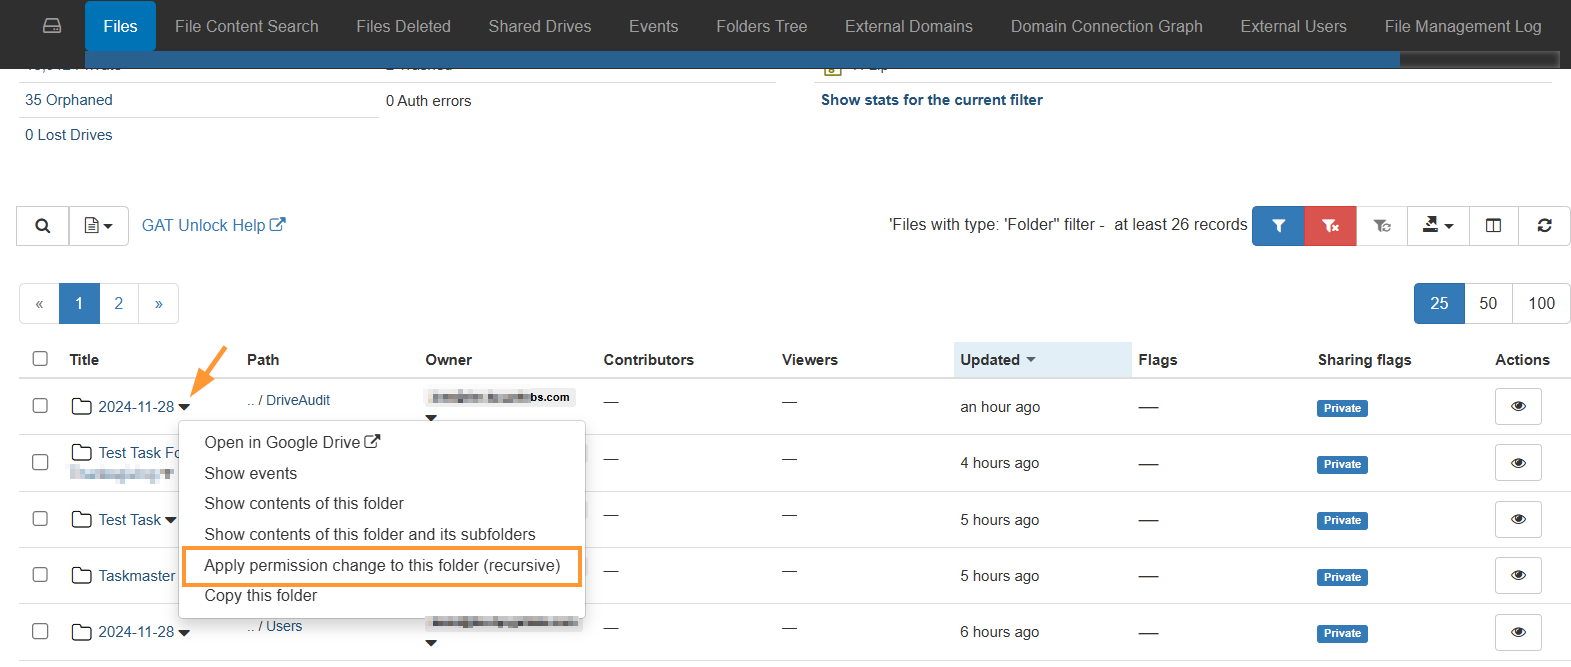
This task is completed with the File Management tab. Use the drop-down menu button next to the folder name to see the options. Click on Apply permission change to this folder (recursive). When the File Management option menu appears, enter the new owner’s email address. And make sure to remove the previous owner as editor.
Note: When changing ownership, the previous owner is added automatically as an editor. You can “deny access for the old owner” if you choose that option.
This is an ideal feature for consolidating a shared folder structure or handling leaving staff or students.
Delegating Access to an email account #
GAT+ allows Admins to delegate access to a User account to another User for a certain period of hours. This may be for business purposes but it also facilitates the fast search and viewing of all the account emails via another user’s browser.
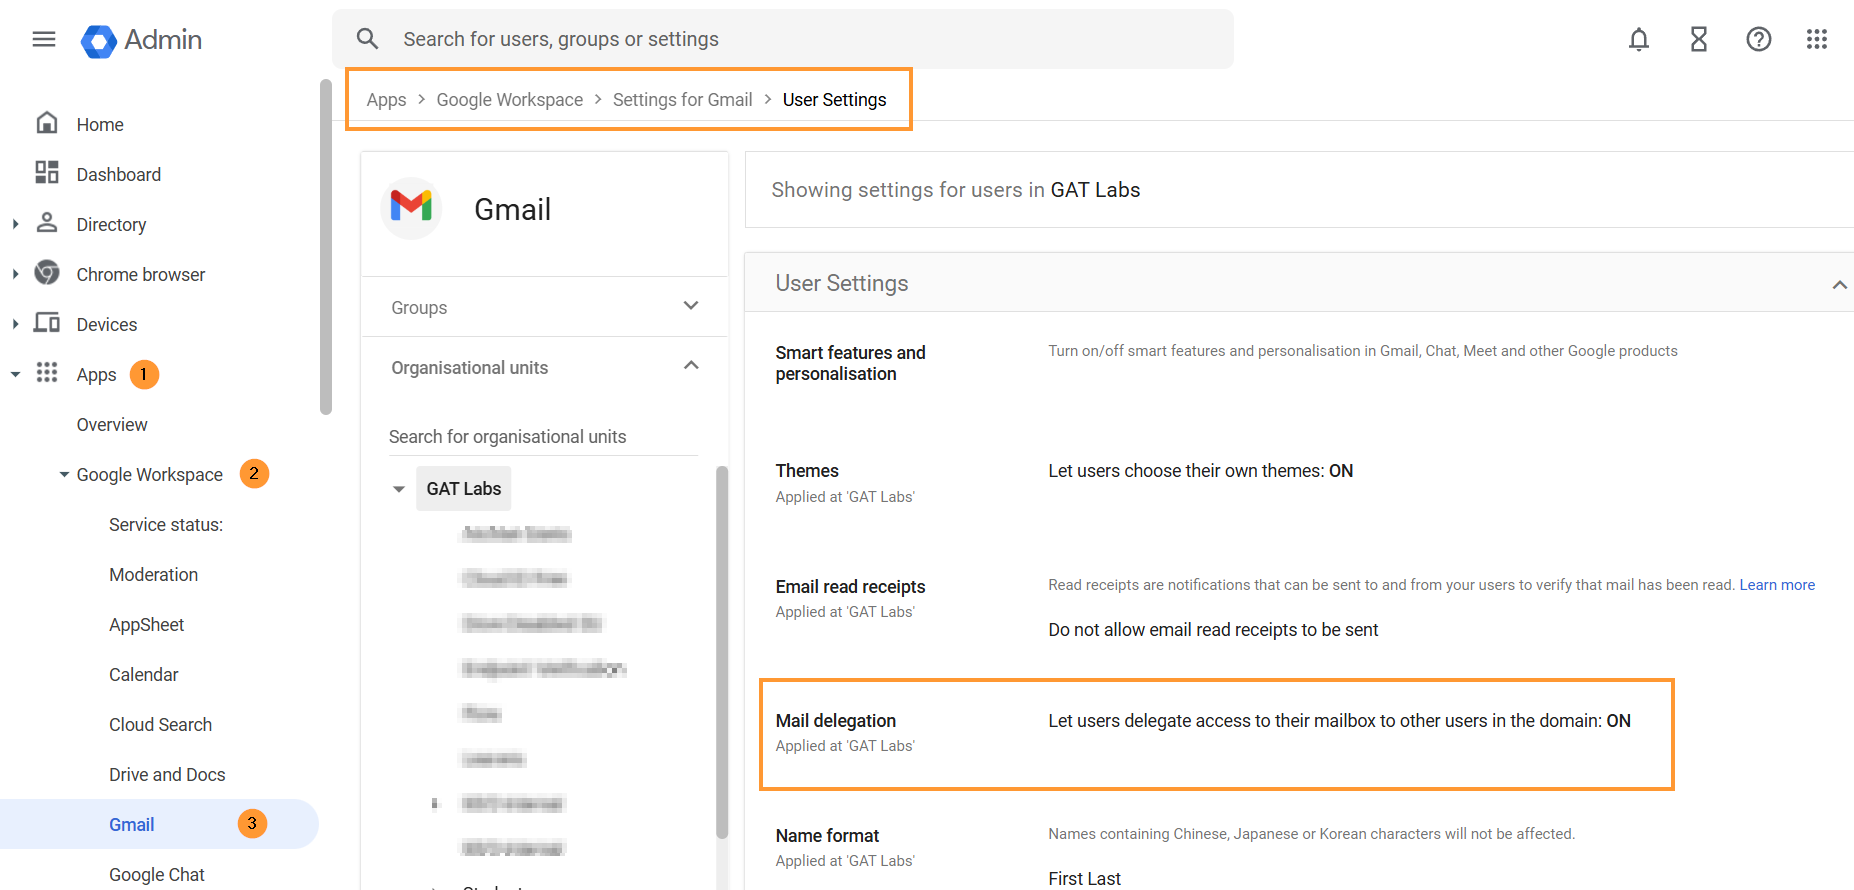
BEFORE USING: Please ensure email delegation is allowed for users in your domain. Go to the Google Workspace Admin Console and under Apps > Google Workspace Apps > Settings for Gmail > User settings check if the email delegation box is allowed for your domain.
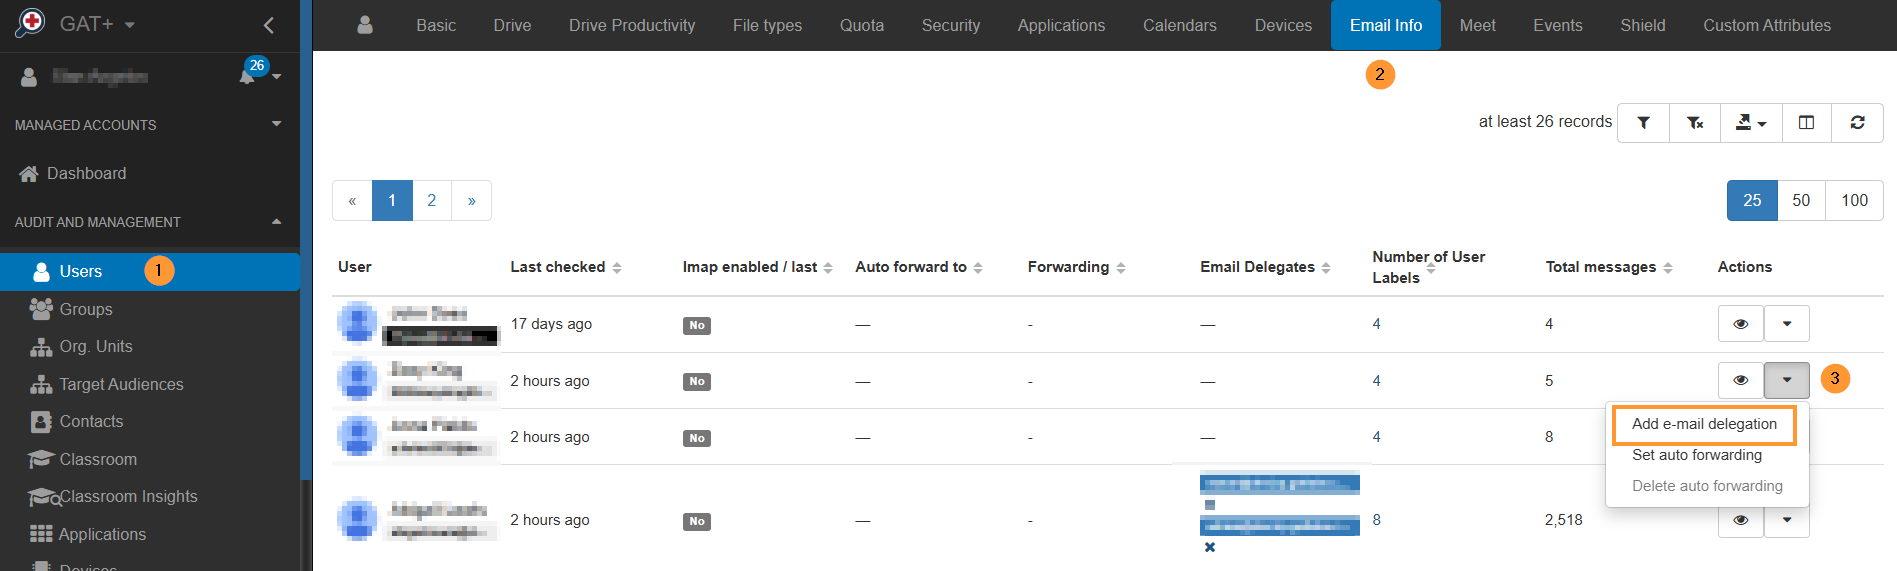
Launch the GAT+ tool, enter the User Audit section then click on the Email Info Tab.
In the Email Info Tab, select any user and click on the Actions button to add an email delegate to their account.
You have the ability to remove existing mail delegation which is already in place as well.
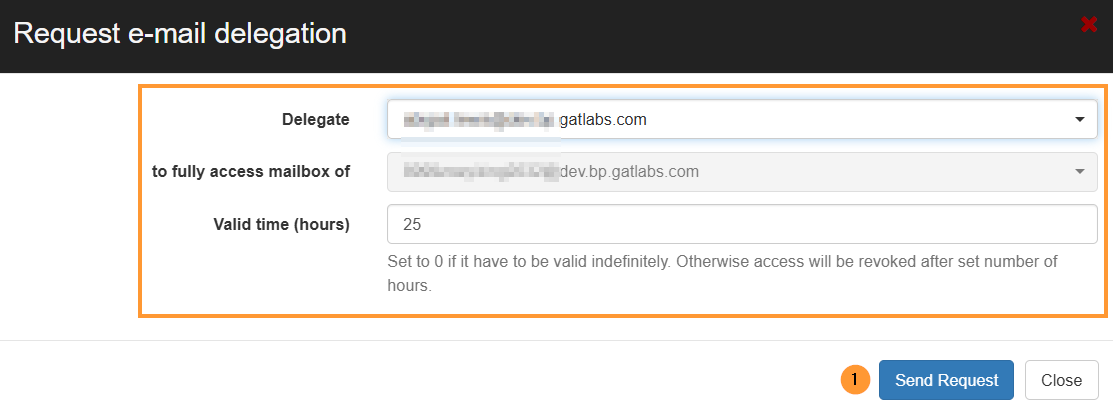
Here the Admin can select the account they wish to gain access to, then select the account they want to give this access to and finally select the number of hours they would like delegated access to be approved for.
Once the request is sent, the Security Officer will still have to approve it before the delegation is created.
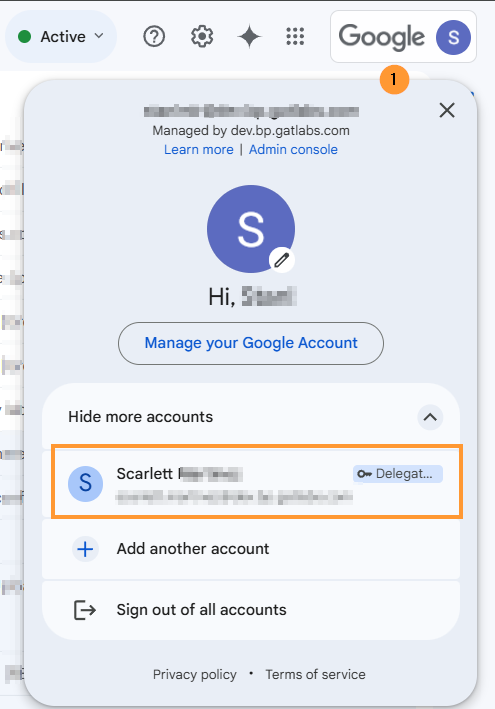
Once approved the delegated account appears in the accounts drop-down list when the profile picture is selected in Gmail.
The delegation will automatically be revoked after the requested period.
Note: If during the period of delegation, the account under audit, logs into their Google account and goes to their email settings, then under ‘Accounts’ the account owner will see that the Admin has granted delegated access to the account.
In addition, if the delegated user reads any unopened email in the audited account, this email will be marked as ‘read’.
Delete Spam, Inappropriate, or Accidental Emails #
There are multiple reasons to have the ability to identify and remove emails that have been received by all or any of your domain users. Here are some unwanted scenarios:
- An email is sent to the wrong user or group
- An email contains inappropriate content
- An email that contains sensitive information
- An email that has gone past spam filtering or is a phishing email.
GAT+ allows Admins to delete these emails from all accounts at once.

We recommend using ‘Email Content Search’ to track down these emails. It is a ‘real-time’ search that is highly configurable (see the ‘search tips’ link beside the search box). In the screenshot above we use the example search parameters
“SEO proposal” in:anywhere newer_than:90d
This tells GAT+ to search in all emails, for all users and look for emails that contain the words “SEO proposal” which are also newer than 90 days.
When the results come back select the emails you wish to view/download/delete then click the “Email operations” button and select “Access permissions list”.
When you search if the result cannot be displayed promptly, the search can go into Background search. You can access those searches by selecting ‘Previous searches‘.
All older or background searches will be displayed there.
Once completed, under the ‘Actions’ tab select the green checkmark to display the results.

Once the emails are selected, click on the ‘Access permissions list’ button and send a request to your SO (security officer). Your SO will have to approve your request.
Before sending the request if you intend to delete the emails rather than just view or download them then check the ‘Allow removing emails’ box.
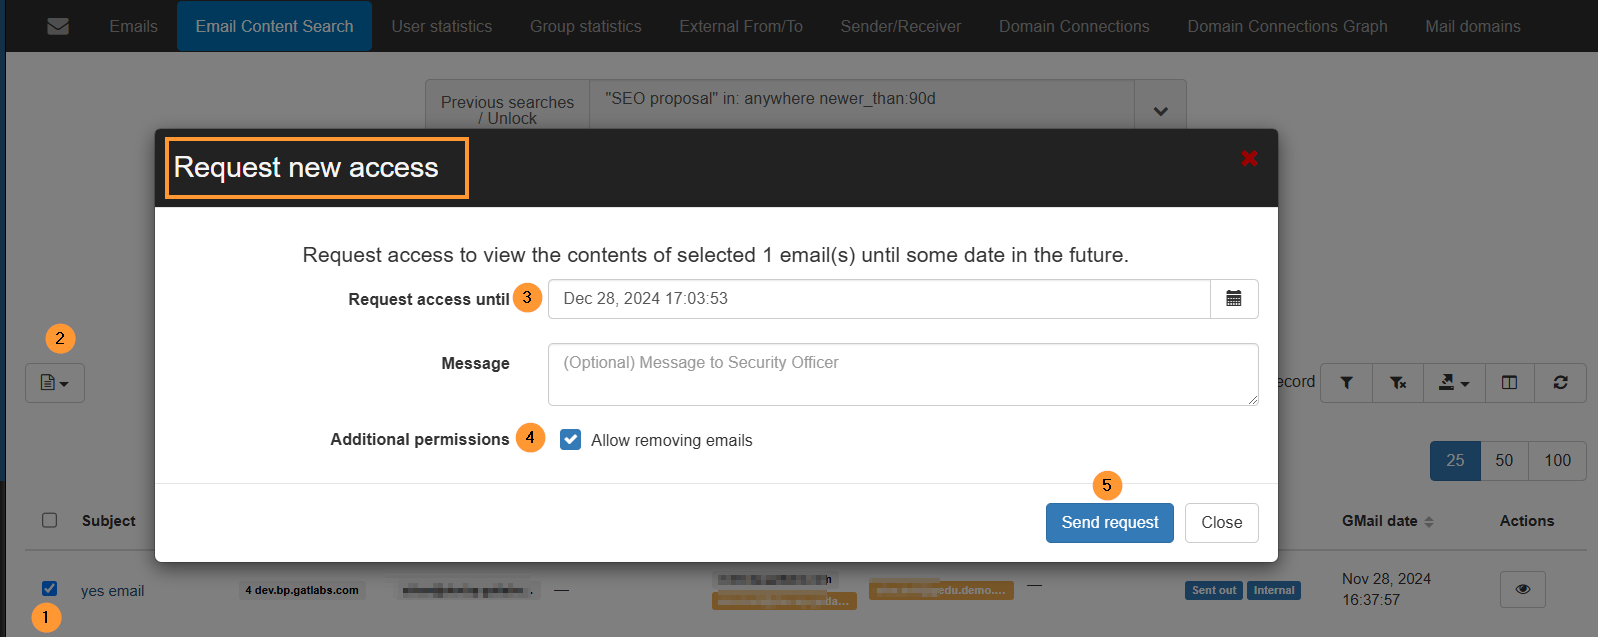
As an option, you can send a message to the Security officer giving a reason for the investigation.
After performing those steps please select and click ‘send request’ and wait for approval to be returned from the Security Officer.
You can check all the requests to the SO in the “Security Officer” section in GAT+.
Note: You can not self-approve your own request. An admin sends the request the Security officer approves.

Once your request has been approved, you will receive an email notification stating that.

Note: While you wait for the approval, you might use the tool for other searches. When you come back to “Email Content search” click on the Previous searches/Unlock button.
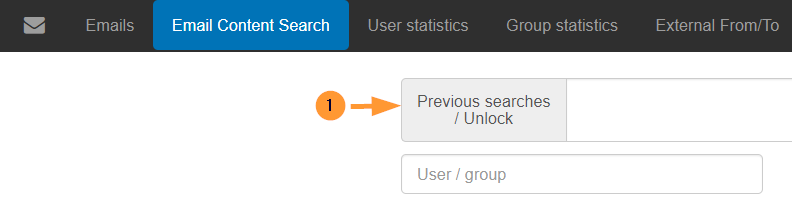
You can then delete one or all of the emails using the drop-down option in the Emails Operation button.

By default, you can send the emails to the user’s Trash folder on their Gmail but if you wish to permanently delete these emails then select ‘Delete permanently”.

Pre-approved Access for Super Admins to all Emails #
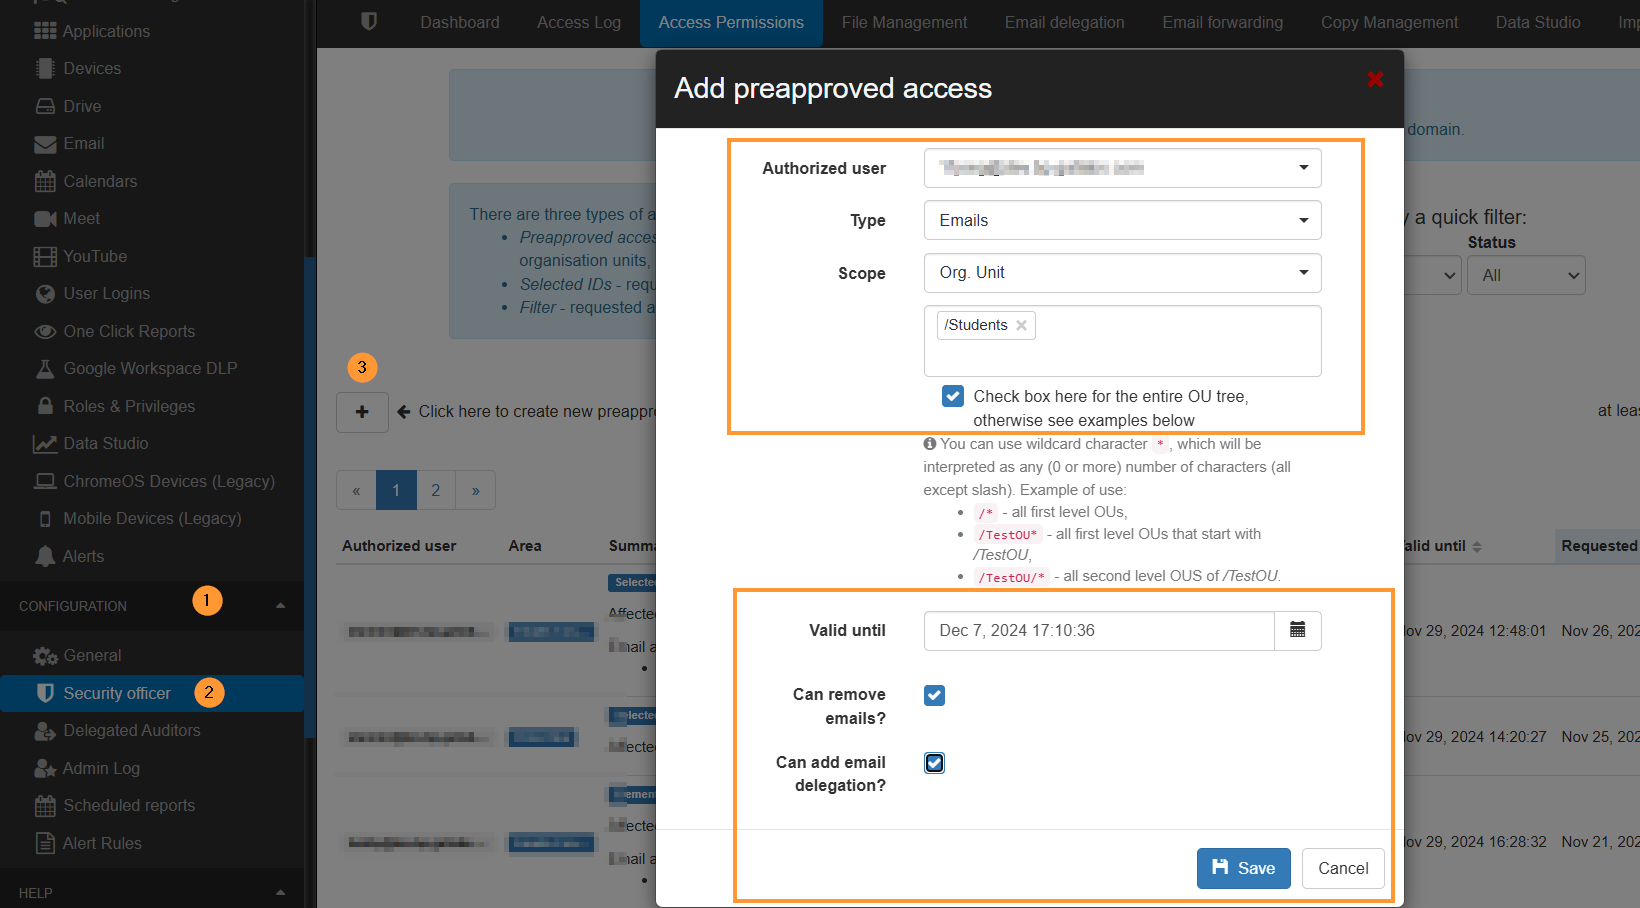
To enable preapproval for Super Admins navigate to the Configuration section of GAT+ and enter the Security officer area.
Once there click on the Preapproved Access Tab and click on the “plus icon” and “Add new pre-approved access”.
The Security Officer can select
- Authorized user – the user who will have access to emails and can take Unlock allowed actions without the need for approval
- Type – select the access area for the preapproval
- Scope – select what users will be affected by the preapproval
This is ideal for situations where Admins do not need to get constant approval to view/download or remove emails.
An example would be in an education domain where the Super Admin would have full open access (view/download or remove emails) for all Student OU’s but would still have to get selective approval from the security officer to access an in the Staff or HR OU.
The Security Officer can also enable the options to remove email or add email delegation without approval
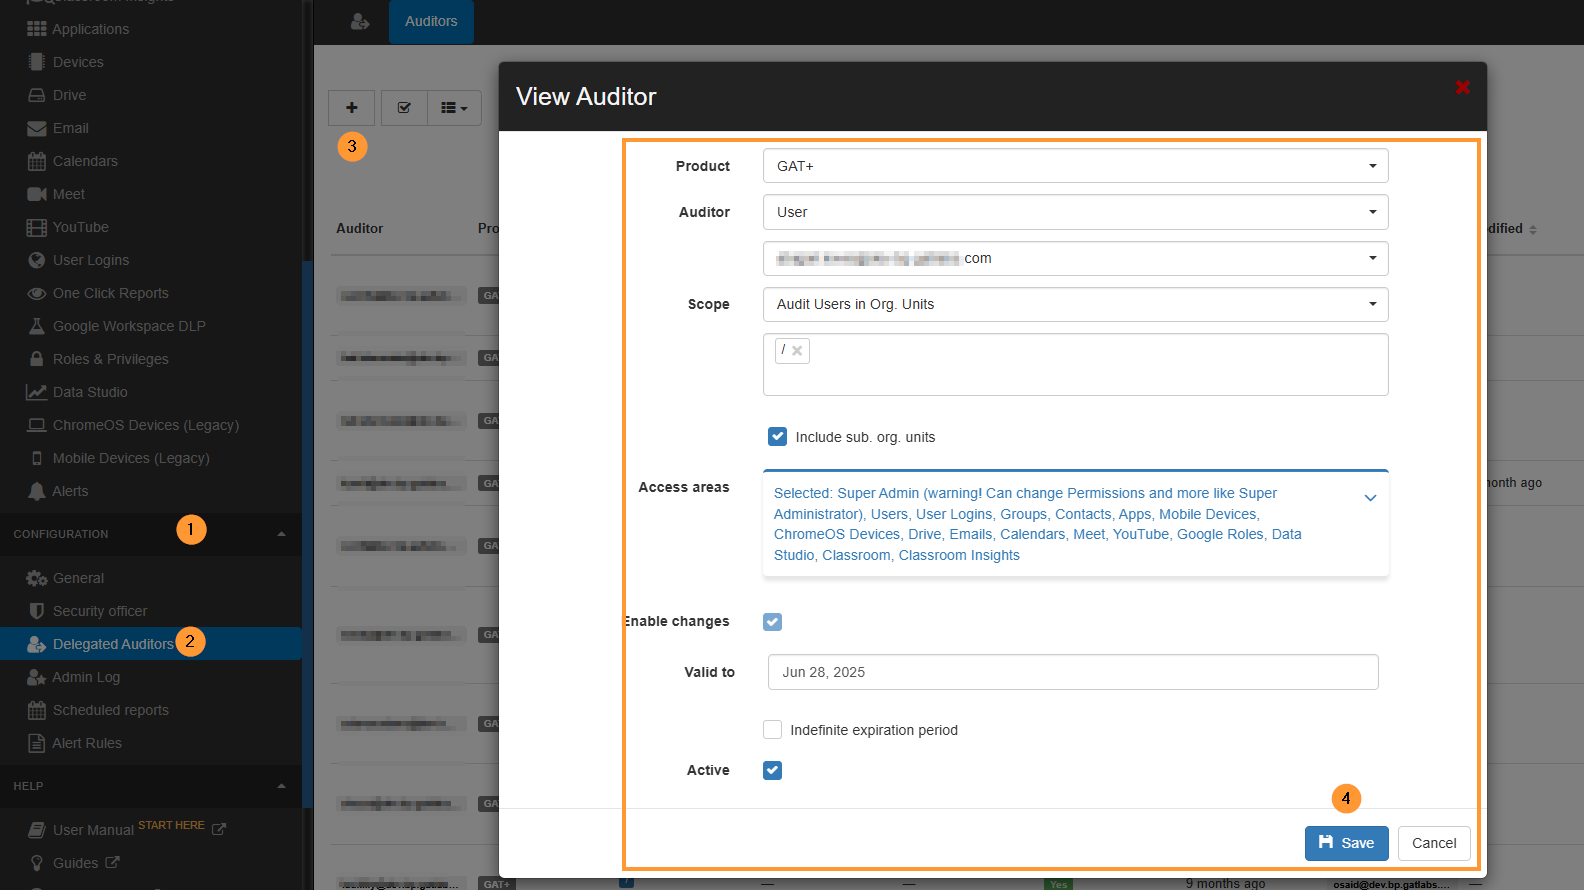
Non-Super Admin Auditors #
This feature is ideal when Super Admins want to delegate the audit function to local managers or regional security personnel.
GAT+ allows the Admin to select the scope of users that will be covered by the Auditor.
The admin can also select what audit areas to be included.
Auditors will have access to Audit areas and for the scope, they are given only.