

Remove Permissions from Google Drive Files (everyone and everyone with a link) #
GAT+ Drive audit allows Admins to see the big picture of their Google Drive and the Sharing Permissions they have.
This guide will walk you through each step to ensure secure and efficient file management within your domain.
Admins can take action on the Drive files by:
- Add – adding users (permissions) to the file
- Remove – removing users (permissions from the file
- Replace – replacing users (permissions) from the file
Before you remove permissions for ‘Docs shared out with link’ it is best practice to automatically inform your users of those shares, allow your own users to take the initiative to clean up the share.
If the shares have not been removed in the allocated time period, as a super Admin you can remove those permissions from Drive Audit.
How to Remove Google Drive Permissions #
Find the files with the Sharing permissions you want to remove.
In GAT+ > Drive > Files filter by Public or Public with link permissions
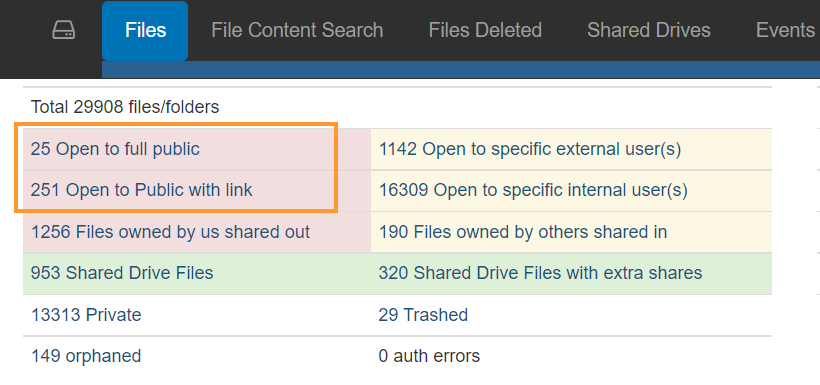
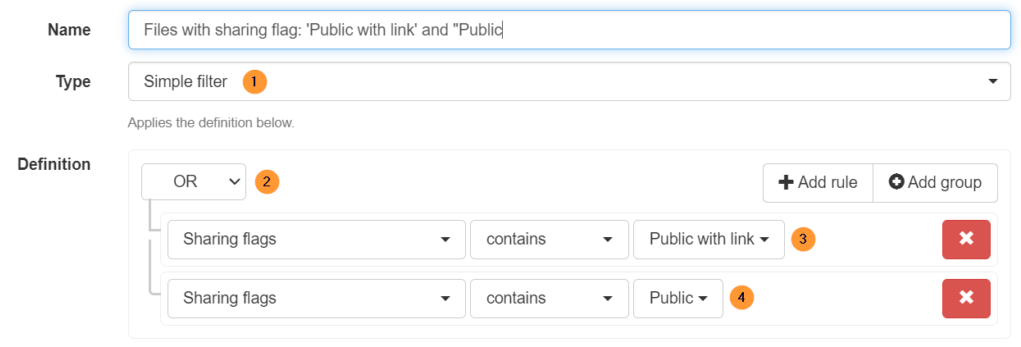
Additionally, you can apply a filter to find All files that are Shared with the permissions “Public” and “Public with a link”
- Type – simple filter
- Definition – OR
- Sharing flags contains Public with link
- Sharing flags contains Public
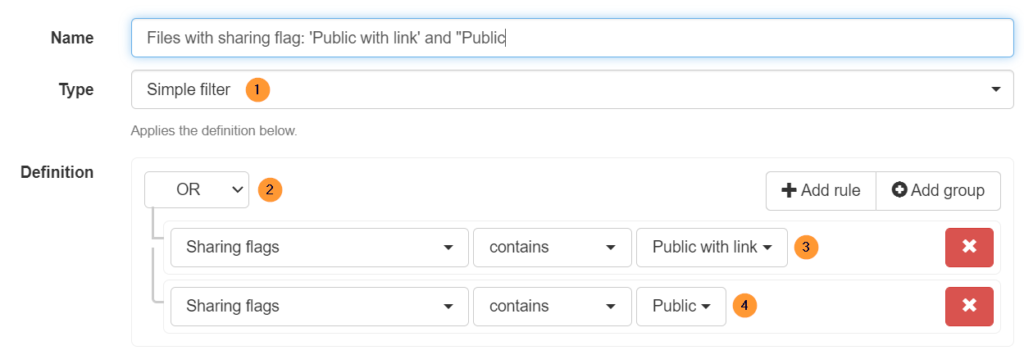
Note: The sharing permissions:
- Public equal Everyone
- Public with link equal Everyone with link
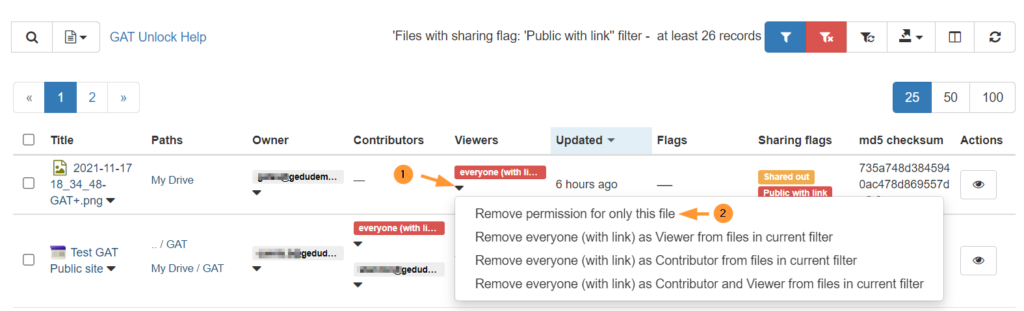
Remove permissions directly #
When the files are found click on the permission.
- Remove permission for only this file
- Remove (user/permission) as Viewer from current files in the current filter
- Remove (user/permission) as Contributor from files in the current filter
- Remove (user/permission) as Contributor and Viewer from files in the current filter
When the result of the search is displayed
- Select the files – click on the check mark beside the Titles
- Click on File operations (4) > Remove permissions (5)
 1")
A pop-up menu will be displayed with options to remove available
- General – remove all internal and external shares
- Internal – remove internal shares
- Remove all internal shares
- Remove only the following internal shares
- Remove users – remove individual users
- Remove domains – remove domains
- Remove everyone – remove “everyone/public” permission
- Remove everyone with link – remove “everyone with link/public with link” permission
- Only shared X days ago
- Only accessed X days ago
- Remove Group members
- Groups – Type emails of groups from which members will be included in share removal.
- External – remove external shares
- Remove all external shares
- Remove only the following external shares
- Remove users – remove individual users
- Remove domains – remove domains
- Remove everyone – remove “everyone/public” permission
- Remove everyone with link – remove “everyone with link/public with link” permission
- Only shared X days ago
- Only shared X days ago
- Remove all external shares excluding the following
- Shares to keep – enter shares to be kept and not removed
- Replace
- Replace “Public” with “Public at the domain”
- Replace “Public at the domain” with “Public at the domain with the link”
- Replace “Public with link” with “Public at the domain with a link”
- Replace “Public” with “Public with link”
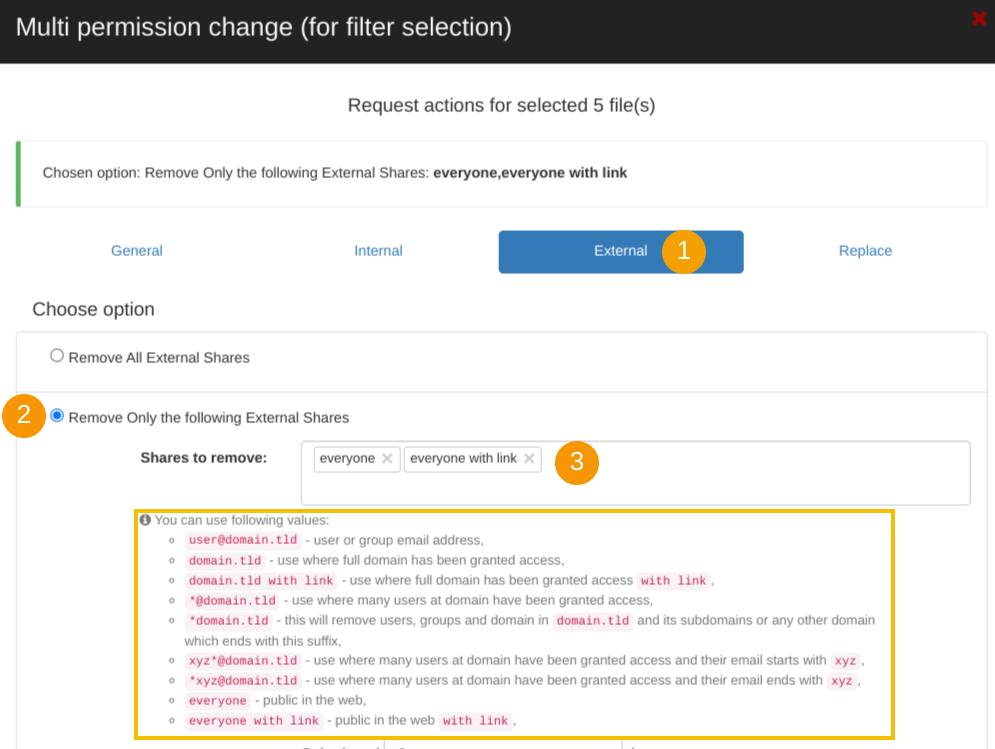
For this case as we searched and found Public and Public with link files
- Click on External (1) – remove external shares
- Remove only the following External Shares (2) – remove the external shares
- Shares to remove – enter Everyone and Everyone with link (3)
Report only #
From the options select Report only under the Configure section. This will guarantee only a report is generated, and NO ACTION will be taken on the files.
If Report only is not enabled the action will be carried
Furthermore, the admin can also:
- Notify local users
- None – disable
- Owners – notify owners only
- All – notify all
- Email subject – enter the subject of the email
- Email message – leave a message to the end-users
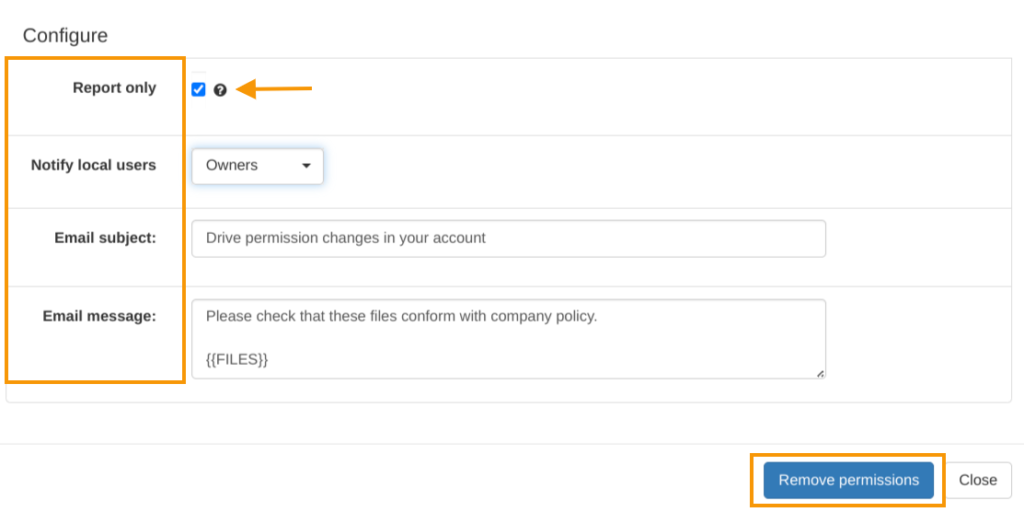
Click on the Remove permissions button to remove shares Or report only.
Note: When “Remove permissions” is clicked – the shares will be removed.
Remove permissions via Scheduled report #
As above find the Public or Public with link
Then click on the Scheduled button, and fill in the required details
- Scheduled – enable the report to run as a scheduled report
- Occurrence – pick a time suitable for you
- Enabled – enable the report
- Recipients – pick who to receive this report
- Apply and Schedule

The report will be scheduled to run based on the Occurrence time.
Navigate to GAT+ > Configuration > Scheduled reports
From the right side under Actions click on the Job Action Edit button
Select External > Remove only the following External Shared and enter “everyone” and “everyone with link”

Under Configure
- Status = enabled
- Report only – the Shares will not be removed, only the report will be generated and sent to owners – if the option chosen
- Notify local users – If the option is used – the users will receive an email as explained above including the Email subject and Email message.
- Save settings – click to save the report

Result #
Once you enable the settings, the report will automatically run every day at the selected occurrence time, and it will remove the shares based on the applied filter. GAT+ will record the removal of these shares in the Admin Log. After completing a new scan of the Drive metadata, GAT+ will display the results, showing the removal of public and public with link shares from the selected files.
Keep record #
Finally, before removing some or all of these permissions. We would recommend you export the data as is to a Google Spreadsheet for record-keeping purposes.


