GAT Labs' Initial Setup
The Guide for Google Admins
This guide provides a step-by-step walkthrough for using the GAT Labs Suite to audit and secure your Google Workspace environment. It covers essential functionalities to help you set up the tools and safeguard your domain effectively from the start
Initial Setup
1. Installing GAT+:
- Follow installation guidelines.
Open Installation Guidelines
GAT+ is a Google Workspace Audit tool that by default can be installed only by the Super Admin of the Domain.
Install GAT+
How to install GAT+ Video
Step 1:
First login to your domain with Super Admin Account.
Navigate to > Google Workspace Marketplace > You can also search for GAT+ in the search bar.
When GAT+ is selected click on Admin install
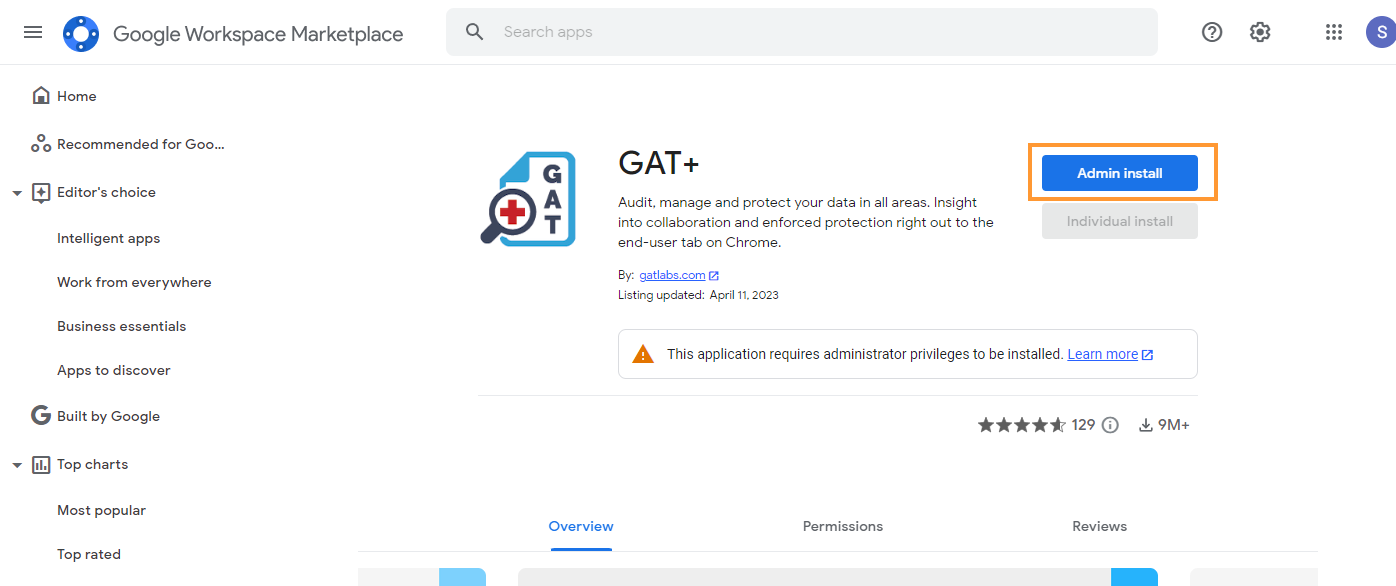
A pop-up window will be displayed click on “Continue“.
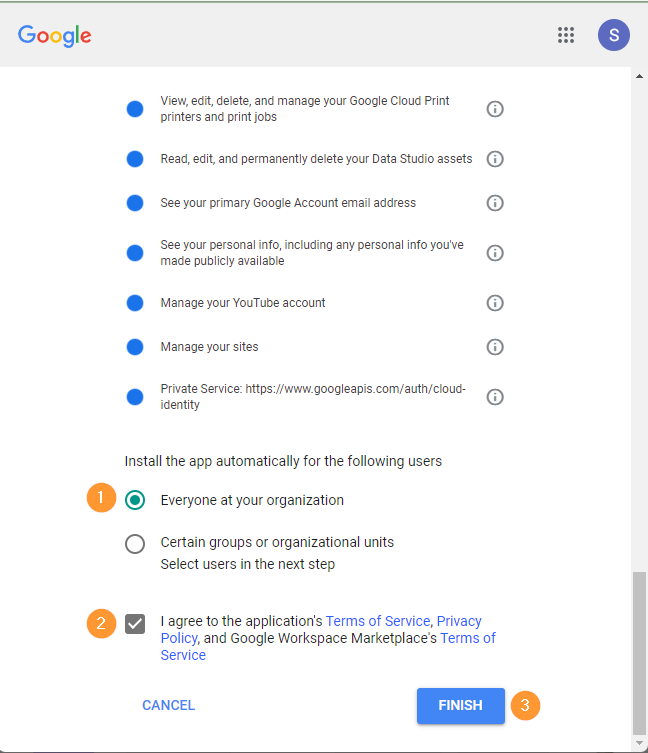
Then a new pop-up will be shown with all the permissions required.
Scroll down to the bottom.
- Under: Install the app automatically for the following users
- Select “Everyone at your organization”
- Note: installing on certain groups or org. units will not give clear and accurate data stats of the domain data
- Enable the checkmark – “I agree to the application’s terms…”
- Select “Everyone at your organization”
- Click on Finish
Note: You can not install it from an incognito window unless you are signed in to your Super Admin account.
Result
GAT+ will be installed.
When installed, click on the Goole apps button and scroll down to the GAT+ icon
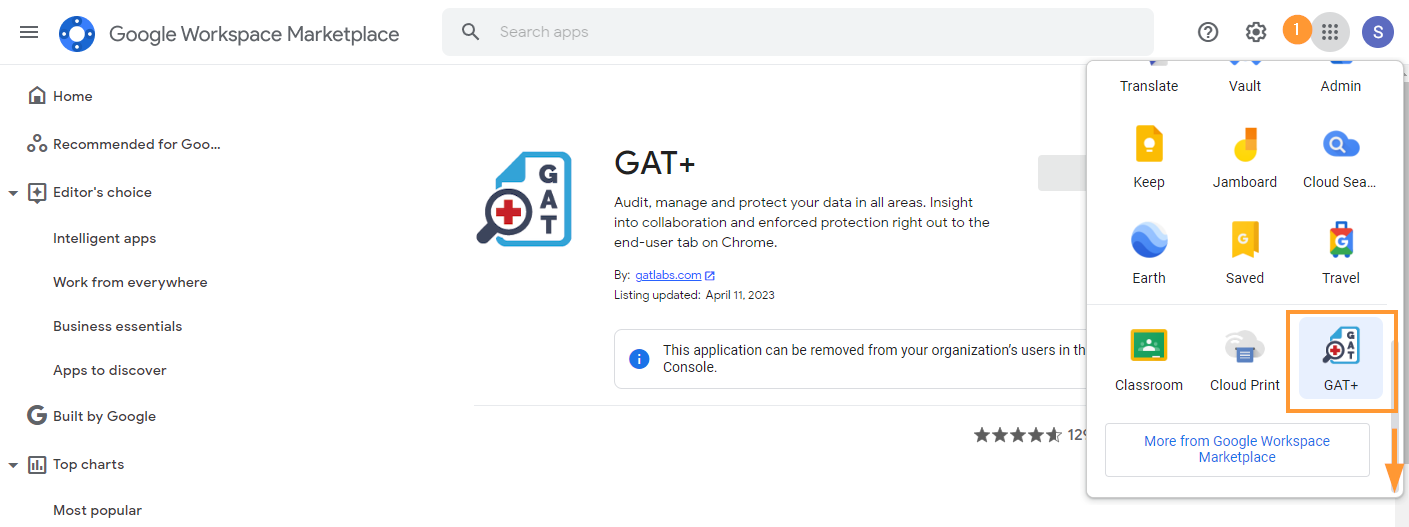
This will be the initial login and the initial scan will be started.
The time for the initial scan to complete will depend on the size of the domain.
- The number of users
- The number of Drive files etc
Estimate time of the initial scan
We estimate the initial scan to take 30 min per 1 million files. When the scan is completed an automatic email will be sent to the Admin account.
Note: Subsequent scans will be faster.
When the initial scan has been completed, the data from your domain will be displayed in the GAT+ console.
Data access
To view and access the full domain data (metadata), we recommend GAT+ be installed domain-wide and all permissions be granted.
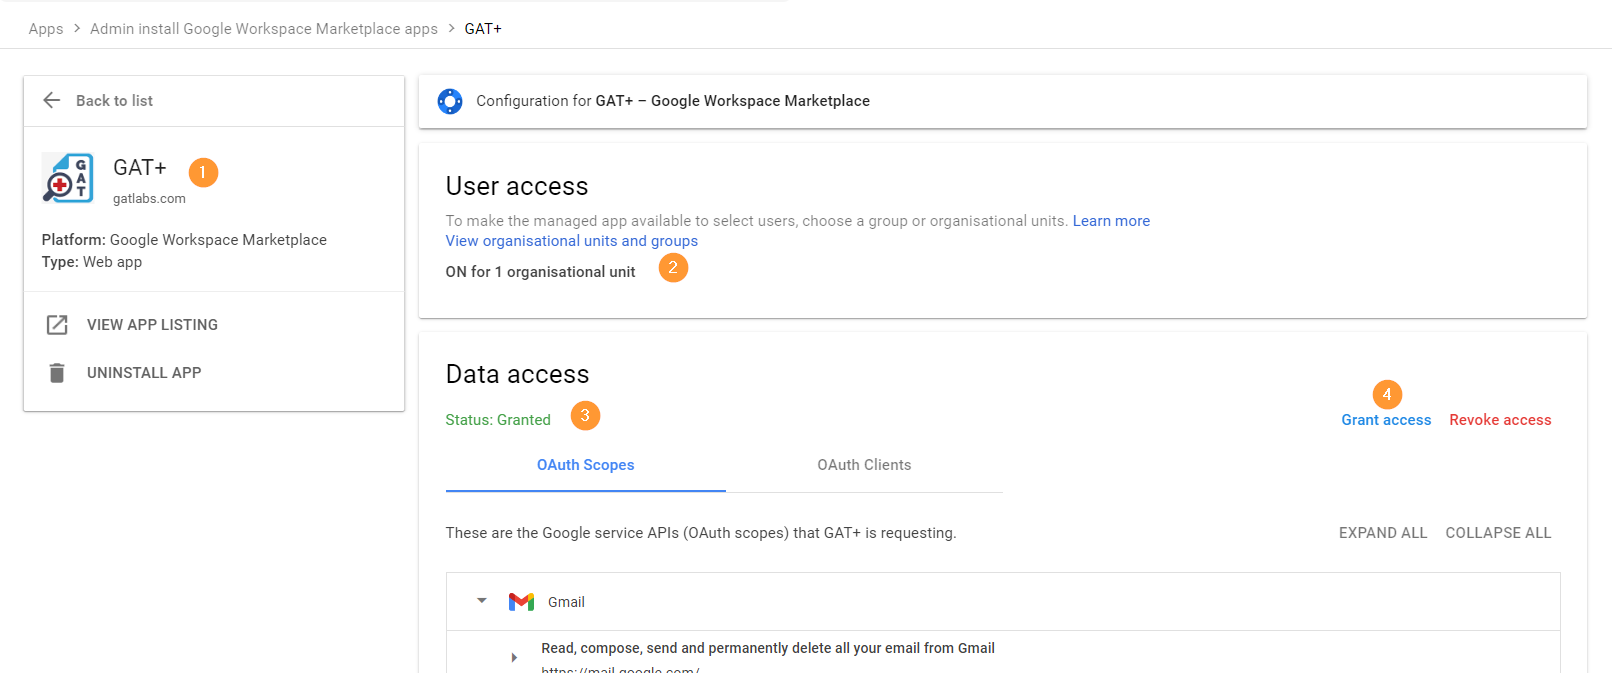
Access GAT+ by Super Admins only
By default the tool can be accessed ONLY by Super Admins of the domain.
Non-admin accounts can see the GAT+ application under their Google Apps option, but CANNOT launch the tool itself.
When the tool is installed domain-wide, it can be launched from the Google Apps menu.
Click on the Google Apps menu button and scroll down to third-party apps and click on GAT+

This will launch GAT+ into a new window on your browser.
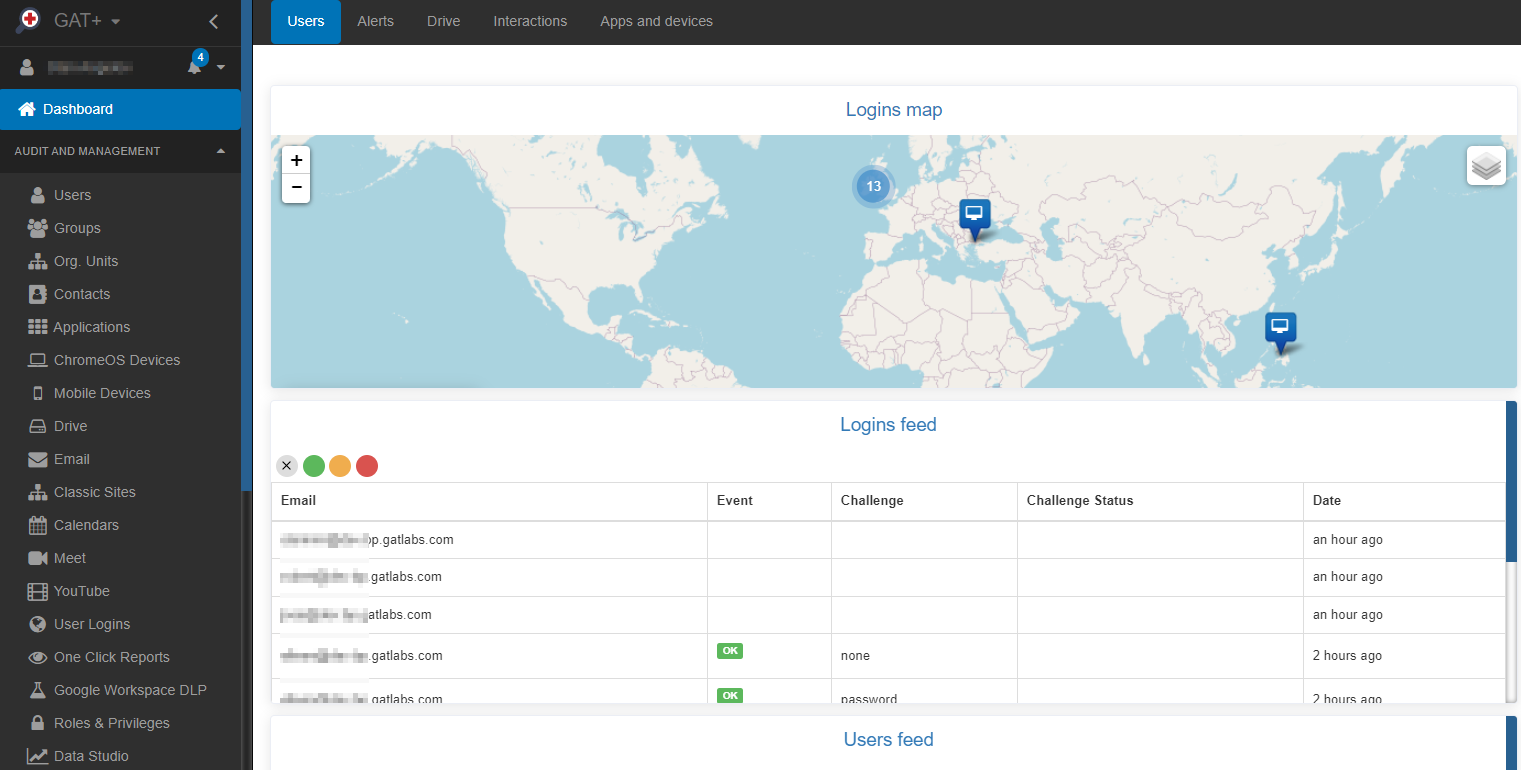
- Grant necessary permissions through the Google Admin console.
See Details
Is GAT+ failing to run? Check these options in your Admin Console
How to make sure GAT+ is running correctly and showing correct information from your domain?
Navigate to Google Admin console
Click the Google Apps menu button on the top right corner of your Chrome session and click on the Admin button

In the Google Admin console navigate to Apps > Google Workspace Marketplace apps > Apps list

Click on the GAT+ app
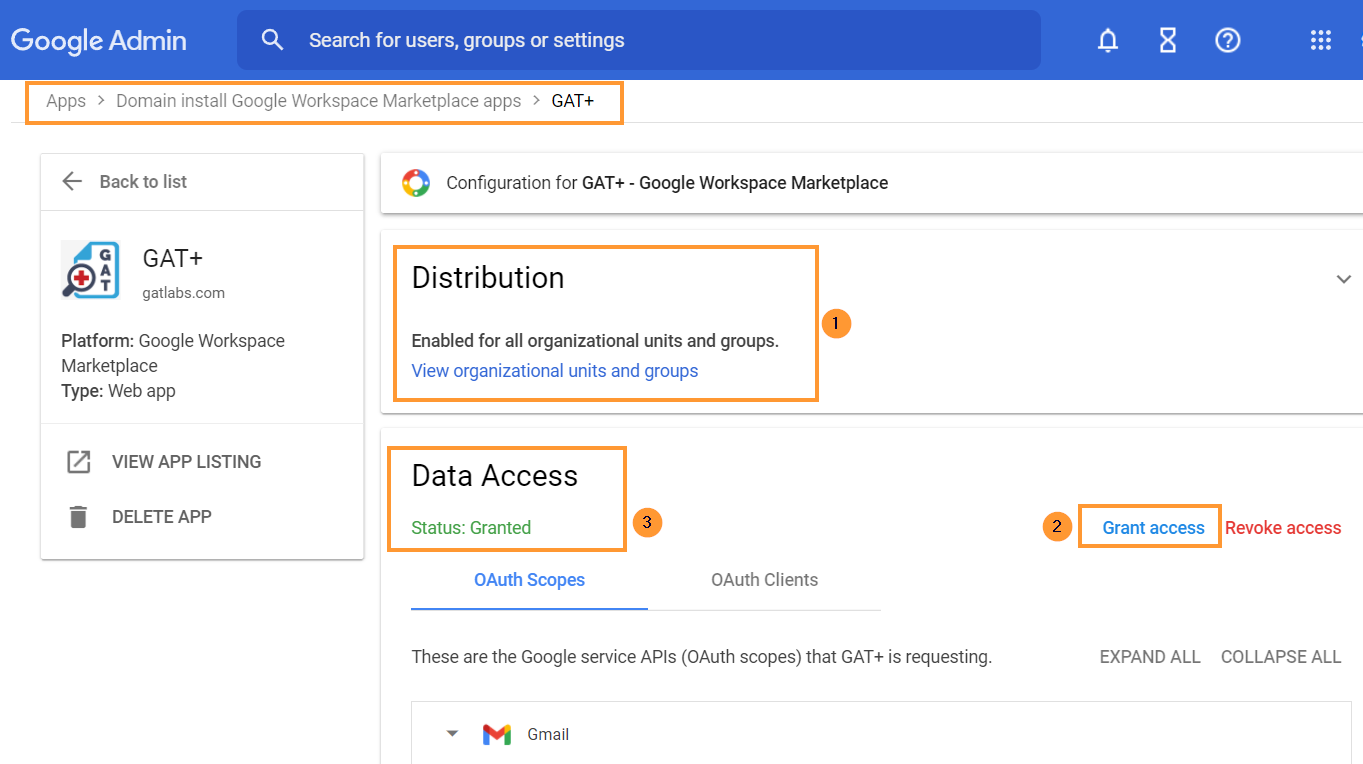
You will need to click and grant access to GAT+
- Distribution – it has to be Enabled for all organizational units and groups
- Data Access – status Granted
- Grant access – click to grant access to GAT+
IMPORTANT NOTE: As Google has deprecated their ‘Google Sites’ product, GAT cannot be granted access to that. You may see that the status is only ‘Partially Granted’ during this step. Though once you have clicked the ‘Grant access’ button you can consider this step finished.
Access by Super Admin Only
By default the tool can be accessed ONLY by Super Admins of the domain. Non-admin accounts cannot login to the tool.
To enable Classroom auditing
Navigate to Apps > Google Workspace > Classroom > Data Access
Make sure that Classroom API – is turned on: ‘Users can authorize apps to access their Google Classroom data’

2. Configure Basic Settings:
- Customise User profile settings.
See Guide
Configuring your User Profile Settings and Preferences
Each Google Workspace Super Admin or Delegated Auditor within GAT+ can have their own user profile settings and preferences configured.
Configuring Settings
To configure your settings, navigate to GAT+, and click on your user name at the top right corner of the side menu.

Within the Settings area, you will see Common, Querying, Language tabs.
Common
- Change Timezone (may affect time stamps on exported reports)
- Change Date Format
- Change Time appearance
- Records Shown per page
Querying
- General time-out settings
- Drive audit time-out setting
- Gmail/Email audit time-out setting
The above settings influence the waiting time for filter searches within Drive or Email sections. If time expires while waiting for a search to complete, a time-out error will be shown.
Language
- Change language within the GAT+ tool to English or Polish
3. Define Administrative Roles::
- Assign Delegated Auditors.
See Details
Why create a delegated auditor in GAT+?
By default, only Google Workspace Super Admins have access to the GAT+ tool.
With the delegated auditors functionality Super Admins can assign users to audit or analyze others within their domain without ever having access to the Google Workspace Admin Console (admin.google.com).
How is this useful? Many organizations have multiple offices, departments, campuses, or locations with the delegated auditors feature you can assign the right person to perform the auditing of a group or organizational unit.
Here are a few examples of when delegated auditors could be used:
- A sales manager would like to create reports for his/her sales team covering data across all of the different Google apps like Gmail and Google Drive.
- A school IT Director would like to give another IT member access to GAT+ but not to his/her Google Workspace Admin Console.
- A Super Admin would like to delegate responsibility to his internal auditing team to give them scope over a specific Org unit.
Creating a Delegated Auditor
In GAT+ navigate to Configuration > Delegaed auditors > + button (Add new auditor)

View the auditor and fill in the details for the Auditor you want to create.
- Product – select the product needed
- GAT+ – create Auditor for GAT+
- Shield – create Auditor for Shield
- Auditor – select the user who will be the Auditor
- User – select individual user to be the Auditor
- Group – select group of users to be the Auditors
- Org. Unit – select org. unit of users to be the Auditors
- Scope – select the users to who the Auditor will audit and have access in GAT or Shield. Users will be under the scope of users the Auditor will manage.
- User – select individual user to be the Auditor
- Group – select group of users to be the Auditors
- Org. Unit – select org. unit of users to be the Auditors
- Include sub. org. units

- Access areas – select what areas in GAT+ and Shield the Auditor will have access to. Access areas visible to the Auditors

- Enable any of the Audit areas
- Enabled – the area will be visible to the Auditor
- Disabled – the area will not be visible to the Auditor
Super Admin
Super Admin (warning! Can change permissions and more like Google Workspace Administrator)
This is a “custom” Google Super Admin within GAT+ only.
The User with Super Admin Delegated auditor will have the same access Super Admin from Google would have – but Only within GAT+ and not within the Google Admin console.
- Enable changes – Enabled by default – Unchecking will give ‘Read-only’ access to GAT for the Auditor
- Valid to – select the time until the Auditor will be enabled.
- Indefinite expiration period
- Active – enable or disable the Auditor

- Click on Save to create the Delegated auditor.
Giving GAT+ Auditor Additional Privileges
When a GAT+ delegated auditor policy is active, you can give the auditor additional privileges. Those privileges allow the Auditor to make changes via Export/Import functionality.
With these additional privileges, the auditor can
- Export any metadata to a Google spreadsheet
- Edit any field in the spreadsheet
- Import the spreadsheet back in to confirm the changes.
Note: A Super Admin has these types of privileges by default.
In Delegated Auditors > click on “lock icon” under Actions to add Additional permissions
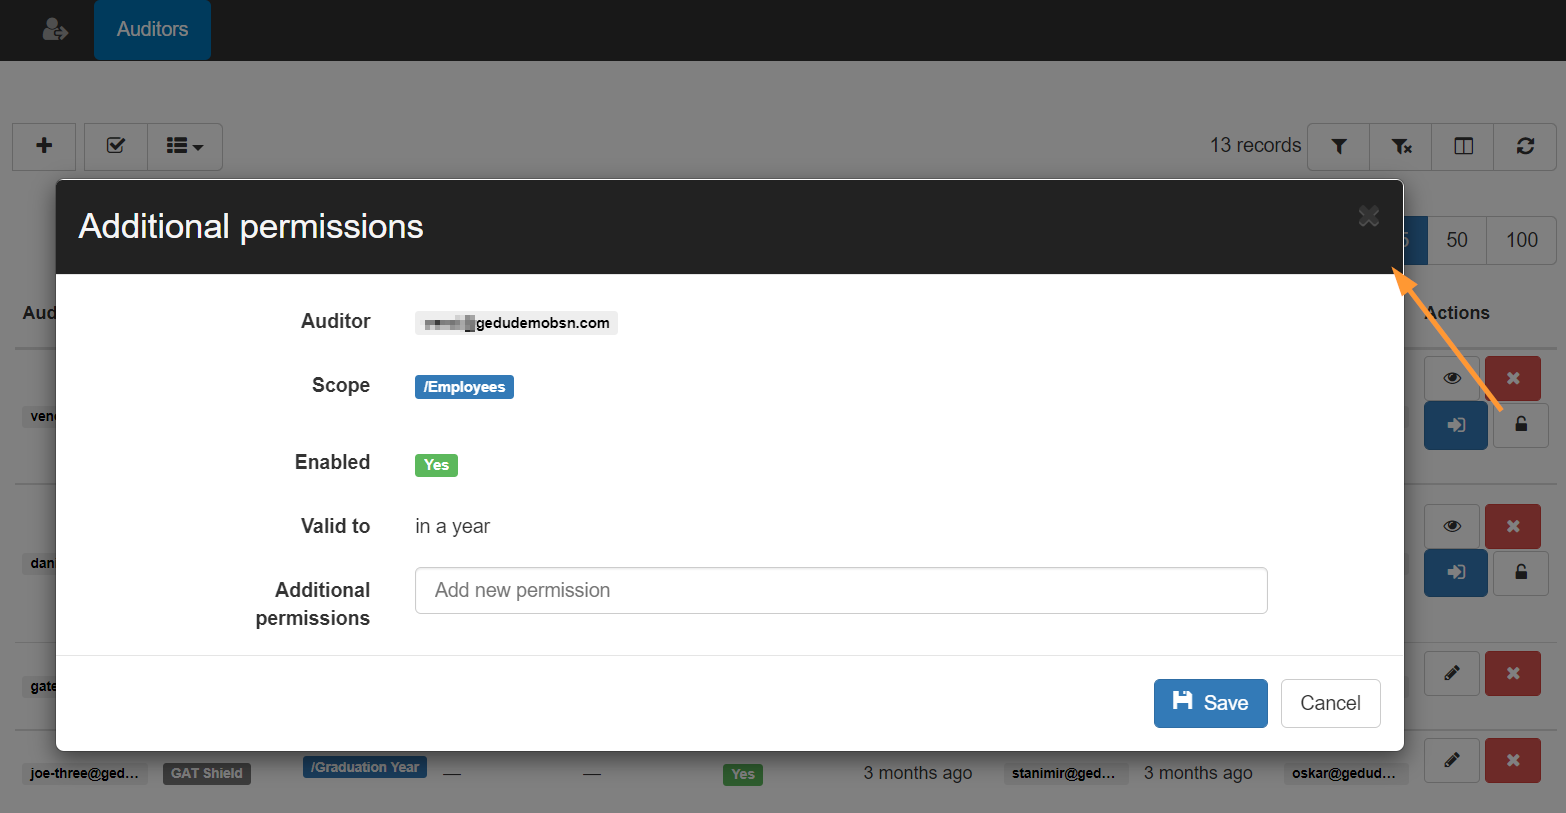
Manage additional permissions – in the following areas:
- Classrooms import
- Groups import
- Users import
- Automatic email forwarding
- Email delegation
- Students import
- ChromeOS device import
For example:
- If Email delegation is enabled, the Delegated auditor will be able to use Unlock and request enablement of Email delegation.
- If Email delegation is not enabled as additional permission, the Delegated auditor will not be able to use Unlock and request the action.

Add the Additional permissions and click on the Save button
Access GAT+ as Delegated auditor
Your delegated auditor can now launch and access the tool from their Google Apps button.
In the Google Chrome session click on the Google Apps menu button > scroll down in the menu and click on GAT+
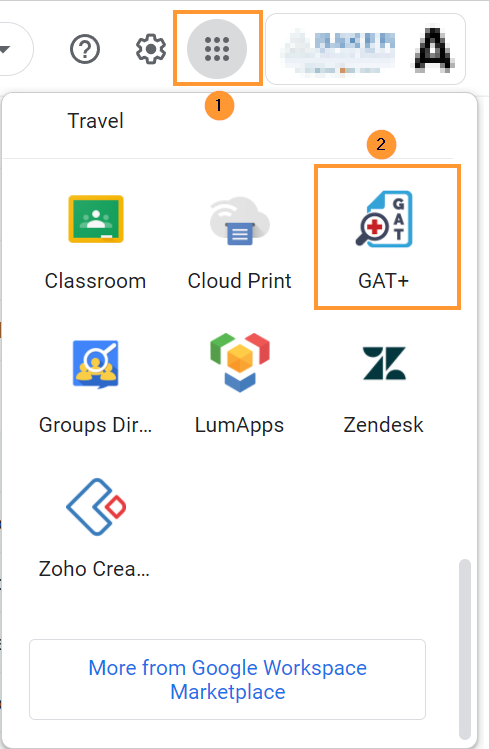
Accessing the tool as a delegated auditor
When the Auditor logs into GAT+, they will have access only to the selected by Admin audit areas

In the Auditing Areas, they can utilize all of the features of GAT Unlock of course with Security Officer approval.
- They can modify and remove permission to download or view file content.
- They can download emails, view emails, and remove emails from users’ Gmail accounts.
- They can set up email delegation to give one user direct delegation into another user’s Gmail account.
- They can remove and add permissions from Drive and much more

Security Officer
If the Auditor is also a Security officer – they will be able to see the Security Officer section in GAT+
- Configuration > Security officer

- How to assign a Security Officer.
See Details
What is GAT Unlock?
GAT Unlock is the most sophisticated security management mechanism for Google Apps (Google Workspace) available today. It works on the principle that access to documents, or change of ownership of documents, without the owner’s knowledge or permission can only be accomplished with the active input of at least two people in the organization. One of these will be the requestor who must be an Administrator, the other a Security Officer (or Verification Officer), who must be identified and verified through a senior executive in the organization.
This is an extra service on top of all GAT versions and for non-education domains comes with a limited cost. All license types must apply for this service if they require it. It does not automatically install nor can it be self-configured.
Policy
Due to security reasons, we do not enable GAT Unlock during the trial version of the app.
From the introduction, the service will be visible to domains and each domain Admin can apply to have it enabled. To avail of this service please email unlock@generalaudittool.com with your request. The requesting email must contain the following 4 items.
- The contact details of the Google Apps Administrator applying.
- The name of the Security Officer(s), her/his position(s), email and phone number.
- The contact details (email and phone number) for the person from whom the GAT team must seek confirmation before enabling this feature (See the list below for the minimum level of organization officer we expect to have to request approval from. Please send us their full contact details also and inform them they may receive contact from us.) This is required to verify the separate identities of both the Administrators and Security Officers.
- The PO details for the requested service, see the price list below. (Not required for education domains that have purchased GAT.)
There can be many Security Officers, and the service will be available to all Super Admins once enabled.
| Number of users in the domain | Verification Requirements or job position to approve the enablement of the product |
| 1- 49 | Owner, CEO, CFO |
| 50 – 99 | CEO, CFO, Head of HR, CIO |
| 100 – 499 | CEO, CFO, Head of HR, CIO |
| 500 – 999 | CFO, Head of HR, CIO |
| 1,000 – 4,999 | Head of HR, CIO, CSO |
| 5,000 – 9,999 | Head of HR, CIO, CSO |
| 10,000+ | Head of HR, CIO, CSO |
You can add as many Security Officers as needed, all of them will receive the Super Admins or delegated auditors requests and any of the designated Security Officers will be able to approve or deny.
The Security Officer list for all domains is maintained by generalaudittool.com staff. Only Security Officers and Approvers can request changes to the list via unlock@generalaudittool.com
When the ‘GAT Unlock’ service is enabled Administrators can generate access or change requests, but only Security Officers can approve them. An individual can be a member of both lists but cannot approve their own requests. Only a Super Admin or delegated auditor can request permission to change files/folders or access to contents. The Security Officer’s sole purpose is to approve requests sent.
By design a Security Officer cannot self approve their own requests, you would need a second Security Officer to perform changes.
For easier management, it is recommended to have at least two Security Officers in the domain.
Administrators and Security Officers should remember the verification process is there to protect you, your domain data and your user’s privacy and rights, while also enabling you to act in the organization’s best interests.
Why all this effort?
We really respect your data security. We respect your company’s right to be protected. This is the highest security model available within Google for the Work Environment.
How to Use GAT Unlock
File Management – Changing ownership or file access rights
GAT Unlock is tightly integrated with the powerful search and filter options available in GAT+. This means you only have to do things once.
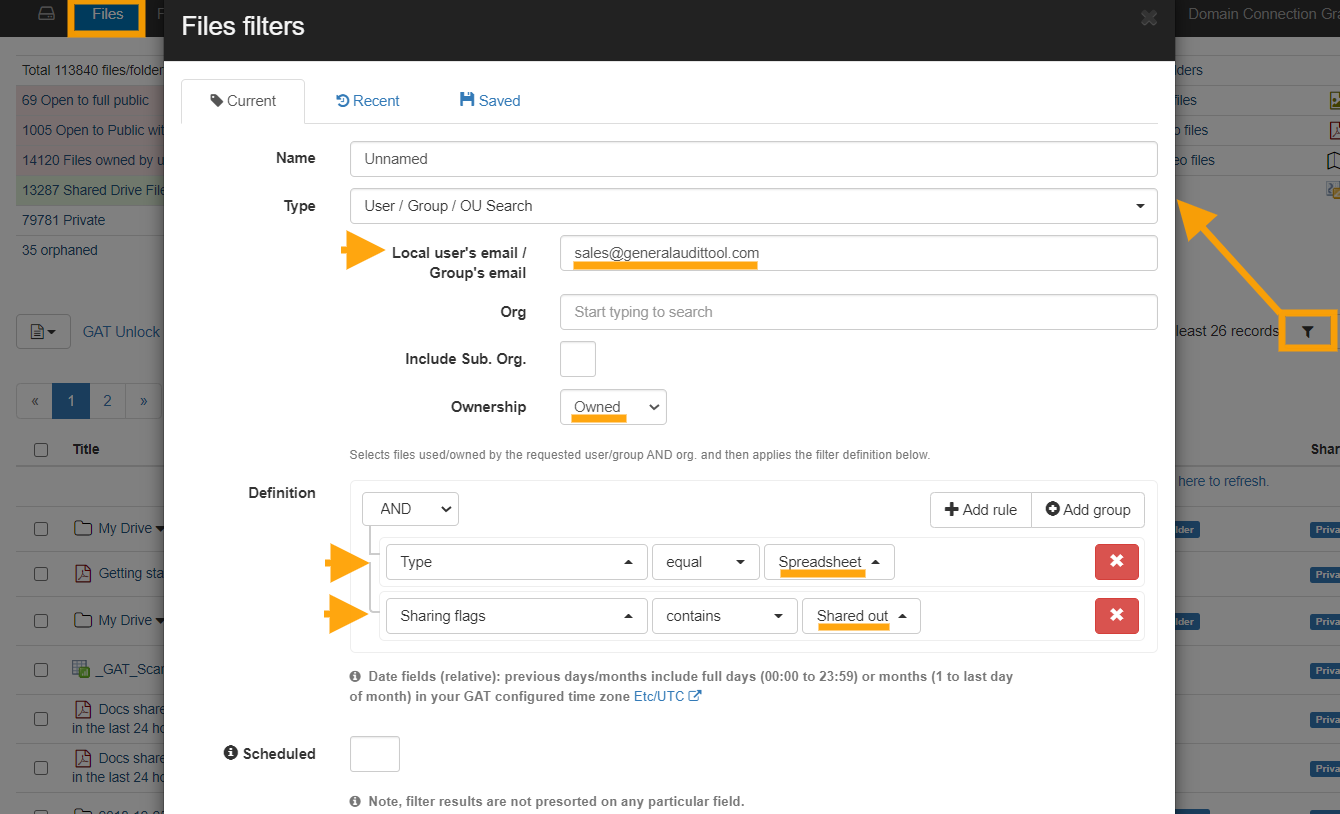
In this example we are going to find all the spreadsheets owned by the group ‘sales’ that are shared externally, then we will remove the external sharing and change the ownership (on all the selected files at once).
💡 TIP: Always narrow the file request with a search first, saving time and simplifying approval.
Step 1: Click on the ‘Apply custom filter’ button in Drive Audit.
Select the following option:
- For the filter Type select User/Group/OU search, we will enter the ‘Sales’ group in this field ‘Local User/Group’, make sure to enter the full email address.
- Under the Ownership option select ‘Owned’, this will show all the files owned by the ‘Sales’ group. Otherwise, it would show all of the files associated with the ‘Sales’ group, were Sales shows up as Owner, Editor or Reader.
- In the filter Definition area, select the parameter Type equal to Spreadsheets and to add another search parameter click on the ‘Add rule’ button and select ‘Sharing Flag’ contains ‘Shared Out’. Selecting shared out will only focus on files leaving your domain.
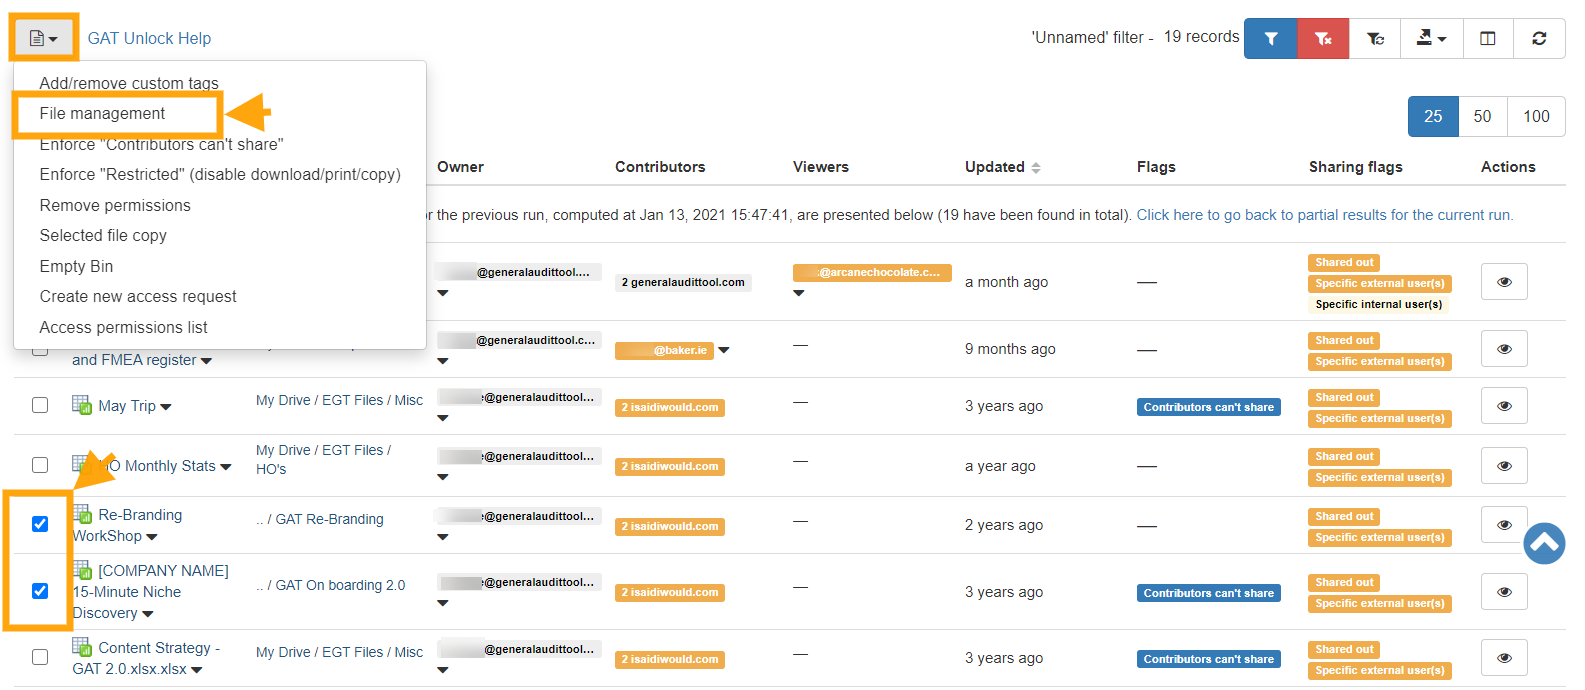
Step 2: Next select the Files you want to act upon, clicking beside ‘Title’ will select all files from the search, or you can select individual files, by clicking beside the files. Click on the button File operation and then select the File Management option. NOTE: The transfer will work on both Active and Suspended accounts.
Step 3: In this example, we are making the account manager the new owner of the selected files.
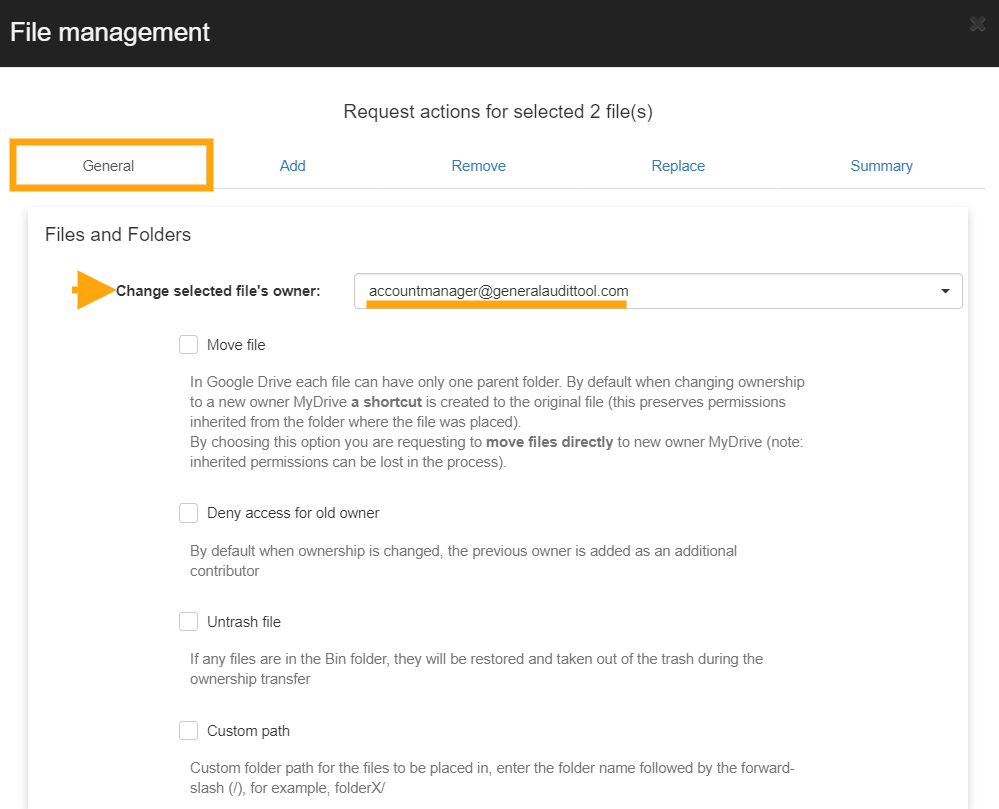
We can also remove external access to the spreadsheets and add or replace the sharing permissions.


Then click on Send request.
An email is going to be sent to your security officer. Click here to see and approve the request.

If the security officer approves your actions, they will be executed and you will be notified.
If permission is not granted by the security officer, you will also be notified and no actions will be taken.
Access Permissions Granted – How to Silently Copy or View Files
We are going to use a powerful search feature inside of the GAT+ Drive audit to identify the contents of the documents we’re going to investigate. This feature is called the ‘Full content text search’. It allows admins/delegated auditors to use a word or sentence to search through all of the files across the domain and to return documents that contain them.
Step 1: Click on the ‘Apply custom filter’ button.
Step 2: Enter the word or sentence to return files that contain them. Select the user’s account you want to search through you can leave this field blank to search your entire domain’s Drive or enter a user, Google Group, or Org Unit to search through them only.
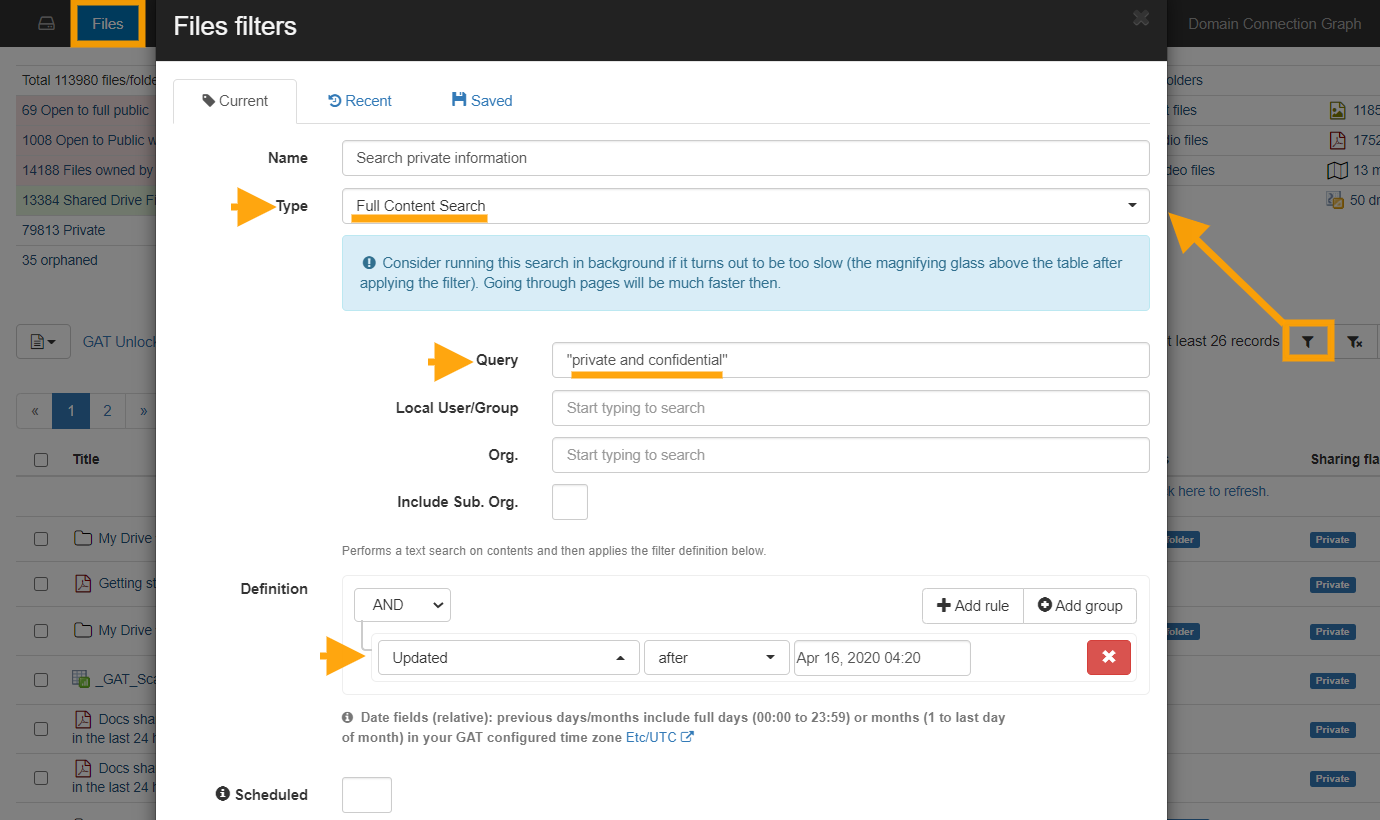
You can also use multiple rules in the Definition section of the (Query builder) Apply custom filter. I used the Updated search parameter. Once you click on the Apply button the search will begin.
It might take some time depending on how many files you have across your domain.
Step 3: Select the files you are interested in, remember that these files contain the sentence “private and confidential”.
Click on the ‘Files operation’ button and then select ‘Create new access request’.

Step 4: Next we will select a date in the future, we will have access to these files until this date. You have an option to write to your security officer explaining why you need access to these files.

Send the request to the Security Officer(s) for approval.
The following email will be sent to the Security Officer.

The Security Officer can click on the link in the email and will be taken to the approval area (Access Permissions) in GAT+.
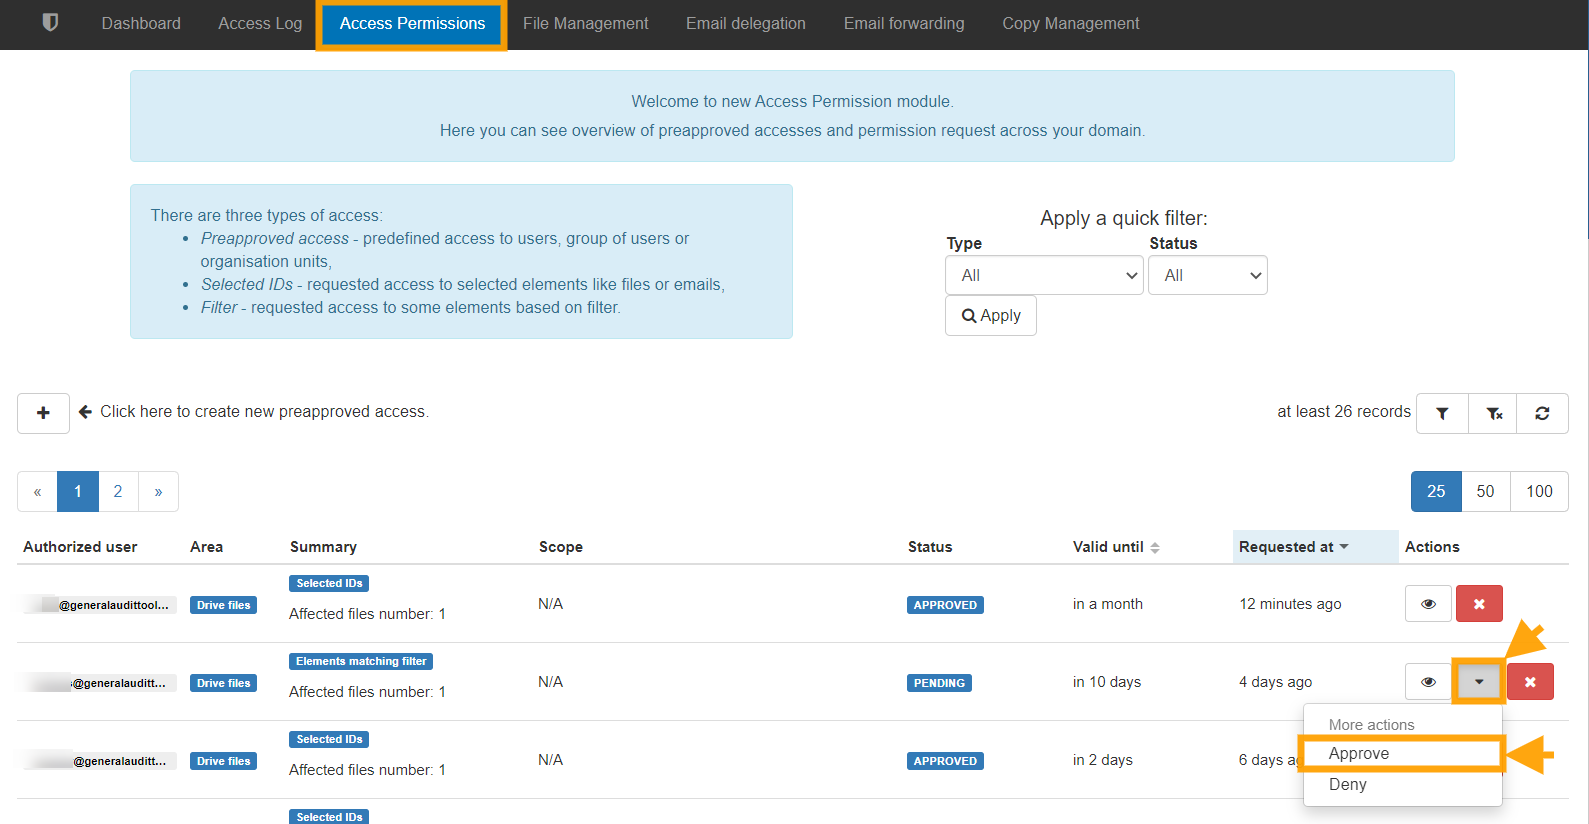
When the Security Officer approves access an email will be sent to the requesting Administrator/delegated auditor informing them. The Admin then opens the ‘Access Permissions list’ menu again and can see the full list of their Access requests along with the time left for each request to remain valid.

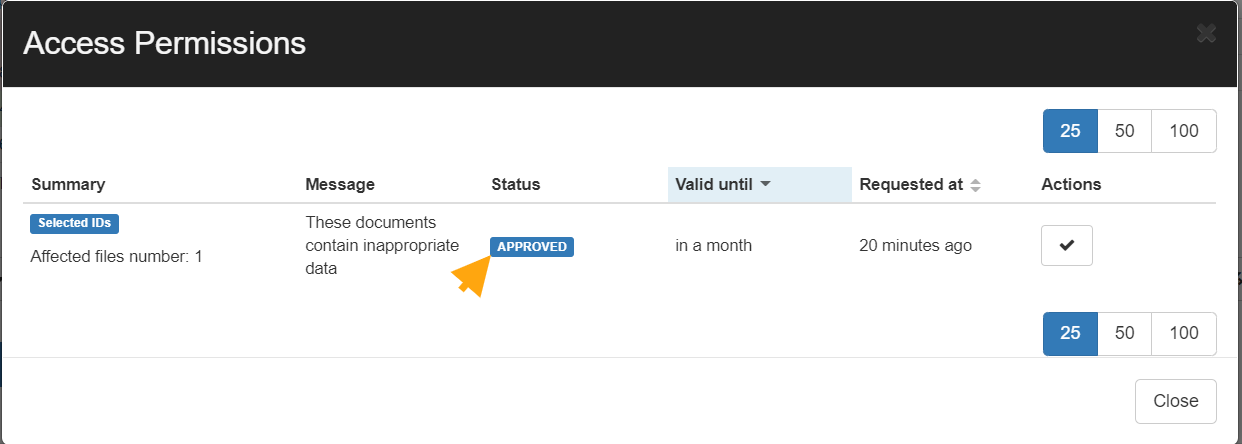
Once the request is selected a new window will open with the results, on the right-hand side those files will have a new tab called ‘Actions‘ under that the requestor can Download or Show file the contents silently without the owners’ awareness.

Pre-approved Access for Admins to All Files for a Range of Users
If your Super admins wish not to get Security Officer approval every time they want to make file permission changes or to view file contents, a security officer can give them pre-approval.
In the Security Officer section on the GAT+ sidebar menu, select ‘Preapproved Access’ and then click on the ‘+’ button to add a new Preapproved admin.
Once clicked a new ‘pop-up’ screen will appear.
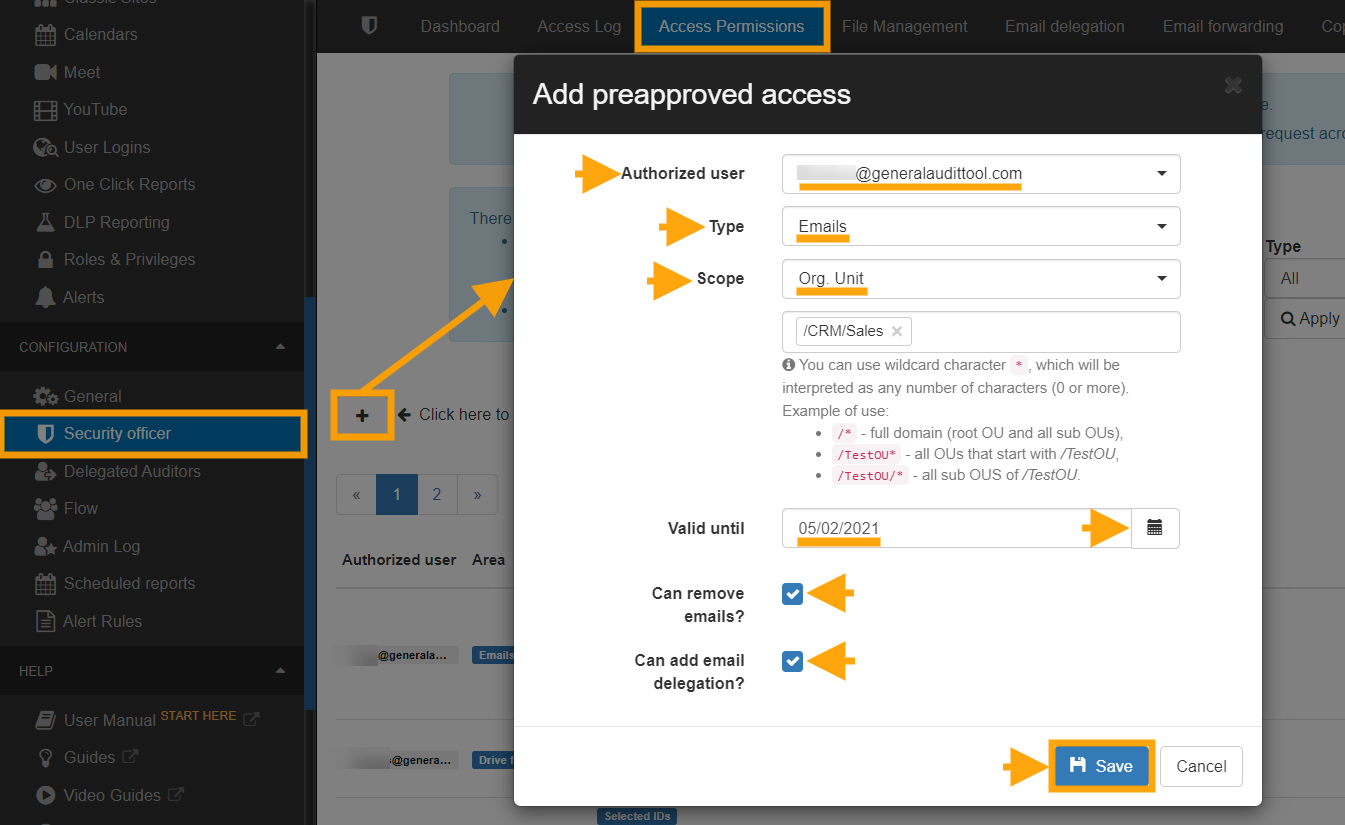
Here the security officer can add the email address of the Super Admin, the OU over which they will have access, they can select a full OU tree and set approval access until a certain future date. In the above screenshot, I gave Alex (super admin) access to the Support OU
Multiple different approvals can be given by the security officer, including several to the same Super Admin, each covering different scopes.
Changing Ownership of an Entire Folder Tree
Another feature of ‘Unlock’ is that it enables an often requested task of moving an entire folder tree, root folder and sub-folders, from one or many owners to a new owner.
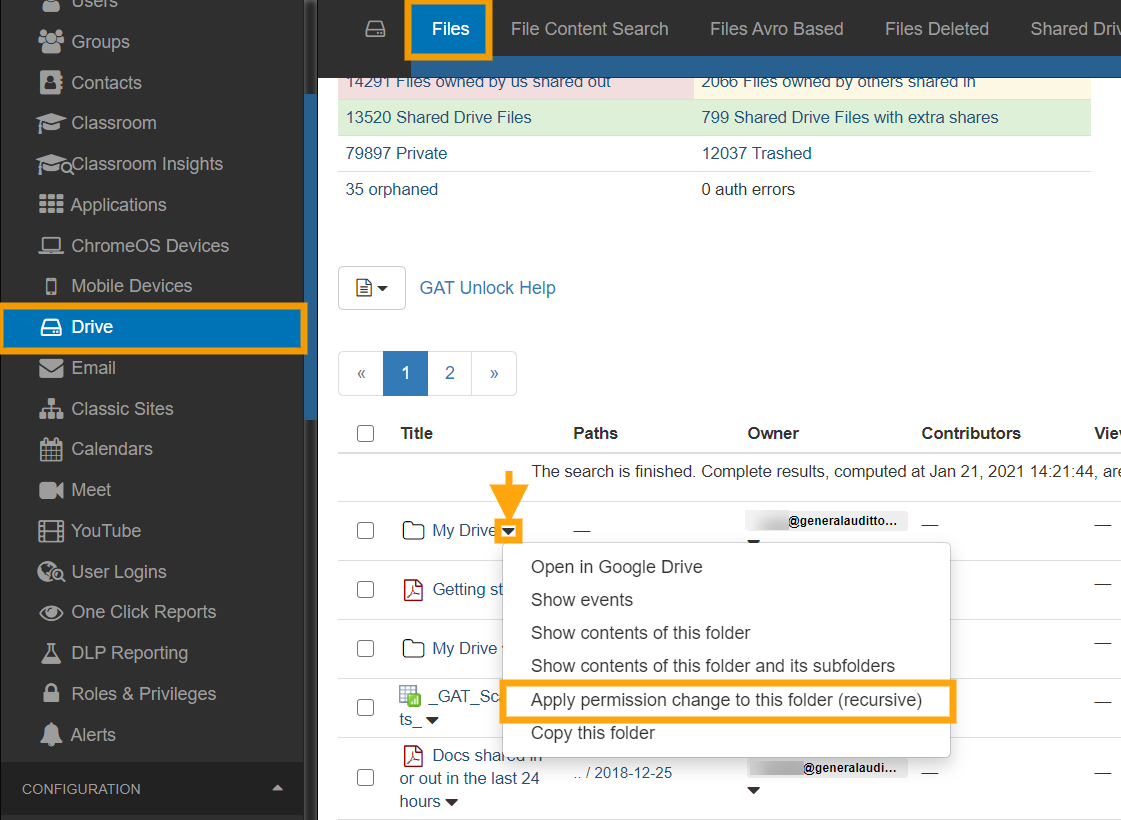
This task is completed with the File Management tab. Use the drop-down menu button next to the folder name to see the options. Click on Apply permission change to this folder (recursive). When the File Management option menu appears, enter the new owner’s email address. And make sure to remove the previous owner as editor.
Note: When changing ownership, the previous owner is added automatically as an editor. You can “deny access for the old owner” if you choose that option.

This is an ideal feature for consolidating a shared folder structure, or handling leaving staff or students.
Delegating Access to an email account
GAT+ allows Admins to delegate access for a User account to another User for a certain period of hours. This may be for business purposes but it also facilitates the fast search and viewing of all the account emails via another user’s browser.
BEFORE USING: Please ensure email delegation is allowed for users in your domain. Go to the Google Workspace Admin Console and under Apps > Google Workspace Apps > Settings for Gmail > User settings check if the email delegation box is allowed for your domain.

Launch the GAT+ tool, enter the User Audit section and click on the Email Info Tab.
In the Email Info Tab, select any user and click on the Actions button to add an email delegate to their account.
You have the ability to remove existing mail delegation which is already in place as well.

Here the Admin can select the account they wish to gain access to, then select the account they want to give this access to and finally select the number of hours they would like delegated access to be approved for. Once the request is sent, the Security Officer will still have to approve before the delegation is created.
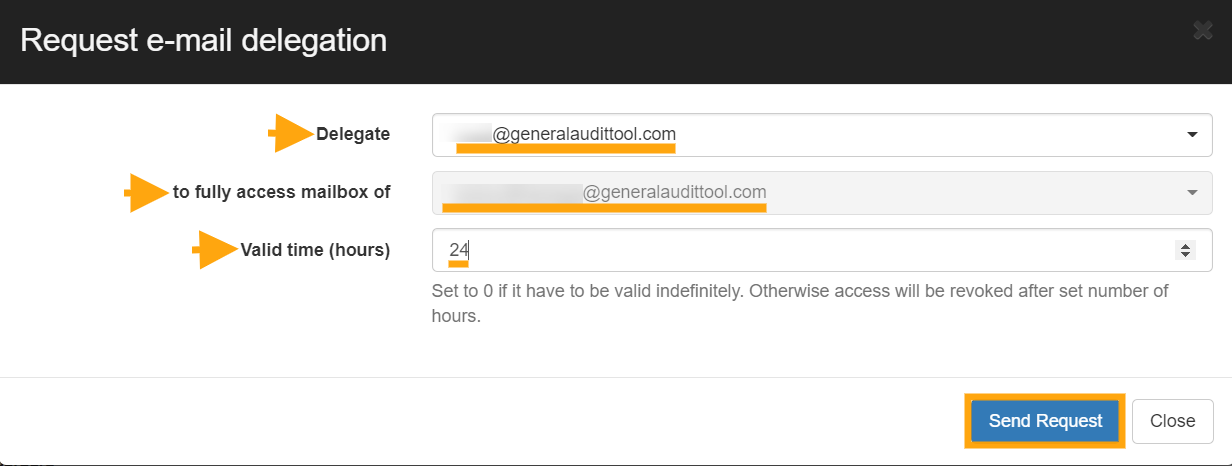
Once approved the delegated account appears in the accounts drop-down list when the profile picture is selected in Gmail.

The delegation will automatically be revoked after the requested time period.
Note: If during the period of delegation, the account under audit, logs into their Google account and goes to their email settings, then under ‘Accounts’ the account owner will see that the Admin has granted delegated access to the account.
In addition, if the delegated user reads any unopened email in the audited account, this email will be marked as ‘read’.
Delete Spam, Inappropriate or Accidental Emails
There are multiple reasons to have the ability to identify and remove emails that have been received by all or any of your domain users. Here are some unwanted scenarios:
- An email is sent to the wrong user or group
- An email contains inappropriate content
- An email that contains sensitive information
- An email that has gone past spam filtering or is a phishing email.
GAT+ allows Admins to delete these emails from all accounts at once.

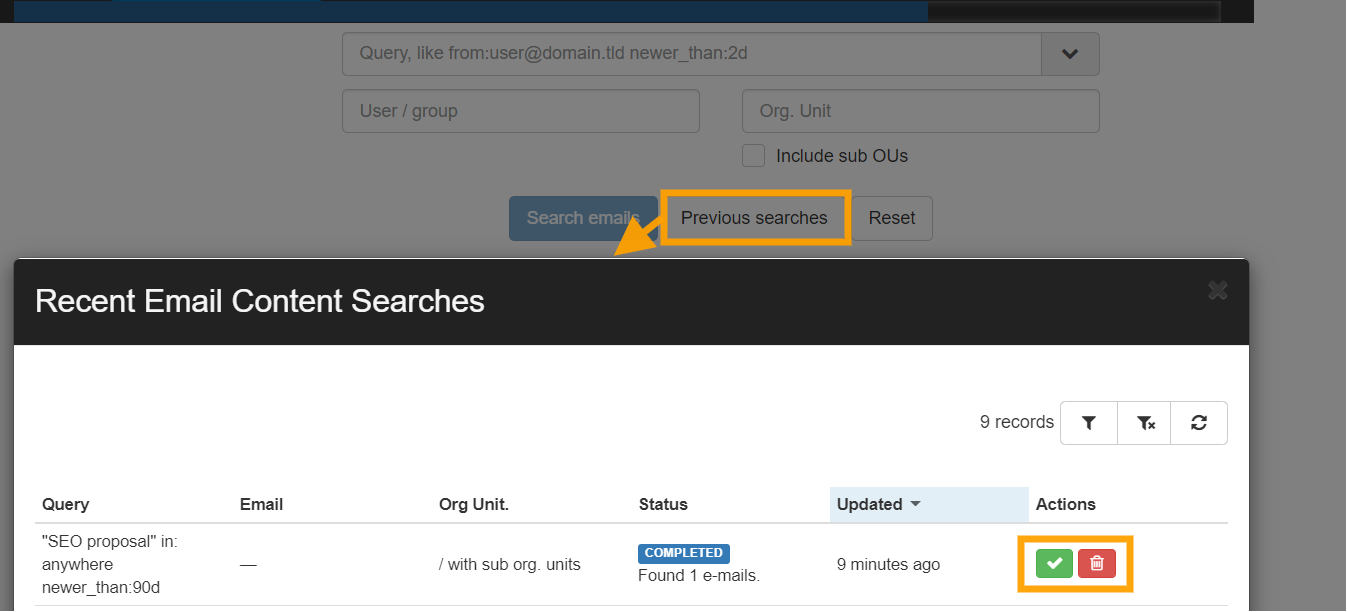
We recommend using ‘Email Content Search’ for tracking down these emails. It is a ‘real-time’ search that is highly configurable (see ‘search tips’ link beside the search box). In the screenshot above we use the example search parameters
“SEO proposal” in:anywhere newer_than:90d
This tells GAT+ to search in all emails, for all users and look for emails that contain the words “SEO proposal” which are also newer than 90 days. When the results come back to select the emails you wish to view/download/delete then click the “Email operations” button and select “Access permissions list”.
When you search if the result cannot be displayed in a timely manner, the search goes into Background search.
You can access those searches by selecting ‘Previous searches‘.
All older or background searches will be displayed there.
Once completed, under the ‘Actions’ tab select the green checkmark to display the results.
Once the emails are selected, click on the ‘Access permissions list’ button and send a request to your SO (security officer). Your SO will have to approve your request.
Before sending the request if you intend to delete the emails rather than just view or download them then check the ‘Allow removing emails’ box.

As an option, you can send a message to the Security officer giving a reason for the investigation.
After performing those steps please select and click ‘send request’ and wait for approval to be returned from the Security Officer.
You can check all the requests to the SO in the “Security officer” section in GAT+.
Note: You can not self-approve your own request. An admin sends the request the Security officer approves.

Once your request has been approved, you will receive an email notification stating that.
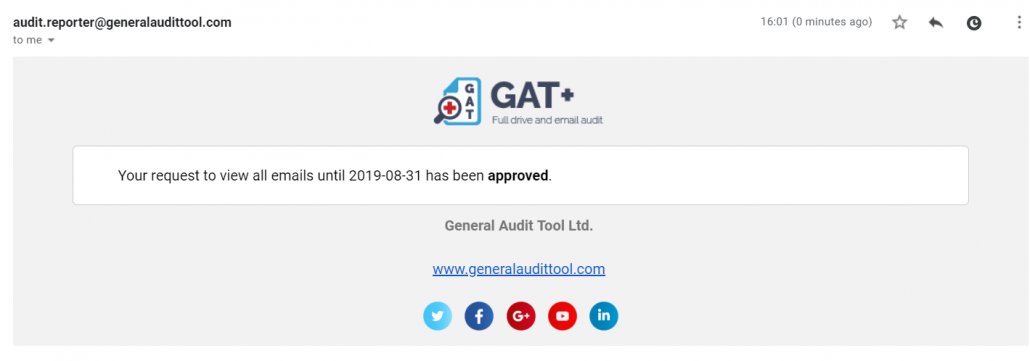
Note: While you wait for the approval, you might use the tool for other searches. When you come back to “Email Content search” click on the Previous searches/Unlock button.

You can then delete one or all of the emails using the drop-down option in the Emails Operation button.
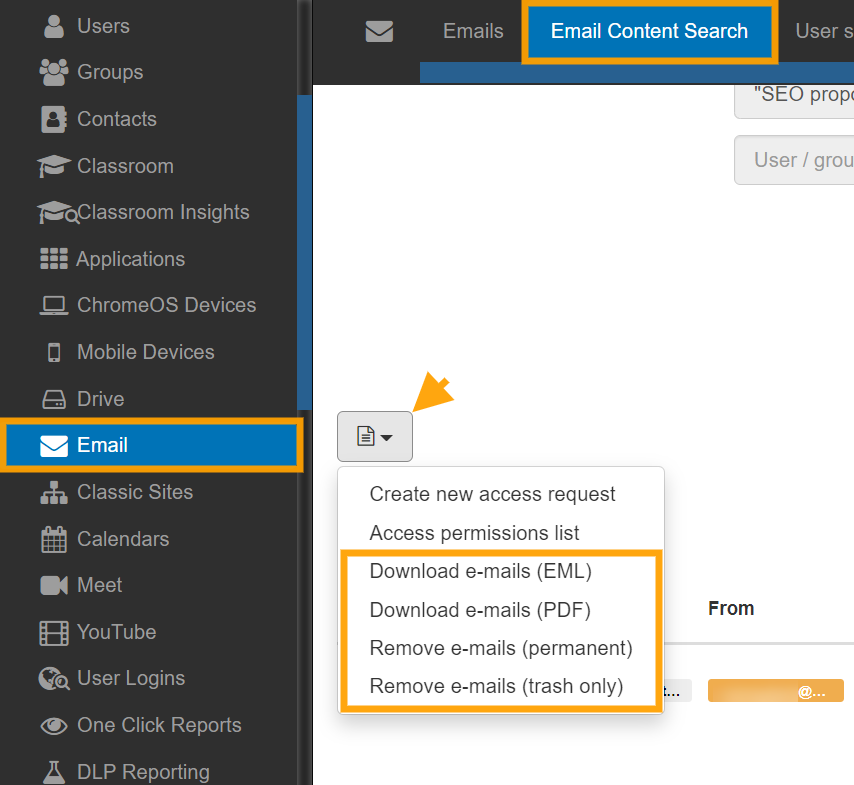
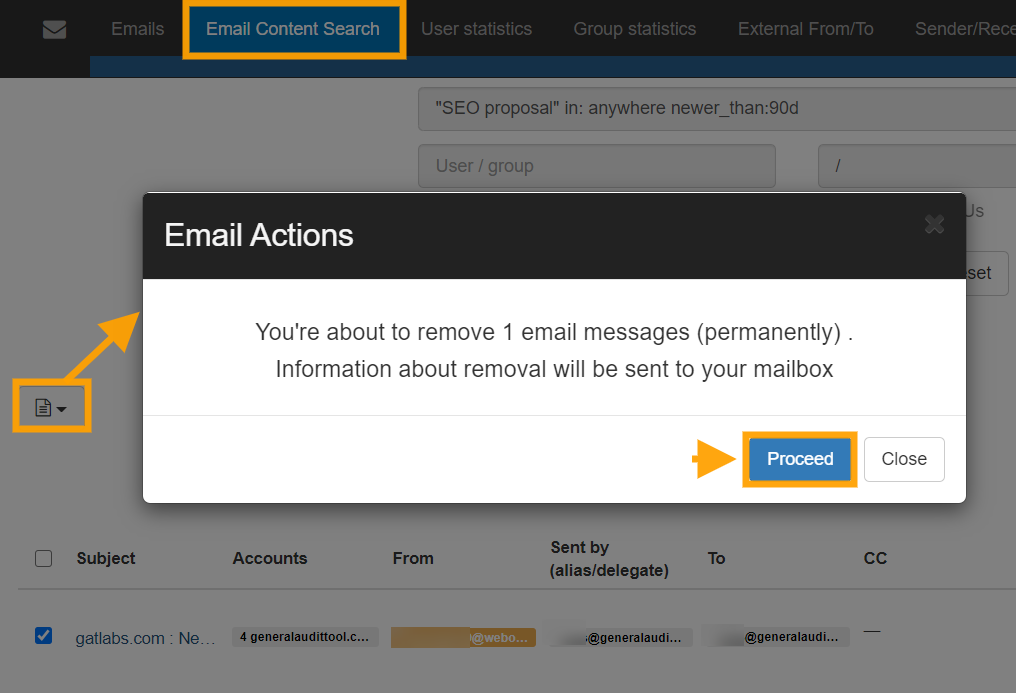
By default, you can send the emails to the user’s Trash folder on their Gmail but if you wish to permanently delete these emails then select ‘Delete permanently.
Pre-approved Access for Super Admins to all Emails
To enable pre-approval for Super Admins navigate to the Configuration section of GAT+ and enter the security officer area.
Once there click on the Preapproved Access Tab and click on the plus icon “Add new pre-approved access”.
Your security officer will have to select you (super admin) to have pre-approval over users across your domain.

This is ideal for situations where Admins do not need to get constant approval to view/download or remove emails.
An example would be in an education domain where the Super Admin would have full open access (view/download or remove emails) for all Student OU’s but would still have to get selective approval from the security officer to access an in the Staff or HR OU.
For a single OU, level adds value like /Staff (Note, this will not grant access to the OU /Staff/IT unless “Sub Org. Units equals Yes!).
In the above screenshot, I put Ferdows (Super Admin) to have pre-approved access to the entire domain by selecting / for the Org Unit and I made sure to cover all Sub-Org Units. / means the root User Org. Unit.
They have access to remove and add email delegations as well because I enabled the last two option which is “Can remove?” and “Can add email delegation”.
Non-Super Admin Auditors
This feature is ideal where Super Admins want to delegate the audit function to local managers or regional security personnel.
GAT+ allows the Admin to select the scope of users that will be covered by the Auditor.
The admin can also select what audit areas to be included.
Auditors will have access to Audit areas and for the scope, they are given only.

Set Up Security Measures
Products: GAT+ & Unlock
2-Step Verification (2FA):
- Monitor and alert on disabled 2FA .
See Details
Two-factor authentication (2FA) is a form of authentication that requires only two authentication factors. The first factor is your username and password and the second factor is another method that you choose.
GAT+ Alert Rules functionality can be configured by a Google Workspace Super Admin when these alerts are triggered by end-users the recipients of the rule get notified.
There are multiple types of Alert options:
- Applications
- Emails
- Drive
- YouTube
- Mobile Devices
- Users
- User Logins
For users, you can set up different alerts and be notified of different actions.
- Notify on Two-Factor Authentication (2FA) backup codes used
- Notify on 2FA disabled
- Notify when an account has not been used for a period of time
- Notify when an account is used again after x days of inactivity
- Notify when storage exceeded
Configure an Alert Rule
Navigate to GAT+ → Configuration → Alert Rules

Click on the “+ sign” and a new window will be displayed, fill in the details.
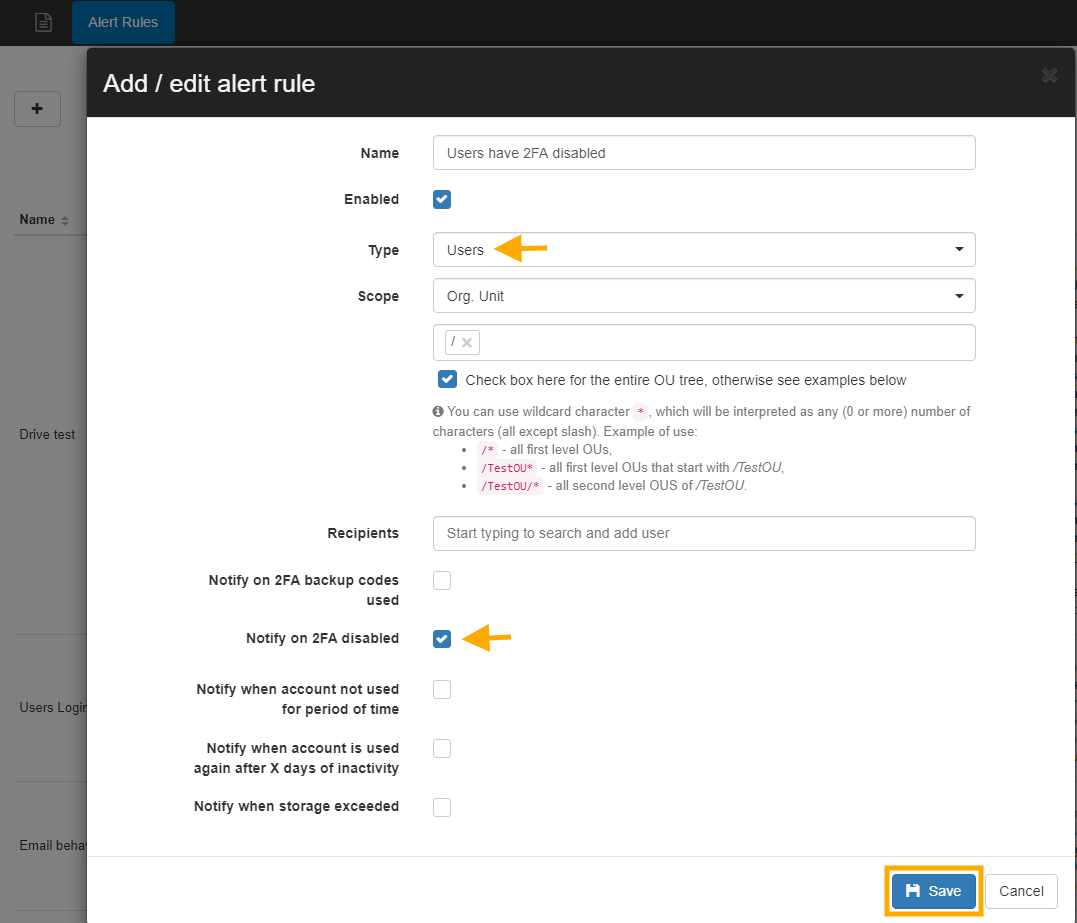
- Name – enter the name of the Alert.
- Enabled – checkmark to enable or disable the Alert.
- Type – Users.
- Scope – select what users for which alert will be triggered.
- Recipients – Add a user email or group email for Email notifications, or leave as blank ( this will show alerts only in the alerts section).
- Select – Notify on 2FA disabled.
- Click on the Save button to save the rule.
Result
The rule can be viewed, edited, or removed in Alert rules

When the Alert is triggered they will be generated and displayed in Audit & Management → Alerts

Video How-to: Two-Factor Authentication (2FA) Alert
Data Loss Prevention (DLP)
- Set alert for sensitive information sharing.
See Details
GAT+ audit tool provides an extensive and detailed overview of the entire Google Workspace domain. Drive audit allows a global and detailed view of Google Drive.
Our tool provides an alternative solution to Google Admin Console alerting, within our tool we call it Alert Rules.
In GAT+ we have different types of alerts
- Applications
- Emails
- Drive
- YouTube
- Mobile device
- Users
- Users Logins
The Drive Alert rules are based on a number of different activities:
- The number of files Downloaded – per day
- A number of files Shared out – per day
- Alert if the regex matches newly shared out files (google native files, PDF, and TXT files)
- Aler if “share to” address matches a specific pattern
Configuring Alert Rules
Open GAT+ navigate to Alert rules under the Configuration tab
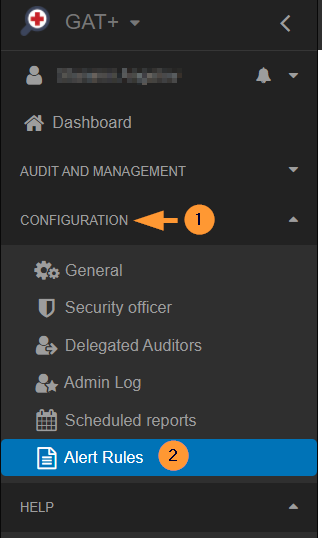
Select users
Click on the + sign and a new window will be displayed, fill in the details as shown below:
- Set up a Name for the rule
- Set the checkmark to Enabled
- Set the Type to Drive
Choose the scope who will be affected by this alert rule
- It can be a user, group, or org. unit.
To apply it to all users on your domain enter /* for the Org. Unit

Pick and select the Recipients it can be any local user email or group email from your domain or someone from outside.
Note: If no recipient selects the alerts will be simply reported in the Alerts tab on the left-hand side menu.
The rules on which an alert will be generated are:
- Alert on number of files downloaded (files in a 24 hour period)
- Alert on number of files shared out(files in a 24 hour period)
- Alert rule can be added as an alert if the regex matches a newly shared out file (doc, spreadsheet, presentation, PDF, text files):
- Alert if “share to” address matches specified pattern.
Set up the rule
For the”Alert if the regex matches a newly shared out file (doc, spreadsheet, presentation, PDF, text files)”
Click on the + button to add a rule.
Two options will be displayed:

Custom: Select and add custom Regex pattern

Click on the Select button and predefined Regex pattern examples will be displayed.

Pick any of the rule examples and click on the “Select” button beside it
Note: If you would like us to add additional Regex patterns that you think is important, please email us at support@gatlabs.com with your suggestion.
The rule will be added
Click on the + sign underneath to add multiple Regex patterns.
Additional rules
Additionally, you can set extra actions:
- Notify the user if you want to show a custom message to the end-user who shared out this document.
- Remove shares if you want to remove the external shares automatically.

Click on the Save button to activate the rule.
Viewing Alert Rules
Alert rules can be found in the Alert rules under the configuration
An admin can quickly see the name of the rule, the type of the rule if it is enabled, what scope, and the recipients.
Under the summary tab, an admin can see exactly the alerts enabled for this rule.
Under the actions tab, the rule can be viewed (eye icon), it can be edited from the pen icon or deleted from the x button.

Result
When the rules are violated the Recipients will receive email notifications and a record for the rule will be generated and placed under Alerts
The recipient will receive an email notification below.

All the Alerts can be seen under the Audit and Management area in GAT+.

Video how-to
In the example below we will create the Drive Alert rule for newly Shared Out files.
- Configure DLP policies (Knowledge Base Posts).
External Sharing and Permissions
- Remove public and ‘public with link’ access.
See Guide
Remove Permissions from Google Drive Files (everyone and everyone with a link)
GAT+ Drive audit allows Admins to see the big picture of their Google Drive and the Sharing Permissions they have.
This guide will walk you through each step to ensure secure and efficient file management within your domain.
Admins can take action on the Drive files by:
- Add – adding users (permissions) to the file
- Remove – removing users (permissions from the file
- Replace – replacing users (permissions) from the file
Before you remove permissions for ‘Docs shared out with link’ it is best practice to automatically inform your users of those shares, allow your own users to take the initiative to clean up the share.
If the shares have not been removed in the allocated time period, as a super Admin you can remove those permissions from Drive Audit.
How to Remove Google Drive Permissions
Find the files with the Sharing permissions you want to remove.
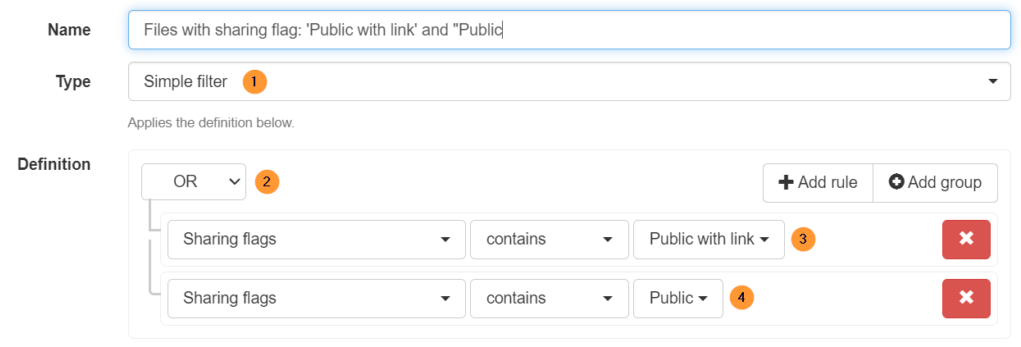
In GAT+ > Drive > Files filter by Public or Public with link permissions
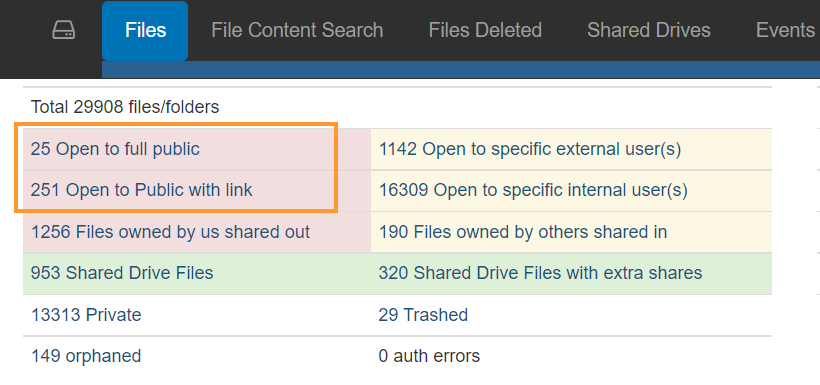
Additionally, you can apply a filter to find All files that are Shared with the permissions “Public” and “Public with a link”
- Type – simple filter
- Definition – OR
- Sharing flags contains Public with link
- Sharing flags contains Public
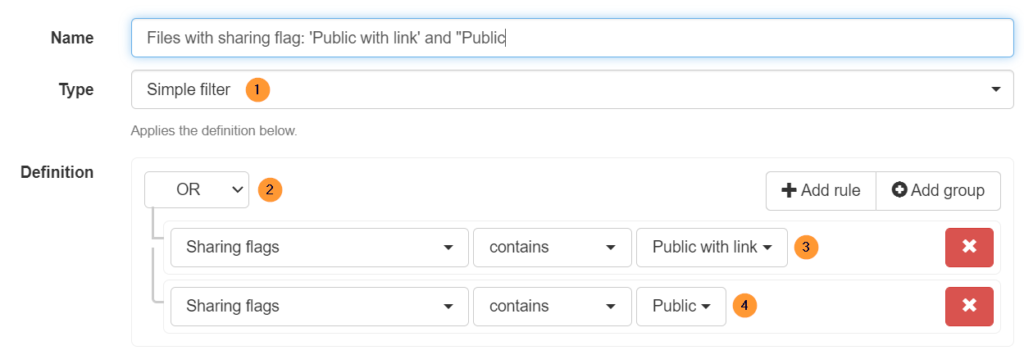
Note: The sharing permissions:
- Public equal Everyone
- Public with link equal Everyone with link
Remove permissions directly
When the files are found click on the permission.
- Remove permission for only this file
- Remove (user/permission) as Viewer from current files in the current filter
- Remove (user/permission) as Contributor from files in the current filter
- Remove (user/permission) as Contributor and Viewer from files in the current filter

When the result of the search is displayed
- Select the files – click on the check mark beside the Titles
- Click on File operations (4) > Remove permissions (5)
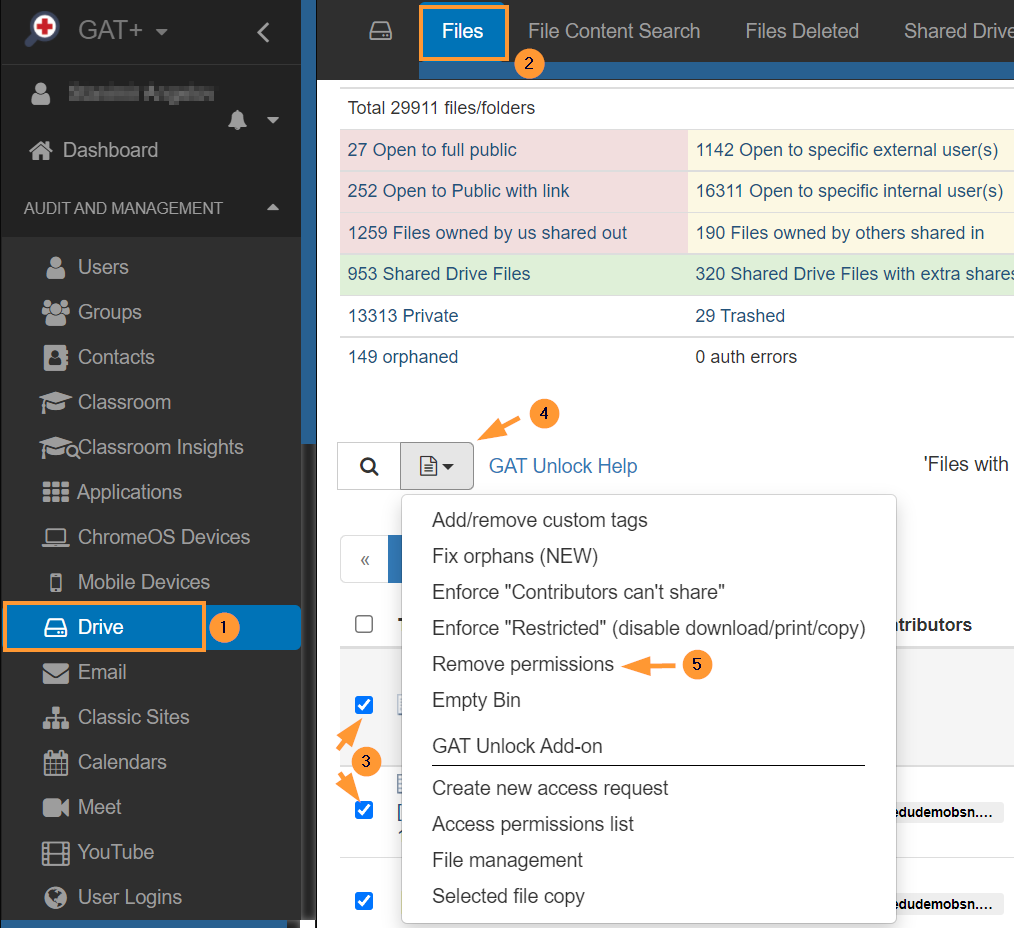
A pop-up menu will be displayed with options to remove available
- General – remove all internal and external shares
- Internal – remove internal shares
- Remove all internal shares
- Remove only the following internal shares
- Remove users – remove individual users
- Remove domains – remove domains
- Remove everyone – remove “everyone/public” permission
- Remove everyone with link – remove “everyone with link/public with link” permission
- Only shared X days ago
- Only accessed X days ago
- Remove Group members
- Groups – Type emails of groups from which members will be included in share removal.
- External – remove external shares
- Remove all external shares
- Remove only the following external shares
- Remove users – remove individual users
- Remove domains – remove domains
- Remove everyone – remove “everyone/public” permission
- Remove everyone with link – remove “everyone with link/public with link” permission
- Only shared X days ago
- Only shared X days ago
- Remove all external shares excluding the following
- Shares to keep – enter shares to be kept and not removed
- Replace
- Replace “Public” with “Public at the domain”
- Replace “Public at the domain” with “Public at the domain with the link”
- Replace “Public with link” with “Public at the domain with a link”
- Replace “Public” with “Public with link”
For this case as we searched and found Public and Public with link files
- Click on External (1) – remove external shares
- Remove only the following External Shares (2) – remove the external shares
- Shares to remove – enter Everyone and Everyone with link (3)
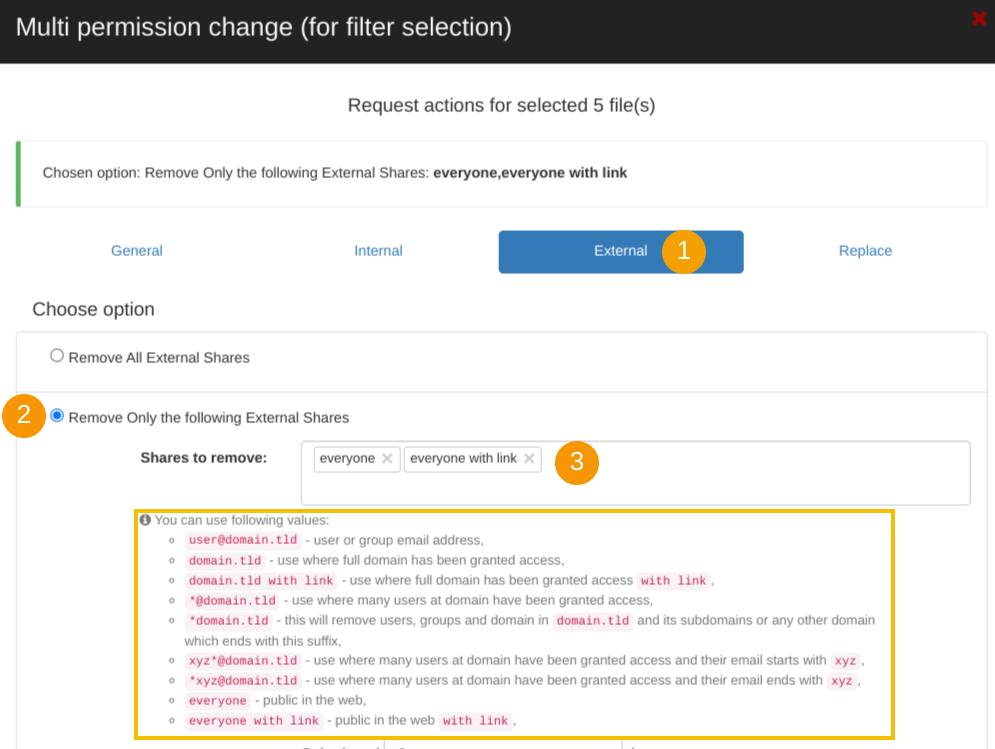
Report only
From the options select Report only under the Configure section. This will guarantee only a report is generated, and NO ACTION will be taken on the files.
If Report only is not enabled the action will be carried
Furthermore, the admin can also:
- Notify local users
- None – disable
- Owners – notify owners only
- All – notify all
- Email subject – enter the subject of the email
- Email message – leave a message to the end-users
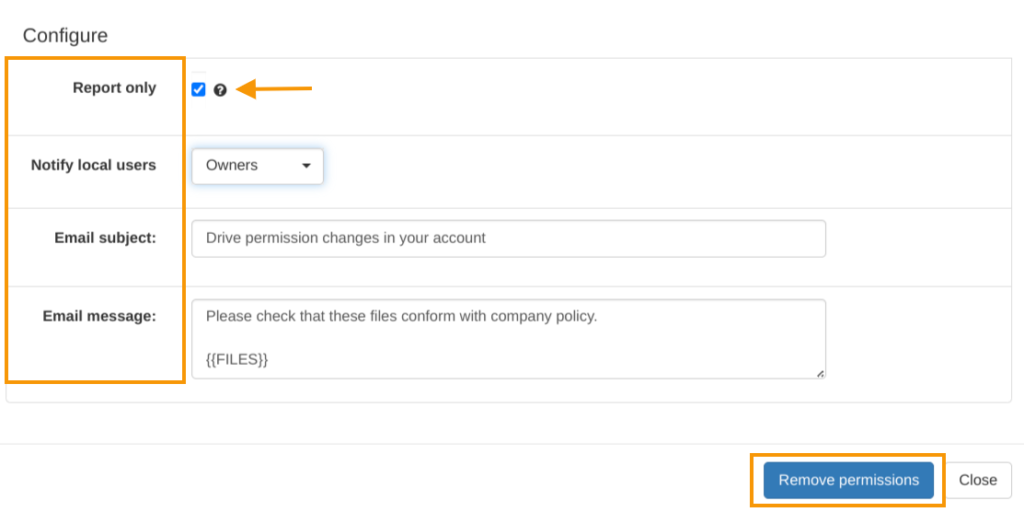
Click on the Remove permissions button to remove shares Or report only.
Note: When “Remove permissions” is clicked – the shares will be removed.
Remove permissions via Scheduled report
As above find the Public or Public with link
Then click on the Scheduled button, and fill in the required details
- Scheduled – enable the report to run as a scheduled report
- Occurrence – pick a time suitable for you
- Enabled – enable the report
- Recipients – pick who to receive this report
- Apply and Schedule

The report will be scheduled to run based on the Occurrence time.
Navigate to GAT+ > Configuration > Scheduled reports
From the right side under Actions click on the Job Action Edit button
Select External > Remove only the following External Shared and enter “everyone” and “everyone with link”

Under Configure
- Status = enabled
- Report only – the Shares will not be removed, only the report will be generated and sent to owners – if the option chosen
- Notify local users – If the option is used – the users will receive an email as explained above including the Email subject and Email message.
- Save settings – click to save the report

Result
Once you enable the settings, the report will automatically run every day at the selected occurrence time, and it will remove the shares based on the applied filter. GAT+ will record the removal of these shares in the Admin Log. After completing a new scan of the Drive metadata, GAT+ will display the results, showing the removal of public and public with link shares from the selected files.
Keep record
Finally, before removing some or all of these permissions. We would recommend you export the data as is to a Google Spreadsheet for record-keeping purposes.
- Automate removal of outdated shares .
See Details
Automatically take action on file permissions after a certain period of time has passed. GAT+ provides this option via a Scheduled feature
Here is a common scenario: Remove public file permissions, if the file has been shared out (outside the organization) longer than X days
- Remove public permission (Shared out) longer than X days
- Essentially placing an expiry date on the sharing permissions.
Steps to configure these scheduled actions:
Access to GAT+ – Drive Audit
Navigate to GAT+ → Drive → Files → Apply custom filter

Apply filter
Apply the following condition (search parameters): Sharing flag equals Shared Out.
Next, add a rule to specify when these files have last been accessed: Last accessed (relative) Older than X days.
Last accessed; describes when a file was last time ‘used’ by internal or external user. File could have been added to folder, created, deleted, downloaded, edited, moved, previewed, printed, removed from folder, renamed, unthrashed, thrashed, uploaded or viewed
Updated is taken directly from the file metadata in the API, “Last time this file was modified by anyone”
Enter a suitable name for the Report.

Schedule Report
- Click on the Scheduled check box, more options will be displayed.
- Set Occurrence time (as an example) – every weekend
- Check-mark to be Enabled
- Click on Apply & Schedule

The report will be saved and Scheduled
Access the report
Navigate to GAT+ → Configuration → Scheduled reports

A list of all the Scheduled reports will be displayed.
Action can be taken for each of the reports under Actions
- Pen icon – edit the report
- X icon – delete the scheduled report
- + sign – Job action edit – set up an action to be taken on the Scheduled report

Schedule action to be taken
When the + sign is selected, a new window called Scheduled job details will be displayed.
Fill in the details and set the action to be taken.
- Click on External
- Select Remove Only the following External Shares
- Shares to Remove – enter the permission you want to remove: as an example (everyone and everyone with link)
- Additionally – Only shared – Enter the number of days since the File was shared out
- Shares to Remove – enter the permission you want to remove: as an example (everyone and everyone with link)
Note: Only files with the last recorded Shared out date will be affected.

- Give time frame
Only shared 30 days ago means files that have the shares (everyone, everyone with link) that have been Shared more > than 30 days ago, only those files will be affected and Shares removed.
Under Configure
- Status – Set to Enable or disable
- Report only – Set report only and take NO action
- Notify local users – Set to notify or not local users
- Save settings – click on the button to save the settings (Scheduled job).

Overall result
When the Report above is Scheduled and the Job is set to run weekly.
- The report for Files Shared out – will be generated on a weekly basis (as selected above)
- Based on the selected action, the Files that are Shared Out – longer than the 30 days selected, will be Removed
Audit your Google Workspace Environment
Products: GAT+ & Unlock
Users and Devices:
1. Audit login behaviour.
See Details
GAT+ now has an option to view the Events based on changes for the User Accounts Audit activity events
In GAT+ navigate to Users audit.
Click on Event tab on the top right

In here an admin can view the events types associated with the accounts such as:
- 2-step verification changed
- Password changed
- Recovery info changed
- Advanced protection enrollment changed
The event names associated with the accounts.

- 2-step verification disable
- 2-step verification enroll
- Account password change
- Account recovery email change
- Account recovery phone change
- Account recovery secret question/answer change
- Advanced protection enroll
- Advanced protection unenroll
If there is an event change happens onto user account it will be reported in Users – Events
2. Identify inactive or idle accounts.
See Details
GAT+ can be used to find inactive and redundant G Suite accounts on your domain.
To find inactive accounts with GAT+ follow the steps below.
Navigate to GAT+ > Users > Basic
You can click on the “Last login” field, to filter the newest or oldest last logins to the domain.
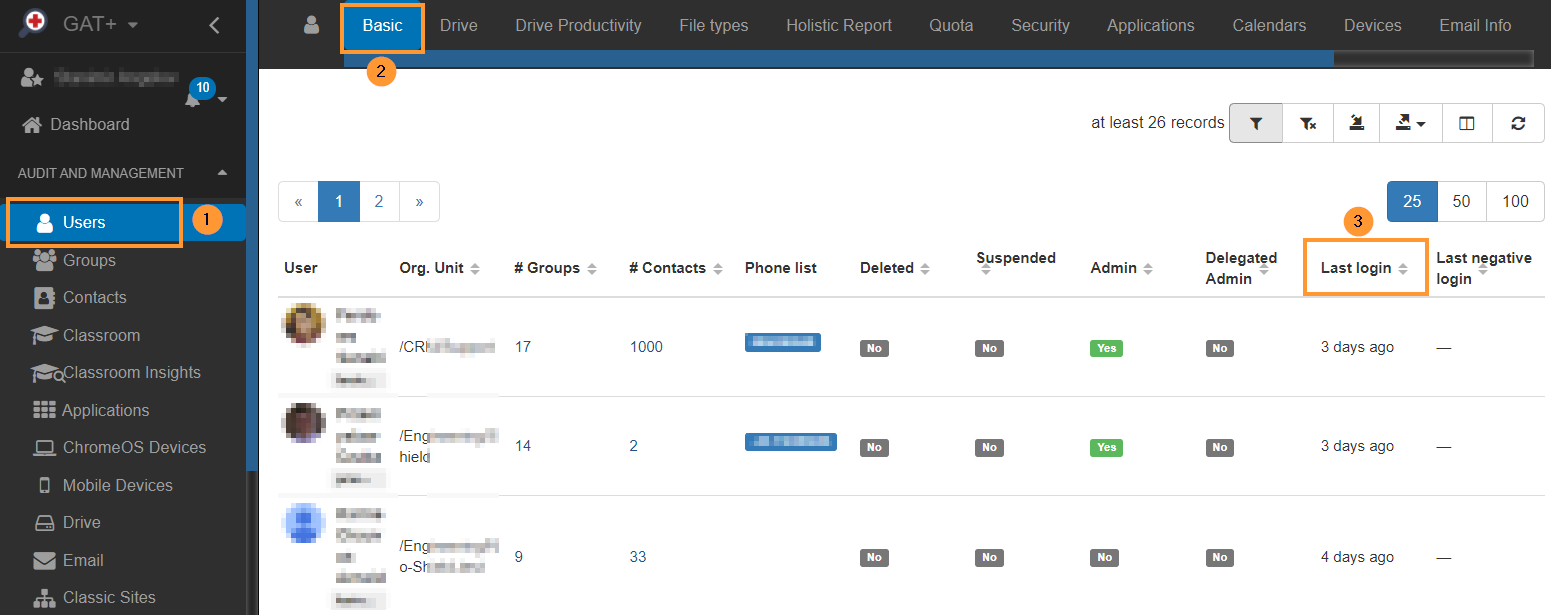
Apply filter
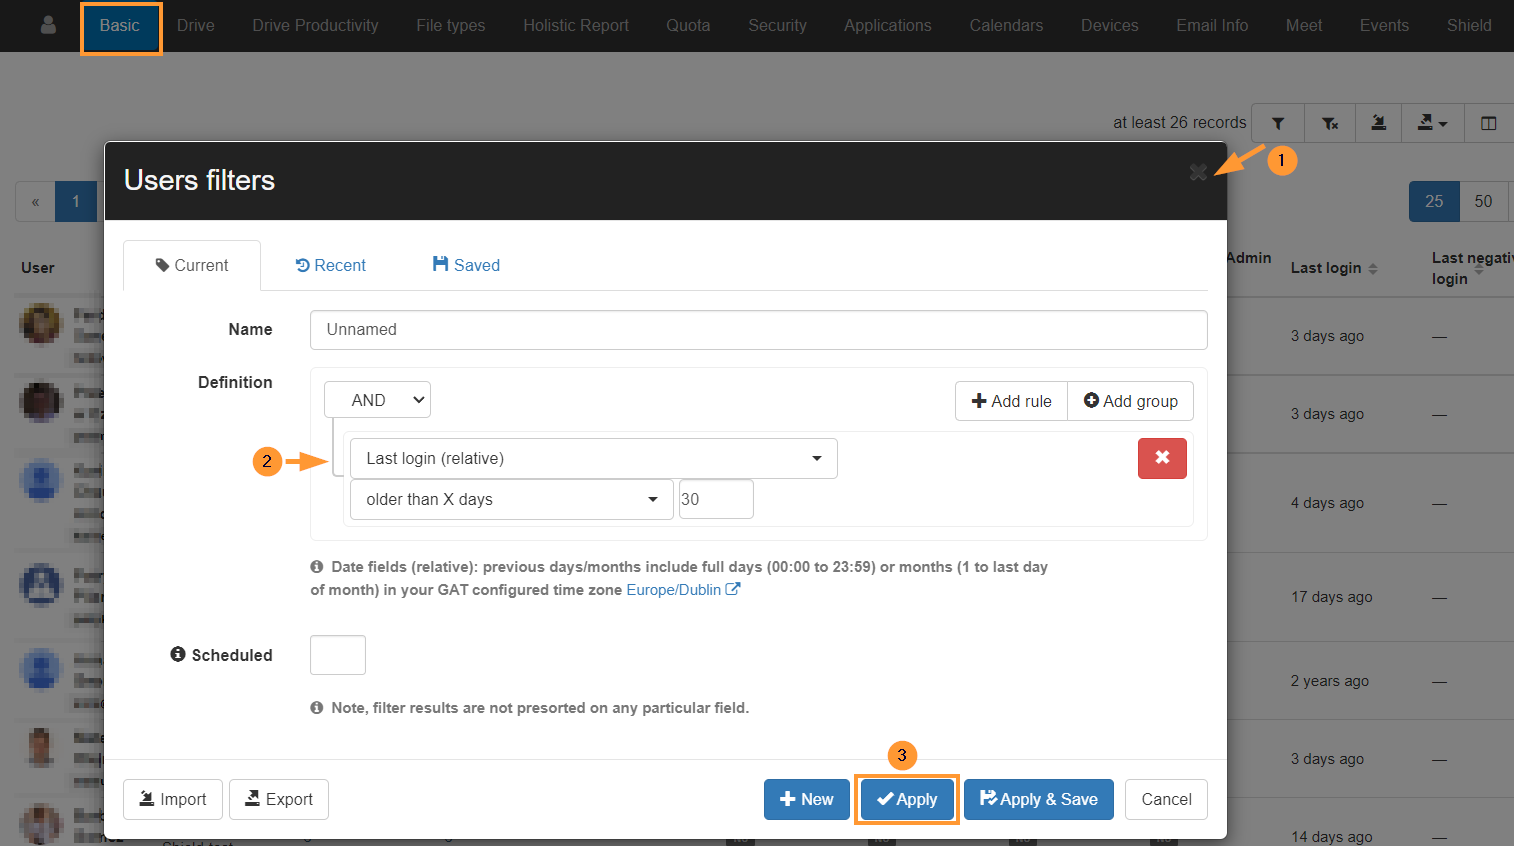
Click on the Apply custom filter option and apply further search.
As example:
- Last login (relative) – older than X – 30
- Click on Apply to start the search.
Result
When the result is displayed, export this list of accounts to Google Sheet or download it to a CSV file.
This will show all the Users with the last login date recorded older than the last 30 days.

Suspend users via Import/Export
If you want to suspend or remove these users in bulk, you can use the Import/Export feature in GAT+.
Export the list (above example) – change the status for IS_SUSPENDED or IS_DELETED to YES or NO.
Then import back – with the changes.
Suspend/Delete users via Flow
You can also use Flow to offboard users in bulk.
3. Monitor and manage devices.
See Details
We provide a new feature to report all devices used in your domain. This cloud identity audit shows a detailed view of all devices used to log in to the domain.
You can do it now with GAT+ which is a Google Workspace audit tool that provides a highly detailed internal view of the entire domain.
Devices Report
Step 1.
Navigate to GAT+ > Audit and management > Devices (1)
Step 2.
Find the list of all the devices reported with Cloud Identity – devices from Google (2)
Note: This might have similar data reported in Chrome OS and Mobile device audits.

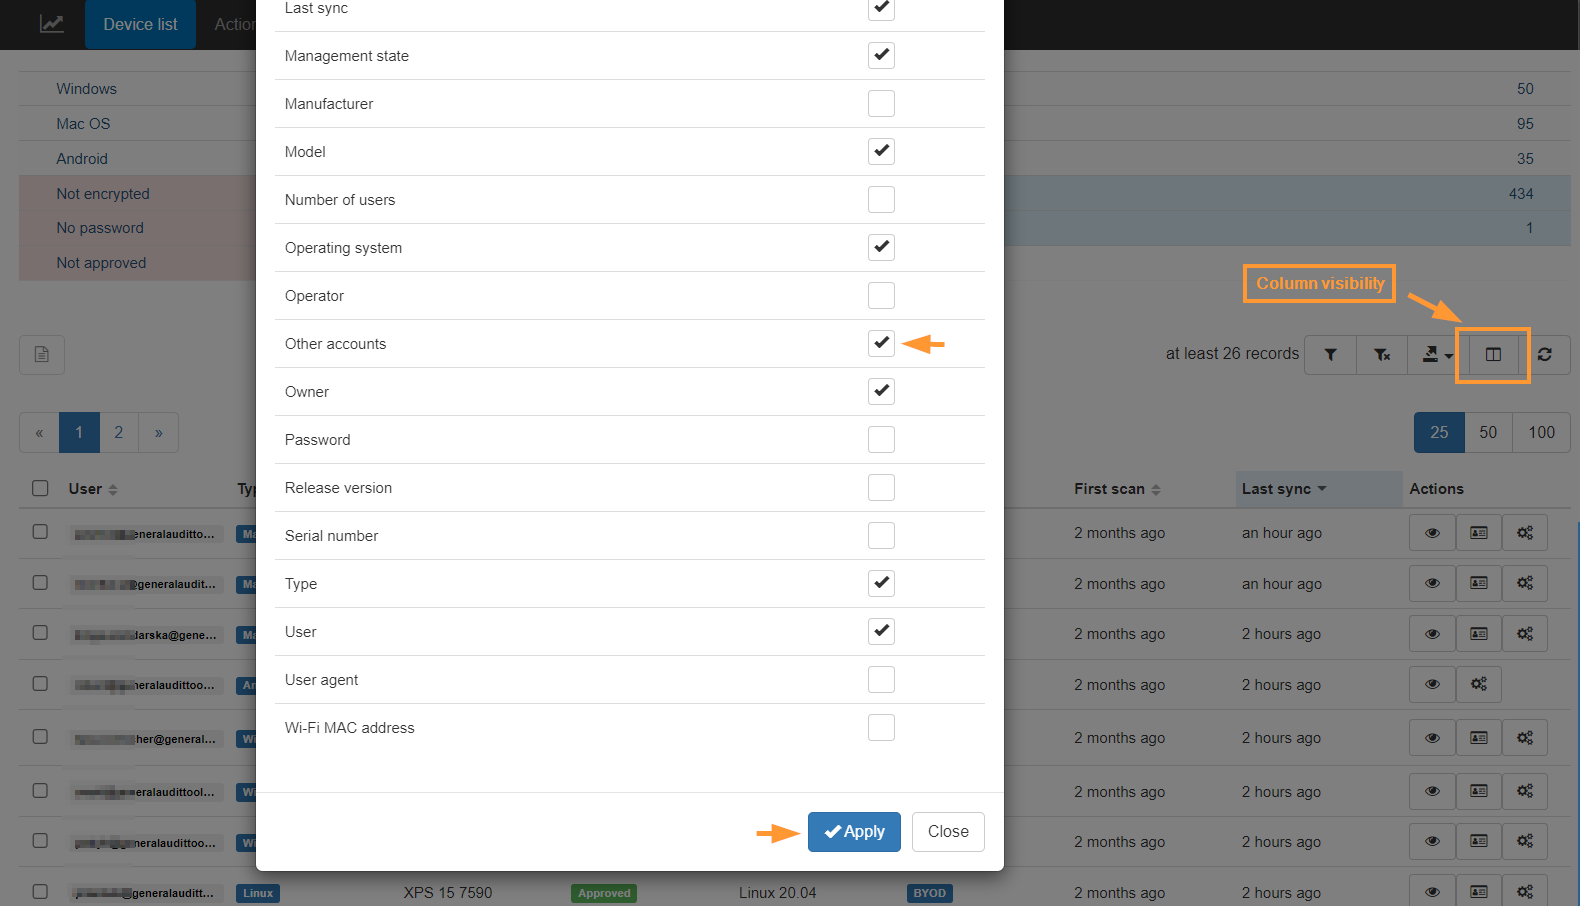
Additional columns of data
By default only a few sections are displayed about the Devices themselves, however under the Columns visibility, more details can be displayed for auditing purposes:
- Hostname
- Last security patch
- Other accounts, and more.
Step 3. Table View
The top table (3) will show aggregated filters.
- Type – shows devices by their type:
- Windows
- macOS
- Android
- Linux
- ChromeOS
- iOS
- Security – shows the number of devices:
- number of not encrypted devices
- number of no passwords set on the device
- number of not approved devices
- Owner – shows the owner of the devices:
- BYOD – Bring Your Device
- Company – Company-owned Device
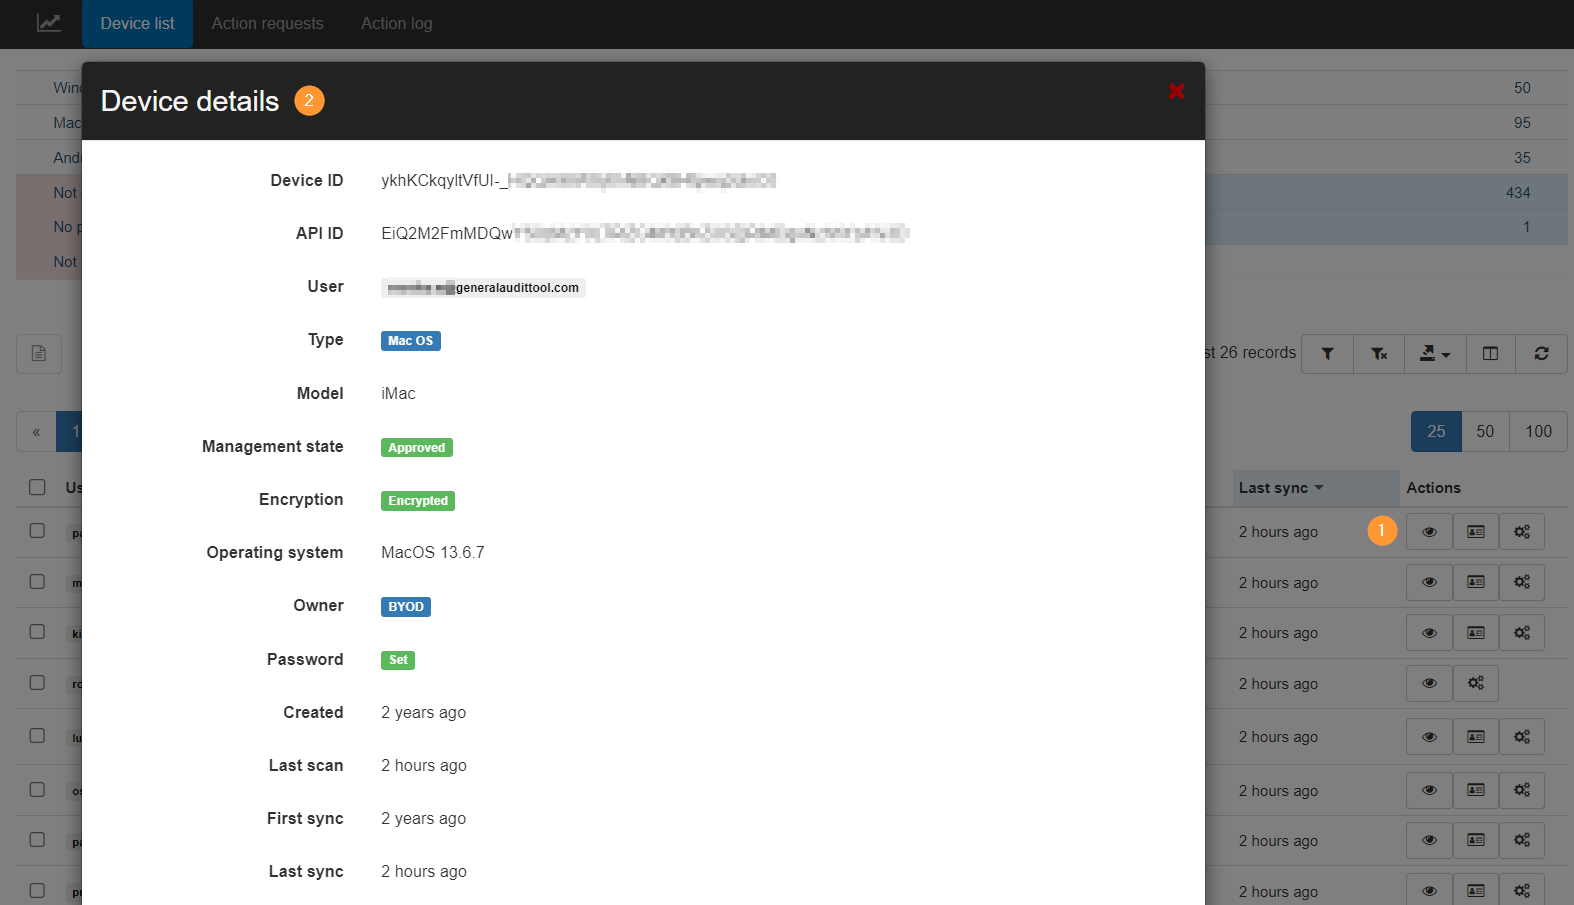
Step 4. Metadata
Click the eye icon under Actions (1) to view all the specific device details.
The metadata will show all the users and the devices each user used to log in and access the domain.
You can view the Type of device used by each user of the domain, the Operating system, whether the device has a Password set up or not if the device is Encrypted or not, the last time the device synced to the domain, and many more filters available.
Step 5. Export data
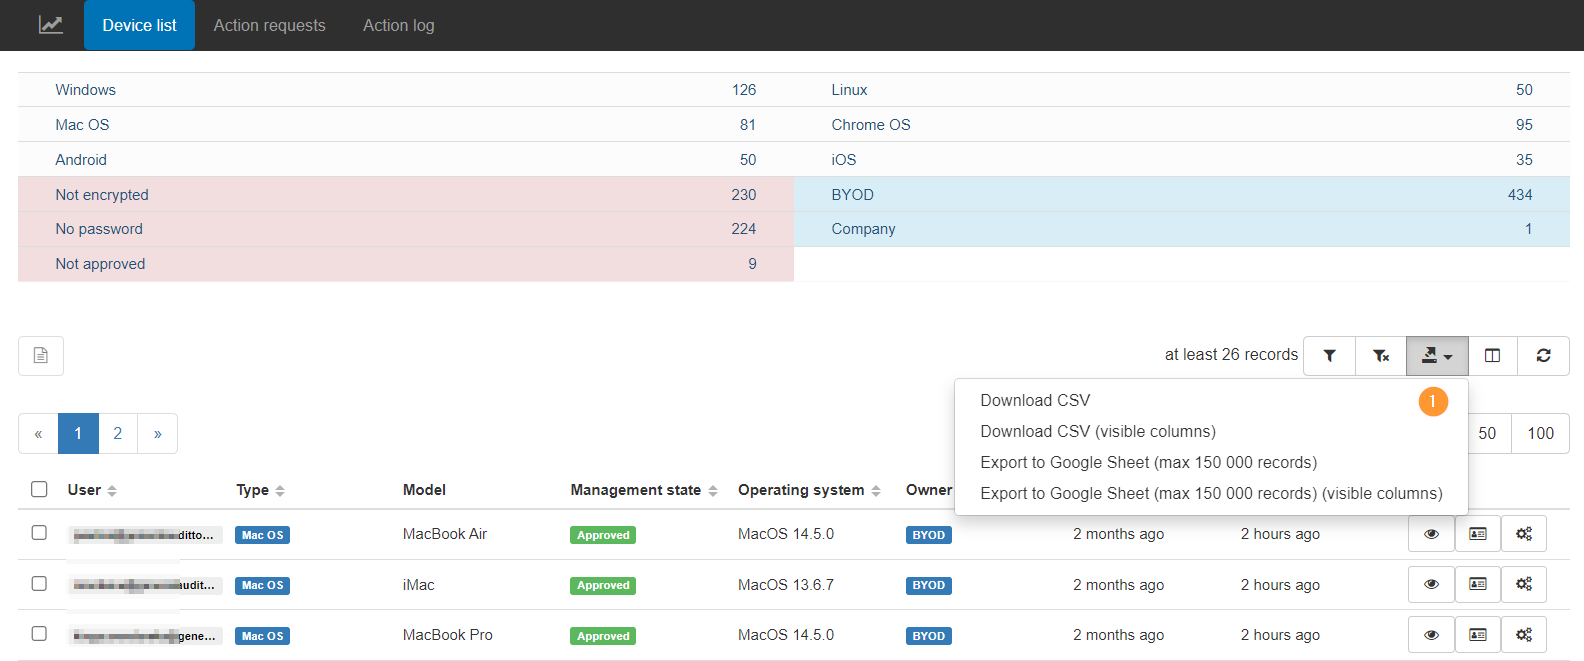
The data can be exported into Google spreadsheets or CSV files (1)
Step 6. Filters
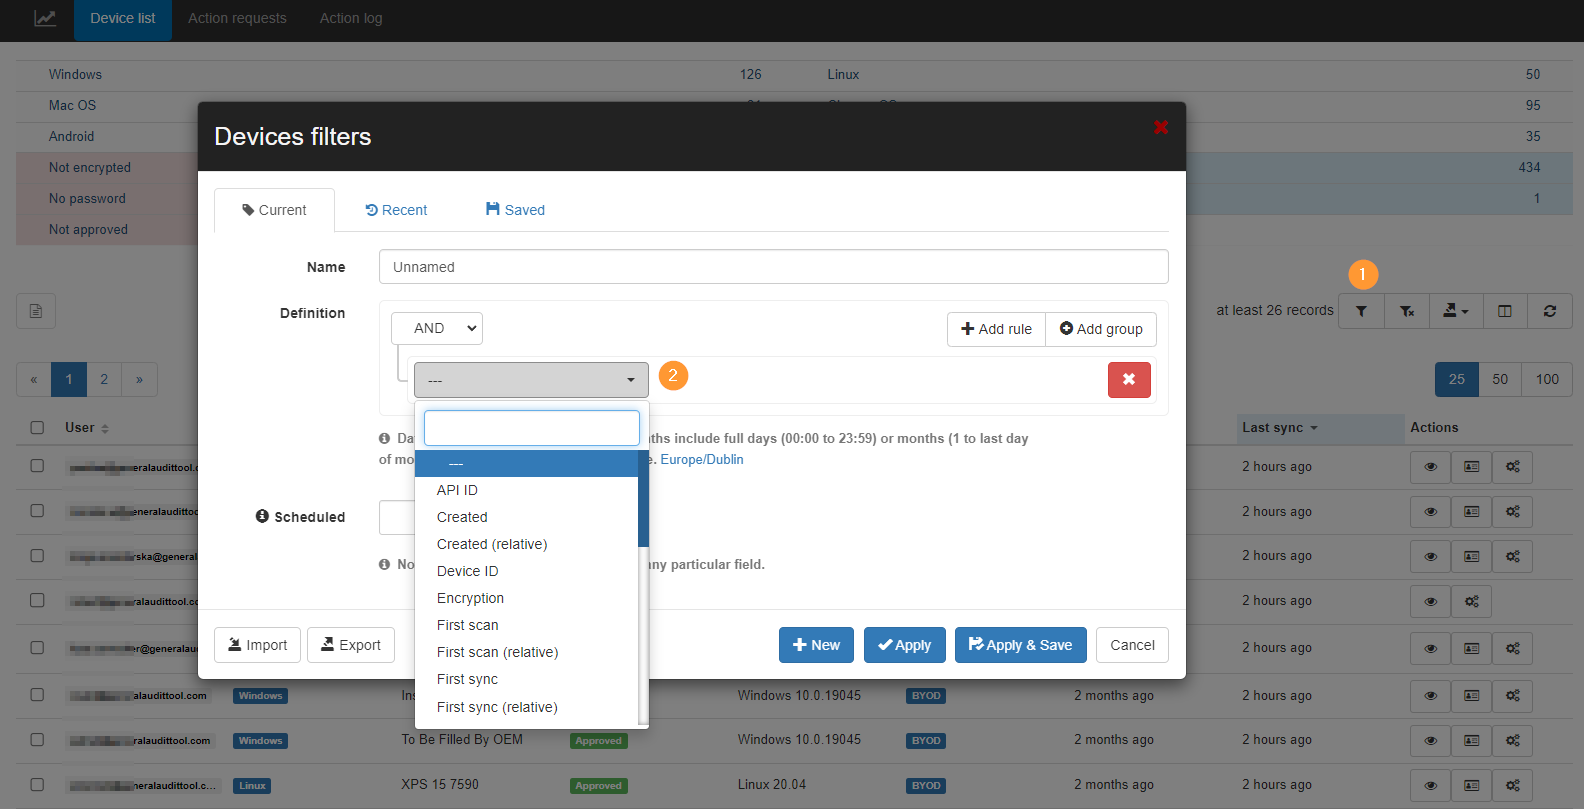
Multiple filters can be applied to find specific users or devices and much more.
Click on the funnel icon on the right side below (1) to define specific device filters (2)
Endpoint verification details
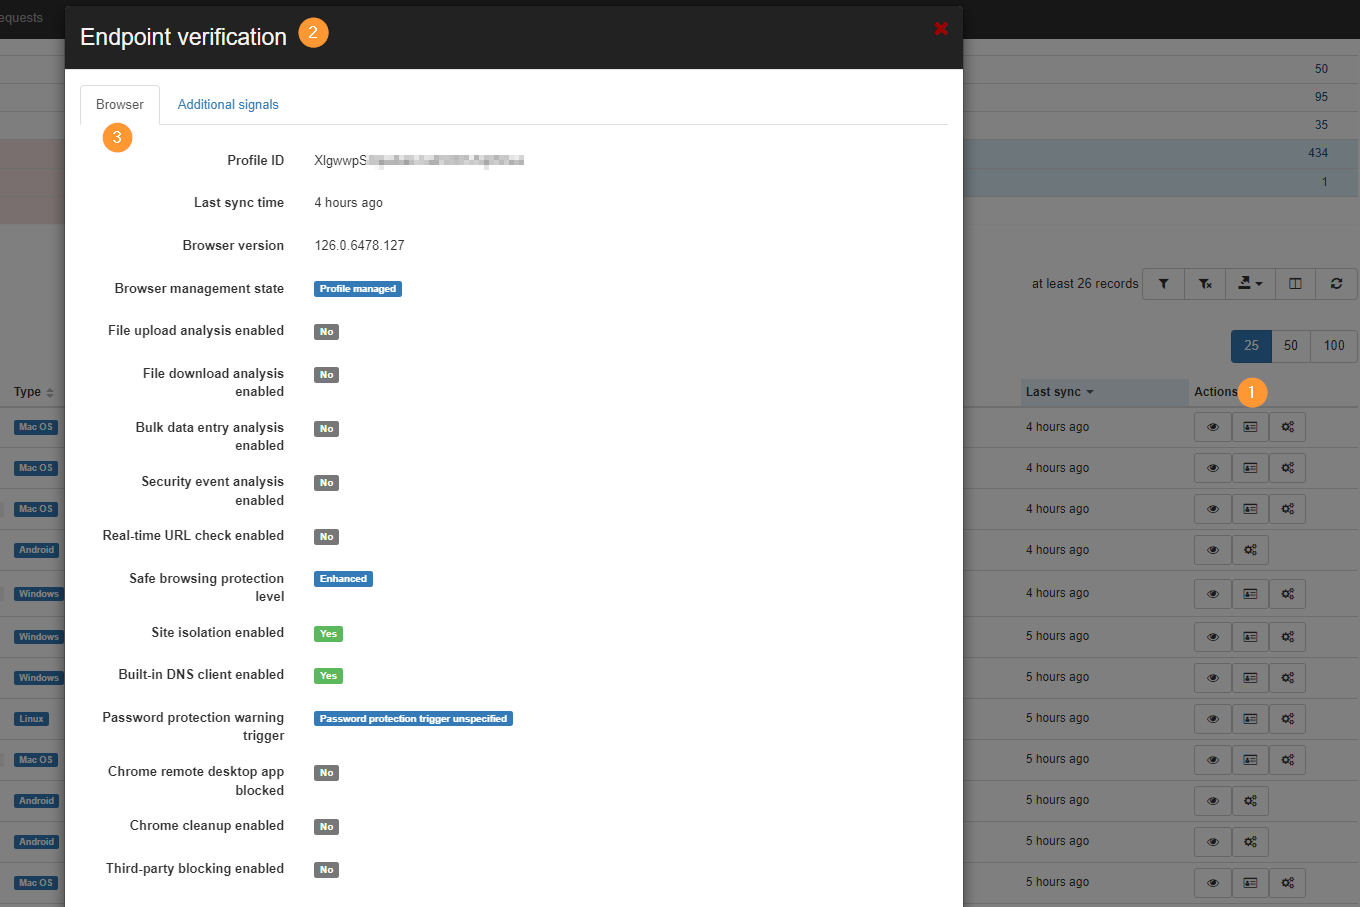
Audit and view all the endpoint verification details by selecting its detail view.
View the information such as Browser info reported such as Last sync time, browser version, browser management state, built-in DNS client enabled, and more.
View the Additional signals such as OS native firewall enabled, Secure boot enabled, or Windows domain name
Actions
GAT+ empowers administrators to perform various actions on devices within the Google Workspace domain, enhancing security and control. These actions can be accessed via the Google API and are available to both Admins and Delegated Auditors.
Device Actions:
- Delete the device: Remove the device from the Google Admin Console
- Wipe the device: Erases all data on the specified device.
- Cancel the device wipe: Halts an ongoing device wipe process, applicable if the device is in a “pending wipe” state.
- The device enters the “pending wipe” state when a wipe device command is issued, but has not yet been sent to the device. The cancel wipe will fail if the wipe command has already been issued to the device.
Device User Actions:
- Approve the device user: Grants a blocked Google Workspace account access to the device.
- Block the device user: Revokes a Google Workspace account’s access to the device.
- Cancel the device user wipe: Cancels an unfinished user account wipe. This operation can be used to cancel the device wipe in the gap between the wipe operation returning success and the device being wiped
- Delete the device user: Schedules the removal of the Google Workspace account from the device.
- Wipe the device user: Erases the user’s work account data on the device, leaving personal data unaffected.
- For example, if a Gmail app is installed on a device that is used for personal and work purposes, and the user is logged in to the Gmail app with their personal account as well as their work account, wiping the “deviceUser” by their work administrator will not affect their personal account within Gmail or other apps such as Photos
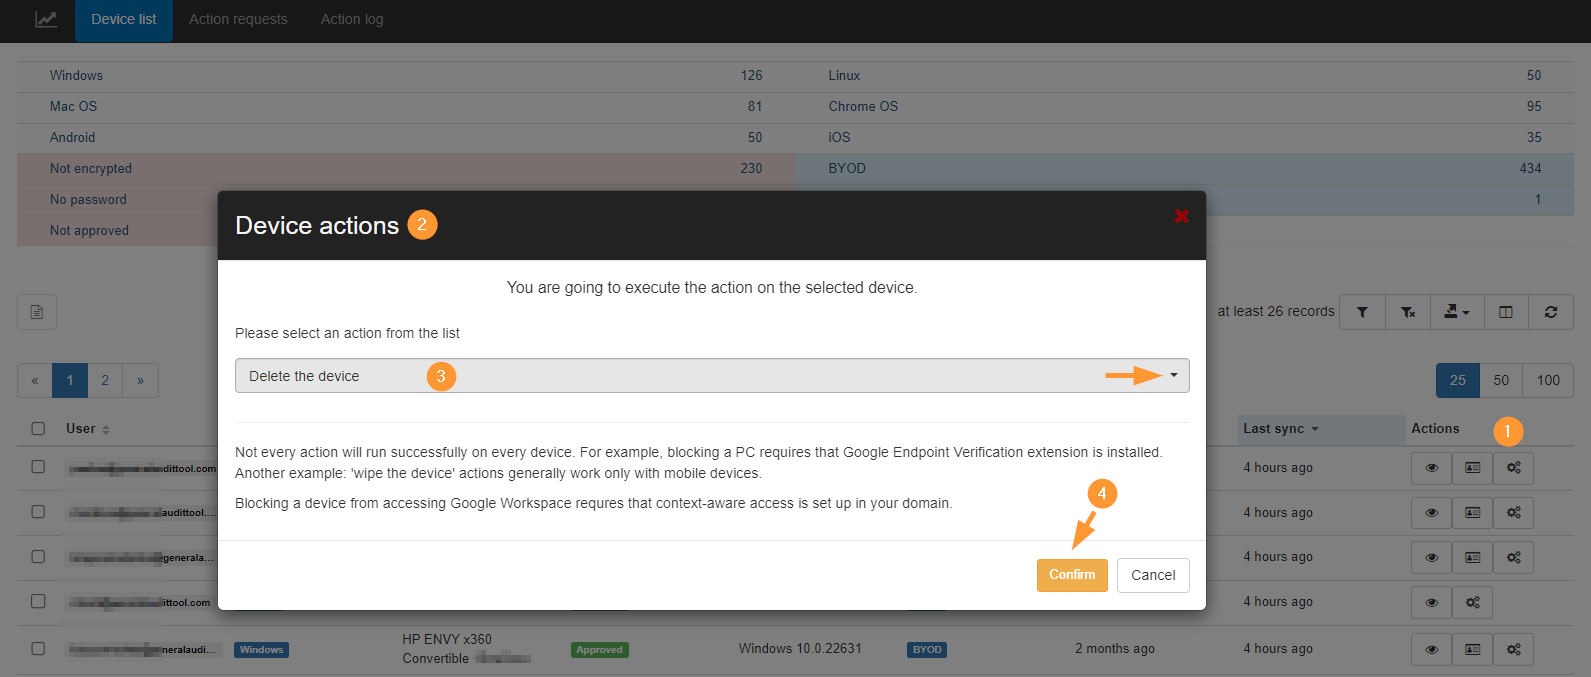
NOTE:Not every action will run successfully on every device.
- For example, blocking a PC requires that a Google Endpoint Verification extension is installed.
- Another example: ‘wipe the device’ actions generally work only with mobile devices.
- Blocking a device from accessing Google Workspace requires that context-aware access is set up in your domain.
When the action is selected click “Confirm” (4) to proceed.
Result
Action requests
Action requests will show all the actions that are requested and executed.
View the number of devices, the action type, the requested at, the last update, and the Status of the job.
Under the Actions, you can see the job that is executed.

Action log
When the action is taken the result will take into effect and will be shown in the Action log.
It could be a case where action cannot be taken and an error will be shown, the Details log will show why it failed.

Related Posts
4. Set up location-based alerts to monitor logins from unusual regions.
See Details
With remote work on the rise, organizations must learn to secure their users and enforce their policies on a continuous basis. GAT Labs facilitates just that, using a powerful Alert Rule notification feature.
This feature helps Google Workspace Super Admins to identify any compromised accounts in their Google Workplace.
Getting Started
To get started on setting up your Alert rule.
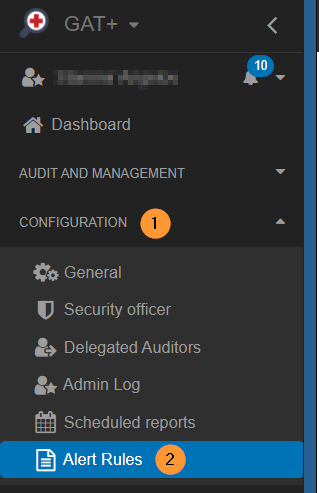
Navigate GAT+ > Configuration > Alert Rules
Add a new rule
Once in the ‘Alert Rules’ section click on the + button to set up a new “User Logins” alert.
You can also edit an existing one using the ‘pen’ icon.

Set the scope
You can set the ‘Scope’ to be either countries or cities.
We recommend starting with countries.
Enter a list of countries where you expect legitimate logins to occur, once the rule is saved it will begin execution.

School students, in particular, are very susceptible to these types of account thefts for several reasons for which,
- They tend not to have 2FA and to use their accounts or passwords on dubious sites.
- They might not even be aware that they are co-sharing their accounts with overseas individuals.
Check the status of compromised accounts
User Logins History
To see if any accounts have already been compromised you can go to the ‘User Logins’ report area where you can filter for successful logins from outside your own country.
GAT+ > Audit & Management > Users Logins

How to find events?
Click on the Events tab in the top left corner.
Apply filter and search:
- Country not equal – select the country (the USA as an example)
- Event equal – select the event (OK as an example)

When you have a list of suspicious accounts, do not jump to immediate conclusions. We recommend first checking with the account owner to see if they have been abroad on holiday or if there is some other legitimate reason for an overseas login.
We hope this new feature will help increase your domain security and alert you to potential dangers.
Video how-to
5. Audit users 3rd party apps.
See Details
The Applications section in GAT+ presents all the third-party applications the users have or had installed using their Google Workspace accounts.
Those are all 3rd party applications that have been authorized to access different permissions from their Google account. This will allow an Admin to view All applications a user has installed using their Google Workspace account and what permissions the applications require from the end-users accounts.

GAT+ will show all the applications and present all the permissions that are required from the Application itself to your Google Workspace data.
The permissions that the Applications require from your Google Workspace APIs are graded under “Scope risk score”.
GAT+ will automatically rank these applications and show a “Scope risk score” this is based on the permissions third-party application required from your Google Workspace API.
Super Admin can examine if those applications are malicious or not and apply a policy on them.
Manage Applications
Ban Third-party apps in real-time
For 3rd party Applications, we have introduced real-time policies that can be applied. An Admin can choose to ban or allow Application to the end-user account.
How it works
When a user for whom the ban is in place tries to install the App again, they will be rejected as soon as Google notifies GAT+ that the new app is being installed.
How to create real-time banning of third-party apps
Find the Applications
Navigate to GAT+ → Applications → Apply custom filter → Search for the Applications

Set up policy
When the result is found, click on the + sign button on the right side under Actions
A pop-up window will be displayed, fill in the policy
- Add application policy for “name of the application”
- Policy name – Enter the policy name
- Policy type – Trust or Ban
- Select users whom the Ban will occur.
- User
- Group
- Org. Unit
- Click on the “Add” button
- Click on the “Save” button to enable the policy

Note: GAT+ will check and if “Trust” policy applied it will take precedence over the Ban polciy
For example: If you ban an app for /Sales team, but trust the app for just one user who is part of the /Sales team, the ban rule will skip this account.
Existing policies
From the top many select “Policies” to view all applied policies currently for the Applications of your domain.
Under the Actions, you can choose to Edit the ban (pen icon) or you can delete (bin icon) the ban policy.

Events
Admin can check and search by User and view the data, and what application had access granted to API, and access was authorized or revoked.

Result
As a result of the setup Ban policies, the 3rd party Applications will be Banned from being used by the selected users.
GAT+ will remove the “scope” access from the Application to your Domain. However, as this is not a permanent ban or removal of the applications, the end-user can still “grant” or install the application again.
GAT+ will then “see” and ban the application again. It will be proactive action based on the end-user behavior.
This happens in real-time when a user tries to install the banned application, they will be rejected as soon as Google notifies GAT+ that a new App is being installed or access is being granted.
Note: In some cases, the user can log in, because the revoke action comes after the fact, but the app can not use any API after. It will depends on the App behavior.
Video: How to ban third-party apps in Google Workspace
Google Drive:
1. Audit externally shared files.
See Details
Want to find all the externally shared Google Drive files for a specific OU owned by users that are also ‘shared out’ to specific external users?
The GAT+ Drive audit can easily do this.
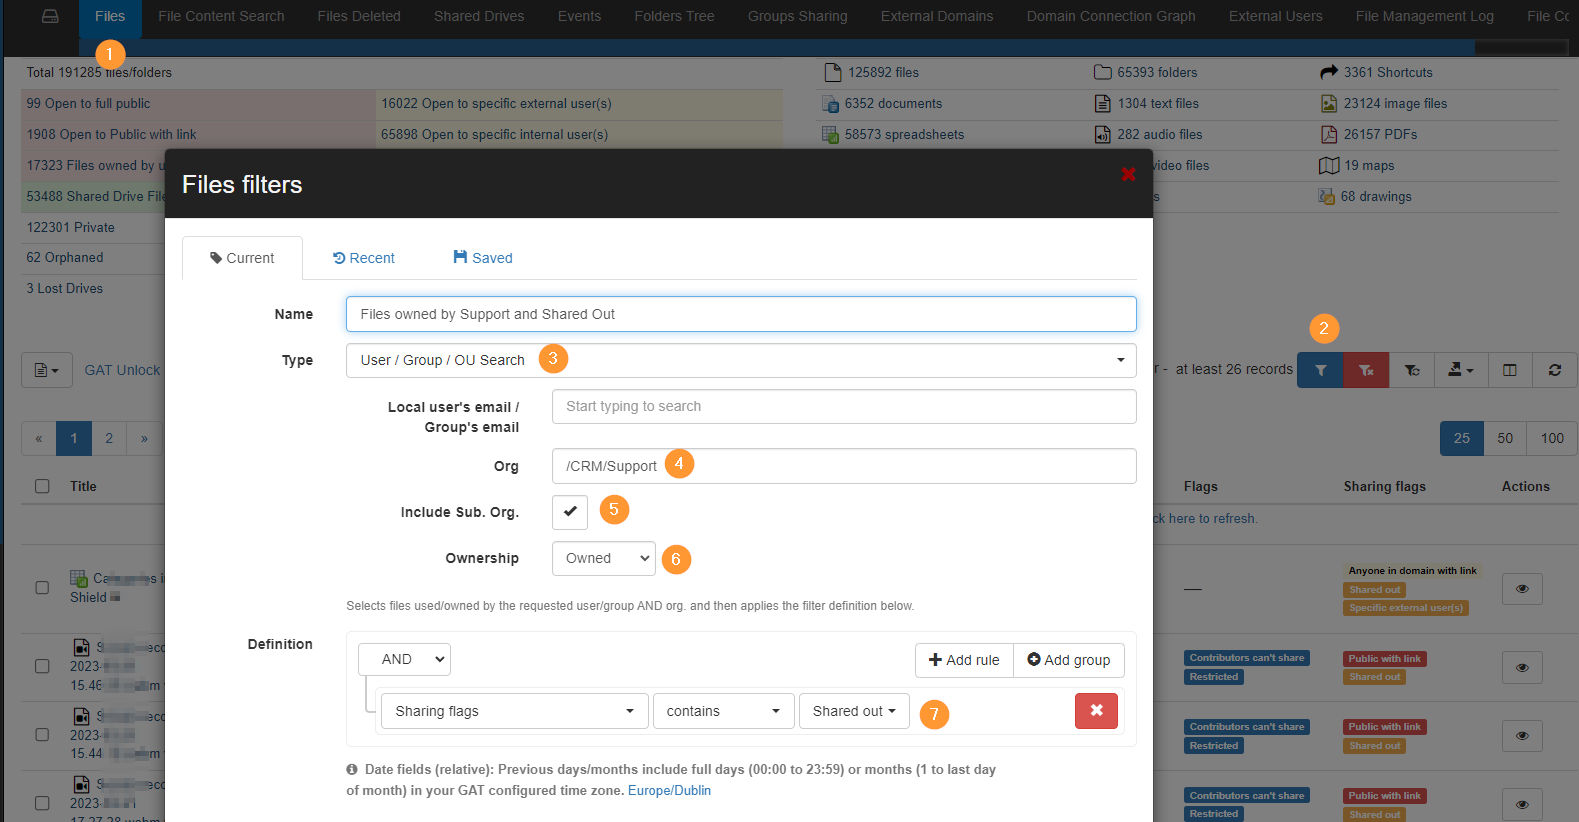
Step 1: Filter Externally Shared Google Drive Files for a Specific OU
Navigate to GAT+ > Drive > Files
- Apply filter (2)
- In the filter option select the following steps
- Type – User/Group/OU search (3)
- Org. Unit – select the Organization unit you need (4)
- Include the Sub. Org
- Ownership – Owned (6)
- Under Definition Add the rule
- Sharing flag contains Shared Out (7)
Step 2: Result
When the filter is applied the result will return all the Google Drive files/folders owned by the users of the selected OU that are also “Shared out” to External users.
All files and folders will have a Sharing Flag equal to Shared Out.
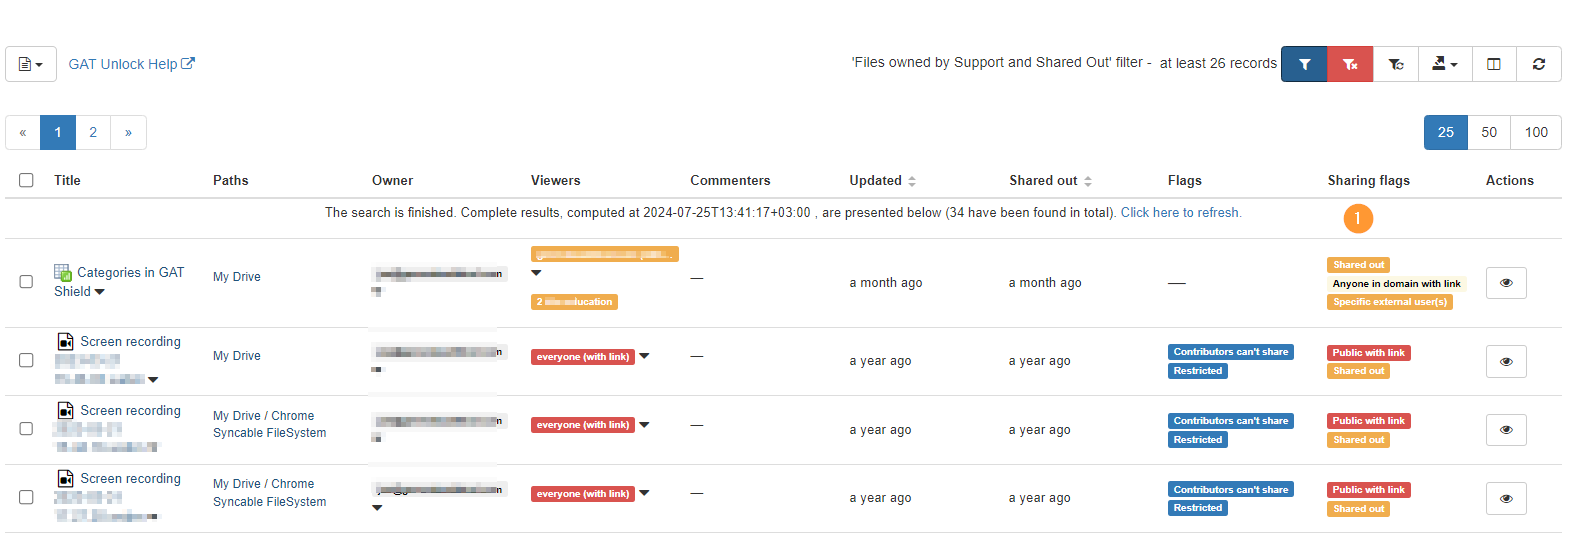
Step 3: Alternative filters
The results will include all Shared Out files/folders including “Public/Everyone and Public/Everyone with link permissions.
Change the Sharing Flag to a different filter to see different results.
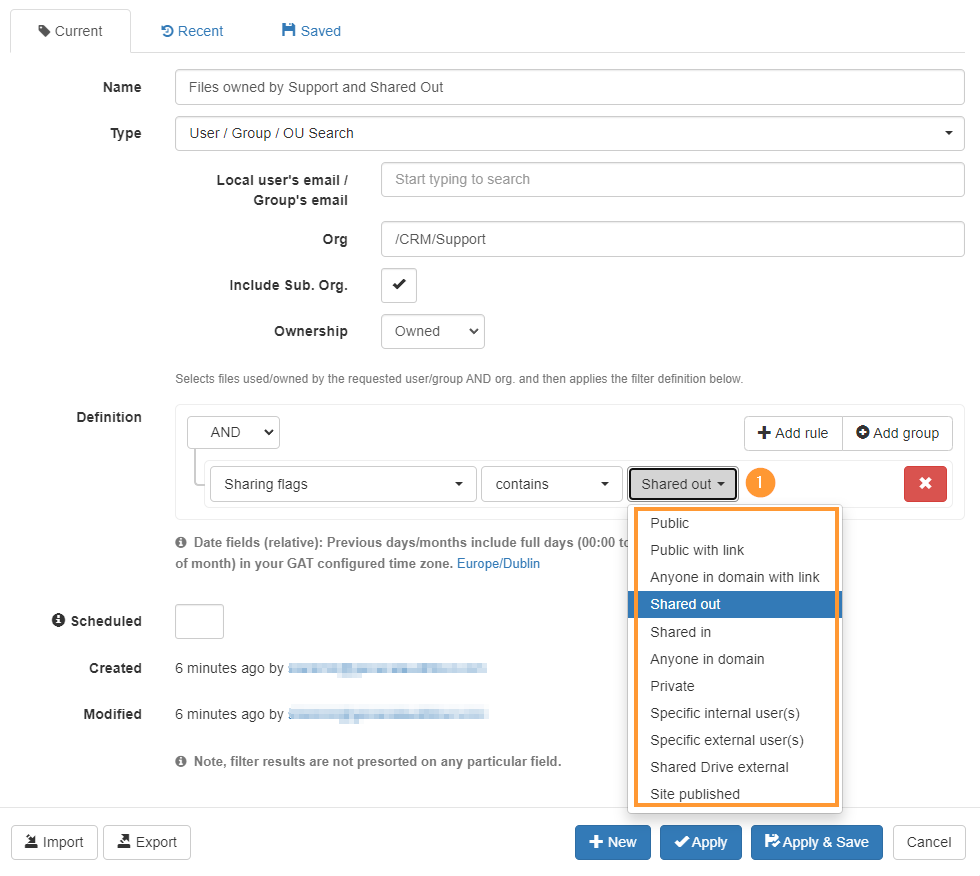
For example:
- Public – view all files owned by users of the OU and with Public permissions
- Public with a link – view all files owned by users of the OU and with Public with link permissions
- Specific external users – view all files owned by users of the OU shared with only specific external users (excluding the Public and Public with link permissions)
2. Find and resolve duplicate or orphaned files.
See Details
GAT+ audit provides an extensive and comprehensive view of overall Google Drive files on your domain.
An Admin can filter and search for any Duplicate files in Google Drive.
Find Duplicate Content files
Navigate to GAT+ → Drive → Apply custom filter → set Type – Duplicated Files
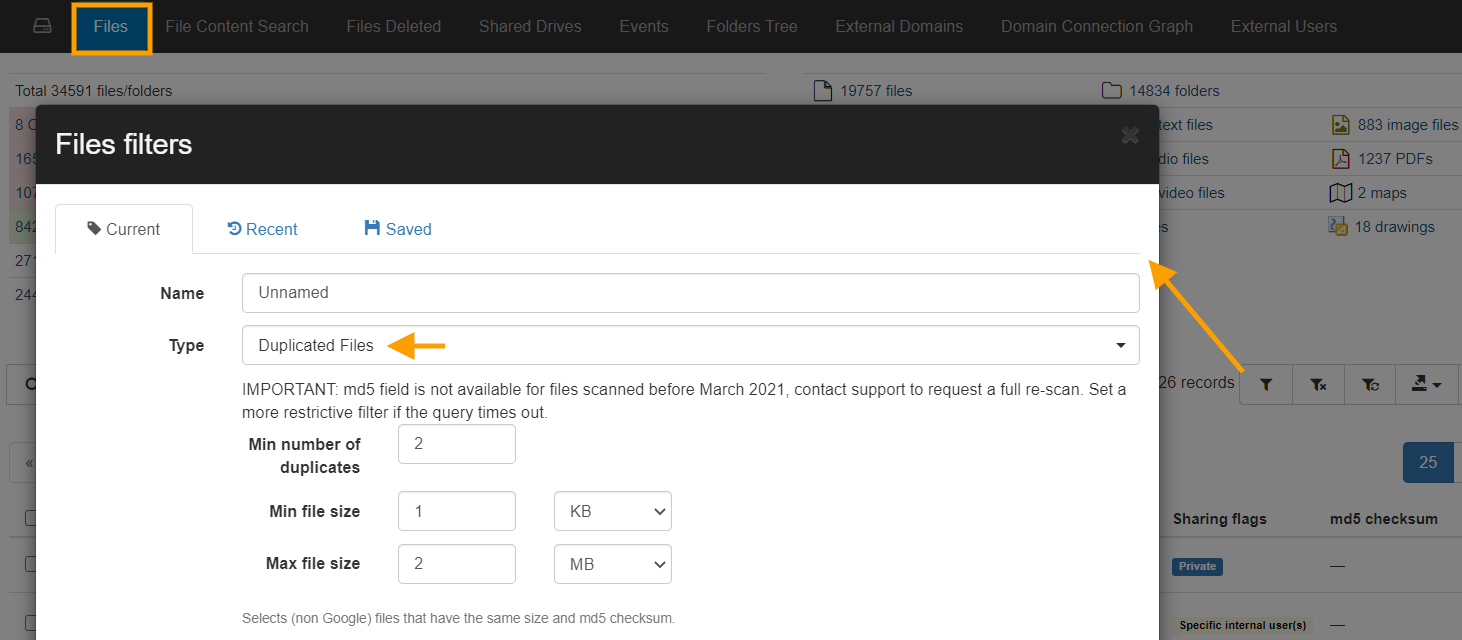
Note: It might take some time to complete, set a more restrictive filter if the query times out.
IMPORTANT: md5 field is not available for files scanned before March 2021, contact support to request a full re-scan.
Add an additional filter to search for the Duplicates:
- by specific user
- by date last updated
- Min number of duplicates – 2
- Min file size – 1 KB
- Max file size – 2 MB
The filter: Selects (non-Google) files that have the same size and md5 checksum.
Result
The result will show all the (Non-Google) Duplicated Files based on the filter applied.

md5 checksum & number of copies
The md5 checksum table shows the MD5 Checksum and the number of copies the File has.
- The shown files have 2 files (copies) – as the screenshot above
View MD5 Checksum
Select the “Column visibility” button from the right side and enable the md5 checksum.

3. Export detailed Drive scheduled reports.
See Details
The scheduling mechanism is built into the query filter button. In any audit menu of GAT+ if you can apply a filter condition you can create a scheduled filter export.
One example of this can be found in the Files tab of the Drive audit menu of GAT+.
Why Schedule a filter in the Files tab?
- A weekly report of files updated in the last 7 days.
- A monthly report of files shared out to external domains in the last 32 days.
- A daily report of files edited in the last 24 hours.
- Monthly report of files greater than 2GB and recently updated in the last 32 days.
Creating a Schedule Report using Filter Conditions
You can easily create a scheduled job on a particular filter you have applied. You can have this report emailed to you on whatever occurrence you want. The below example will be a report about files recently edited.

Create a filter condition.
Select the following search operand ‘Updated (relative)’ and set the search operator to ‘in the last x days’ (1). Creating scheduled reports is done by clicking on the ‘Scheduled’ checkbox on the drive file filter menu.

I will set this report to run ‘Every day – after midnight’ and make sure the Enabled checkbox is ticked.
You can share this report with multiple admins and or users by adding their email addresses into the ‘Recipients’ field.
You may be interested in expanding the above report, to report on files shared in and changed since yesterday or files shared out and changed, etc.
To do this, you can simply expand on the filter and add another filter search operands. Click on ‘Add rule’ and select the ‘Sharing Flags’ search operand and set it to ‘Shared in’.

This will report on files shared in and changed (edited) since yesterday.
Note: You can change the search operands to report back on all file types and or exposures. For more details contact support@generalaudittool.com
When you have finalized your filter go ahead and Apply & Schedule.
Note: If you wish to append the date to the name of your scheduled report, then add {DATE} when providing a name within the Custom path and filename field. Something like this “My_report_name – {DATE}”.

Viewing your scheduled jobs
Under the Configuration area of GAT+, you can view all the scheduled jobs which have been created by super admins by clicking on ‘Scheduled reports’

In this section, you can modify the existing scheduled reports with the pencil icon.

You may also take action on these reports by clicking the calendar icon (on reports where that display sharing permissions). For example removing certain shares that you may not want to be shared with specific users.

Emails:
1. Monitoring email activity and Storage.
See Details
GAT+ is a powerful audit and security tool for Google Workspace. It provides admins with an extensive and detailed overview of their entire domain.
Email audit is one of the many features GAT+ offers, whereby Google Workspace admins can view all incoming and outgoing emails across their domain.
Email audit
Run different reports for all emails coming into your domain.
Email stats by the size of emails received/sent
Navigate to GAT+ > Email > User statistics
There you’ll see Email stats for your domain users. You can see the size of received and sent internal and external emails
In “User statistics” click on Column visibility and enable the fields.
- Bytes received external
- Bytes received internal
- Bytes sent externally
- Bytes sent internally
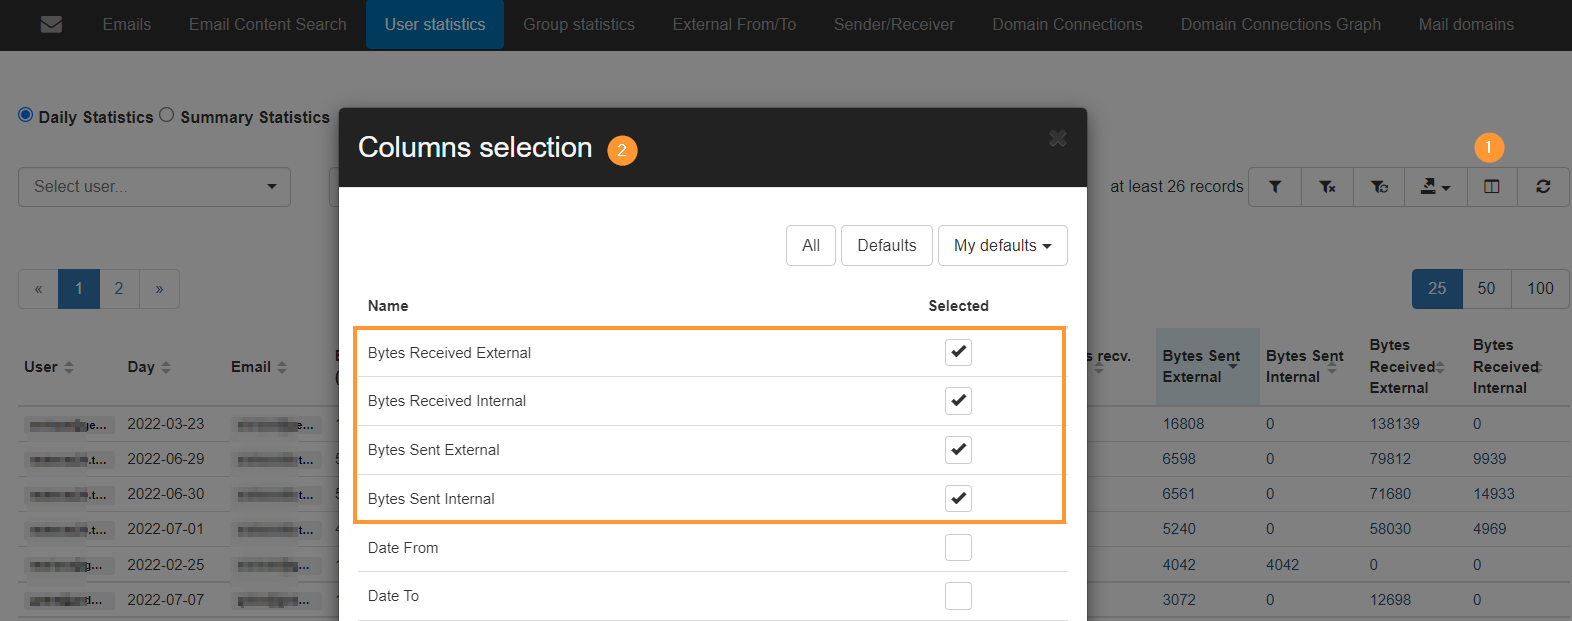
Daily Email statistics
Select a user and pick a date.
- User statistics – navigate to User statistics
- Daily statistics – click on Daily statistics
- Select user and Date > Filter data
The result will show the user and the bytes of sent/received internal and external emails for the chosen day.

The result can be exported into Google Sheets or CSV.
Scheduled Email audit report
This can also be set up as a Scheduled report.
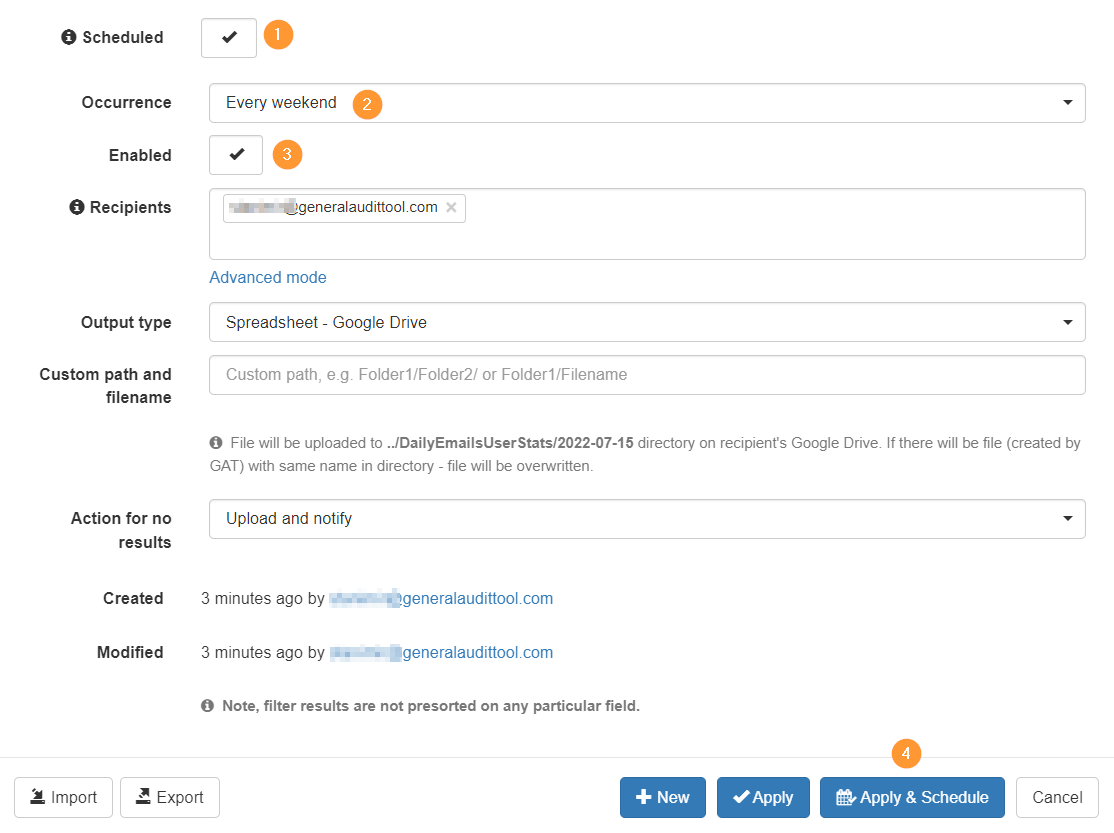
Monthly Email audit report
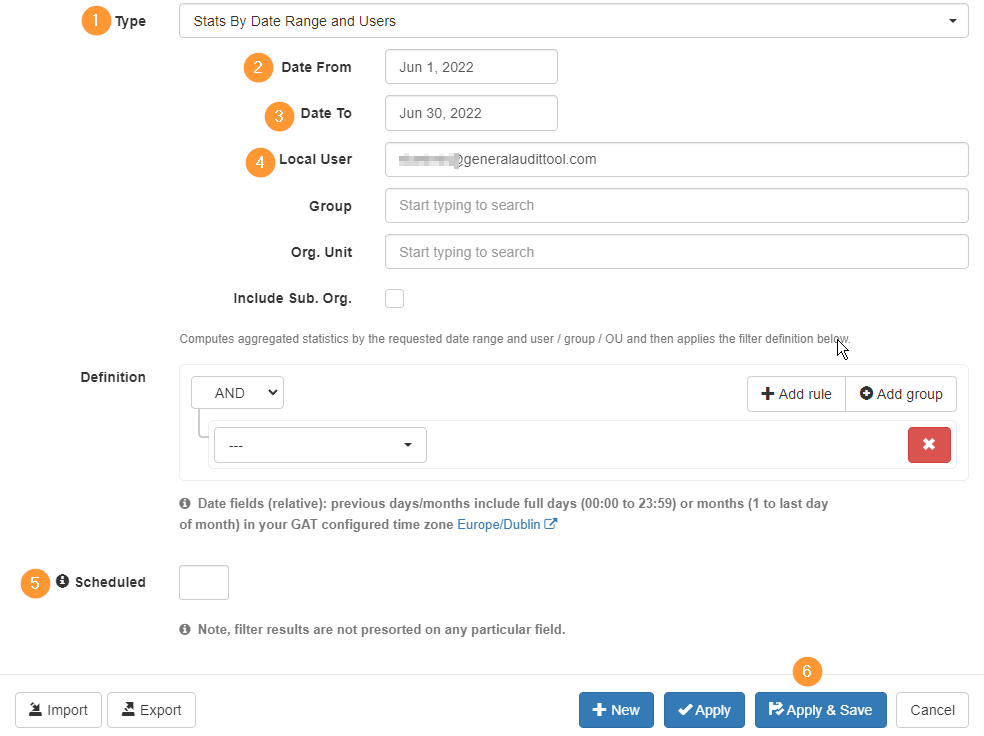
The Admin can also apply a more extensive filter for a longer period of time. Per month for example.
- Apply a filter in User statistics
- Type – change type to Stats by date range and users
- Date from – enter date from
- Date to – enter date to
- Local user – enter local user, group, or org. unit
- Scheduled – click to set up a Scheduled report (optional)
- Apply – run the filter
Result of monthly data
You can see the chosen user and all the data (bytes) sent/received by internal/external users.
The “Email” will show the user from which the email was sent or received.
- Dave from Sales@gatlabs.com
- Dave from Dave@gatlabs.com

2. Detect and delete phishing or suspicious emails.
See Details
With the GAT+ tool, Google Workspace Admins can identify and delete emails of any user in your domain. There are several reasons why an admin would want to do that, but the biggest concern is the security risks posed by them. GAT+ has been designed to offer the ability to navigate the emails of your concern and delete them.
Some of the scenarios that may apply are as follows:
- an email containing sensitive data
- an email wrongly addressed
- phishing or spamming
Identify emails that are a security risks
In order to find the emails of your concerns, navigate to GAT+ and apply a filter that helps to identify them.
There are several filtering options that can be applied depending on your use case. Apply a definition that best suits your search purpose. Once ready, apply the filter.
We show a proposal of the filter below that searches for emails containing specific wording in the title of the email: ‘for example ‘sensitive data’.
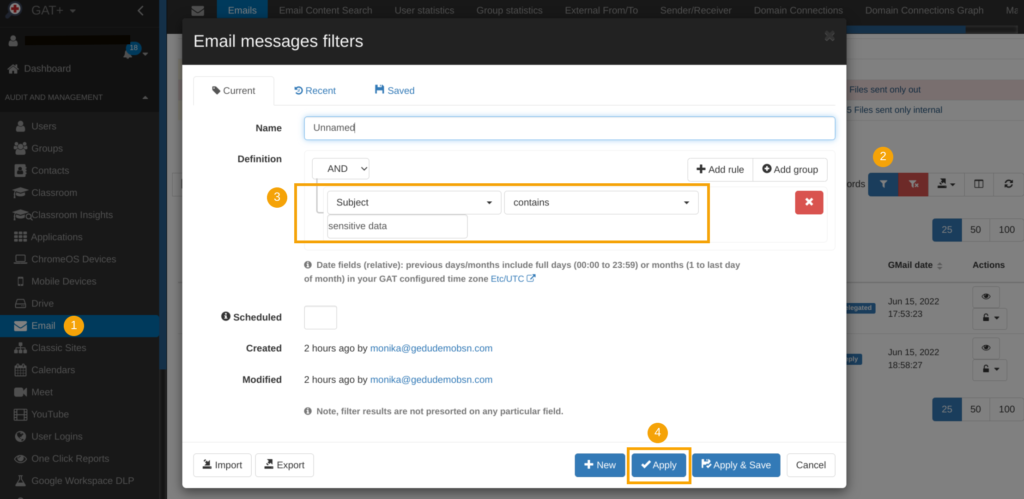
Request access permission to emails for security auditing
As a result of the above, GAT+ returns the metadata based on the filter applied.
You can have a quick overview of the metadata that is returned and decide on what email you wish to have closer look at by selecting them for further investigation (select All or specific results).
Next, you can request access to view the content of those emails.

To create a request to access the emails’ content, click on the ‘Email operations‘ button. From the drop-down menu select the option ‘Create new access request’.
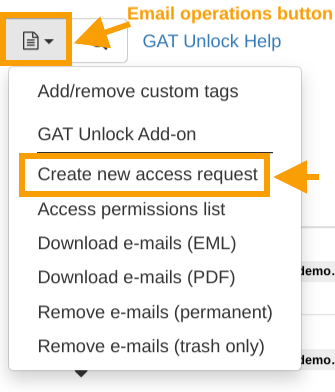
When requesting access, specify the timeframe, add a message for internal communication, and select the option Allow removing emails. When ready, send a request for review.

The request can be verified by Security Officer.
Get Security Officer’s approval
The Security Officer can view the request under Access Permissions tab once signed in to GAT+ dashboard, and approve it from there.

Review emails’ content and delete the ones that pose security risks
Once the request to access the emails’ content is approved, the requestor of the access can now navigate to Email audit in GAT+ and apply the same filter as before.
GAT returns the same results with the additional options enabled under the ‘open padlock’ icon on the right-hand side.

The email content will be displayed in GAT’s new window from there the email details can be reviewed. Upon that review, you can decide to move forward and remove the emails.
To trigger such an action, select the email you reviewed, navigate again to Email operations button, and select the option Remove e-mails (permanently).

Once the option to remove the email is selected, the last verification message comes up. Once confirmed, the email will be removed.
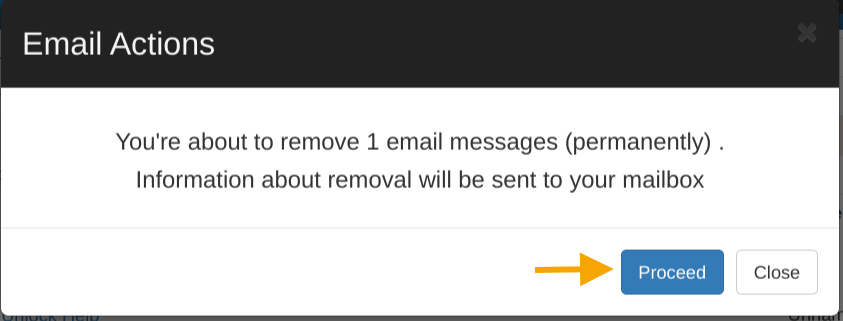
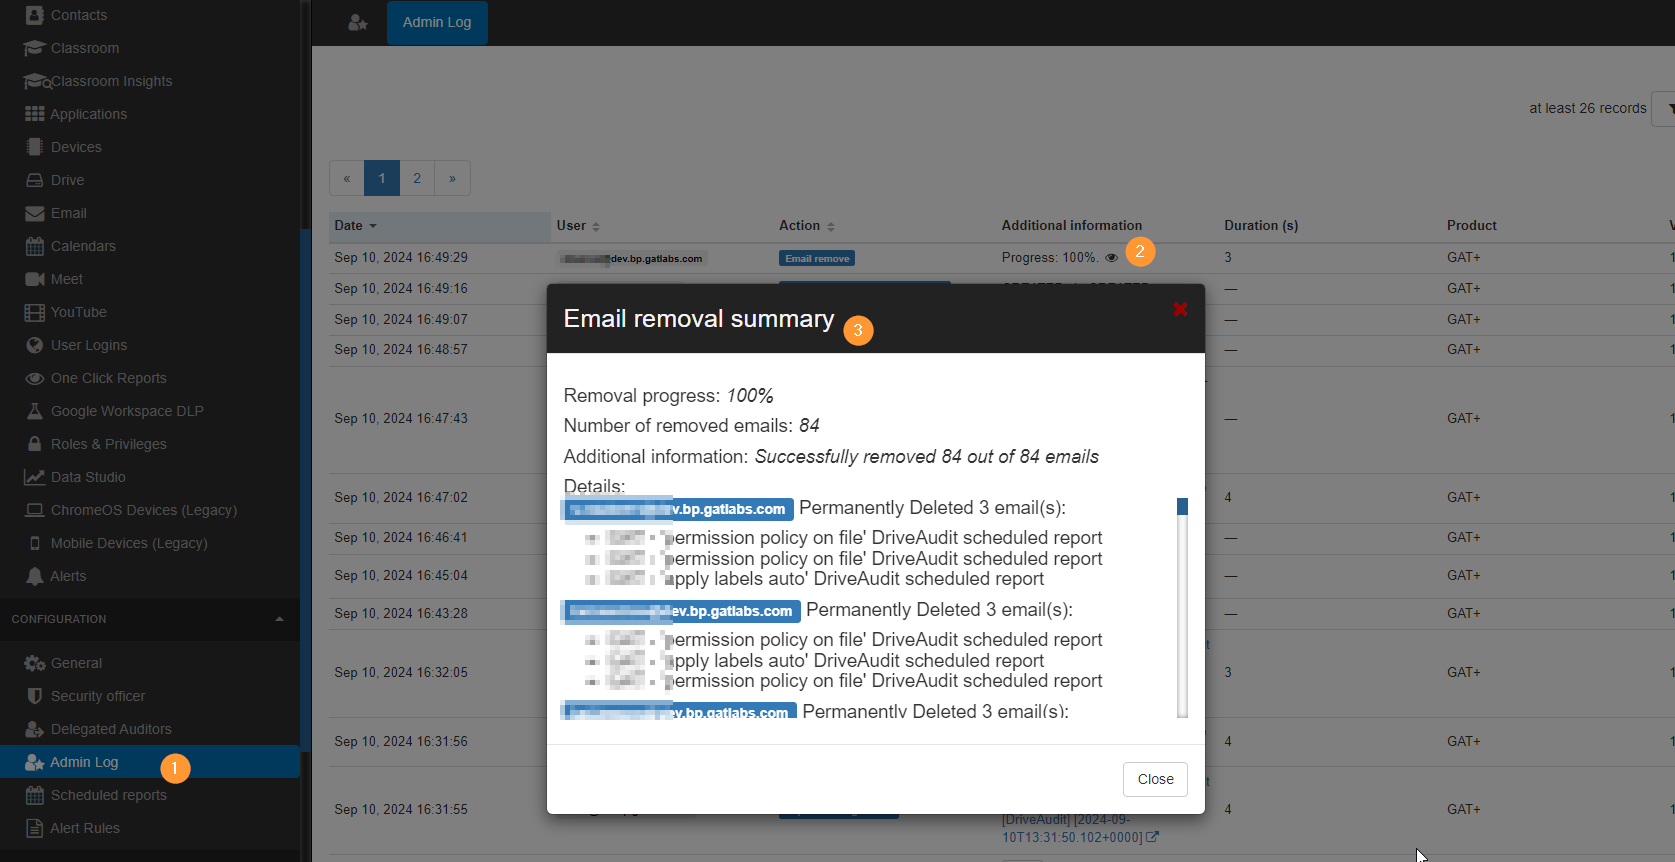
Details can be found in Admin log.
Restore deleted emails
If emails are deleted permanently and done by mistake they can be resoted via the Admin console for 25 days from the day of deletion.
The process is explained in this Google article
Related Posts
Google Calendar:
1. Audit shared calendar permissions.
See Details
GAT+ supports full domain-wide automatic Google calendar discovery and exposure classification.
GAT discovers all calendars automatically. It also classifies them by exposure type.
Filtering for Particular Calendar
You can click on the Apply Custom filter button to search for a particular calendar.
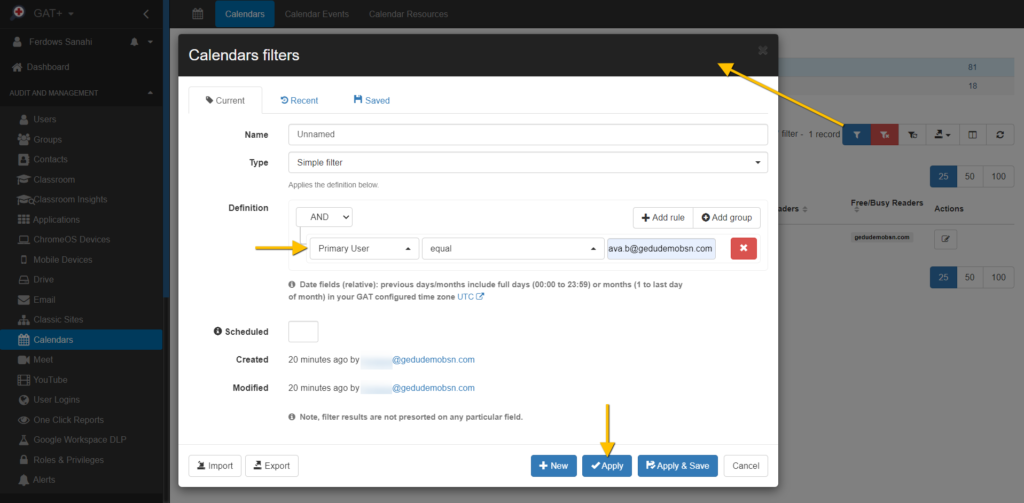
There is a multitude of different Search Operators you can use and also combine together to find the Calendar of interest.
- ACL Type equal External
- In account equal …
ACL Type search operator will show you calendars based on how they were exposed.
In account search operator will show you a user who appears in many different Calendars.
Calendar tab in User audit
You can now view the aggregated information about Calendars in the User Audit, Calendar tab.
In the Calendar tab, you can view calendar information per user, and the number of events the user has which has Passed (Past) or will happen in the Future.

The values under Calendars, Past events, Future events, and Total columns are all clickable.
Clicking on any value will take you to the Calendar audit section so you can view those events in detail.
Calendar Events tab in Calendar Audit
In addition to the automatic calendar discovery, GAT+ can report on domain-wide automatic event discovery.
Super Admins or Delegated Auditors can examine the past or future appointment lists of users on the domain.
This can be particularly useful for departing employees who may have future appointments management need to be aware of. You might want to check out GAT Flow for Calendar management and Offboarding actions for Calendars.
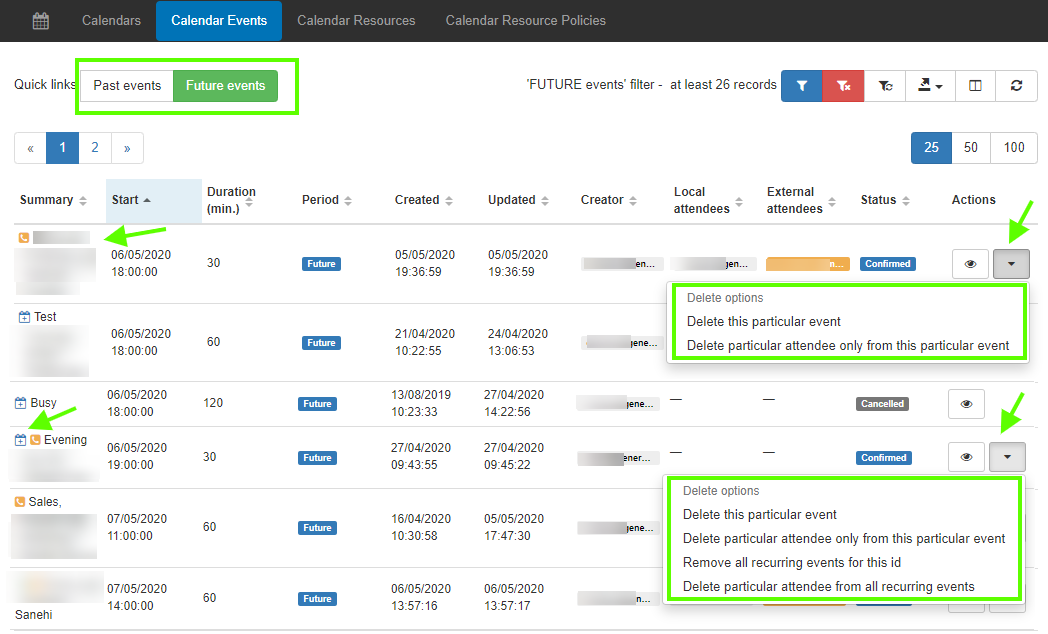
Actions you can take on Events
- Ability to delete an instance of an event
- Ability to delete all recurring events
- Remove users from events and/or recurring events
Calendar Resource tab in Calendar Audit
Each calendar event that is created can use or book a resource (office board room, office facilities, projectors, etc).
When a resource has been taken by a calendar event it becomes unavailable to be selected by other users when they are creating a calendar event.
You can view all available resources within the Calendar Resources tab.
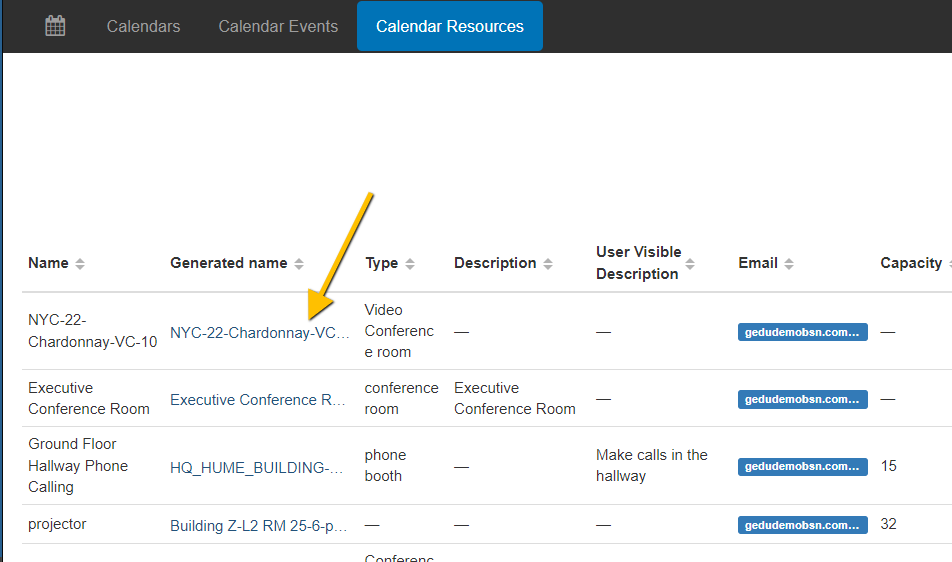
Selecting any of the resources’ names will redirect you to all Calendar events associated with the Calendar Resource.
Clicking the eye icon next to each calendar event you can view the associated resource.
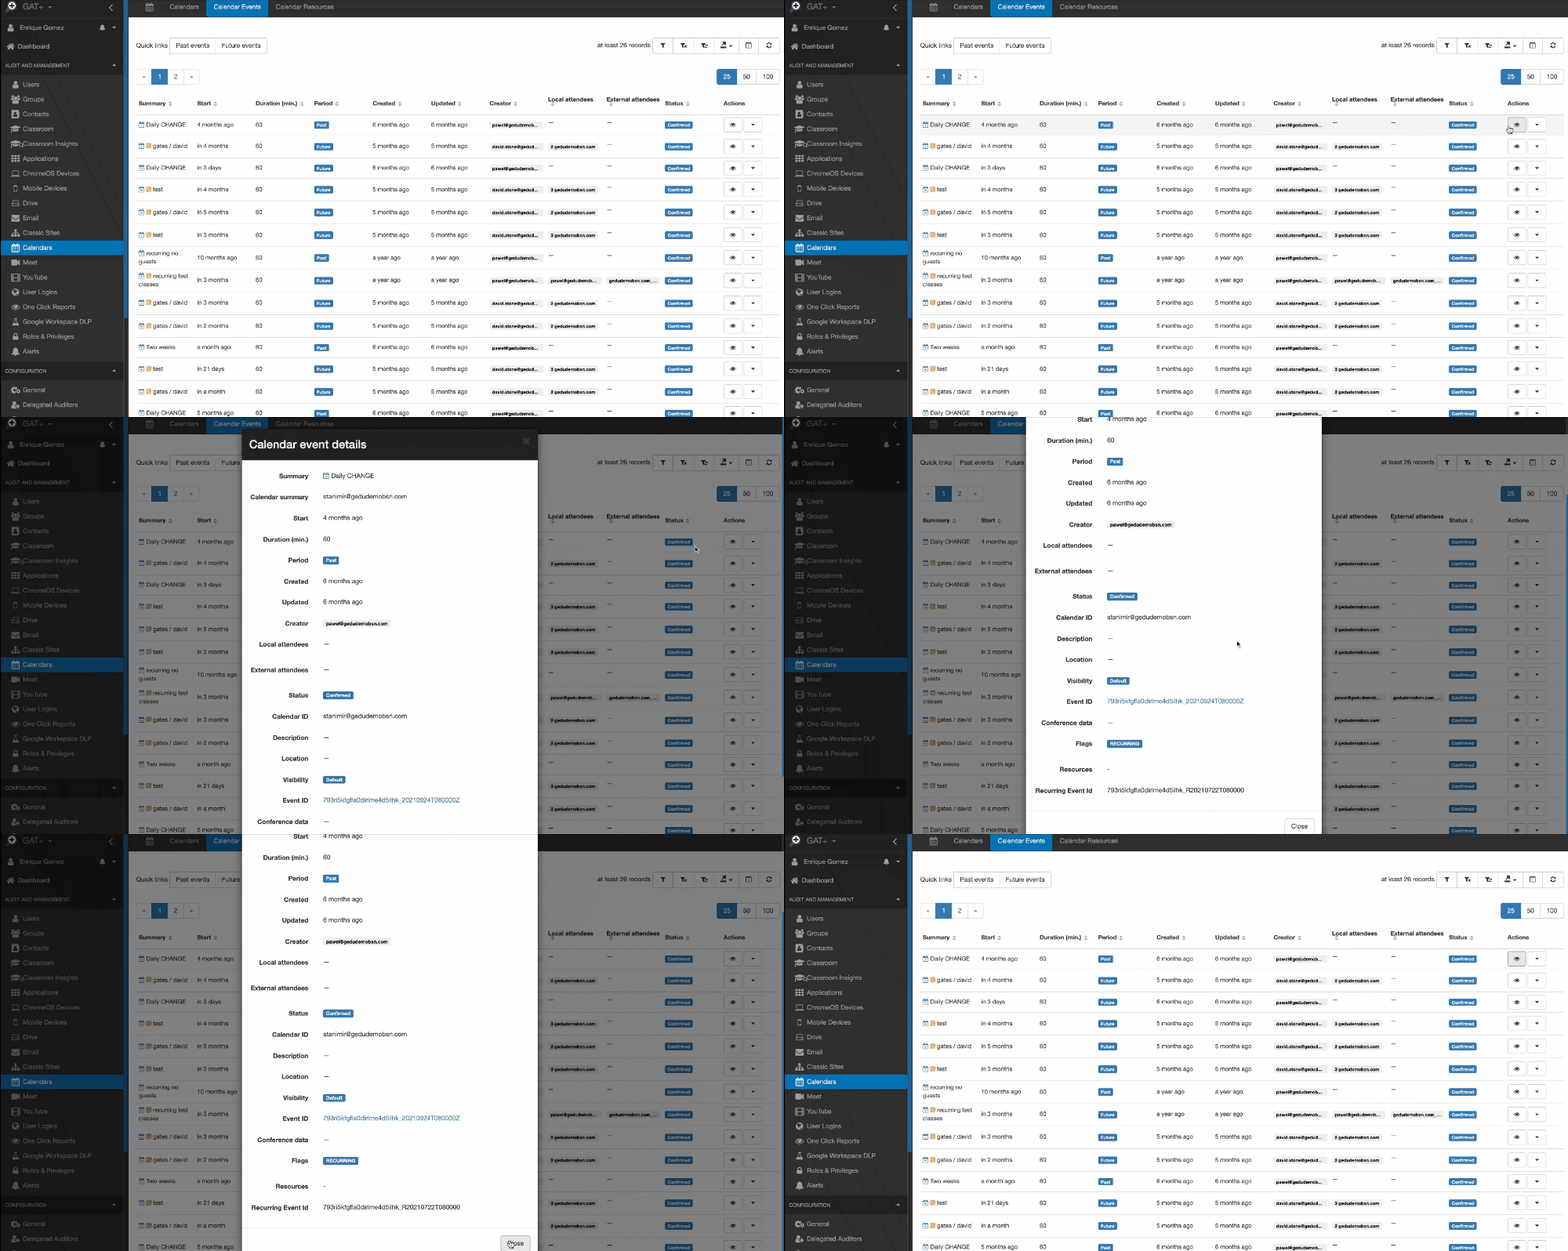
A pop-up window will be displayed showing General, Conference data, and Calendar resources tabs.
Click on the ‘bin’ icon to remove the resource from the selected Calendar event. When the resource has been removed, the resource is freed up to be used by other calendar events.

2. Delegate and manage calendar access.
See Details
The Google Calendar audit in GAT+ provides an extensive overview of every calendar created in your domain.
Using Calendar an Admin can delegate calendar access to other users from the domain or external users.
This can be done by following a few easy steps.
Select calendars
Navigate to the Calendar audit section from the menu on left
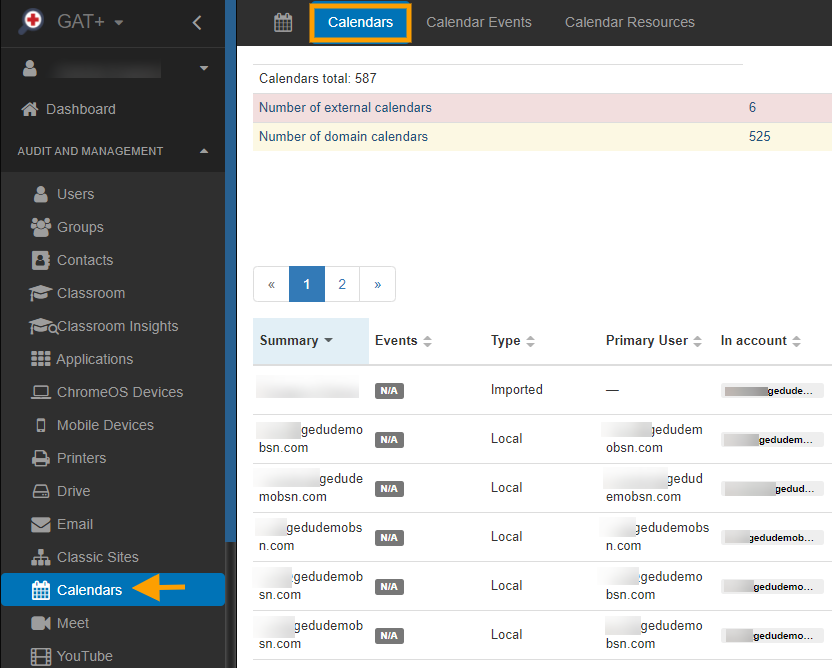
Apply filter and search for the Calendar you want to Delegate access to
You can apply any filter to find the result you need.
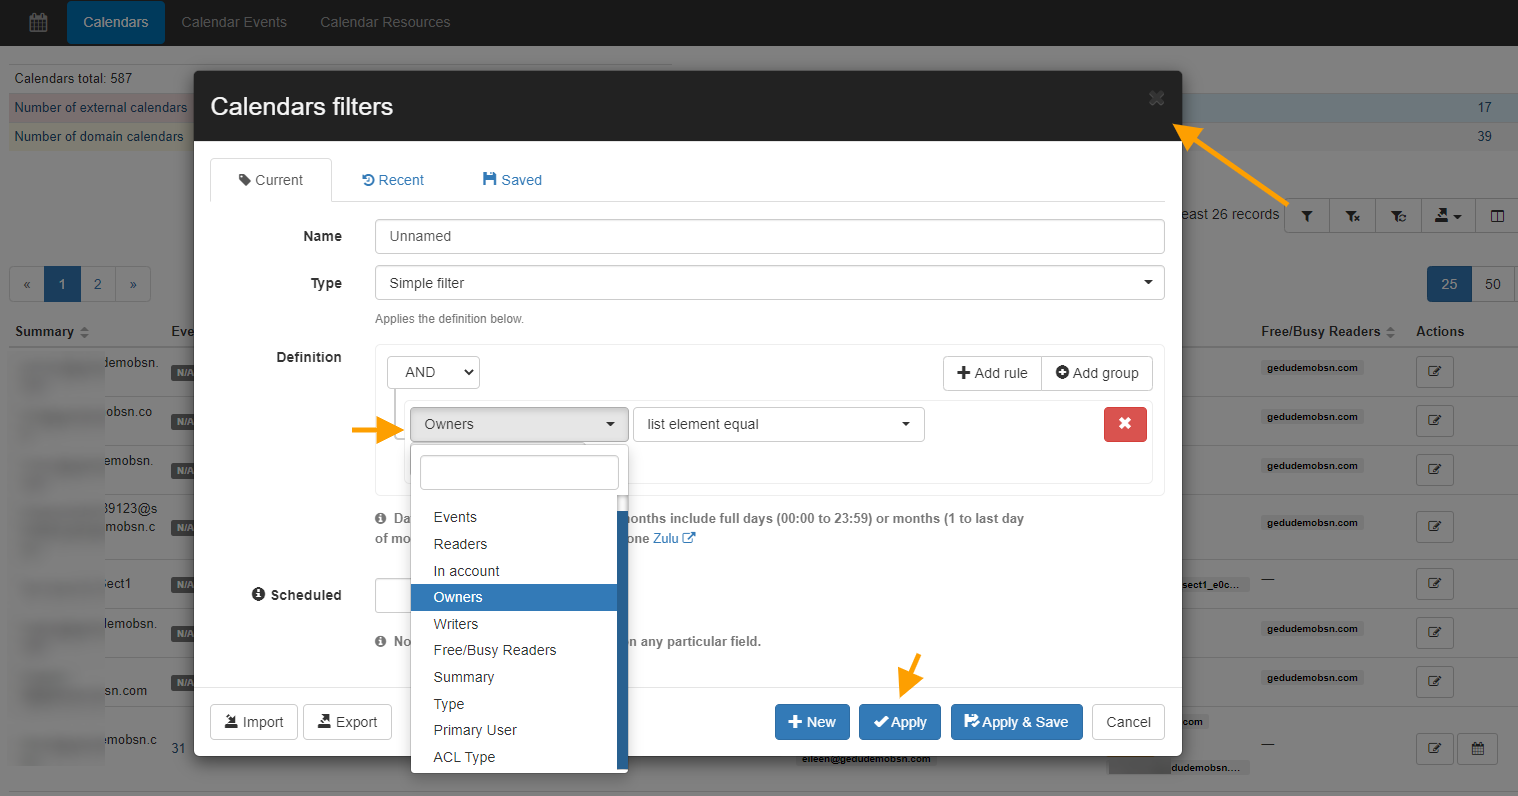
Apply calendar delegation
When the result is found apply the delegation.
Click the “pen” icon from the right side under Actions
A pop-up window will be displayed Calendar Permissions Management

Select the permission you want to grant the Delegated user.
- Owners – Add user as the second Owner of the calendar –
- Writers – Add user as a writer to the calendar
- Reader – Add user as a reader to the calendar
- Free/Busy readers – Add user as a Free/Busy reader
In the field Email/Domain name – Enter the Email/Domain name of the User you want to add
Click on the Add button
Click on the Save button
Result
As a result of the action, the calendar will be edited and an additional user will be added as Delegated user access
In the Calendar audit, you can see the selected calendar has a new Writer added

Remove user from the calendar
Note: Primary calendar owner – Cannot be removed
The same action can be taken to Remove users from the calendar.
Find the calendar click on the “pen” (edit) icon, click on the “bin” icons beside the name you want to remove.

Automate User Management
Products: GAT Flow
Role Management:
- Set Admin roles and privileges.
See Details
GAT Flow allows Google Workspace Super Admins to manage admin roles for all users. It also can be used to onboard, offboard, and modify existing users. There are many manual or automated actions that can be taken.
The Admins can manage and set or remove the pre-built roles or the custom roles with specific privileges created in the Google Admin console.
- Set user role – A custom or google defined role can be assigned to any user of the domain
- Remove user role – The custom or google defined role can be removed from any user of the domain
Any user of the domain can have different Admin or Custom roles assigned to them.
Flow allows the Admins to freely add or remove those roles.
Creating workflow
Navigate to GAT+ > Flow > Create workflow
Note: Those actions can be also used in Event or Recurring workflows
Workflow type – fill in the details for the workflow you want to create.
- Name – enter a name for the workflow
- Description (Optional) – enter a description for the workflow
- Type – select Modify – select any or both options
- For Onboarding – Set up user role
- For Offboarding – Remove user role
- Conditional flow – set up a workflow based on conditions
- Run immediately after approval – set up a specific time for when the workflow to run

- Next – click to proceed further.
Search for a user – select any user you want to take the action for.
The users can be added individually, by groups, or by org. unit and can also be imported via Google spreadsheet.

When the users are selected click on the Proceed to actions button.
A new window will be displayed.
Click on the ‘+’ button to Add an action or ‘++’ to Add action sets

A pop-up window will be shown.
Search for the actions (1) or scroll thru the actions to find them.
- User > Set user role
- Users > Remove user role

When the actions are selected fill in the details required.
1) Set user role
Assign pre-build roles or some of the custom-created roles.
- Role – select any of the custom or pre-build roles
- Scope (3) – select the scope of the role
- All organizational units
- Specific org. units only

2) Remove user role
The Admins can also remove already assigned roles.
Click on the Remove user role and select the Role.
The users will lose the selected roles

When ready with the actions click on Send approval request
Approval on request
The Security Officer will receive an email notification for the approval of the workflow.
Note: If pre-approval is enabled no email will be sent for approval.
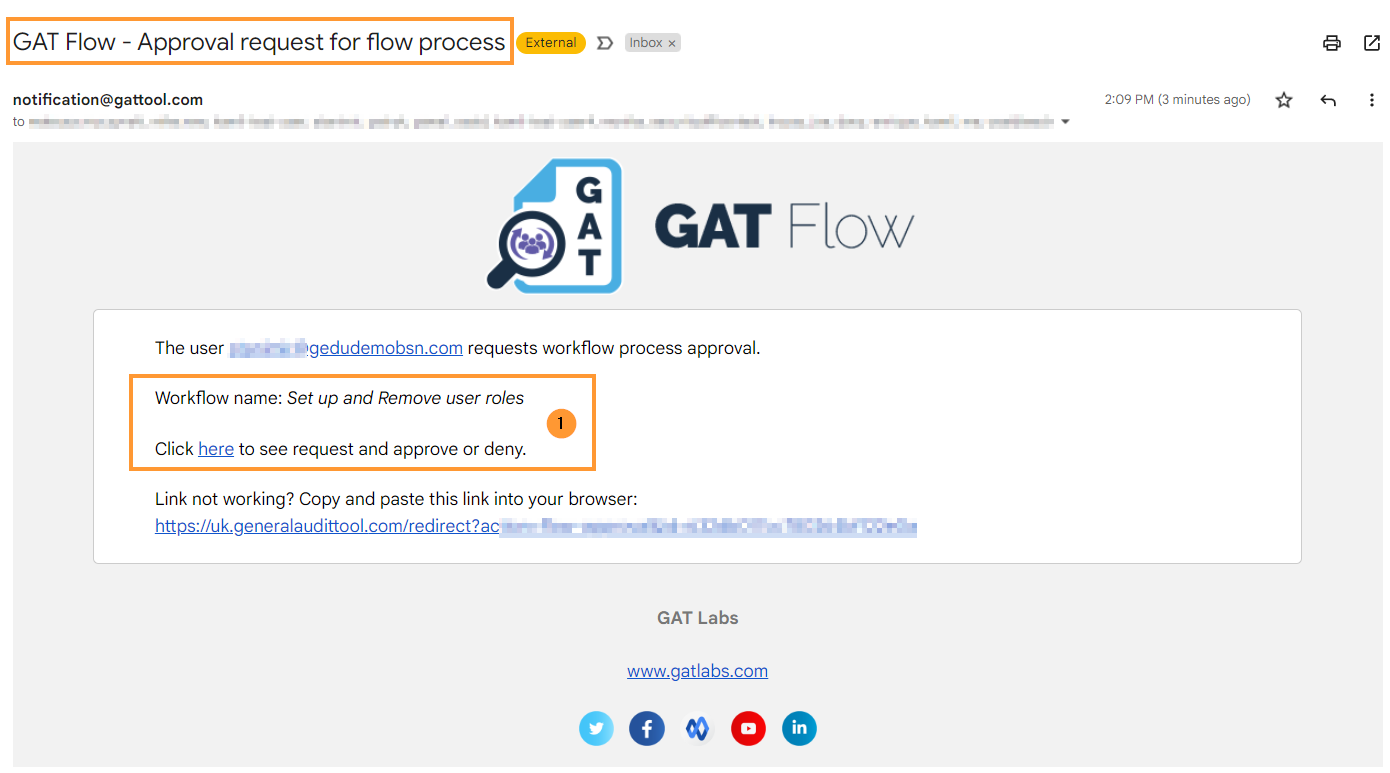
The Security Officer then needs to approve the request in GAT Flow. They can see all the details of the workflow.
Who is affected and what actions will occur if approved will be shown.

In Flow > Workflow – the Admin can see the details for the requested workflow.

Result
When the workflow is approved the actions will take effect.
The result can be seen on the Workflow or Approval details (eye icon) page.
If an error occurred click on the value in the Failed field. This will show you the reason for the failed workflow

Related Posts
Onboarding:
- Automate onboarding workflows.
See Details
GAT Flow allows Google Workspace Admins to take actions on the users on their domain in bulk. They can also automate user onboarding with this tool by creating and running the workflow and saving the action set to be used in the future.
Create Workflow and Save Action Sets
An Admin can use Create workflow feature and create a new user(s), then set the jobs required to run during the onboarding process.
Step 1: Create workflow
To onboard a new user(s) navigate to Flow-> Create workflow, fill in the title and set the type to Onboarding, then click on Next.

Next, fill in all necessary fields in the Create a user window.

For a large number of users, Admin can add the information separately or upload the user details from a spreadsheet.
When ready, click on Proceed to actions.

Next, choose actions that must run during the onboarding process.
When ready, Send approval request.
The request is sent to the Security Officer.

Step 2: Save action sets
To search for the existing workflow, navigate to Workflow, find a previously created workflow whose action set is to be copied (or search via name set), then click on the ‘eye’ icon to see further details.

Click on Save as action set after reviewing the details.

That set of actions can be used for the next onboarding process if applicable.
The saved action set can be used in the new workflow by clicking on Add actions set.

Previously set actions are automatically included in the workflow.
Saved Action Sets and Event Workflow
GAT Flow also provides an alternative method to speed up the new user(s) onboarding process. It consists of two steps:
- Saved Action sets
- Event Workflow

In this method, the admin first creates and saves a set of actions for onboarding new users. Then, they create an Event triggered workflow where the saved set of actions will be used. This 2 step process will help Admins to automate onboarding in any organization including schools or colleges.
Step 1: Saved action sets – Modify
To create a new set of actions that can be used for further workflows, navigate to GAT Flow -> Saved action sets -> Create action set

On the next window, enter the actions set name, select the type of the workflow: MODIFY, and if applicable, switch on the following options ‘Conditional flow’, ‘Validated’.
- The conditional flow option allows the creation of the workflow based on the conditions that need to be met to run the jobs
- The validated option allows choosing whether all mandatory fields need to be filled in right away in the workflow, or they can be left empty and be filled in at a later stage during the workflow creation – depending on the business/project needs

When the name and type of the workflow are filled in, select the ‘plus’ button on the left-hand side of the graph to Add action. Continue adding as many new actions as necessary to be executed on onboarded users in your organization, and once all is set up, click on Save. A new Action set is created and ready to be used.

Conditional flow
An Admin can set up the conditional flow based on the requirements set in the workflow, as per an example below:

There are several predefined conditions that can be used, such as:
- The Advanced option allows setting complex condition that contains several rules, as shown below in the Advanced condition editor. Once applied, several specified conditions need to be met to trigger the job(s) set.

- Group, Org. unit, Active, Suspended, Archived, Cost center, Department, Manager, Title, Building ID
- Custom Attribute
How the complex setup would look like:

When everything is ready, click on Save to record the whole setup in Flow for future usage.
A set of actions for the onboarded user(s) based on the Advanced condition (several rules to be met to trigger the whole workflow) is now saved in the GAT Flow dashboard and can be found under Saved action sets.
The setup of actions can be edited or deleted here.

Validated
If Validated is switched ON all the jobs’ fields set up in the workflow will necessarily have to be filled in, for example, Send email job must be configured as shown below:

If Validated is switched OFF, the jobs’ fields can be left empty and be configured at a later stage when using Saved action sets in the future workflow. This depends on the user’s needs.
Step 2: Event trigger workflow – Start when the user has been created
In GAT Flow the actions can be set to run automatically based on different Events.
Navigate to Event workflow > Create workflow

In Add event workflow creator, specify the Name of the workflow, Type: Modify, and Event: Start when user is created
The user needs to be already onboarded/created for this event workflow to kick off. Every time a new user is onboarded into the domain, the workflow will run.

Other options in this setup are:
- Active – activate or deactivate the Event workflow using this switch
- Pre-approved – when on the workflow does not need to be approved, when off the whole workflow (actions after the user is created) has to be approved again by the Security Officer.
- Conditional flow – this option needs to be switched ON if the previously saved set of actions is based on conditions. If the standard workflow was used while creating the Action set, the Conditional flow switch should be OFF. All the actions need to be consistent throughout the tool.

When ready, click on Next
Add a set of actions configured before
When choosing the actions, hover around the top left side of the START box and select the ‘plus’ button to be able to use the saved Action sets:

Once clicked on the Add actions set, previously set and saved action sets become available.

Select the designated setup by clicking on the ‘+’ button to build up the Event triggered workflow with one mouse click.
Next, click on Send approval request.
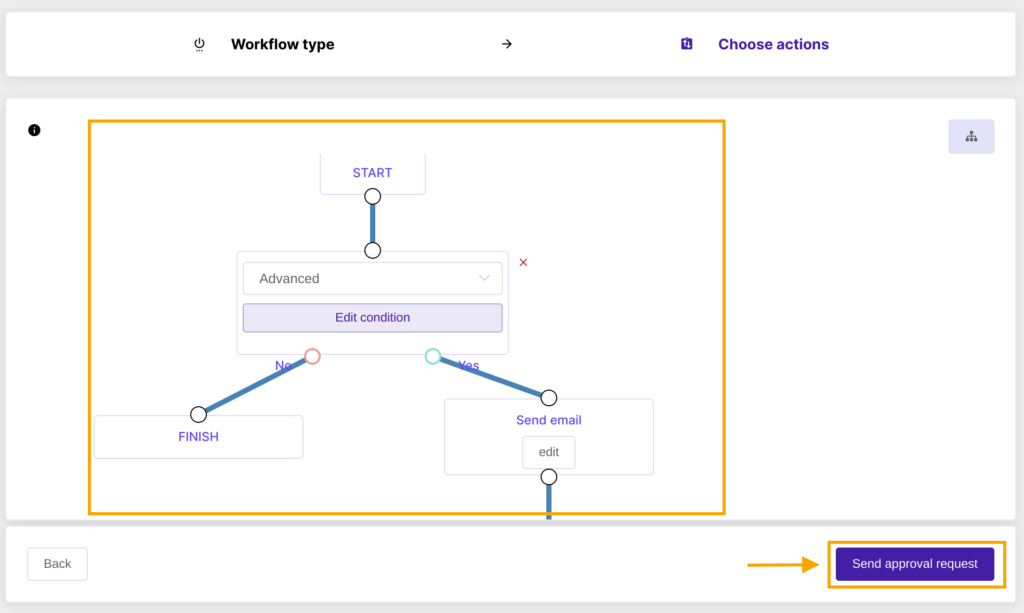
Security Officer Approval
Security Officer needs to approve the workflow only once if the Pre-approved option was toggled on during the process of creating the workflow. If the Pre-approved option was not enabled for this workflow, Security Officer needs to approve the request every time when a new user is added.
Results
The set of actions will become available and will run automatically every time when a new user is added to the organization.
Related Posts
- Transfer multiple folders to multiple users in bulk.
See Details
GAT Flow allows admins to onboard, offboard or modify existing users/students in bulk and add any given Folder into their Google Drive.
Allowing any selected group of users to have a copy of specific folders in bulk.
This will create a copy of the existing folders and the copy will be placed in the Drive of the selected users.
Below we will show how this can be done with GAT Flow
Create Workflow
Navigate to GAT+ > Flow > Create workflow
For this example, we will use the Modify option
Fill in all the required details
- Name – enter a name for the workflow
- Optional – Description – enter a description for the workflow to be taken
- Type – select the workflow type you want to take
- Modify – modify existing users
- Conditional flow – this can be used to create a workflow that will be executed based on condition being met
- Run immediately after approval – use if you want to set up a specific date and time for when the workflow to be ran

Click on Next to proceed.
Select User(s)
This will lead to a new window Search for a user page.
Pick the users to whom you want to copy the folders to
The users can be selected individually, via group, or by the org. unit of users. You can also import users via Google spreadsheet.

When the users are selected click on Proceed to actions (3).
Choose actions
This will lead to the Choose actions tab
Click on the + sign to Add an action or ++ sign to add a prepared Action Set of actions

When selected a pop-up menu with different options will be displayed.
Search for or select the actions you want to take.
In this case Copy folder to selected users
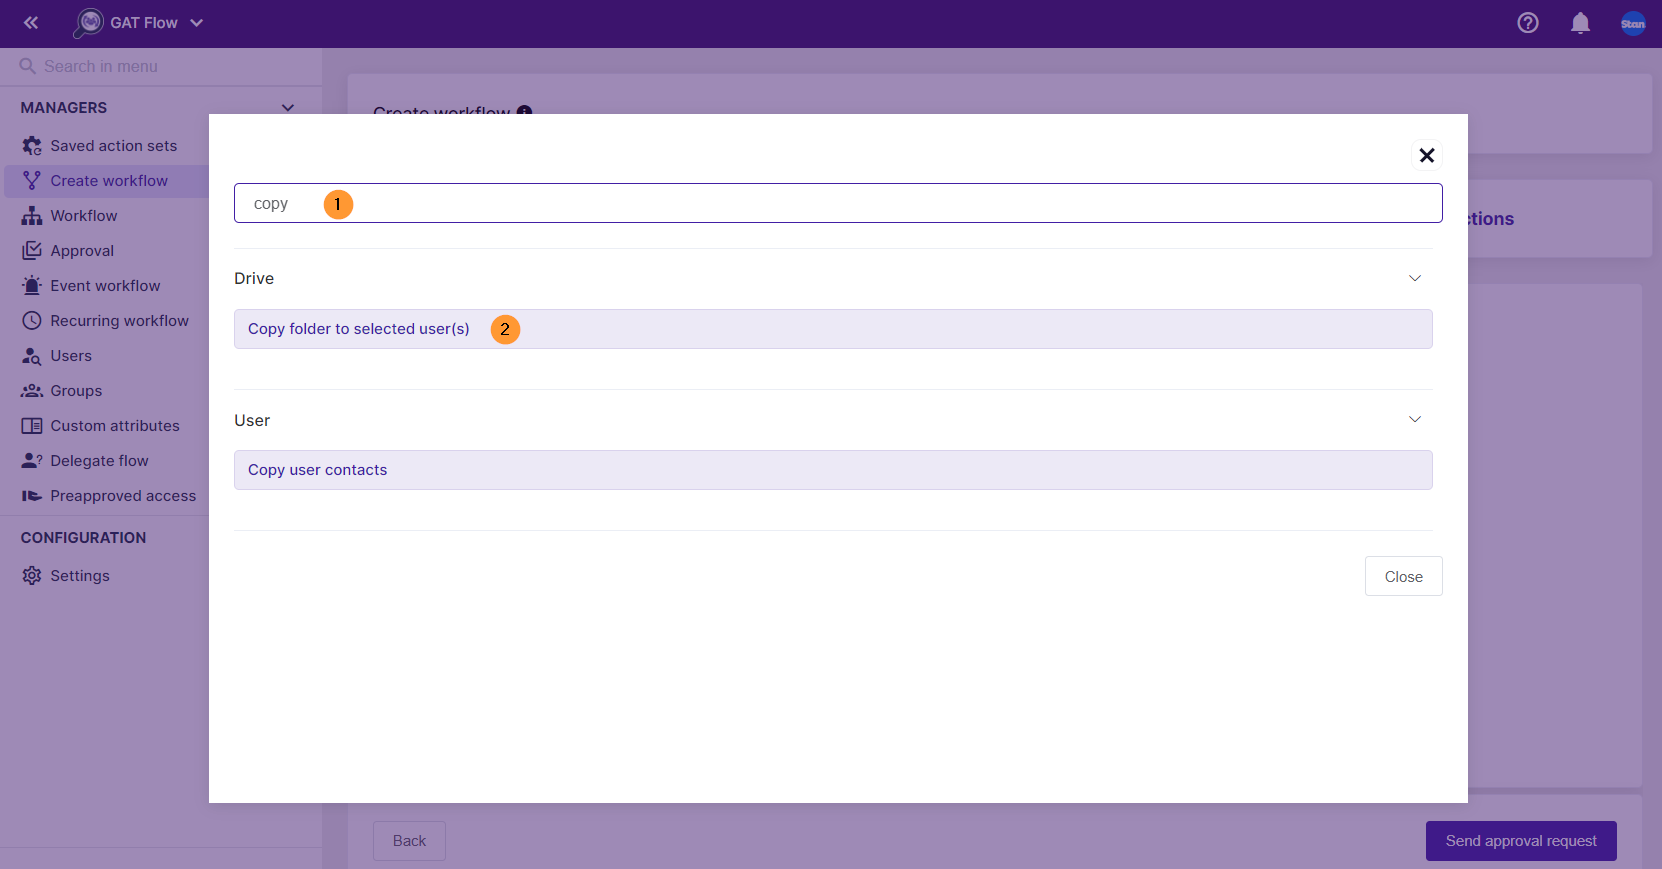
The action will be shown, fill in the required details.
- Copy folder to selected user(s) – the action required
- Copy from – select the user from whose drive you want to copy the Folders. A list of the Folders under the Users MyDrive will be displayed
- Search folder – manually search for the needed folder
- Select the folders you want to create a copy of (5)

Pick the Folders you want to copy and click on Send approval request.
An email will be sent to the Security Officer. The Security officer will receive an email for the approval required.

Note: If you have pre-approved Flow approved, the action will be set to run without approval required.
The Security Officer can view all the actions to be taken and approve the request.

When the request is sent – details can be seen in the Workflow tab by the Admin.

Result
When the workflow is approved (via pre-approval or by a Security officer). The workflow will be set to run.
As a result, this action will create a copy of the existing (selected) folders and it will be placed in the MyDrive of the chosen users.
Example:
User A’s Google Drive before the changes.

User A’s Google drive after the changes.
It has 2 new Folders

Offboarding:
- Remove access and secure the leaver account.
See Details
Flow allows the Google Admins to:
- Onboard and create new users for the domain
- Modify existing users
- Offboard and delete users from the domain
Important
- The Offboarding deletes the user and the action cannot be undone. Selected accounts will be deleted. All emails and files once removed can be restored within 20 days using the Google Workspace Admin Console otherwise they will be gone forever.
How to offboard a user
The steps below will show steps to offboard a user to the domain.
Launch GAT+ and navigate to Flow

From the menu on the left select Create workflow (1)
Note: The action can be done also with Event and Recurring workflows.
Select workflow type
In Workflow type – fill in the details
- Name – enter a name for the workflow
- Description – enter a description for the workflow to be taken
- Type – select Offboarding
- Note: This workflow will delete the account
- Conditional flow – you can set up the action alongside conditional workflow
- Run immediately after approval – select if you want to pick a specific time for when the workflow to occur
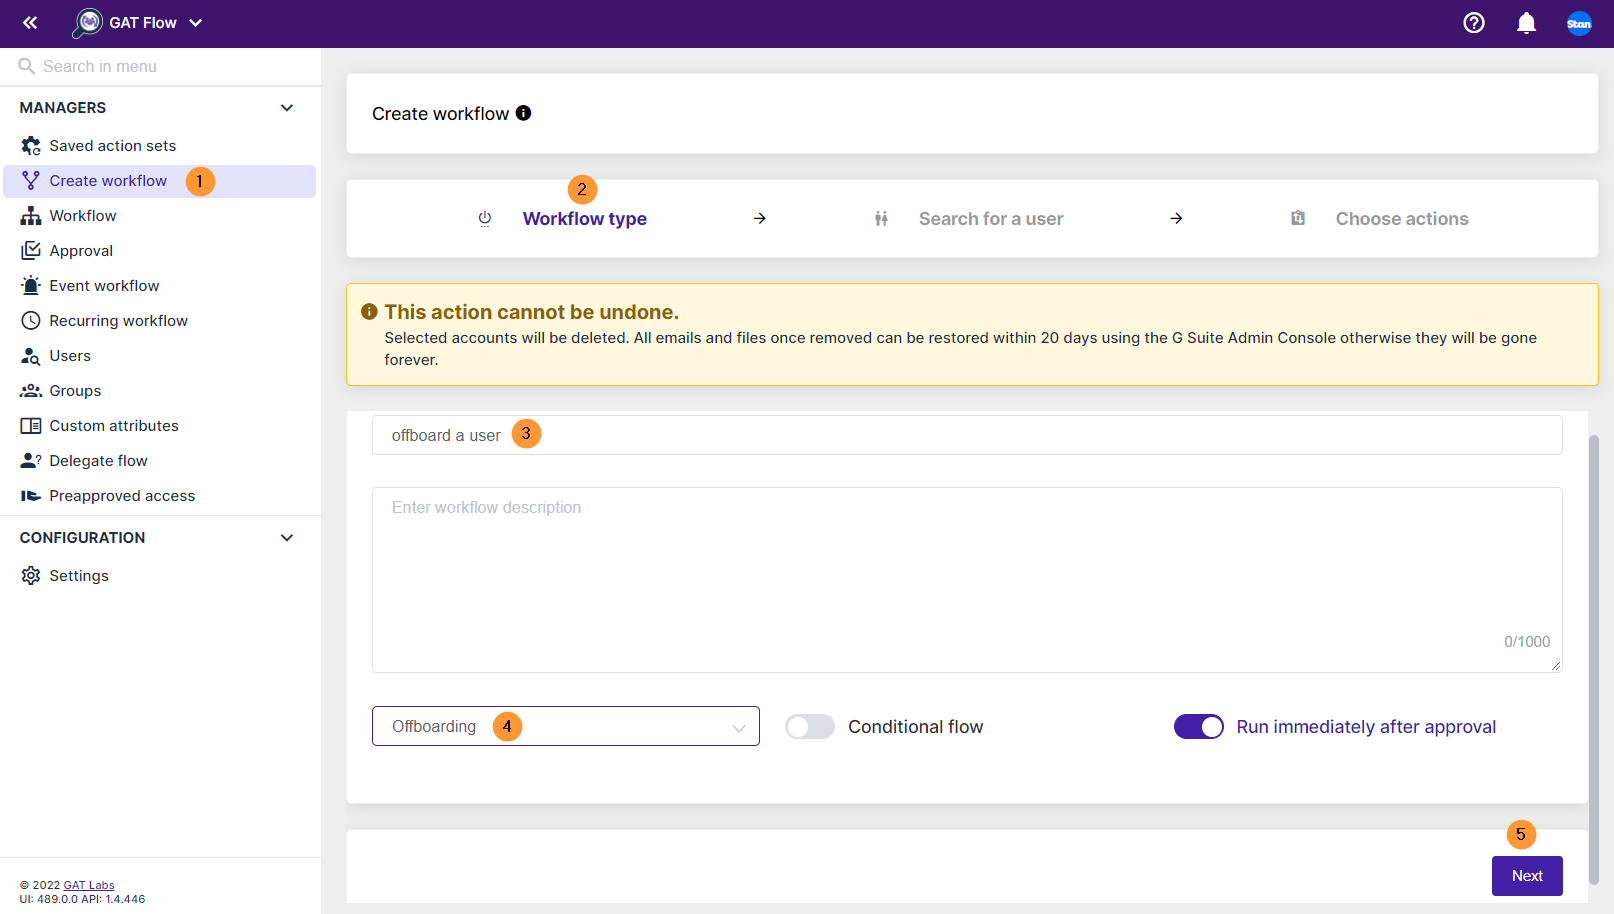
Click on the Next button.
Pick users
Under Search for a user – select the users who will be deleted
- Select one or a few users
- Group of users
- Org. Unit of users
- Import users via Google spreadsheet

Click on Proceed to actions button
Set the action
In “Choose actions” search and select the actions you want to take on the chosen users.
To “Add action (2)” or “Add action set (3)”, please select the plus + button shown in the screenshot below.

If the process hasn’t been set before (no action set created), please use Add action button and create the node.
Search for the action using the search field and select the action you want to take.

As example:
- Delete user from all groups
- Force sign out
- Migrate emails
- Delete 2-step verification backup codes
- Revoke app tokens

Once you are happy with the selected actions to be taken, click on Send approval request button.
A pop-up window will be displayed click Yes to proceed.

The request will be sent to the Security officer.
The workflow results page will be loaded. Click on the Eye icon to view details.

Security Officer
The Security officer will receive an email notification with the request to be approved.

The Security officer will be navigated to the Approval page > Details page (eye icon)
Select Approve to approve the request.

Result
The account will be deleted from your domain, alongside the below actions.
- Delete user from all groups
- Force sign out
- Migrate emails
- Delete 2-step verification backup codes
- Revoke app tokens
- Remove user – deletion of the user
IMPORTANT: This action cannot be undone. Selected accounts will be deleted. All emails and files once removed can be restored within 20 days using the Google Workspace Admin Console otherwise they will be gone forever. Are you sure you want to proceed?
The Admin can check the result in Flow > Workflow > Details (eye icon)

The detailed view will be present under the “eye icon” to show all the actions taken on the user.

Video how-to
You can check the how-to video below
Advanced Features:
- Conditional Workflows for dynamic user management.
See Details
The Conditional flow allows the Admins to create any workflow that will be executed based on different conditions.
Furthermore, those conditions can be combined to create the workflow you need.
Create workflow
Navigate to GAT+ > Flow > Create workflow
Alternatively, the Conditions can be used in Event and Recurring workflows
Fill in the details:
- Name – enter a name for the workflow (3)
- Type – select any of the workflow types (4) – in this case – Onboarding
- Conditional flow (5) – enable the conditional workflow
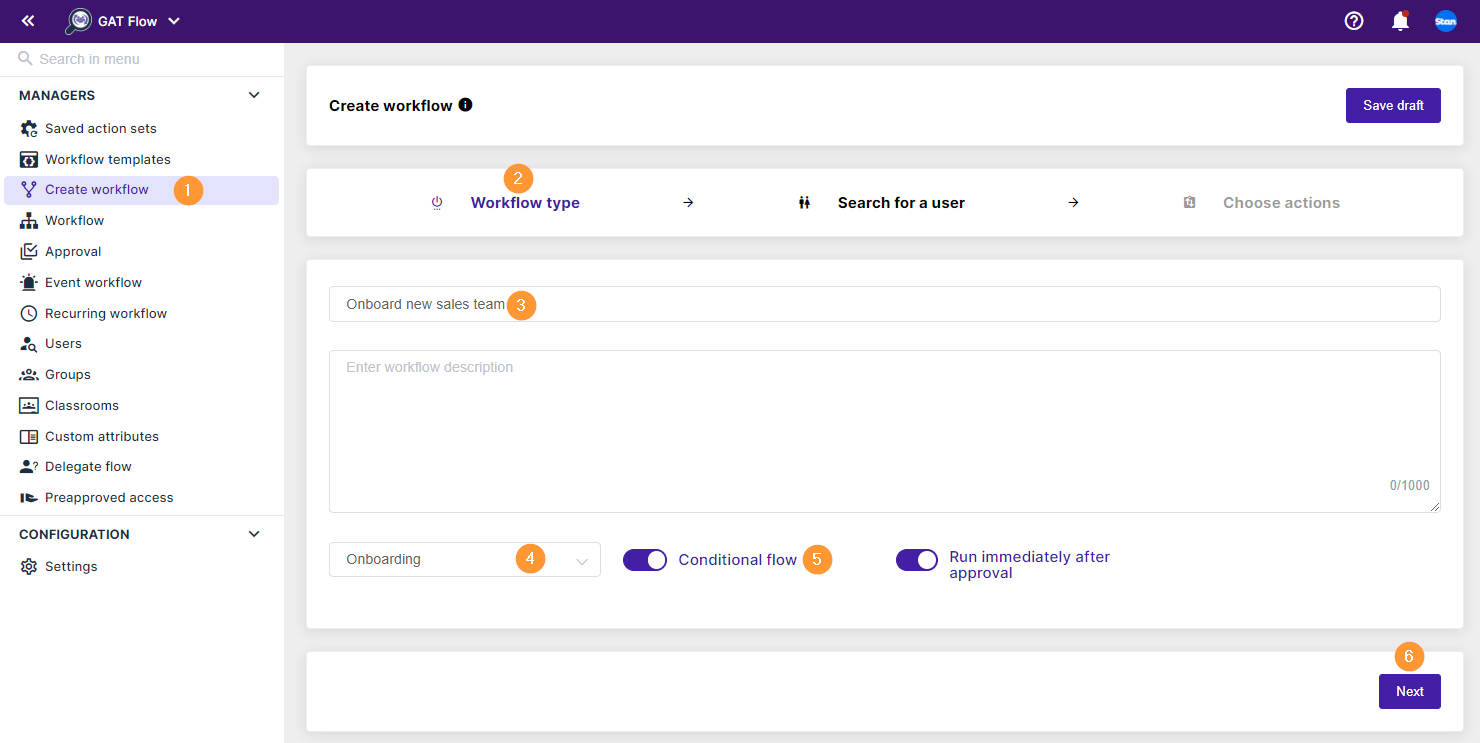
- Next – click to proceed
Create a user
In “Create a user” section (1) fill in the required details.
- Select the domain (2) – pick a domain where to onboard the users into
- Create a user’s email template (3) – select and pick options for the email’s appearance – such as first name, dot, last name, etc.
- Generate user password (4) – generate a password for the user
- Send user password – enable the option to send a password to another user
- Password receiver – depending on the above, an email can be sent to
- Workflow creator
- Manager
- User private email
- Add new user – add the details for the creation of the user directly.
- Add users individually via UI – click on Add new user.
- Add users in bulk via spreadsheet import – click on Import users.

Onboarding user
When you click on ‘Add new user’ a new window will be displayed.
Fill in the details for the new users.

Click on the (arrow-purple field) to display additional fields. Fill in anything necessary.
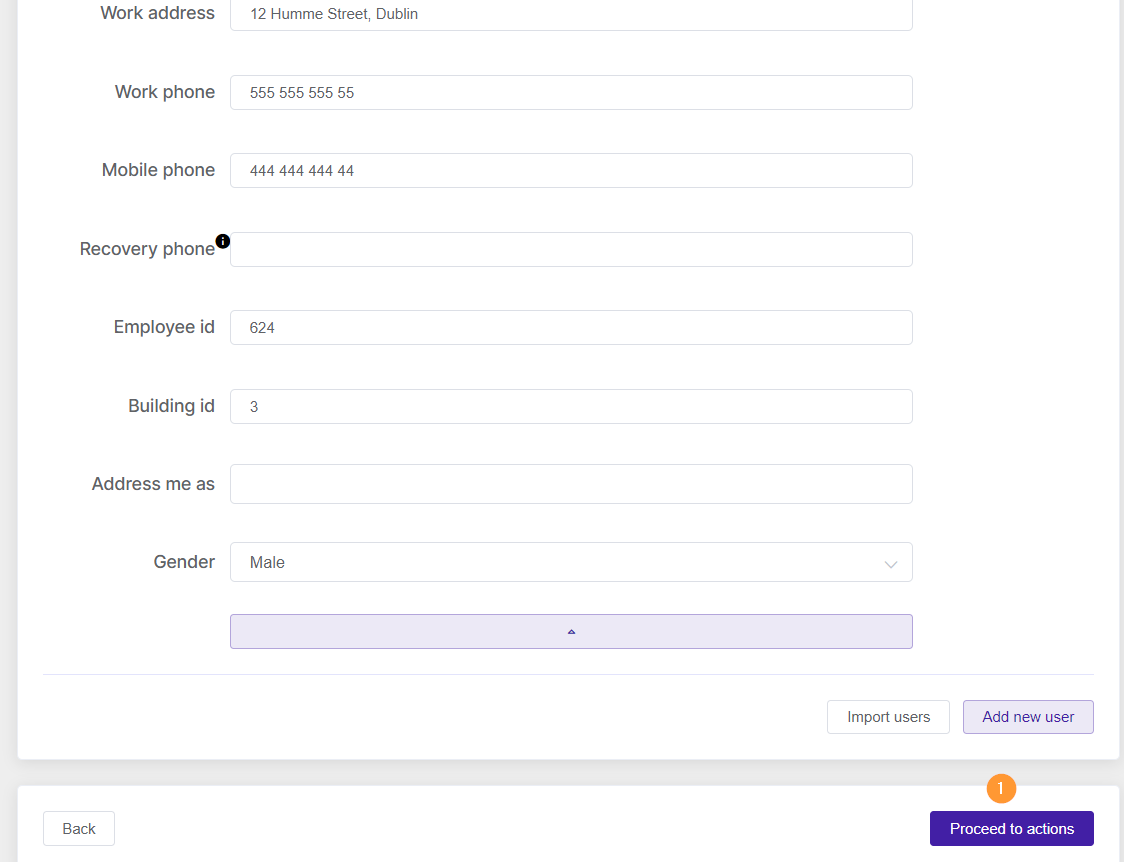
Create Conditional Workflow – “Choose actions”
When you’re ready to create the users and add their information, click on Proceed to “Choose actions”. Furthermore, this field allows the Admin to configure the actions to be taken on the users being created.
Fill in the details.
- Click on Add condition.
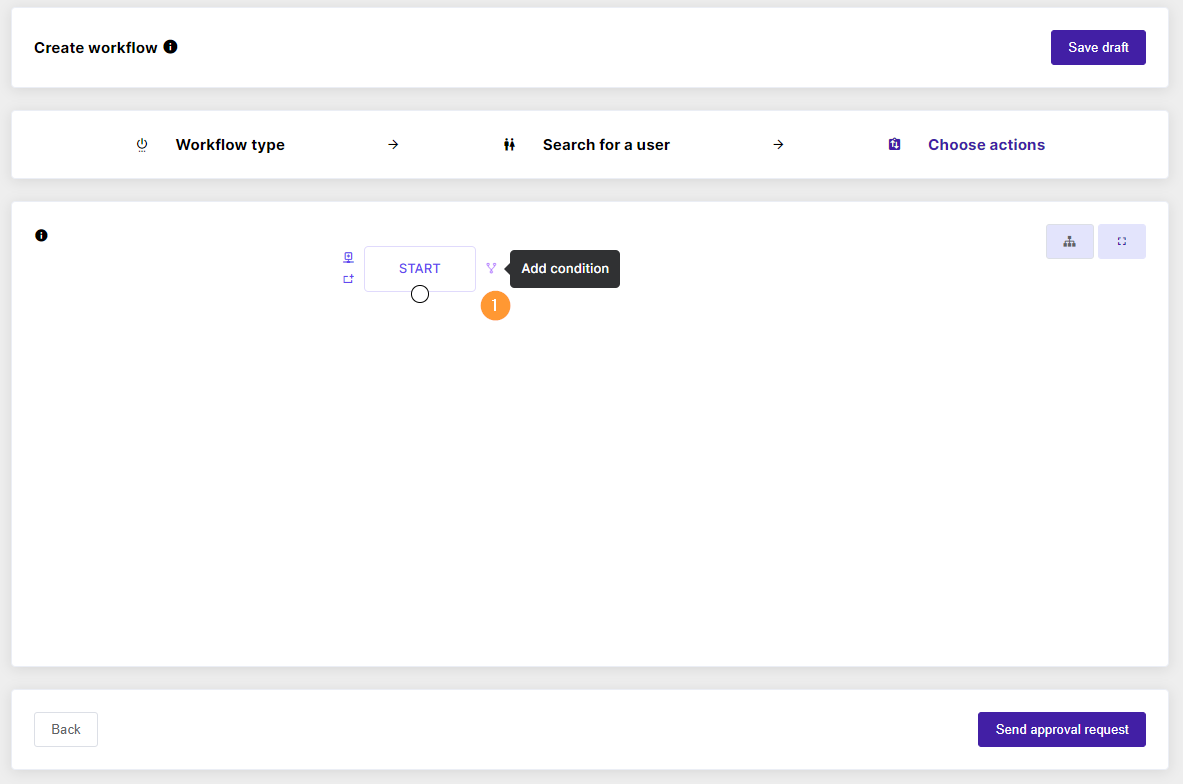
In the ‘Condition’ section, set up anything needed.
For example Departement equal Sales
- Department equal Sales
- If – No –
- Finish the workflow (meaning just create the account as in previous steps)
- If – Yes –
- Change user organization unit – add the user to a specific org. unit
- Send email – sent an email to the newly created user
- Finish – finish the conditional workflow
- If – No –
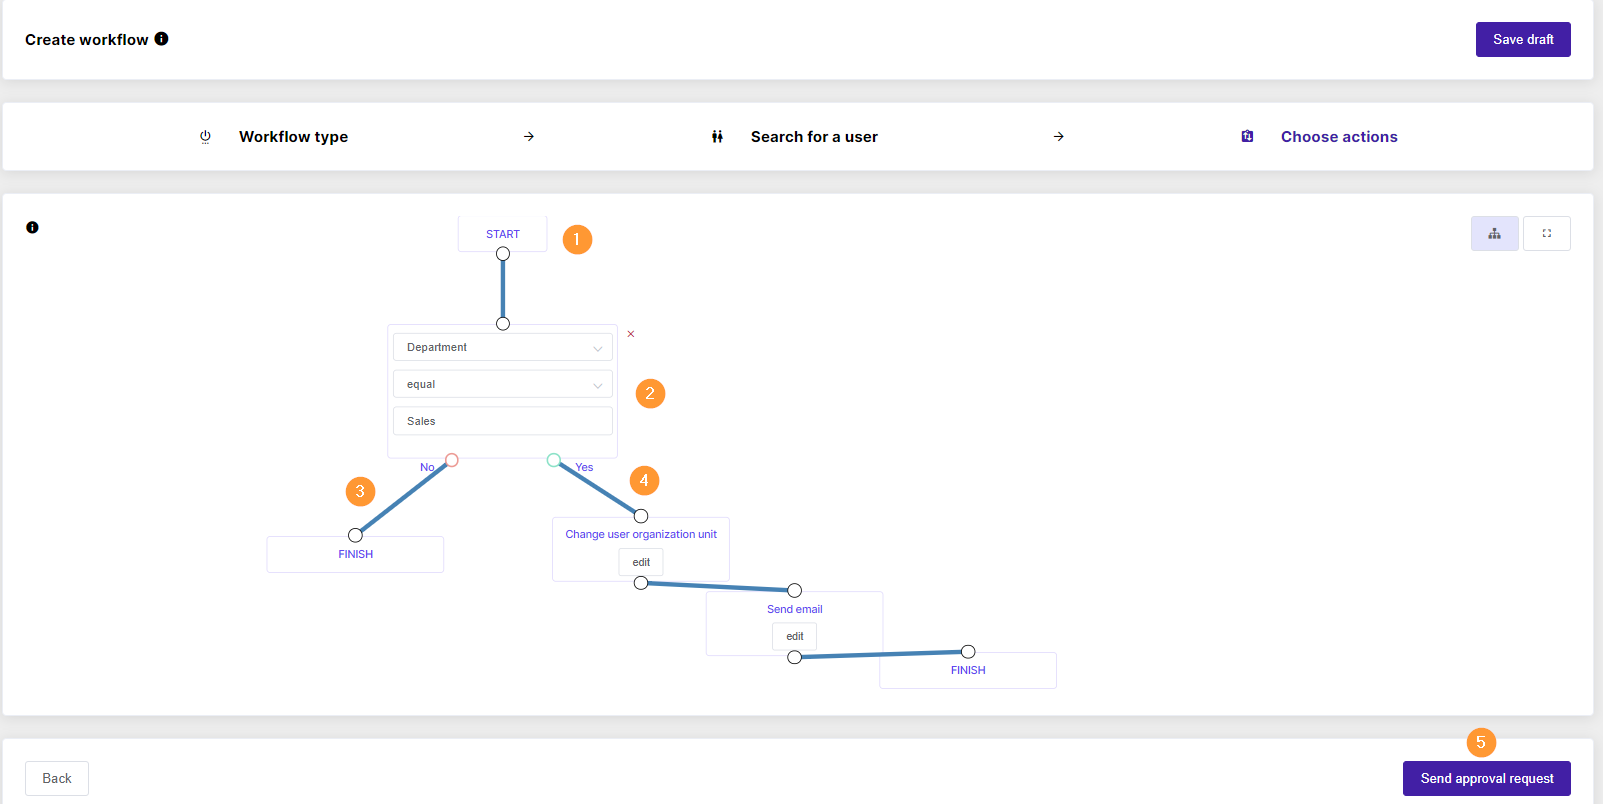
You can create more complicated workflows by using layered conditions, etc.
When ready click on “Send approval request.”
Approval
An email will be sent to the Security officer for approval unless pre-approval is enabled.

When approved, the workflow will run.
Result
Finally, the system creates the account, and performs actions based on the conditional workflow:
- Account creation
- Sending emails based on conditions
- Moving the user to a selected org. unit

Continuous Monitoring and Reporting
Products: GAT Shield
Site Access Monitoring:
- Use Site Access Control to define policies and enforce safe browsing for your domain.
See Details
The Site Access Control feature gives the Google Admins control over which websites users in the Google Workspace domain can access.
Why it Matters
This solution gives you fine-grained control over what your users can see online. It’s like a safety net, protecting them from dangerous websites and letting you block any pages you don’t want them to visit.
How to Implement
The Admins can easily create a rule to block or allow (if blocked) users from visiting websites.
Navigate to Site Access Control > Rules > Allow/Block sites.

You will see a new pop-up window. Fill in the details required.
- Action – select to Block or Allow sites.
- Redirect URL – if blocking a site, you can enter a webpage to which the user will be redirected (optional).
- Scope – select the users affected by the rule.
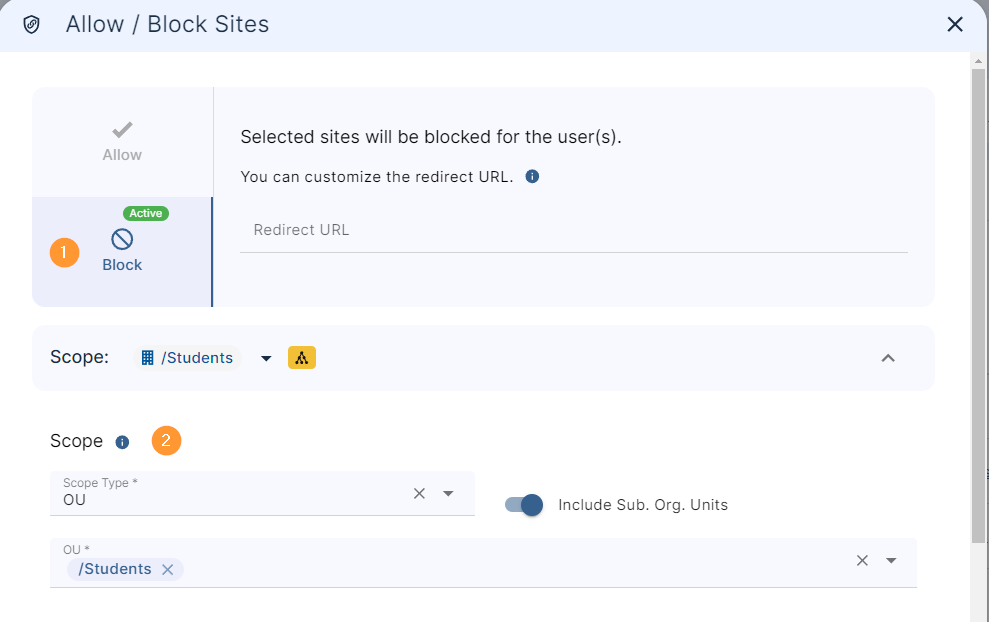
- Site List – enter the sites you want to block or allow.
- Paste from clipboard – Paste a list of sites (optional).
- Block – click to Block the added sites for the selected users.

Result
As a result of the quick rule, the sites added will be blocked for the selected range of users.
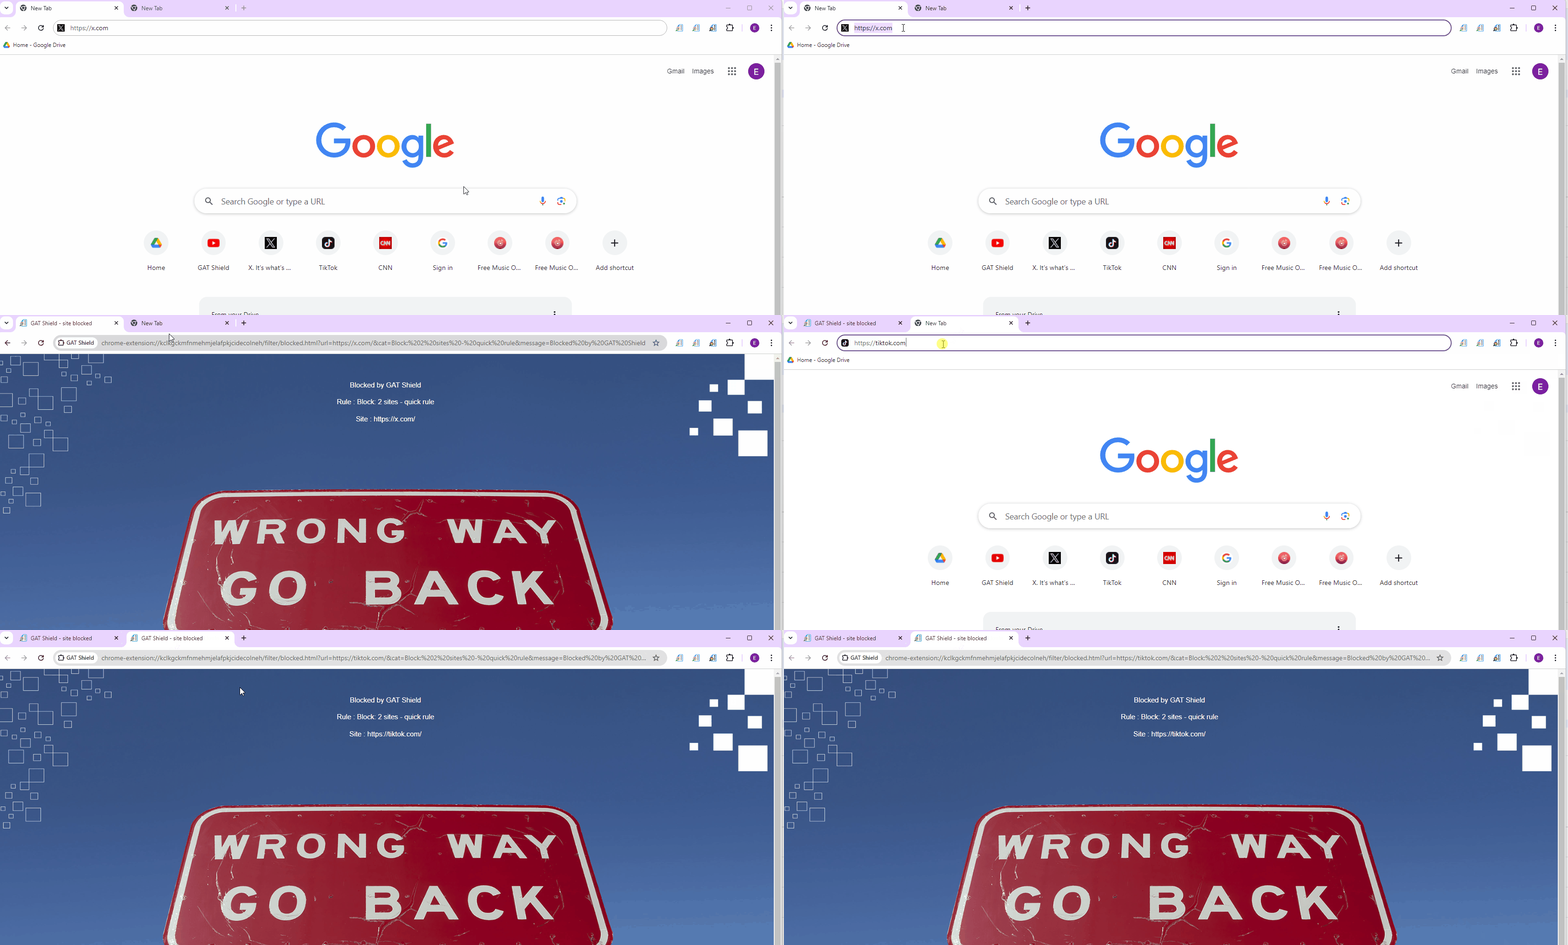
Related Posts
Alert Configurations:
- Configure alerts for specific user activities, such as file downloads or unauthorised Chrome extensions .
See Details
GAT Shield provides an extensive way to alert admins and delegated auditors on certain behaviors in their domain and web activity.
By deploying the extension to the web browser, Shield is able to monitor the browser, report back and take action on any alerts configured by the admin/auditor.
Alert Rules
Navigate to Shield > Configuration > Alert Rules > Add a rule
Pick any of the Rules available
- File download
- Page content inspection
- Google docs inspection
- Visit
- Search
- Device usage
- Location
- IP Address
- Active ID
- Denoted user/last user mismatch
Alternatively, you can Add from a template.

Alert Rule Types
File download
This alert allows admins/auditors to capture any file download activity.
To set up the rule configure the options below:
- Alert rule name – Alert rule name.
- Active – Toggle to activate/deactivate rule.
- File extensions – The type of file extensions to monitor. ( DOC and DOCX, HTML and HTM, PDF, XLS and XLSX etc ).
- File size – Minimum number of sizes to detect ( Bytes, Kilobytes, Megabytes, Gigabytes ).
- Cancel/delete download – Toggle to cancel/delete download.
- Report file name – Include file name and meme type in the alert.
- Time restriction – If enabled, the local user timezone will be used for checking. Otherwise, the timezone from General Configuration will be used.
- Notification interval – Time interval in minutes after which the notification about subsequent rule violations by the user will be sent. If empty, the default value will be used.
- Monitor on the following sites only – Monitor an exclusive list of sites.
- Site exclusions – Exclude certain sites from the rule.
- Scope – Users’ email or Org. unit to be monitored.
- Scope exclusions – Users’ email or Org. unit to be excluded from the rule.
- End-user action
- Display warning message.
- Display a warning message and close the browsing tab.
- Display warning message and redirect.
- Close the browser tab without a message.
- Redirect without a message.
- None.
- Warning message – warning message to display.
- Alert recipients – Recipients for the alert in place.
- Screen capture – Screenshot of the screen where the alert triggered.
- Webcam capture – the capture of the webcam on the device (access must be pre-configured in the admin console).

Page Content Inspection
This alert allows admins/auditors to trigger an alert on any words specified in the rule for any webpage.
To set up the rule configure the options below:
- Alert rule name – Alert rule name.
- Active – Toggle to activate/deactivate rule.
- Page content inspection Regex – enter words to trigger in a regex format.
- Distinct uppercase and lowercase letters – toggle to activate.
- Scan and alert on entire page – toggle to activate scan on user input AND user visit/load pages. By default, this option is unchecked and scans only on user input (typing).
- Regex word exclusions – words to exclude in a regex format.
- Page Keywords – Add words to trigger on any webpage.
- Alert trigger threshold – The minimum amount of words to trigger an alert.
- Time restriction – If enabled, the local user timezone will be used for checking. Otherwise, the timezone from General Configuration will be used.
- Notification interval – Time interval in minutes after which the notification about subsequent rule violations by the user will be sent. If empty, the default value will be used.
- Report matched text – Include the triggered text in the notification.
- Monitor on the following sites only
- Site exclusions -Sites to be excluded from the rule.
- Scope – Users’ email or Org. unit to be monitored.
- Scope exclusions – Users’ email or Org. unit to be excluded from the rule.
- End-user action,
- Display warning message.
- Display a warning message and close the browsing tab.
- Display warning message and redirect.
- Close the browser tab without a message.
- Redirect without a message.
- None.
- warning message – warning message to display
- Alert recipients – Recipients for the alert in place. This can be a user or group email.
- Screen capture – Screenshot of the screen where the alert triggered.
- Webcam capture – the capture of the webcam on the device (access must be pre-configured in the admin console).

Google Docs Inspection
This alert allows admins/auditors to trigger an alert on any words specified in the rule for any Google document.
To set up the rule configure the options below:
- Alert rule name – Alert rule name.
- Active – Toggle to activate/deactivate rule.
- Google docs content inspection Regex – enter words to trigger in a regex format.
- Distinct uppercase and lowercase letters – toggle to activate.
- Regex word exclusions – words to exclude in a regex format.
- Page Keywords – Add words to trigger on any webpage.
- Alert trigger threshold – The minimum amount of words to trigger an alert.
- Time restriction – If enabled, the local user timezone will be used for checking. Otherwise, the timezone from General Configuration will be used.
- Notification interval – Time interval in minutes after which the notification about subsequent rule violations by the user will be sent. If empty, the default value will be used.
- Report matched text – Include the triggered text in the notification.
- Monitor on the following sites only
- Site exclusions -Sites to be excluded from the rule.
- Scope – Users’ email or Org. unit to be monitored.
- Scope exclusions – Users’ email or Org. unit to be excluded from the rule.
- End-user action,
- Display warning message.
- Display a warning message and close the browsing tab.
- Display warning message and redirect.
- Close the browser tab without a message.
- Redirect without a message.
- None.
- warning message – warning message to display
- Alert recipients – Recipients for the alert in place.
- Screen capture – Screenshot of the screen where the alert triggered.
- Webcam capture – the capture of the webcam on the device (access must be pre-configured in the admin console).

Visit
This alert allows admins/auditors to trigger an alert on any websites visited that are configured in the alert rule.
To set up the rule configure the options below,
- Alert rule name – Alert rule name.
- Active – Toggle to activate/disactivate rule.
- Check page URL proximity – Toggle to activate a trigger when any site visited is not matched with the site list. (for authenticity)
- Page URL regex -enter page URLs to trigger in a regex format.
- Report site name – Toggle to send the site name in the trigger notification.
- Time restriction – If enabled, the local user timezone will be used for checking. Otherwise, the timezone from General Configuration will be used.
- Notification interval – Time interval in minutes after which the notification about subsequent rule violations by the user will be sent. If empty, the default value will be used.
- Scope – Users’ email or Org. unit to be monitored.
- Scope exclusions – Users’ email or Org. unit to be excluded from the rule.
- End-user action,
- Display warning message.
- Display a warning message and close the browsing tab.
- Display warning message and redirect.
- Close the browser tab without a message.
- Redirect without a message.
- None.
- warning message – warning message to display
- Alert recipients – Recipients for the alert in place. This can be a user or group email.
- Screen capture – Screenshot of the screen where the alert triggered.
- Webcam capture – the capture of the webcam on the device (access must be pre-configured in the admin console).

Search
This alert allows admins/auditors to trigger an alert on any search words input on any webpage.
To set up the rule configure the options below,
- Alert rule name – Alert rule name.
- Active – Toggle to activate/disactivate rule.
- Search term – Enter search words to trigger.
- Search term regex -enter search words to trigger in a regex format.
- Distinct uppercase and lowercase letters – toggle to activate.
- Report site name – Toggle to send the site name in the trigger notification.
- Time restriction – If enabled, the local user timezone will be used for checking. Otherwise, the timezone from General Configuration will be used.
- Notification interval – Time interval in minutes after which the notification about subsequent rule violations by the user will be sent. If empty, the default value will be used.
- Monitor on the following sites only
- Site exclusions -Sites to be excluded from the rule.
- Scope – Users’ email or Org. unit to be monitored.
- Scope exclusions – Users’ email or Org. unit to be excluded from the rule.
- End-user action,
- Display warning message.
- Display a warning message and close the browsing tab.
- Display warning message and redirect.
- Close the browser tab without a message.
- Redirect without a message.
- None.
- Warning message – warning message to display
- Alert recipients – Recipients for the alert in place. This can be a user or group email.
- Screen capture – Screenshot of the screen where the alert triggered.
- Webcam capture – the capture of the webcam on the device (access must be pre-configured in the Admin console).

Device Usage
This alert allows admins/auditors to receive an alert if a device appears to be active again, particularly useful for missing devices.
To set up the rule configure the options below,
- Alert rule name – Alert rule name.
- Active – Toggle to activate/disactivate rule.
- User OR device – Users or devices to cover with this rule.
- Notification interval – Time interval in minutes after which the notification about subsequent rule violations by the user will be sent. If empty, the default value will be used.
- End-user action,
- Display warning message.
- Display a warning message and close the browsing tab.
- Display warning message and redirect.
- Close the browser tab without a message.
- Redirect without a message.
- None.
- Warning message – warning message to display
- Alert recipients – Recipients for the alert in place. This can be a user or group email.
- Screen capture – Screenshot of the screen where the alert triggered.
- Webcam capture – The capture of the webcam on the device. (access must be preconfigured in the admin console).

Location
This alert allows admins/auditors to trigger an alert if users are outside a specified location.
To set up the rule configure the options below:
- Alert rule name – Alert rule name.
- Active – Toggle to activate/deactivate rule.
- Location Bounds – select an area on the map that will define the non-triggerable location.
- Time restriction – If enabled, the local user timezone will be used for checking. Otherwise, the timezone from General Configuration will be used.
- Notification interval – Time interval in minutes after which the notification about subsequent rule violations by the user will be sent. If empty, the default value will be used.
- Scope – Users’ email or Org. unit to be monitored.
- Scope exclusions – Users’ email or Org. unit to be excluded from the rule.
- End-user action,
- Display warning message.
- Display a warning message and close the browsing tab.
- Display warning message and redirect.
- Close the browser tab without a message.
- Redirect without a message.
- None.
- Warning message – warning message to display
- Alert recipients – Recipients for the alert in place. This can be a user or group email.
- Screen capture – Screenshot of the screen where the alert triggered.
- Webcam capture – the capture of the webcam on the device. (access must be preconfigured in the admin console).

IP Address
This alert allows admins/auditors to trigger an alert if users either match the specified IP addresses or mismatch.
To set up the rule configure the options below:
- Alert rule name – Alert rule name.
- Active – Toggle to activate/deactivate rule.
- IP Addresses – IP addresses to be considered in the rule.
- Mode – Toggle for a match or no match mode.
- Time restriction – If enabled, the local user timezone will be used for checking. Otherwise, the timezone from General Configuration will be used.
- Notification interval – Time interval in minutes after which the notification about subsequent rule violations by the user will be sent. If empty, the default value will be used.
- Scope – Users’ email or Org. unit to be monitored.
- Scope exclusions – Users’ email or Org. unit to be excluded from the rule.
- End-user action,
- Display warning message.
- Display a warning message and close the browsing tab.
- Display warning message and redirect.
- Close the browser tab without a message.
- Redirect without a message.
- None.
- Warning message – warning message to display
- Alert recipients – Recipients for the alert in place. This can be a user or group email.
- Screen capture – Screenshot of the screen where the alert triggered.
- Webcam capture – the capture of the webcam on the device. (access must be preconfigured in the admin console).

Active ID
This alert allows admins/auditors to trigger an alert if users do not match their active ID verification. Active ID continuously checks if the designated user is using the device at hand.
To set up the rule configure the options below:
- Alert rule name – Alert rule name.
- Active – Toggle to activate/deactivate rule.
- Prediction threshold – Set threshold value for minimum breach trigger.
- Report site name – Toggle to send the site name in the trigger notification.
- End-user log out of the action,
- None.
- Soft logout.
- Hard logout.
- Time restriction – If enabled, the local user timezone will be used for checking. Otherwise, the timezone from General Configuration will be used.
- Notification interval – Time interval in minutes after which the notification about subsequent rule violations by the user will be sent. If empty, the default value will be used.
- Scope – Users’ email or Org. unit to be monitored.
- Scope exclusions – Users’ email or Org. unit to be excluded from the rule.
- warning message – warning message to display
- Alert recipients – Recipients for the alert in place. This can be a user or group email.
- Screen capture – Screenshot of the screen where the alert triggered.
- Webcam capture – the capture of the webcam on the device. (access must be preconfigured in the admin console).

Denoted User/Last USer Mismatch
This alert rule allows admins/auditors to trigger an alert whenever someone who is not the denoted user of the device is using the device.
This feature uses a variety of information gathered from Shield to determine if the identity of the denoted user and the user actually using the device at hand match (particularly Chromebooks assigned to a certain user).

User Behaviour Insights:
- Configure alerts for specific user activities, such as file downloads or unauthorised Chrome extensions.
See Details
GAT Shield has a new functionality called Behaviour Flow.
Behavior Flow Network shows how users are moving through the selected site.
The network should be read from left to right. The leftmost node of the flow network represents sites where users start their interaction with the site. The path through links represents user site browsing until decided to go to another site.
This allows admins to view the Browsing behavior of the users.
To view how your users are interacting with a particular website view the steps below
Open GAT Shield and click on the Browsing tab

Then from the top bar click on Behavior Flow
Filters
In the Filters tab:
- Site – add the site you want to view the Browsing behavior for
- Supports * to match any sequence of characters (including the empty sequence). Value is case sensitive.
- Examples: *abc, abc*, *abc* and a*bc
- Supports * to match any sequence of characters (including the empty sequence). Value is case sensitive.
- Time range – Select the time
- Today
- Last day
- Last 7 days
- Scope – Select what users you want to check this behavior flow for
- Device OU’s or IDs
- Users OUs or Groups
Select the Site, Time range, and Scope and click on Generate

Description
Description of the Behavior Flow: Behavior Flow Network: shows how users are moving through the selected site. The network should be read from left to right. The leftmost node of the flow network represents sites where users start their interaction with the site. The path through links represents user site browsing until he decides to go to another site (drop-offs).
- The more interactions with the site, the longer the network. You can move deeper into the network via Network depth buttons.
- Clicking on a node shows the path of connected nodes. Changing depth will reset the view.
- The red border on the node shows the magnitude of drop-offs – the thicker the more drop-offs it has.
- Link’s weight shows how many such transitions were made by users.
- The source node represents a virtual site from where the user enters the site of interest.
Options
- Network depth – click to move through different Nodes
- Show description – Enable or disable the description section

Behavior Flow
Behavior flow will display how users are moving through the selected site. (see description above)
The Source shows the main site user is visiting and it is moving left-to-right.

Result
The Flow will show how your users are moving through the selected webpage and their Behavior flow
Read the user browsing Behavior from left (source) to the right side, viewing all different sub-pages the users visited
With this guide you can quickly familiarise yourself with our products, making the most out of their powerful features to audit, secure and automate your Google Workspace domain.
If you’d like a detailed overview or require assistance, feel free to contact us at support@generalaudittool.com.
