

Managing access to YouTube (and similar sites) for your school has been proving to be a pain since the beginning of this complete shift to eLearning?
On one hand, you can’t block it entirely as students and teachers still need it for important online learning tasks. On the other hand, some students have been over-exploiting it and abandoning school work?
We understand your pain and there’s actually a simple solution for it.
GAT Shield provides Browsing management capabilities for Domain users.
The Site Access Control feature allows admins to create Web-filtering rules.
Admins can set up rules to:
- Block list of websites
- Allow list of websites
A limit of the hours of time spent on sites like YouTube can be set.
Block the category ‘Video’ entirely #
A system category “Video” can be blocked for all users. The System Category covers thousands of video sites (YouTube is one of them).
Enable video category rule #
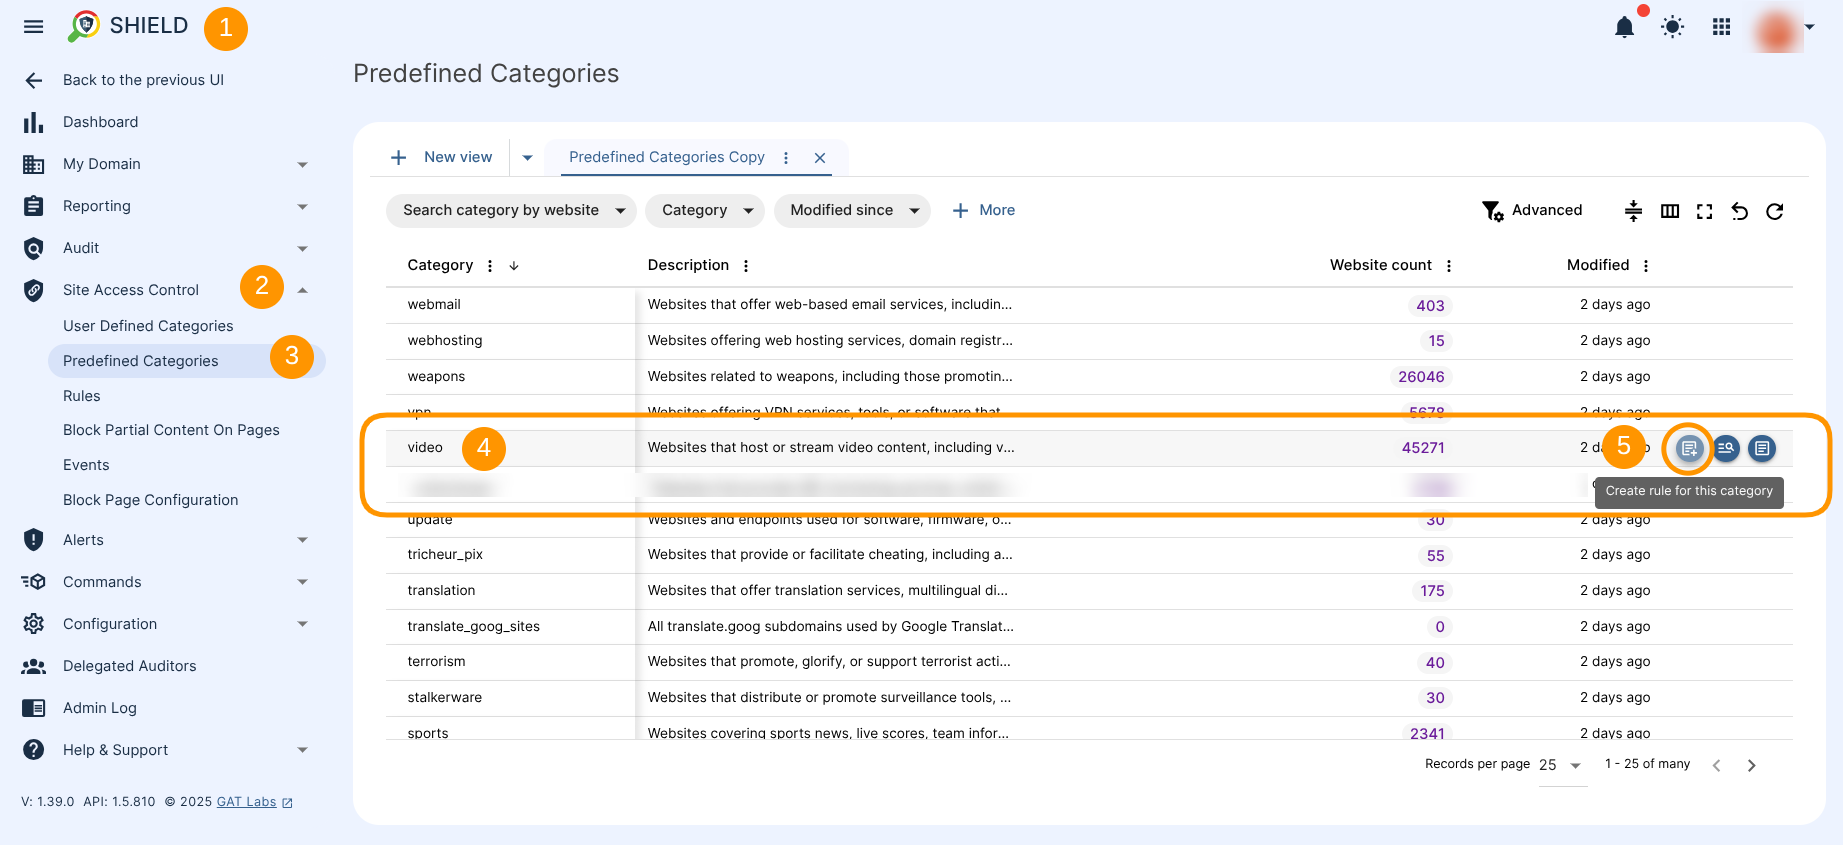
Navigate to GAT Shield (1) -> Site Access Control (1) -> Predefined Categories (3)
Next, search for “Video” category directly from the list (alphabetical order makes it easy to navigate) or by applying the filter, e.g Category > Equal > “Video”.
When the “Video” category (4) is found, hover the cursor over the right side of the category row to display additional options. Select the First option that allows Creating rule for this category (5).
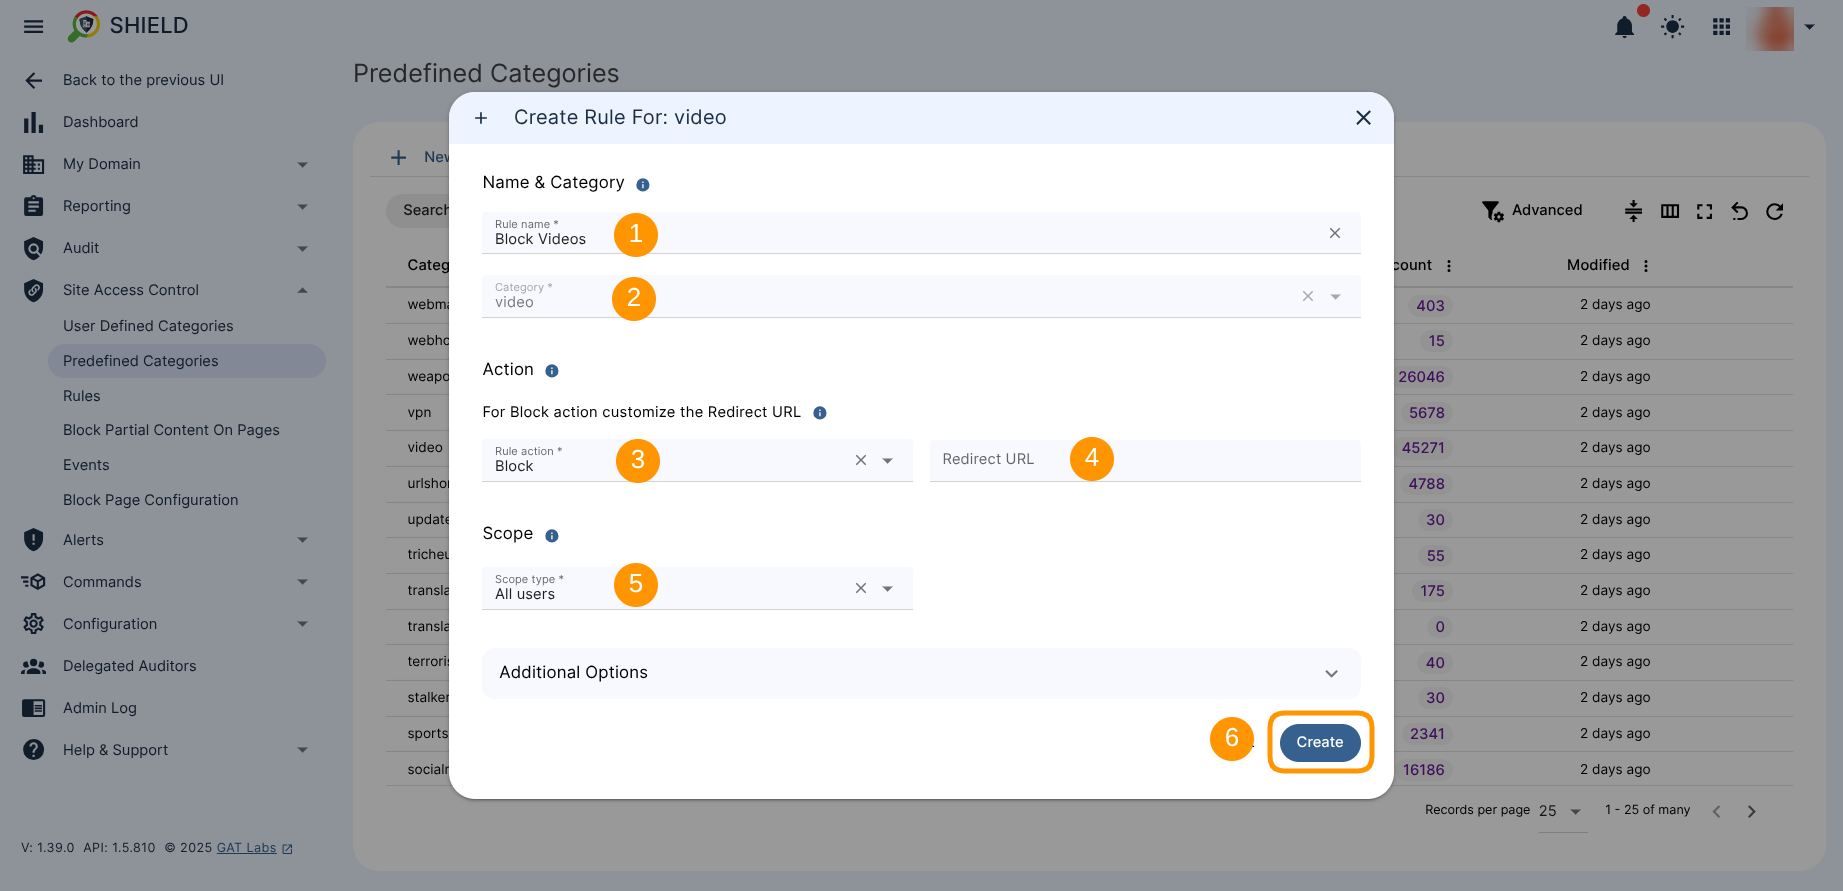
The rule creation wizard will be displayed and the rule can be configured.
Fill in the following sections:
- Rule name (1) – Type the rule name for easier identification
- Category – Video (2) – Category “Video” is already pre-defined and filled in automatically
- Action – define the action required when the rule will be triggered, Block in this particular example
- Rule action (3) – Block – Rule action is already set to Block by default
- Redirect URL (4) (optional) – type the URL that the user will be redirected to
- Scope (5) – choose the Scope which the user will be applied to
- User
- Group
- OU
- Include sub. org. units
- All users
Once all is ready, Create (6) the rule.
The rule will be saved and placed under the Rules section.
To review the created rule, navigate to GAT Shield (1) > Site Access Control (2) > Rules (3), find your rule you created, e.g. Block Videos (4) and hover cursor over the right side of the record to display more Options (5).
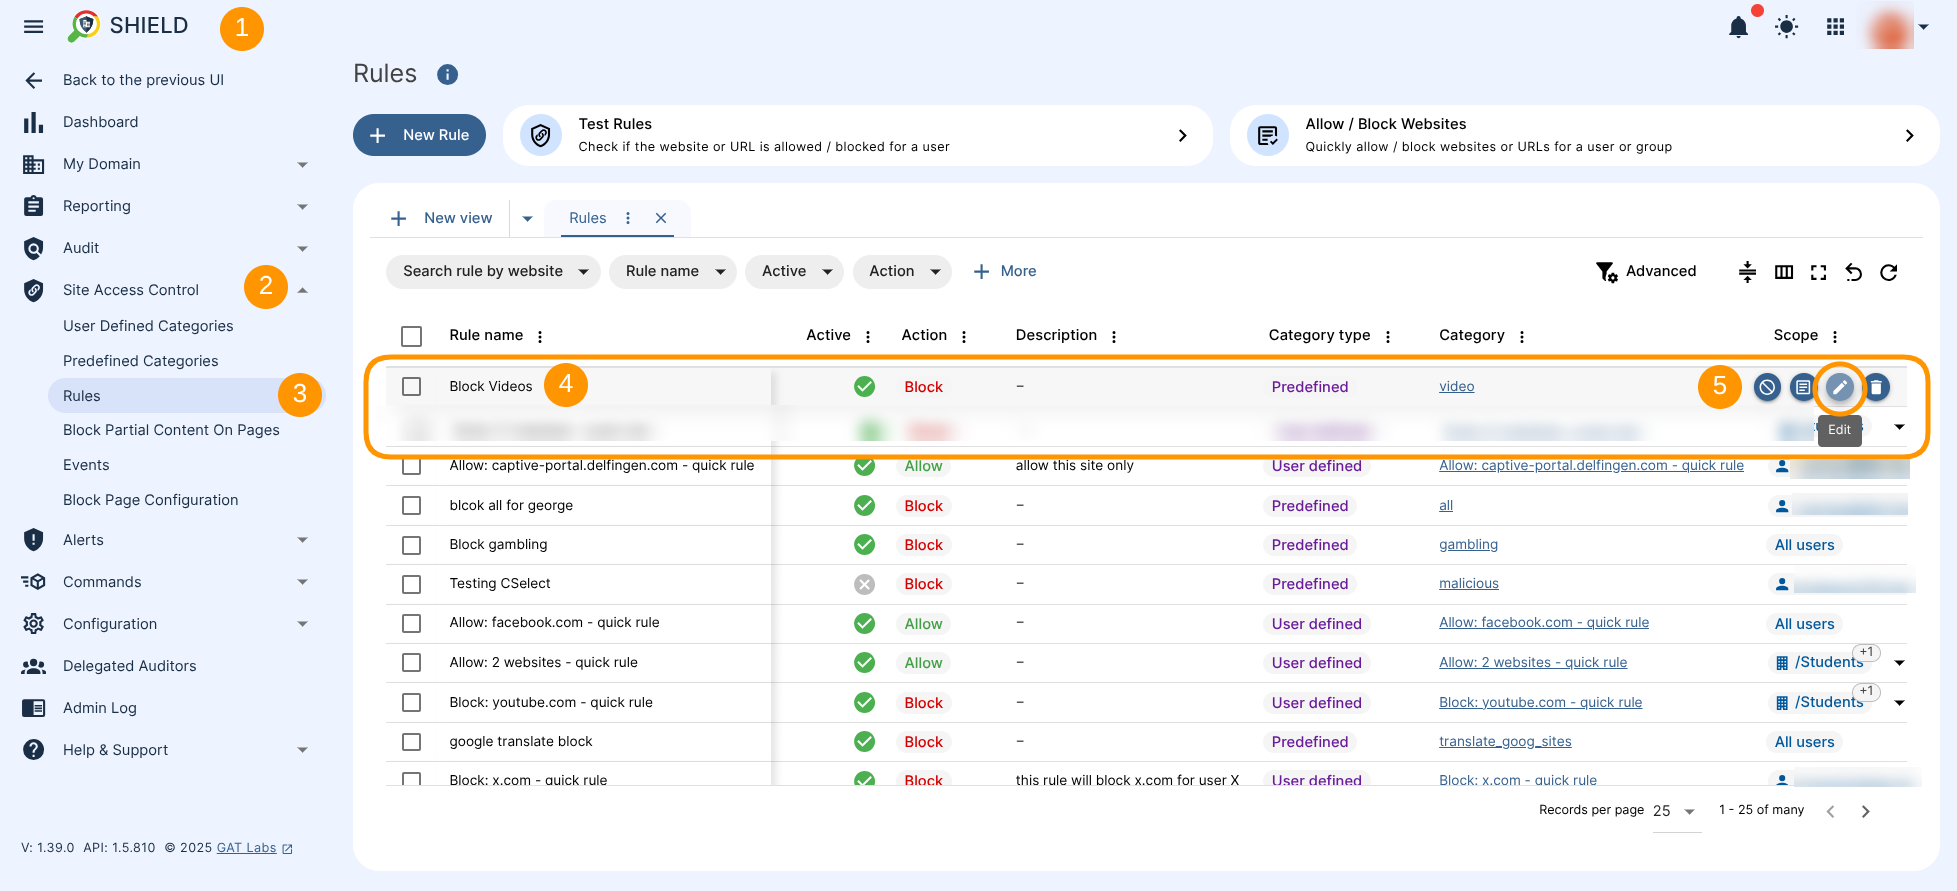
The following Options will appear:
- Disable rule – deactivate the rule without removing its record (can be enabled later)
- Details – show the rule details
- Edit – edit the rule setup
- Delete – delete the rule
Result #
All sites that are included in the Video site Category will be blocked. As YouTube is part of the Video category it will also be blocked.
A message like the below will be displayed to any user where the rule is applied to.

Allow a time frame where Youtube can be accessed #
In Site Access Control an Allow List can be set.
- Allow specific sites of the Video category to be opened.
- Allow time window (Time restrictions) where YouTube can be accessed (during School hours).
Time restriction can be set up allowing Site Visits to specific sites at a specific time.
Set up YouTube Site Allow category #
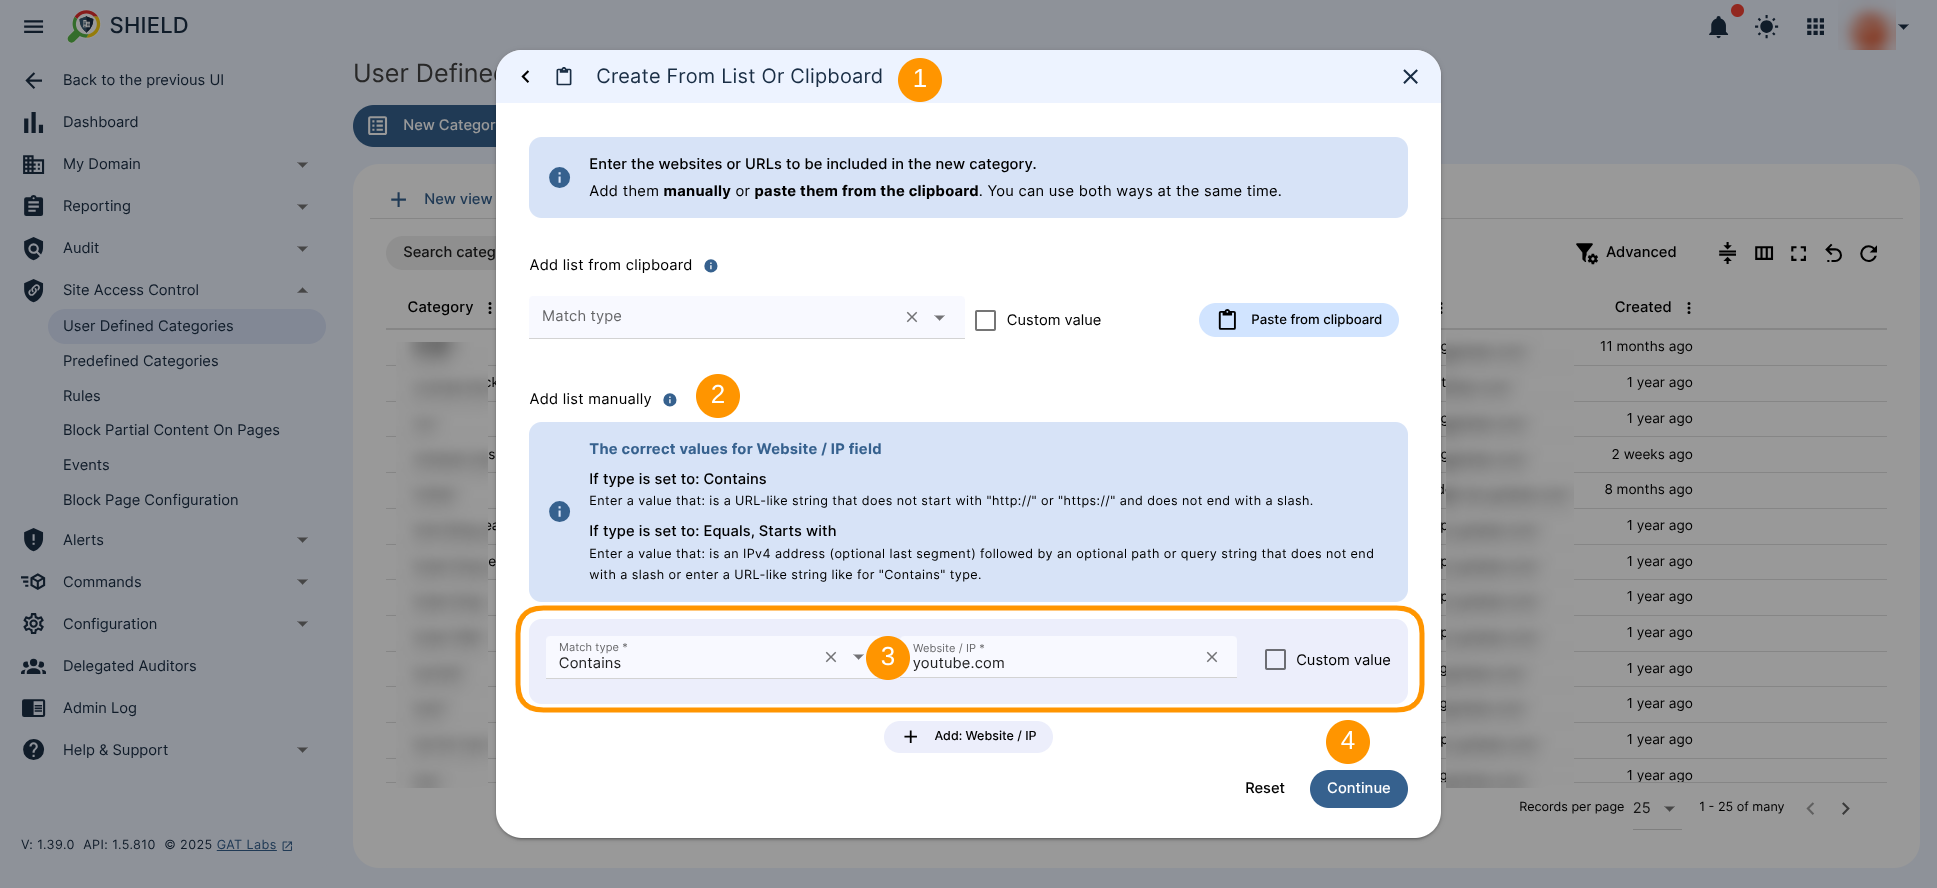
Navigate to GAT Shield (1) -> Site Access Control (1) -> User Defined Categories (3) -> click on “New Category” (4) -> and select one of the options displayed, e.g. List or clipboard (5) to start creating the cateogry.
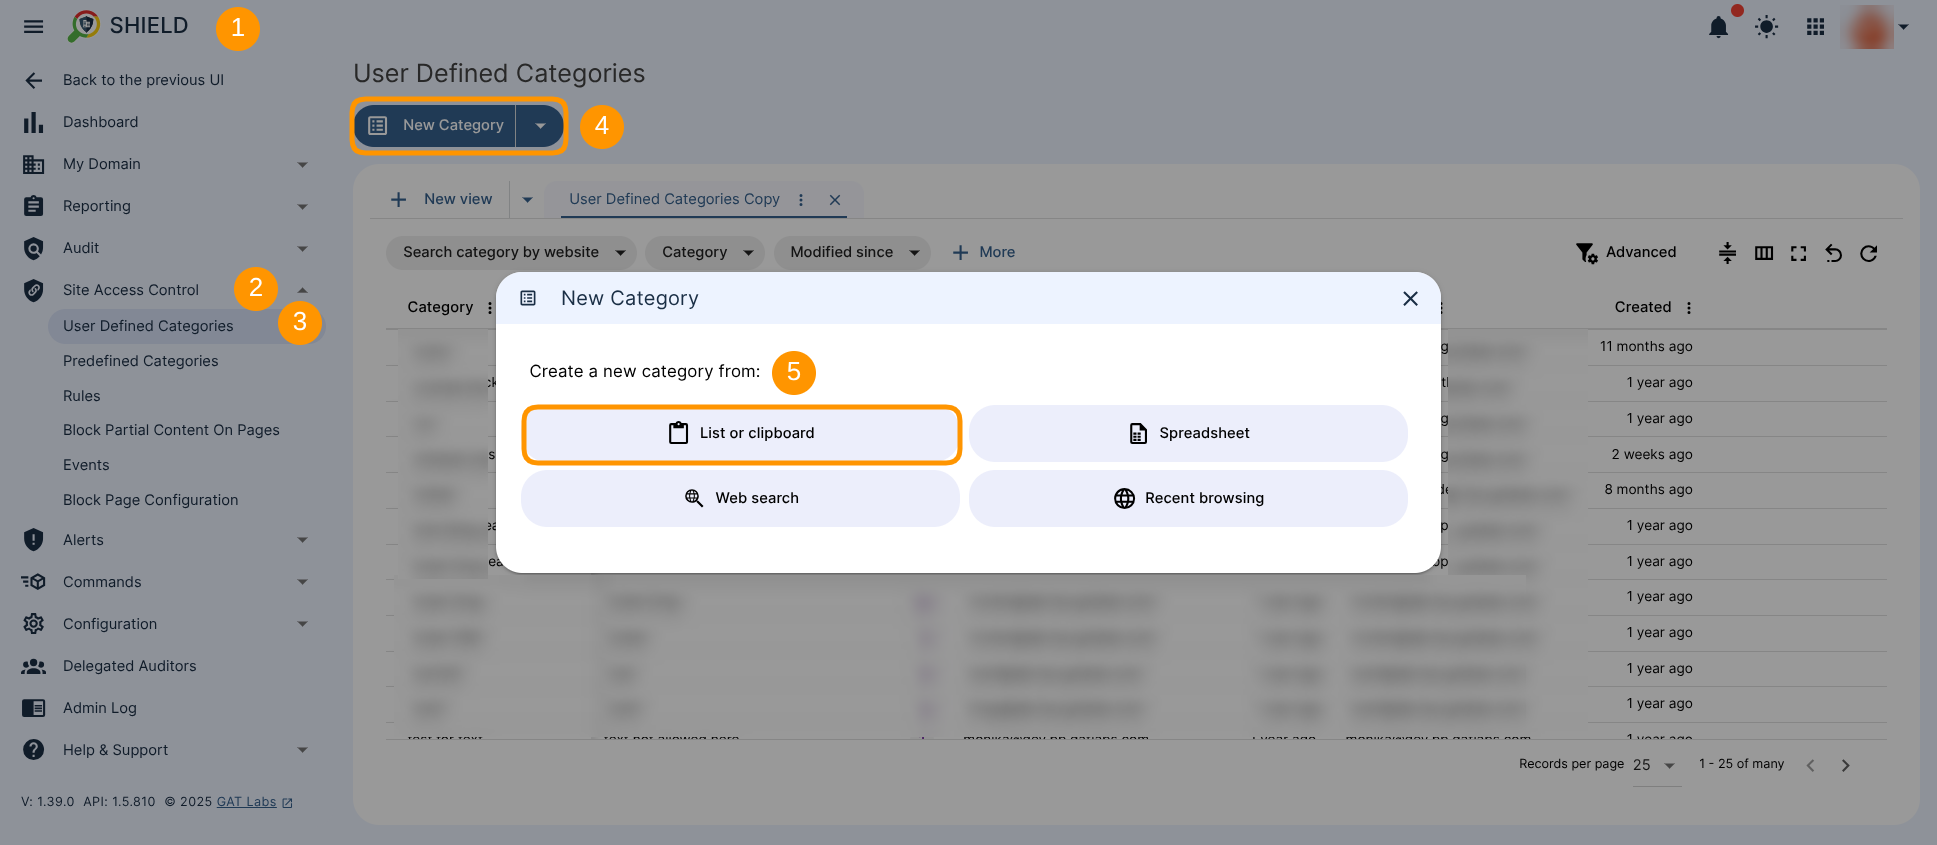
The category creator window will appear (1). Move on to “Add list manually” section (2), and the value Contains > youtube.com, and click on Continue (4).
The next window will be displayed.
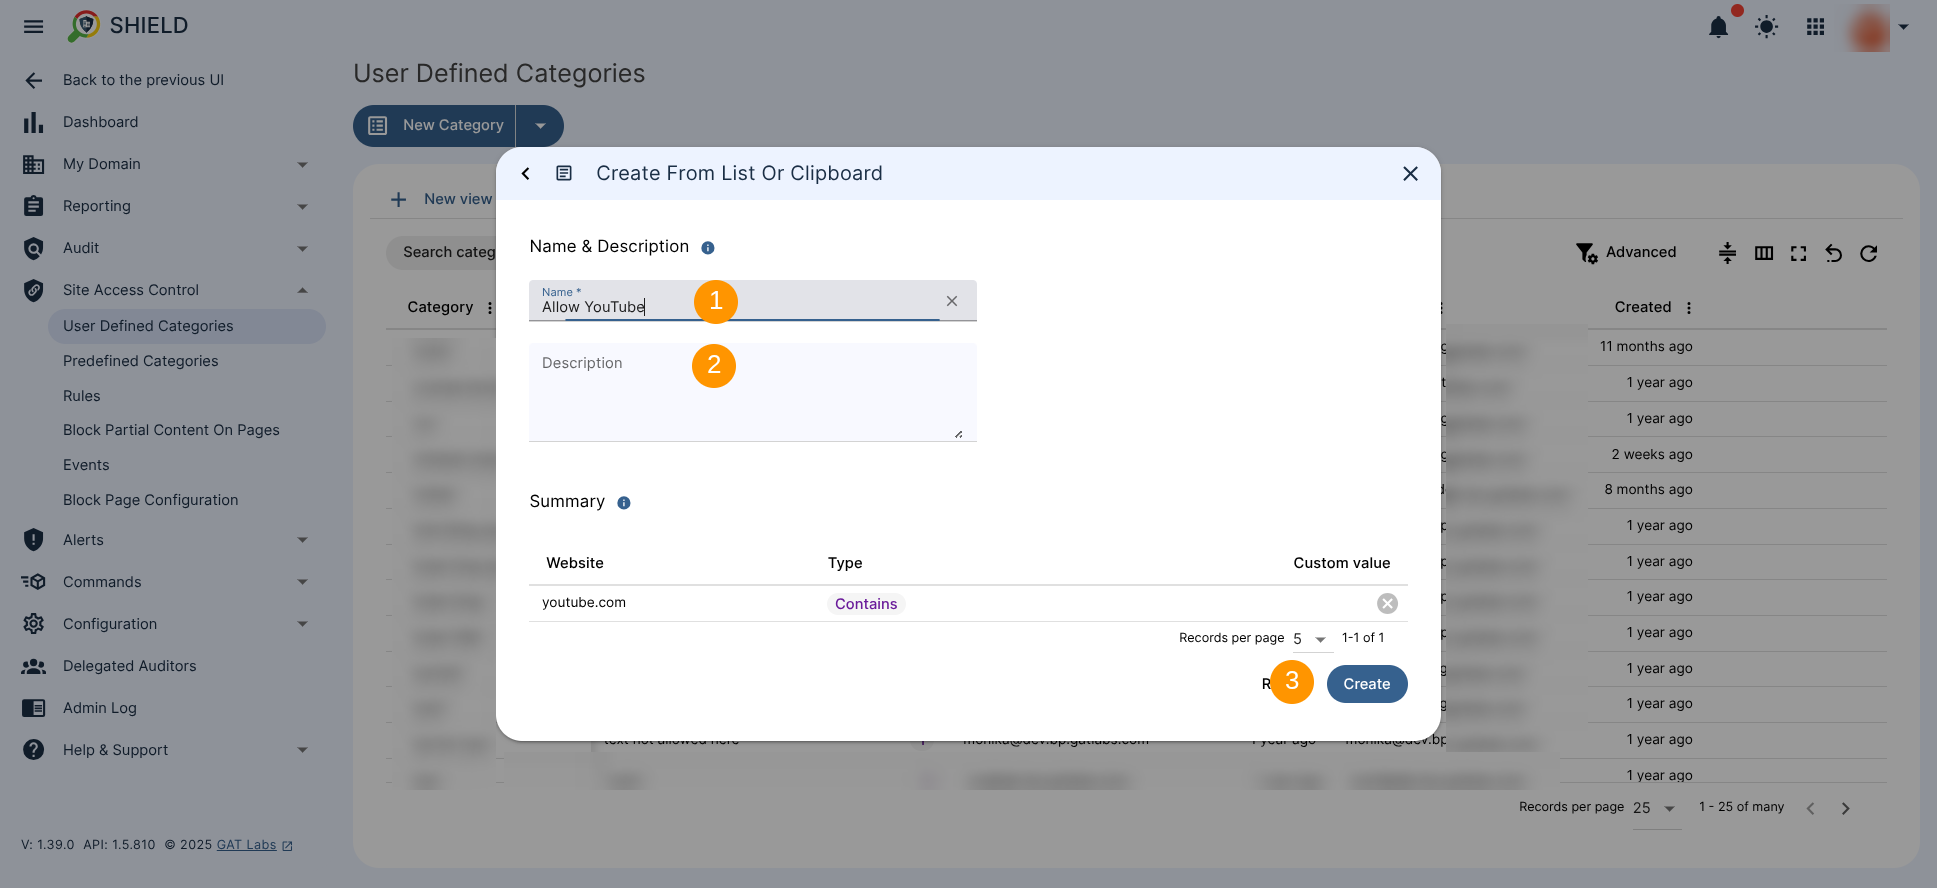
Fill in the details
- Name (1) – Enter a name for the category
- Description (2) (optional) – Enter a description for the rule
- Create (3)
The Site Access category will be created, and is displayed in the User Defined Categories table where the other categories are listed.
To start creating a rule based on that newly category, hover the cursor over the right side of its record and pick the create rule for this category option (1), alternatively, used the prompted message displayed on top of the dashboard that refers to newly created category and allows quick access to create a rule based on that action (2).

A new window will be displayed.
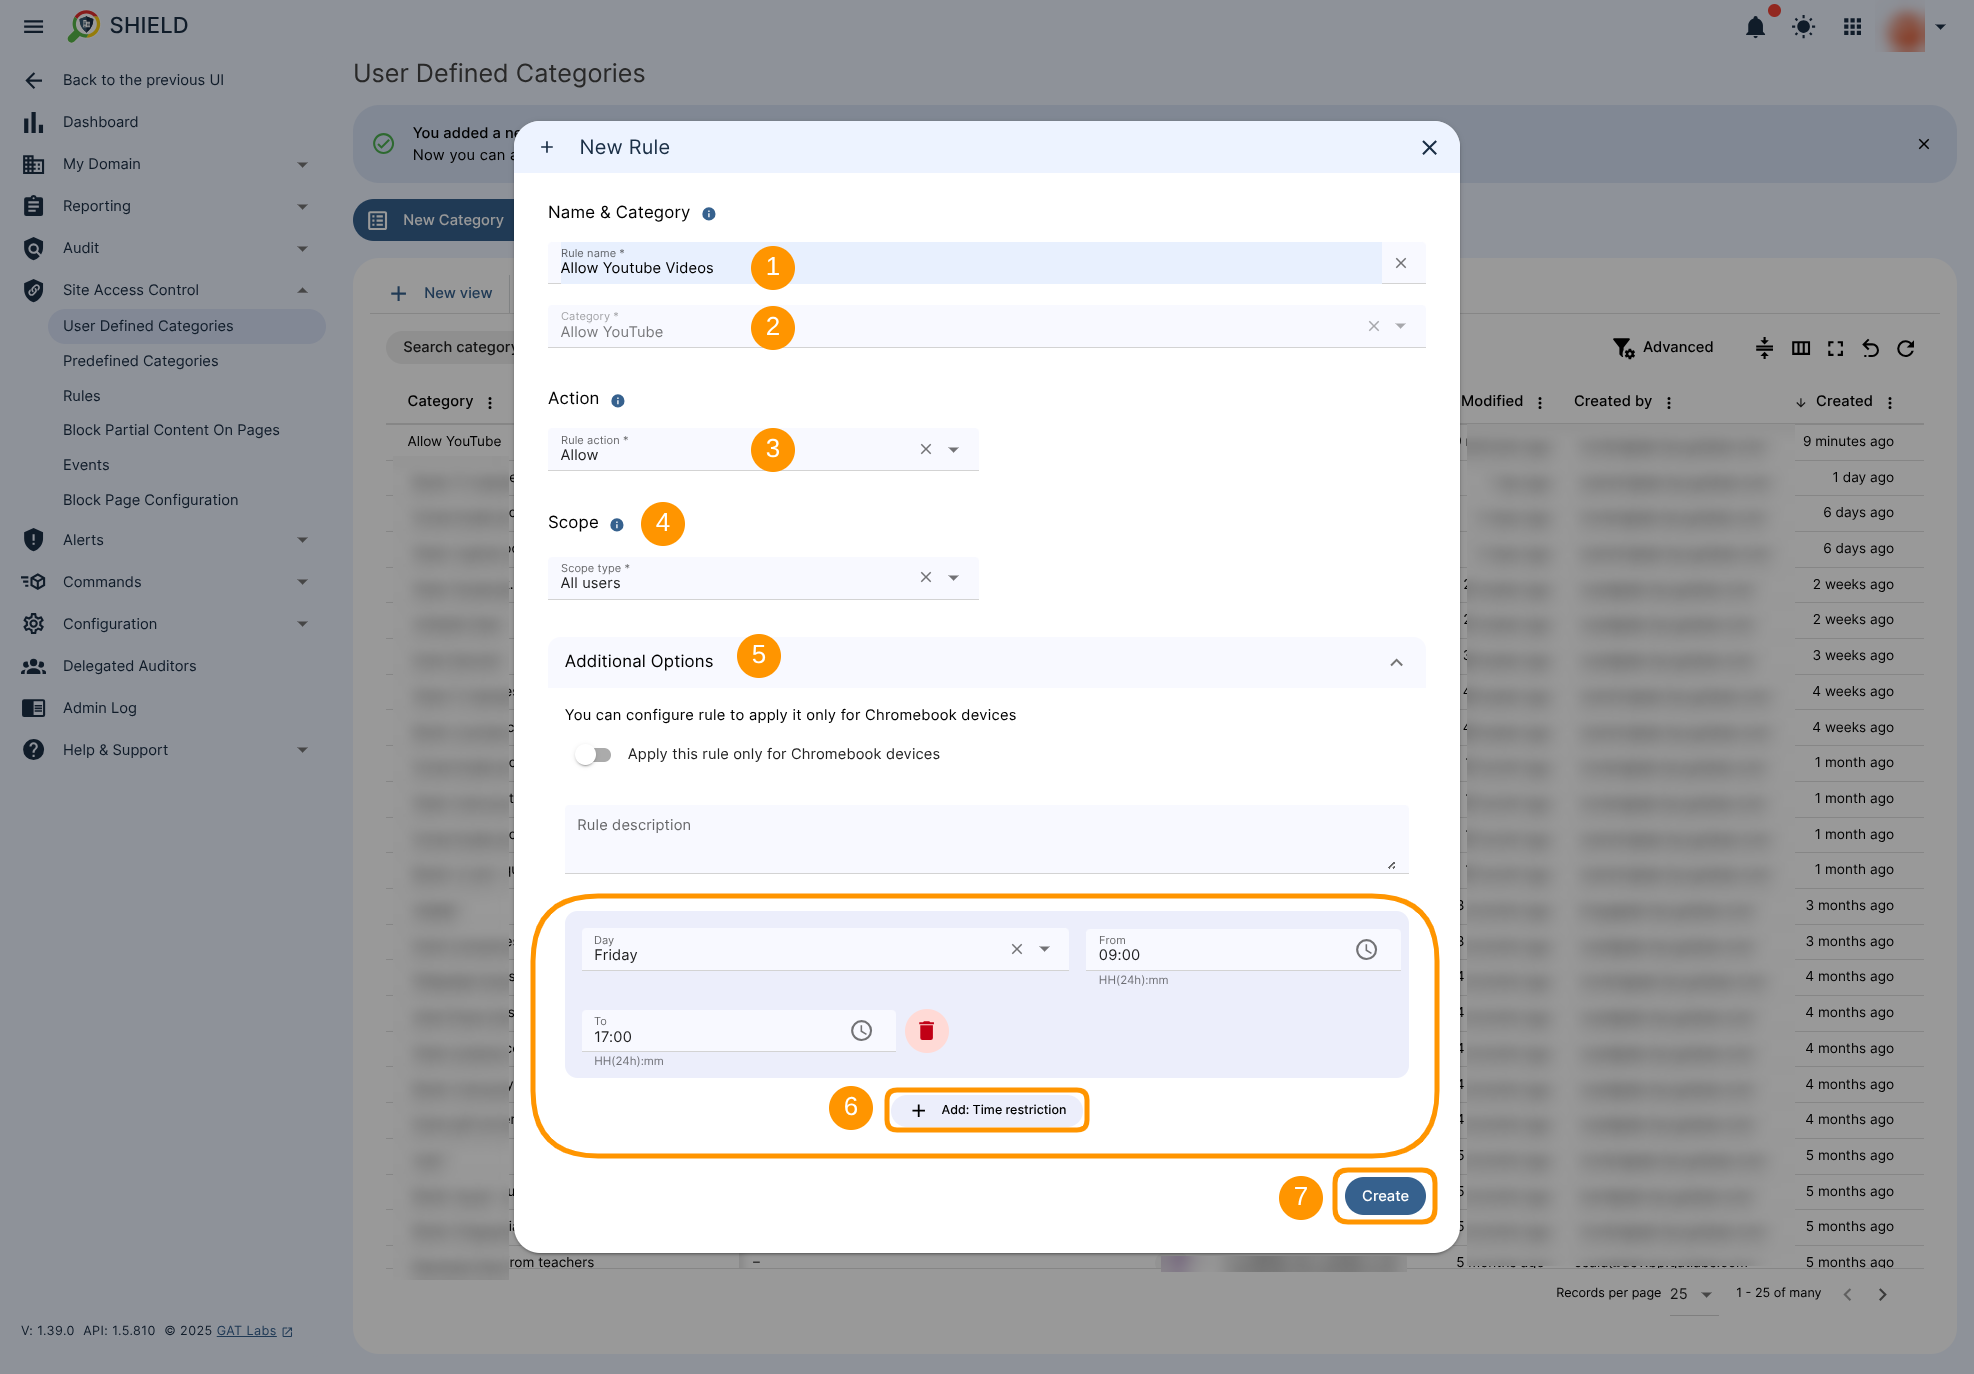
Fill in the required fields.
- Rule name (1) – type the name of the rule
- Category (2) – already automatically displayed
- Action – Allow (3) – set as allowed to ensure the access to the website will be granted
- Scope (4) – Enter the users that will be affected by the rule. Users/Group/Org.Units.
- Additional Options (5)
- + Add Time restriction (6) – Select a time range during which the rule will be active.
- Select Start and End time, and what Days the rule to be active.
- Note: Your default time-zone (Shield) is used
- + Add Time restriction (6) – Select a time range during which the rule will be active.
- Create (7)
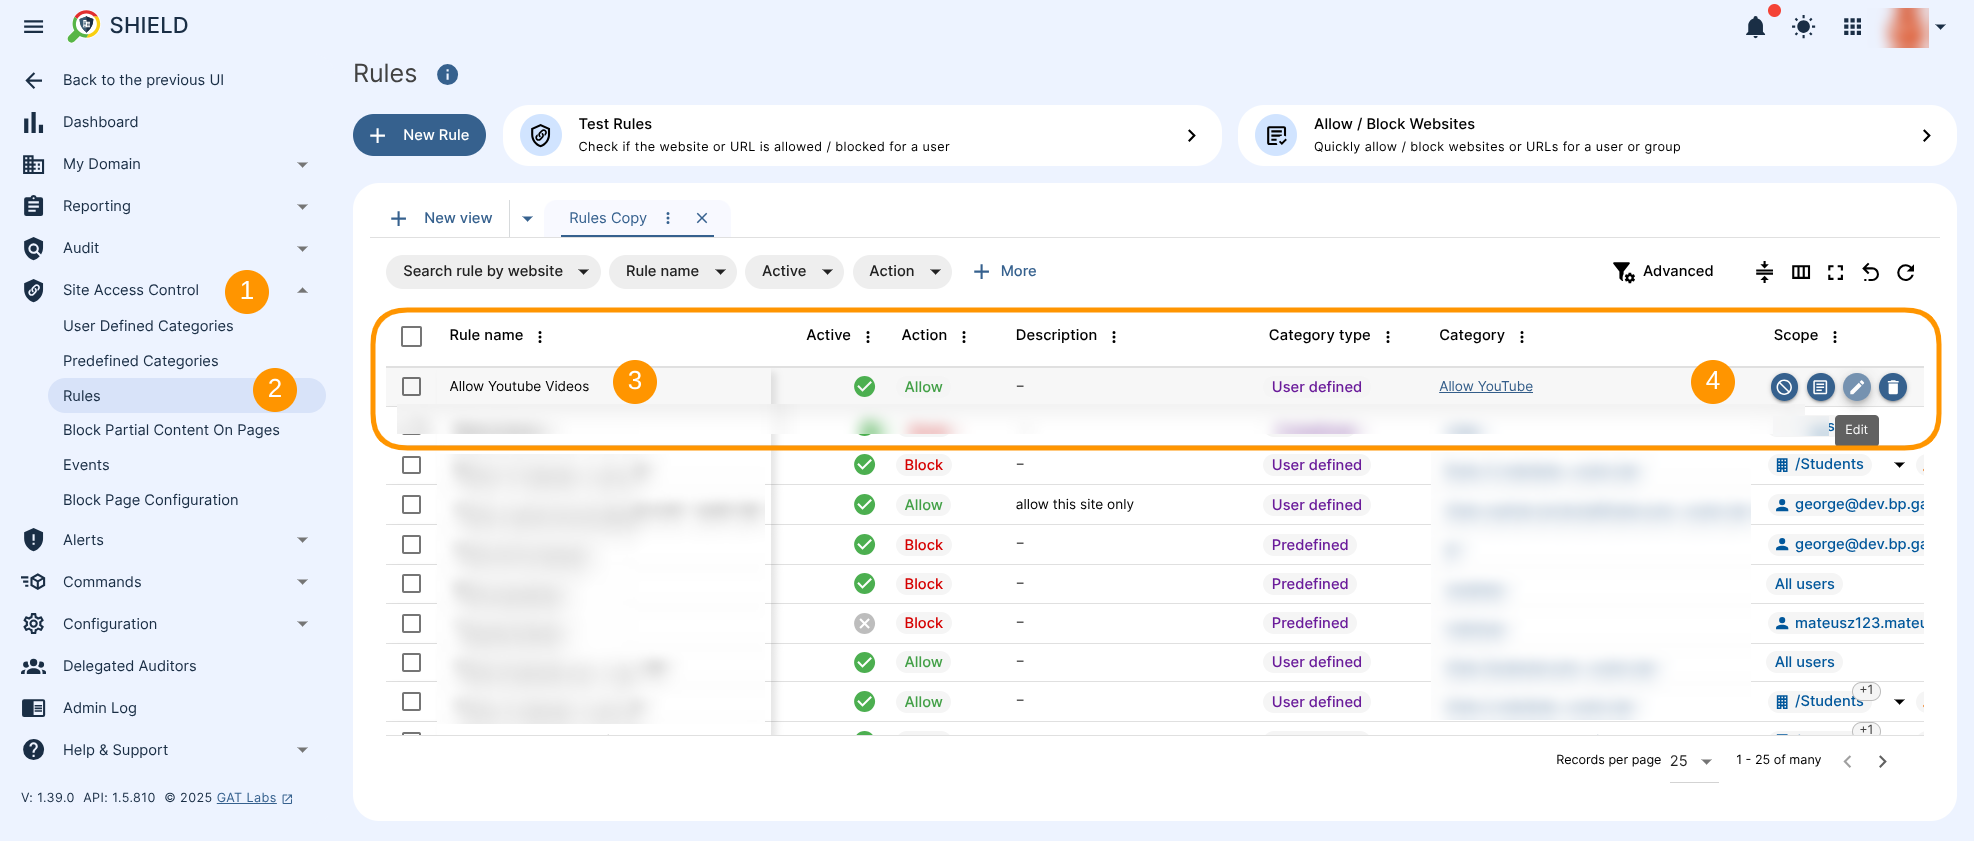
The newly configured allowed rule is displayed under the GAT Shield (1) > Site Access Control (2) > Rules section (3) and can be edited or deleted from there (4).
Result #
The YouTube.com site will be set as allowed, during the selected hours and days set up in the Time Restrictions and blocked every other time.


