

Introduction to Teacher Assist #
With Teacher Assist teachers are given the ability to monitor and control students while class is in session. With this tool, teachers can ensure that students stay on track and follow along with the subject being taught. Having the ability to track student engagement in real-time is a big asset for teachers, Google Workspace Super admins, and Principals.
Functionality that teachers have:
- Monitor the current screen of all students in their classrooms.
- View all of the tabs on students’ Chrome Browser.
- Close browser tabs that are irrelevant for students.
- View the browser history during the active session.
- Distribute a website to automatically open and display on some or all students’ screens.
- To block a website from being used while class is in session.
Super Admins, principals, or teachers can create a group of students whose behavior is alarming. The group can be monitored and controlled with the same abilities above.
Who can access the Teacher Assist tool? #
- Google Super Admins – By default all Google Workspace Super Admins have access to Teacher Assist.
- Teachers of Google Classrooms – By default all users of the Google domain are assigned as Classroom Teachers.
Login to Chrome #
Note: For Teacher Assist to work – the students have to be logged into Chrome browser and GAT Shield has to be enabled. Visit this page for more information
Teachers #
Teachers are Google Workspace users who are assigned as Teachers to a Google Classroom.
Teachers who own or have created a Google Classroom can log in and use Teacher Assist.
How can a teacher start a session? #
Launch Teacher Assist from the Google Apps button then Login

Alternatively can be launched from this URL: https://gs.generalaudittool.com/apps/teachers
Dashboard #
The dashboard shows details of the previous classroom sessions
- Last sessions list – list of the previous classroom or group sessions
- Last session details – the last session details

In the Last session list – the Admin/Teacher can
- Download report – Download a PDF report for the selected classroom session
- Send report by Email – Send an Email with the PDF attached report to the Teacher’s email
- Show attendance list – View an attendance list for the selected classroom session
- The details of the classroom with Emails of each student who was present or not (active or not) during the classroom session

- Show screenshot list – view screenshot that are taken during the classroom session
- Site access control history – view list of sites that were blocked or opened by the Teacher.
Courses #
From the menu on the left select Courses tab.
This will show a new card view of the Google Classrooms and Teacher Assist Groups the Teacher has.
This can be searched by Owner, Teacher, Classroom, Student.

Click on the “Start session” button on any of the Classrooms
The classroom session will be started.
A new window will be shown, the browsing activity will be automatically displayed for all active students.

Important: Make sure that students are signed in to their school Google account on ChromeOS devices and if they’re using Windows or Apple devices that they sign in and sync with their Google Chrome browser. Shield must be deployed on the student accounts.
Individual student control #
Options are available individually for each student.
Clicking on the “green button” list of options will be displayed.
- Open new tab – opens a new tab for the selected student with the URL entered
- Distribute current page – opens the page the selected student has and distributes it to all other active students
- NOTE: Block current page – blocks the current page for ALL Students –
- This will not prevent pages from being opened in the future – it just closes the Currently opened site for All Students
- Browsing history – opens a new window with the browsing history of the user (during the classroom session)
- Chat – Send an individual chat message to the chosen student
- Screenshot – Take a screenshot of the current opened screen the student has
- Maximize viewing window – maximize the viewing window of the picked student (can also be done via double clicking on the selected student tab)
- View Google Drive – opens the Google Drive of the students ( Teacher has access only to files they already have access to)
- Set lock tab – lock the current tab. Students will not be able to navigate to other tabs but the current one (locked one)
- Close All Browsing Tabs – reset all student’s tabs
- Pin student – pick the selected student to be on top of the screen always

Actions on the maximized viewing window #
Double-click or click on the Maximize Viewing window
This will open the current tab of the selected student in the big window.
On the right-hand side, you will see a Tab list of all tabs that are currently opened on the student Chrome browser.
- Current – the current open tab
- Previous – other currently opened tabs (not currently opened)
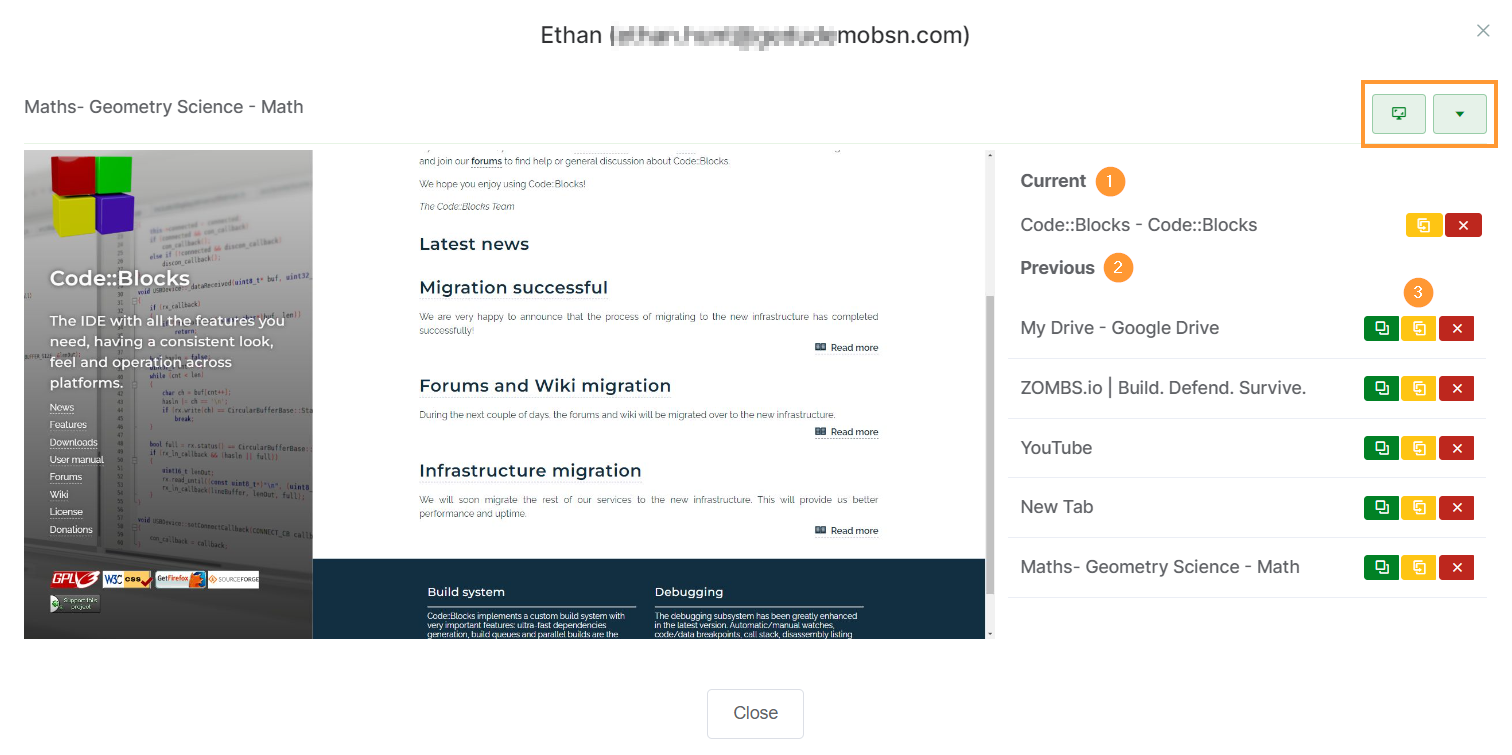
Control tabs #
The three buttons on the side allow the Admin/ Teacher to control the tabs.
- Green button – with the tab to the selected one
- Open tab – opens the selected tab on the Admin/Teacher window
- Red button – closing the tab for the student
Take action on a single student #
Hover over the action button to see all of the individual actions you can take.
- Take a screenshot (1)
- Menu (2)
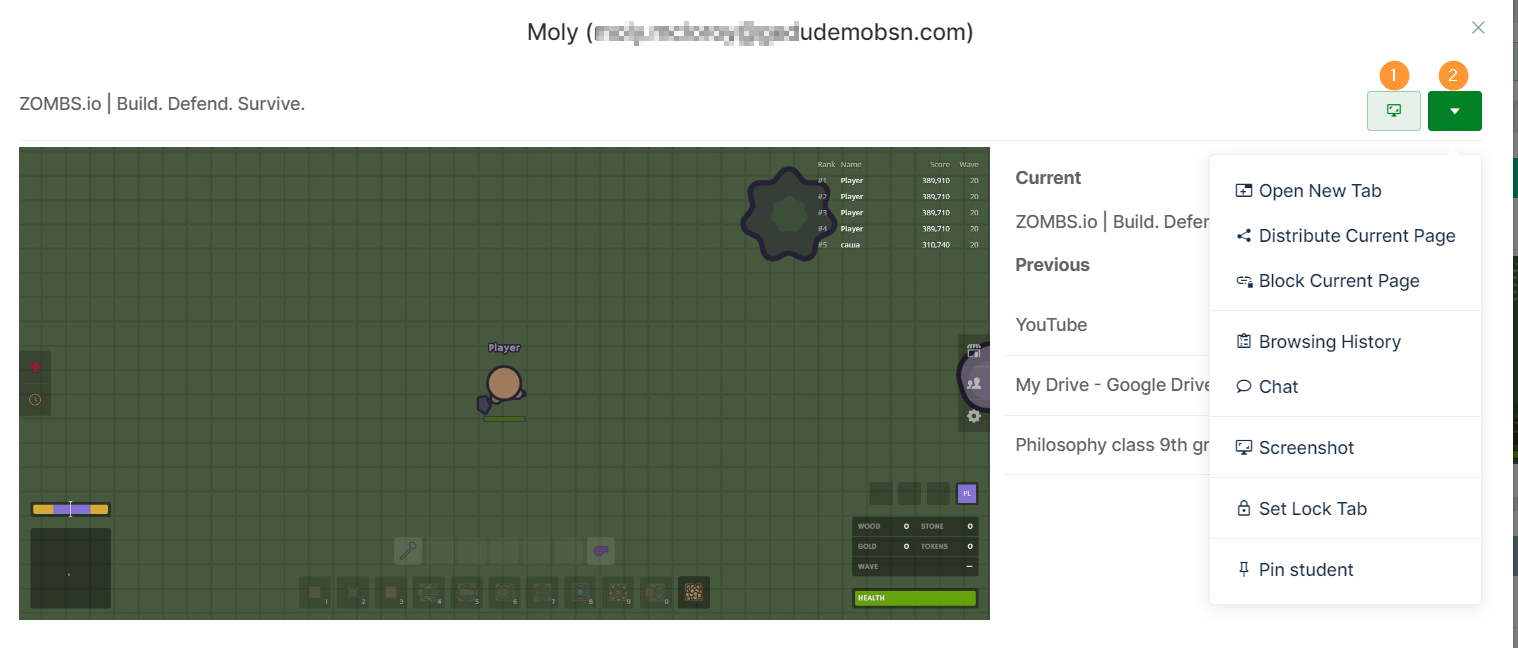
Hover over the action button to see all of the individual actions you can take.
You will be presented with the following options:
-
- Open New Tab – This will open a new tab on the student’s device.
- Distribute Current Page – will distribute the current tab to all other students.
- NOTE: Block current page – blocks the current page for ALL Students –
- This will not prevent pages from being opened in the future – it just closes the Currently opened site for All Students
- Browsing History – will show all of the web pages accessed by the student from the point of the session.
- Chat – It will launch a chat window with the student.
- Screenshot – Take a screenshot of the current page the user has opened
- Set Lock Tab – This will lock the student in the current tab.
- If enabled – release lock tab
- Close All Browsing Tabs – reset all student’s tabs
- Pin Student – Pin this student to the top of the virtual class granular display.
- If enabled – in pin student
Take action for All Students #
When hovering over the classroom action bar, you will be presented with the following options:

- Select All – Select all students.
- Clear selection – clear the selected students.
- Open the New tab – set a page as allowed and distribute the page to ALL users.
- Push Site Collection – Push out any defined Google Sites.
- Classroom Announcement – send an announcement to all students that will appear on their screen.
- Site control – apply rules for all students in the classroom
- Block all sites by default – block all pages (disable the students from accessing any site)
- Allow – individual pages – allowed pages will only be allowed
- Block – individual pages

The above rules are applied for the Teacher assist session. Pages will be allowed after the Teacher leaves the session.
- Reconnect – if the class is having any connectivity issues.
- Absence Notes – View the absence notes taken for students
Important:
- Reconnect – Set reestablishment of the connection. Use of Students were not logged in to their accounts at the start of the session. Use reconnect to reconnect with student accounts.
Courses details #
In the Classroom tab, the Admin can filter by Teacher, Owner, and Classroom and Students

- Click on the Play button to start a session
- Refresh membership – refresh the membership of the classroom (sync with Google Classroom)
- Show absence notes – show absence notes taken if a student was not active in the classroom session
Settings for the Classrooms
- Click on the Pen icon to view details for the classroom.
- Students – list of all the students in the classroom
- From the right side – the Admin or Teacher can deactivate the student from the classroom
- Prepare class session – apply rules for the classroom sessions
- Apply rules
- Block all sites by default – enable if you want to block every page the user visits (block internet)
- Allow pages – Set up a site to be allowed (will take precedence over the block list)
- Block pages – Set up a site to be blocked
- Apply rules
- Students – list of all the students in the classroom

- Info – view details of the classroom
- Timers – Set up a time for how long the classroom session should last
- Site collections – Set up and save Sites (Web pages) into a collection – This site collection then can be sent to students
- YouTube Control – Control YouTube by allowing or blocking specific Categories, Channels, Videos and Keywords
- IMPORTANT: Available only for Shield – Site Access Control users
Groups in Teacher Assist #
Within Teacher Assist we have an option for classroom Groups.
Classroom groups are artificial classrooms, where the Super Admin of the domain can create Classroom Groups and give permission to Users or Teachers to create Groups.
The users can be assigned as Students and Teachers to the classroom groups. Please check this how-to for more details.
Teacher Assist Groups and Classrooms work in the sample principle. The Teachers can control the Students in Google classrooms and the custom groups.
In the Courses menu – click on Create a Group
A pop-up window will be displayed to Enter a name for the group

Fill in all the details required
- Description – Enter a description and edit the group name
- Teachers – enter the Teacher email and click on the Add button
- Students – enter the Student email and click on the Add button
- Prepare Group session – Pre-apply browsing rules for the group
- Block all sites by default – you can block all pages by default (block internet)
- + Create site access rule – enter a webpage and set it up to be Blocked or Allowed
When ready with settings, click on the Exit button(x)
The group will be created and saved under the Groups tab
Classroom Insights #
Classroom Insights (eye icon) will display additional information regarding the classrooms.

This will allow the teachers to view everything about the classrooms.
- People list all students and teachers in the classroom.
- In Classworks see all the classwork for the classroom, the Due date, the Average grade for the classwork, and the description.
- The Grades will show all the submitted grades by the teachers for each student and the average for each classwork.
- The browsing activity will use data from GAT Shield to display the browsing done by the students for any given day (3 months back)

- Site Access Control History allows to view the history logs of the Site Access Control.
- When the teacher adds or removes a URL rule in the Site Control section of Teacher Assist during the session (allow or block rule), those actions are logged and displayed in the history list under the Site Access Control History section.
NOTE: After 30 days the history log will be deleted.

Attendance spreadsheet #
This shows the attendance during the last classroom or group sessions.
Filter by Classroom names or Time range.
Export into a PDF report

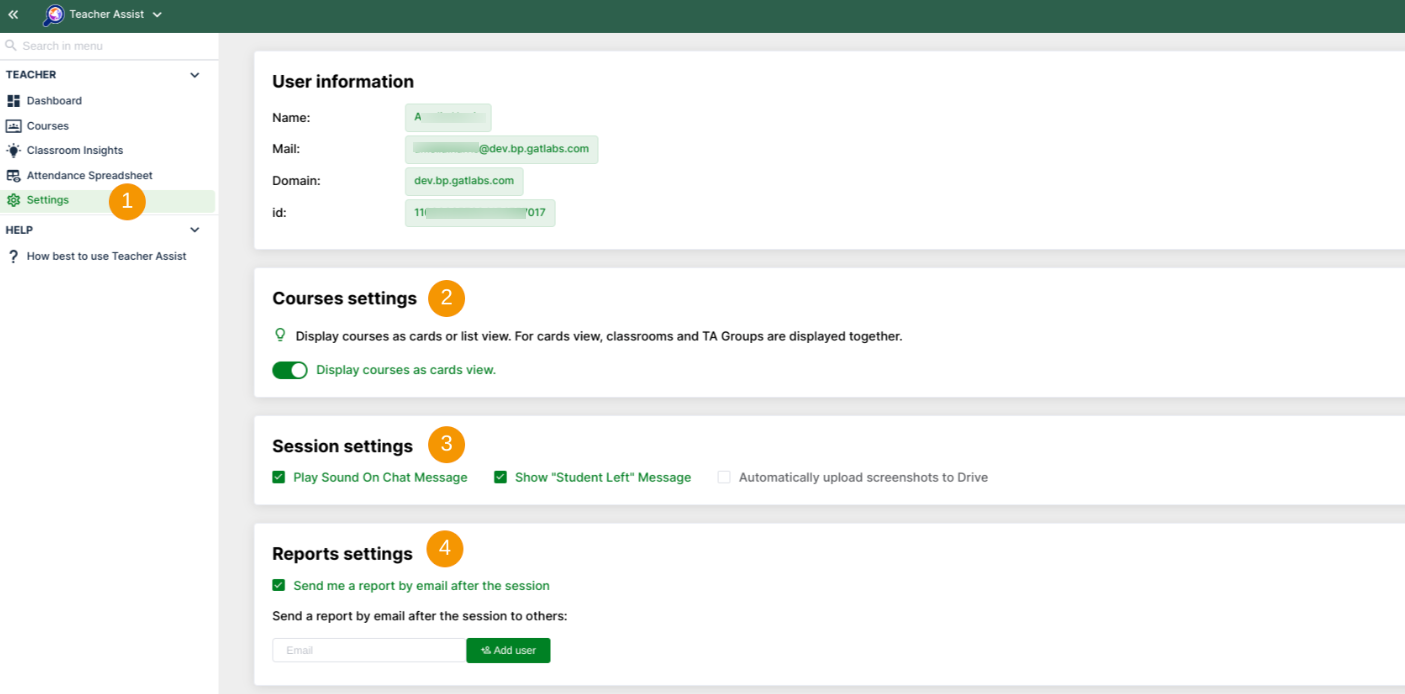
Teacher settings #
The Teacher Settings (1) allow the Admin and Teacher to set up Session and Report settings.
- Courses settings (2)- Display courses as cards (default view) or list view. Card view displays Classrooms and TA Groups together
- Session settings (3) – Set settings for the session
- Play sound on chat messages received – play a sound when the Chat function is used
- Show student left message – show message when Students leave the session or are disconnected
- Report settings (4) – Set up settings for the after-classroom reports.
- Send me a report by email after the session – enable the Admin/Teacher itself to receive emails
- Send a report by email after the session to others – enter an additional email for an email to be sent after the classroom session has ended
- Automatically upload screenshots to Drive – This saves the screenshot taken to the Teachers MyDrive.
Admin settings #
The Admin has additional settings they can set for Teacher Assist
- General – Set up the default timer for Teacher Assist classroom sessions And/Or window size when the tab is locked
- Enable or disable Timer for the sessions:
- Session timer is enabled – Set a default timer for all classes.
- Session timer is disabled – deactivate the default timer for all sessions.
- Maximize or keep current size of the window when you lock the student’s tab:
- Keep a current window size to lock the tab
- Keep a maximized window to lock the tab
- Enable or disable Timer for the sessions:
- Sessions – The Admin can audit the Teacher Assist sessions that occurred in the domain
- Time limits – Set up Classroom sessions with time limits. The Admin can select when Classroom sessions can be started
- Weekdays hours – select days and hours for when Teacher Assist can be used by Teachers.
- Special hours – select time period for which Teacher Assist cannot be used.
- For example mid-term, a set time period where Teacher Assist cannot be used.
- Access rights – Create edit or delete “Access rights for use of Teacher Assist”
- All – enable all additional permissions
- Create & Edit group – allow the Teacher to create and edit the Teacher Assist Group
- Allow co-teachers to edit – enable secondary teacher to edit the classroom settings (to enable co-teacher to edit the TA Groups as well, the Edit group permission must also be granted)
- Access to students Drive – allow the Teacher to access the Students Drive – access to Drive of the user – unless the teacher has direct access to the file they will not be able to see the content of the files.
- Students drive can be viewed – enable the option to view student drive
- Teacher – Add user to act as Teacher, have access to Teacher Assist
- Access to reports – allow the Teacher to view and access the reports
- Principal – enabled the Principal feature for the selected user
- Action logs – The Admin can view the Logs for the classroom session

YouTube control – Site Access Control #
Teacher Assist allows YouTube control. This feature allows the Super Admin of the domain to control access to YouTube.
This feature works for domains that have new version 2 of Site Access Control available (all new GAT Shield users), as well as domains that have new version 2 of Site Access Control automatically enabled when migrating to GAT Shield MV3.
- Base settings – Set up and enable different YouTube settings
- The Admin can set up Age restrictions for YouTube.
- Enable Restrictive Mode, block all except allowed videos
- Prevent override by Sessions, Teachers can not override global YouTube settings
- Categories – Settings to Block or Allow YouTube categories
- Channel – Enter the YouTube video ID or URL for the YouTube channel to be allowed or blocked
- Video – Enter YouTube video or URL to be allowed or blocked
- Keyword – enter keyword to be blocked

Troubleshooting #
Connection State #
- Green – WebSocket connection is established and working.
- Yellow – WebSocket connection is trying to be re-established.
- Red – WebSocket connection is lost.
- Grey – The user is not logged in to their account (Shield is not deployed to this user). If a student has logged in after the Teacher assist session has started their account will be “grey”, You can use Reconnect to reset the connection so the new students are visible.
Status messages #
- Error: MSG001, ‘Messaging connection error. The problem is caused by a connection error, an invalid link or the server can not create a connection. Please contact us at support@gatlabs.com
- Error: MSG002, ‘Messaging connection error. The problem is caused by configuration or the messaging system is not enabled for the domain. Please contact us at support@gatlabs.com
- Looking for a student – The application is looking for a student, if the connection process stops at this stage it means the remote peer (student) is not connected or online
- The student is online, preparing to stream – the student is connected to the system and is waiting for the streaming [webrtc] connection. If the message is not changing it means that the streaming connection can not be created, because of network/firewall/nat settings.
- Connection is failing to complete on the remote side (user enrolled in another session) – the remote peer refused connection because the user is already in another session. A student can’t be in two monitored classrooms at once.
- Connection is failing to complete on the remote side disabled by config – the remote peer refused connection because it’s disabled by config. Configuration should be updated in 15 min. If the situation repeats please contact us at support@gatlabs.com
- Connection is failing to complete on the remote side (browser has been closed) – the remote peer refused connection because all tabs for the user’s browser are closed. This is the same as ‘there is nothing to see here. The student must open at least one tab in the browser for the teacher to see.
Network and Firewall Requirements #
Make sure the Firewall settings allow those ports:
- The Port for messaging is 9871 TCP for WebSocket and HTTP traffic.
- WebRTC ICE server port 3478 UDP/TCP


