

Teacher Assist is designed to do exactly as the name suggests. The tool will help teachers deliver a fully managed classroom experience to students, whether those students are in the classroom, or remote in the home environment.
The first step is to set up your Teacher Assist environment properly. We recommend that teachers always deliver online classes in a 3 screen environment. Yes, you read correctly, three!
To deliver the classroom experience, whether, by Zoom or Google Meet, having three screens is the ideal set-up. They should be laid out as follows.
Screen 1 #
The first screen (left) will run Teacher Assist, this will allow the teacher to prepare the classroom, set up the default open tabs for each student, line up any tabs that will need to be opened during the class, and when the class is running, monitor each student’s desktop.
Screen 2 #
The Second Screen (bottom) will have the Google Classroom material or other Classroom material that the teacher is delivering. The teacher changes and manages their presentations here.
Screen 3 #
The 3rd screen (right) will show the student faces, allowing the teacher to judge the awareness and level of engagement of the students. In effect, the following environment will be created. Screen 1, the view the teacher would get as they looked at student desktops and walked around the classroom. Screen 2, the blackboard or whiteboard the teacher would present from. Screen 3, the view the teacher has from their desk, looking out at the classroom.
Using this format Teachers can best emulate the classroom environment and work in a way that is familiar to both teachers and students.
We recommend running Teacher Assist on one Chromebook/box/PC with a single large screen and Classrooms and Meet on a second device with 2 large screens.
The reason is Teacher Assist and Meet are both processing intensive.
Login to Chrome #
Note: for Teacher Assist to work – the students have to be logged into Chrome browser and GAT Shield has to be enabled.
Visit this page for more information.
Who can use Teacher Assist? #
- Google Workspace Super Admins.
- “Teachers” who have existing classes inside of Google Classroom, the information will be pulled from Google and existing classrooms will appear inside of the Teacher Assist console.
- If your school doesn’t use Google Classroom, you will need to get your G Suite Super Admins to create a Group and assign you as the Teacher of that group. Teacher Assist Groups are unrelated to Google Groups.
- A delegated user (Teacher) by G Suite Super Admin.
Teacher Assist session #
Launch Teacher Assist from the Google Apps button

When Teacher Assist is started, the teacher will automatically see all their Google Classrooms. Where a teacher has responsibility for a group of students where that grouping exists across classrooms, or where the school does not use Google Classrooms at all then the Administrator for the domain can create a ‘Group’ and assign Teachers and Students to that group.
If this grouping does not exist ask the domain administrator to set it up for you.
Before a class begins we recommend that the teacher prepare and load the web pages that the students will be using.
GATLabs Teacher Assist allows the class to start for each student with a preloaded set of web pages. In addition, the teacher can block all other web pages by default, forcing the students to stay ‘on message’.
The teacher can also have a ‘reserve’ list of web pages that they or the student can launch at any time during the case. Having this list ready will allow the class to progress efficiently, again giving the class access to extra material, while still holding the students within the bounds of the learning material.
Important:
- Make sure that students are signed in to their school Google account on ChromeOS devices.
- If they’re using Windows or Apple devices that they sign in and sync with their Google Chrome browser.
- The Shield must be deployed on the student accounts.
Start session #
From the menu on the left select Courses.
From the card view of the Classrooms search and select the classroom or Teacher Assist Group you need and click on the Play button (2).
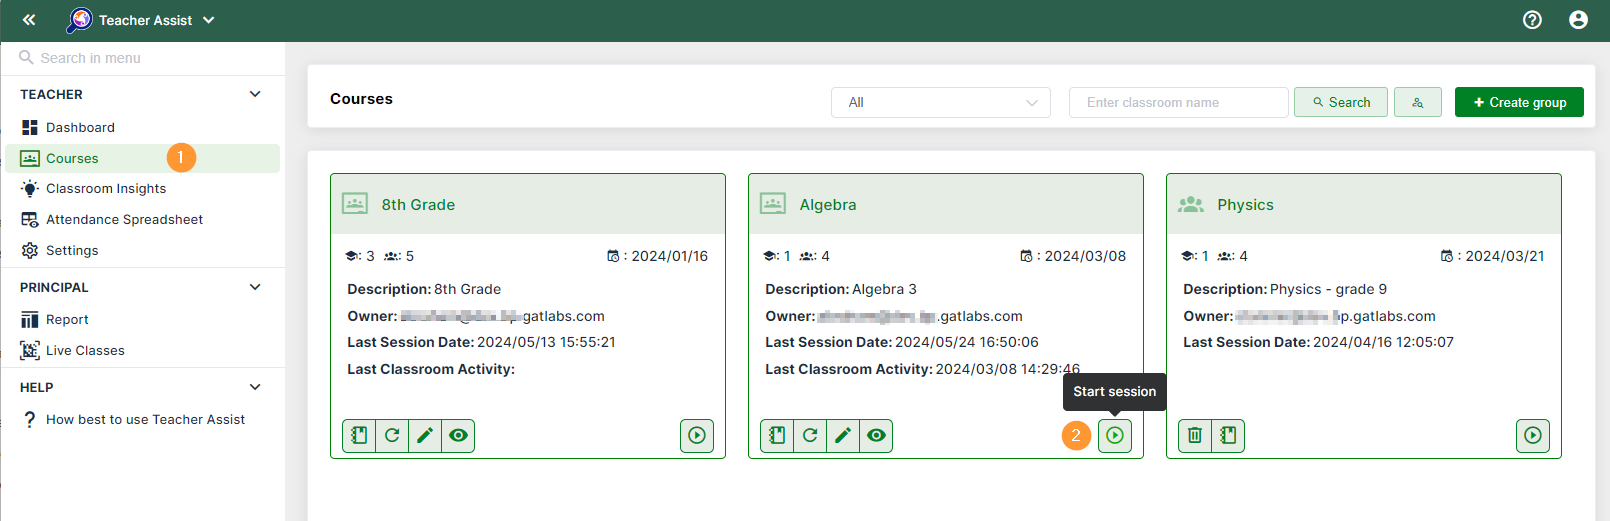
The classroom session will be started.
You will see a list of students if they are already connected and logged in to their devices.
The browsing activity will be automatically displayed.
View global student’s activities in real-time #
An overall view of all students within the classroom will be displayed. View all active students who are currently signed in to their Google accounts. See a preview of the current browsing tab the students are on.

- Time – time left for the classroom session. When the time expires it can be renewed and extended.
- The Admin can enable or disable this from the Administration settings options
- Exit session – click to exit the classroom session
- Chats (bubble icon) – open chat session window with Students and Co-Teachers
- The “green” color will be shown for currently active students
- Set lock tab (lock icon) – set lock tab for all users in the classroom
- Open search panel (search icon) – open the panel to search for individual students
- Display options (display icon) – sort users how to be displayed
- Users in a row – pick how many users to be shown in a row
- Preview type – pick the preview on the main classroom window
- Preview active tab
- Preview statistics
- Sort by – sort the students by
- Email – sort by email
- First name – sort by the first name
- Last name – sort by the last name
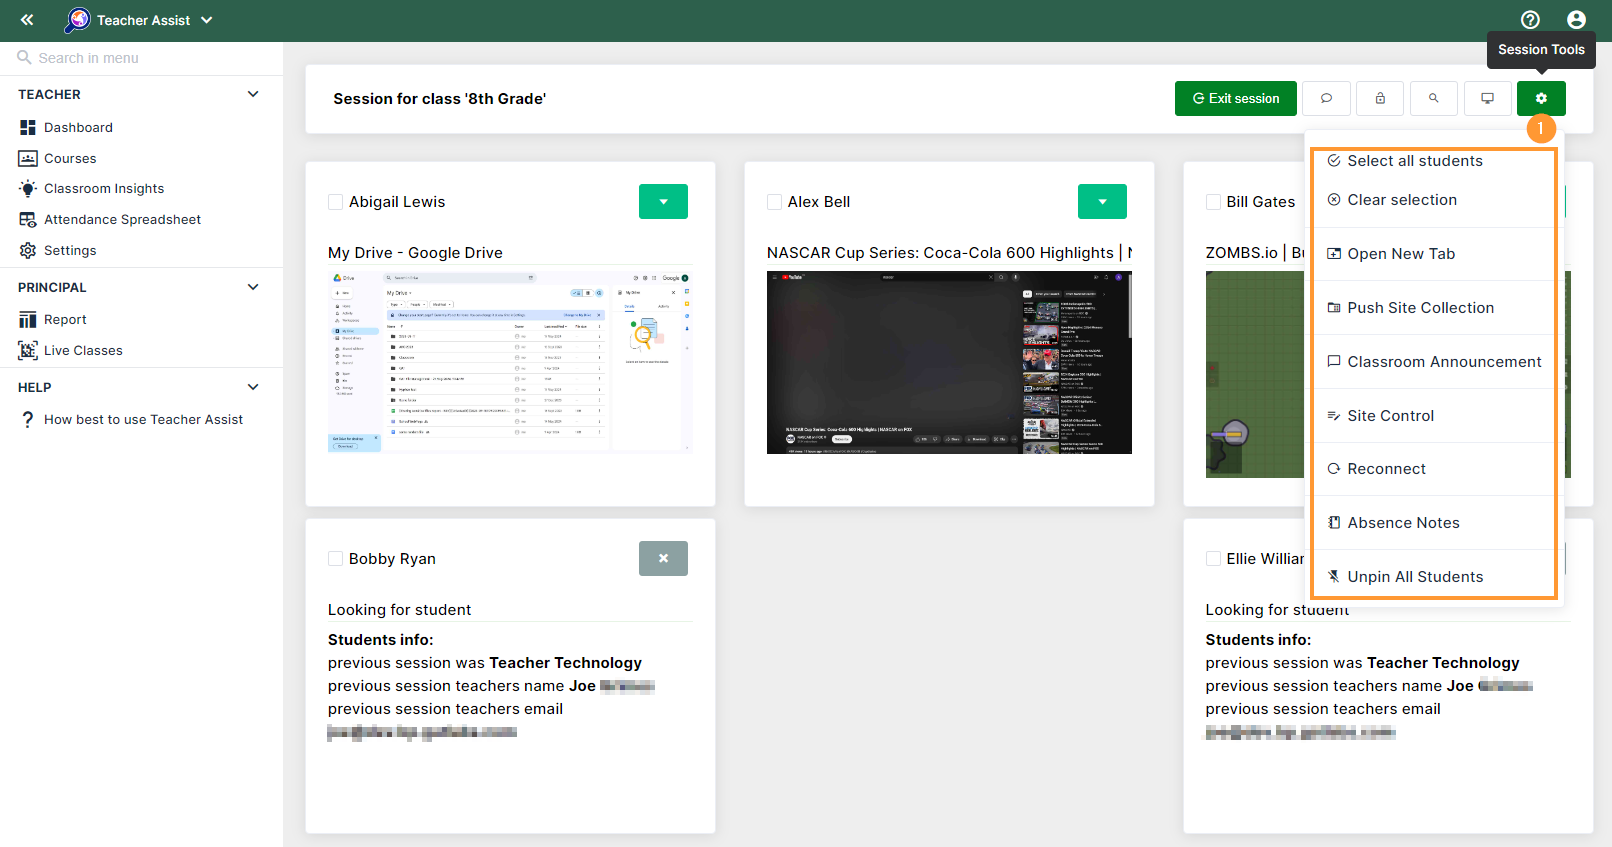
- Sessions tool (wheel setting icon) – different global settings that can be applied to all students in bulk
- Select all students
- Clear selection
- Open new tab – open a new tab for all the students of the classroom session
- Push site collection – push a prepared list of sites to all students
- Classroom announcement – sent a message to all students as an announcement
- Site control – apply site control rule to block or allow sites for the students
- Reconnect – set up reconnection with students who are not yet not shown as active
- Note: this runs automatically every few minutes checking if all users are connecting
- Absence notes – View any absence note taken for any student who is not active
- Unpin all students – if students are pinned to be shown on top, you can unpin them
View individual student’s activities in real-time #
View the current screen the student is on by “double-clicking” on the user or selecting Maximize Viewing Window
The student screen will be shown on a bigger screen with more detailed information.
View the current screen the student is on. On the right side click on the green button.
- Current – view the current tab (site) the student is on
- Previous – view the previous tabs (other) tabs that are currently on the student Chrome browser session
- Switch tab – click to switch the tab to be current (green button)
- Open tab – pull the tab the student has and open it on your (teacher) browser (orange button)
- Delete tab – click to delete/remove the tab from the student browser (red button)

Take action on a single student #
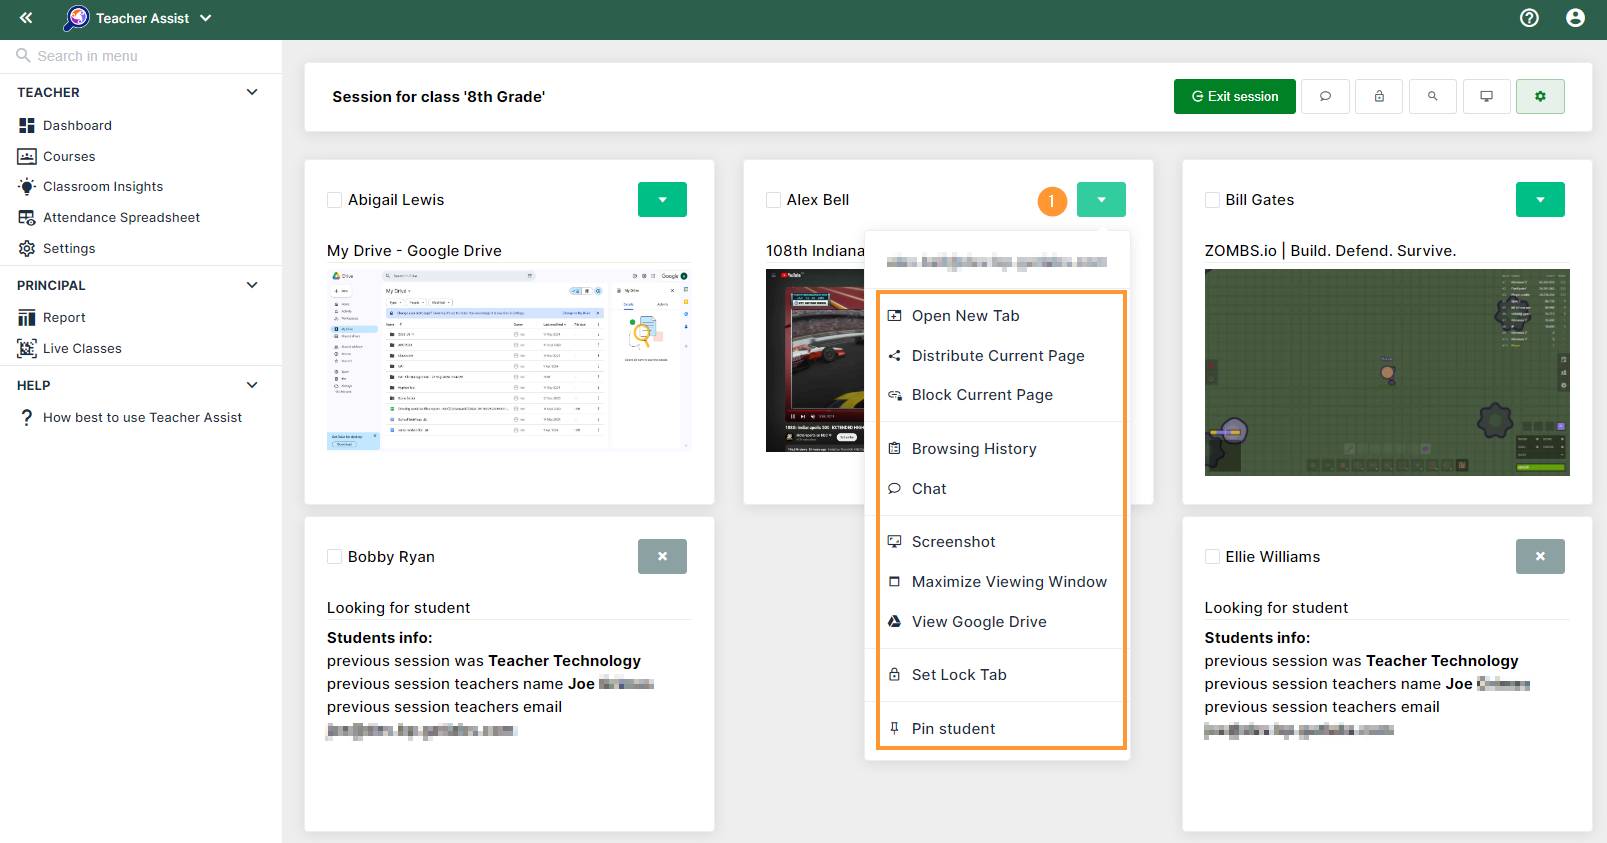
From the “Maximized view window” select user (above) and click the green button.

You will be presented with the following options:
- Open Tab – this will open a new tab on the student’s device.
- Distribute Current Page – will distribute the current tab to all other students.
- NOTE: Block current page – blocks the current page for ALL Students –
- This will not prevent pages from being opened in the future – it just closes the currently opened webpage for All Students
- Browsing History – will show all of the web pages accessed by the student from the point of the session starting.
- Chat – start chat messages with the student
- Screenshot – take a screenshot of the current tab open on the student’s browser
- Maximize Viewing Window – view the entire screen of the student
- View Google Drive – view the Google Drive of the student
- Set Lock Tab – lock the current tab of the student
- Pin student – pin the location of the student at the top of the Classroom session view window
The above rules are applied only to the teacher-assist session.
NOTE: The blocked pages will be allowed again after the Teacher leaves the session.
When “Block all sites by default” is used – every page the student tries to access will be automatically blocked.
The same message will be displayed if only an individual page is blocked.

Note: Those pages will be blocked only during the Classroom session, when Teacher leave the session, students will be allowed to open the pages again.
Classroom Settings #
The teacher clicks on Classrooms to see a list of their classrooms, from there they can click on the ‘pen’ icon to prepare a class or click on the ‘play’ icon to ‘launch’ the class.
Clicking on the pen icon takes the teacher to an area where they can set the controls for the student class experience. This will allow the teacher to set tabs to be open at the start of class, line up additional pages that the teacher can launch at any time, and block or allow general web browsing.
The student’s button shows the teacher which students are in this class, and the info button shows the teacher details about the Google Classroom in G Suite.

List of Students #
A list of all students in the classroom will be displayed. You can make students “inactive”.

Prepare Class Session #
The teacher can also have a ‘reserve’ list of web pages that they or the student can launch at any time during the case. Having this list ready will allow the class to progress efficiently, again giving the class access to extra material, while still holding the students within the bounds of the learning material.
Set up rules for the Classroom before the Teacher Assist session starts.
- Block all sites by default (1) – set up a rule for all sites to be blocked (block internet) by default for all students
- Create site access rule (2) – create a list of sites to be blocked for the students.
- Block – Set up individual sites to be blocked during the session
- Allow – Set up allowed sites. The allow list will overwrite any block list. If all sites are blocked, you can create an allowed list, so only those sites will be allowed.
- When the URLs are added you can set them to be opened by default at the start of the session
- Open on session start – option can be set up from the right side (3)

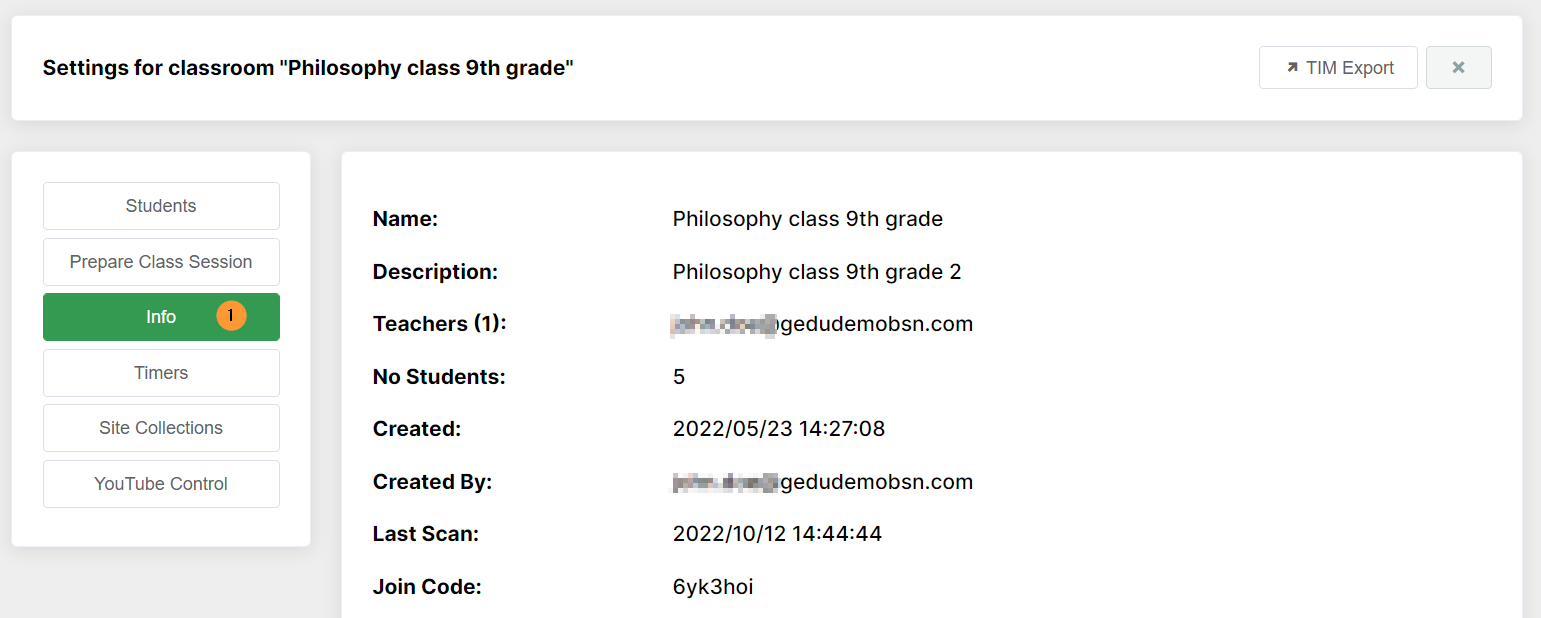
Info #
View additional information for the Classroom
Once the teacher has set up the environment they should return to the classroom page and press play to begin the class whenever they are ready (this may even be the next day or week)
Timers #
Set up Time for session/lesson [hh:mm].

Site collections #
The Teacher or Admin can create a list of sites called Site Collection.

This list then can be easily pushed by the teacher to the students and be available for every classroom session.
You can set the sites to be opened on the start session by default etc.

Classroom Insights #
From the Classrooms list page, the teacher will be able to click on the “eye” icon at any stage to be taken to the classroom insights for that particular class.

The Classroom Insight will show all the details for the Google Classroom.
- People – list of teachers and students
- Classworks – list of all classwork and their details
- Grades – list of classwork and grades given for each of them for each student
- Browsing activity – list of students and the browsing activity performed during a particular day
- The Teacher can pick a day and see the browsing activity for the day
- Site Access Control History – list of Site Access Control rules applied during the session (kept for 30 days only)

Update Membership #
Using the revolving arrows icon you can update the classroom members by refreshing the membership.
Show absence notes #
The “book” icon will show the Absence notes taken for the classroom.

Attendance spreadsheet #
This shows the attendance during the last classroom or group sessions

Teacher settings #
The Teacher Settings (1) allow the Admin and Teacher to set up Session and Report settings.
- Courses settings (2) – display courses as cards (default view) or list view. Card view displays Classrooms and TA Groups together
- Session settings (3)– set up settings for the session
- Play sound on chat messages received – play a sound when the Chat function is used
- Show student left message – show message when Students leave a session or are disconnected
- Report settings (4)– set up settings for the after-classroom reports.
- Send me a report by email after the session – enable the Admin/Teacher itself to receive emails
- Send a report by email after the session to others – enter an additional email for an email to be sent after the classroom session as needed
- Automatically upload screenshots to Drive – enable the options to add the screenshots taken to the Teachers Drive

Troubleshooting #
- Green – WebSocket connection is established and working.
- Yellow – WebSocket connection is trying to be re-established.
- Red – WebSocket connection is lost.
- Grey – The user is not logged in to their account (Shield is not deployed to this user). If a student has logged in after the Teacher assist session has started their account will be “grey”, you can use Reconnect to reset the connection so the new students are visible.
Status messages #
- Error: MSG001, ‘Messaging connection error. The problem is caused by a connection error, an invalid link or the server can not create a connection. Please contact us at support@gatlabs.com
- Error: MSG002, ‘Messaging connection error. The problem is caused by configuration or the messaging system is not enabled for the domain. Please contact us at support@gatlabs.com
- Looking for a student – The application is looking for a student, if the connection process stops at this stage it means the remote peer (student) is not connected or online
- The student is online, preparing to stream – the student is connected to the system and is waiting for the streaming [webrtc] connection. If the message is not changing it means that the streaming connection can not be created, because of network/firewall/nat settings.
- Connection is failing to complete on the remote side (user enrolled in another session) – the remote peer refused connection because the user is already in another session. A student can’t be in two monitored classrooms at once.
- Connection is failing to complete on the remote side disabled by config – the remote peer refused connection because it’s disabled by config. The configuration should be updated in 15 min. If the situation repeats please contact us at support@gatlabs.com
- Connection is failing to complete on the remote side (browser has been closed) – the remote peer refused connection because all tabs for the user’s browser are closed. This is the same as “there is nothing to see here”. The student must open at least one tab in the browser for the teacher to see.


