Reviewing actual data and not just metadata #
GAT Unlock functionality within the GAT+ tool, allows Workspace Super Admins or Delegated Auditors of GAT+ to be able to view or download email contents. If GAT Unlock functionality is not enabled only metadata can be accessed within the GAT+ tool.
Using GAT+, there are 2 main tabs related to searching, analyzing, and reviewing metadata of email content for every user within your Google Workspace domain.
- Email: The Emails tab allows admins to find any email sent or received in Gmail by users from your Workspace domain based on scanned metadata. Metadata is periodically updated by regular scans from GAT+. Since scanning occurs periodically, some emails sent or received contemporary may not appear until a completed scan.
- Email Content Search: The Email Content search tab allows Super Admins or Delegated Auditors to search for emails across your organization’s Gmail inboxes, all inboxes for every user can be queried and the metadata will be returned in real-time. It is not based on a scanning method but rather a live query made through the GAT+ tool. The search field accepts common Gmail search operators.
Email Content Search #
Simple search
Search for emails sent to a particular user that were ‘Unread’
- Query: to (insert user email) is: unread
- Pick the users whose emails will be searched thru
- / – main OU and include sub. ou’s
- Search emails – click to apply the search

As a result, the query will be searched thru all the users of the domain (/ include sub. ous)

Available query filters #
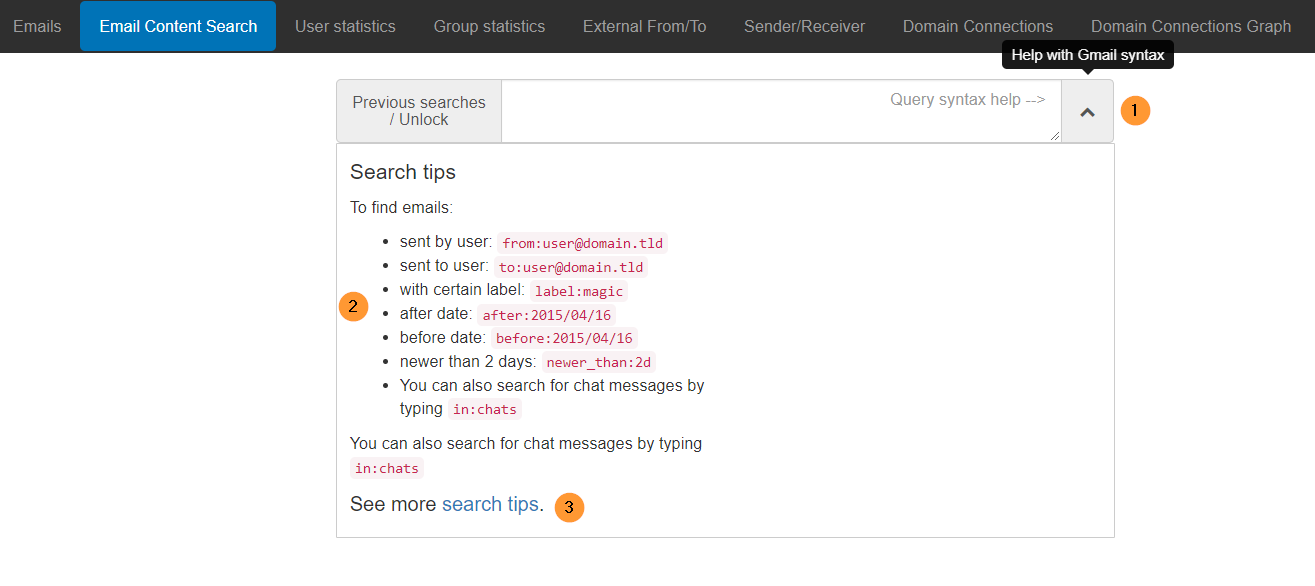
Click on the Help with Gmail syntax button.
A pop-up window will be displayed with examples of different searches available.
You can also check and see more search tips (3).
How-to apply query within Email Content Search tab #
In a real-world example of using the email content search tab, we will be searching for an email that contains a sensitive sentence.
We will be looking for any emails that contain a particular sentence of interest.
Gmail Search Operators used: “content” added into quotes, date (newer_than days), and has attachments
- Apply this search – “security keys”, newer_than:30d, has:attachment

The result will show all the emails fitting the criteria selected above.
Note:
- Limiting search queries only to a certain user/group will improve the accuracy and speed of the search.
- Apply any filter and click on “Previous searches” this will show a list of all the previous searches, select the one you need.
Previous searches #
The Previous Searches button once pressed will show all previous searches and current searches ongoing.

Create a request to view the emails #
When metadata is returned after a successful query once applied.
There are many ways to work with the metadata displayed on the page. A Super Admin or a Delegated Auditor has the following ability.
Abilities:
- View metadata details of each email interaction listed on the page and request access to view the content of the emails
When the result of the search is found directly or via previous searches
There will be options
- Select the email itself – click on the checkmark beside the subject of the email (1)
- Click on the Email operations button (2)
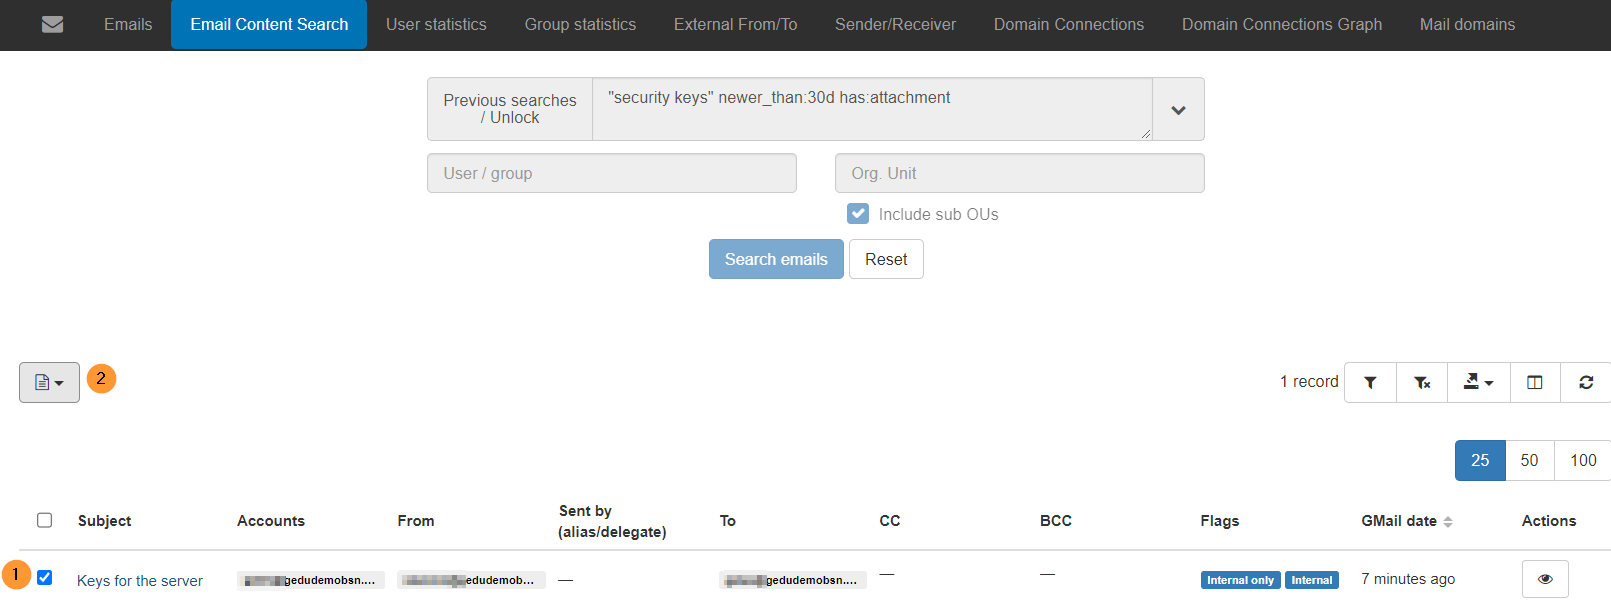
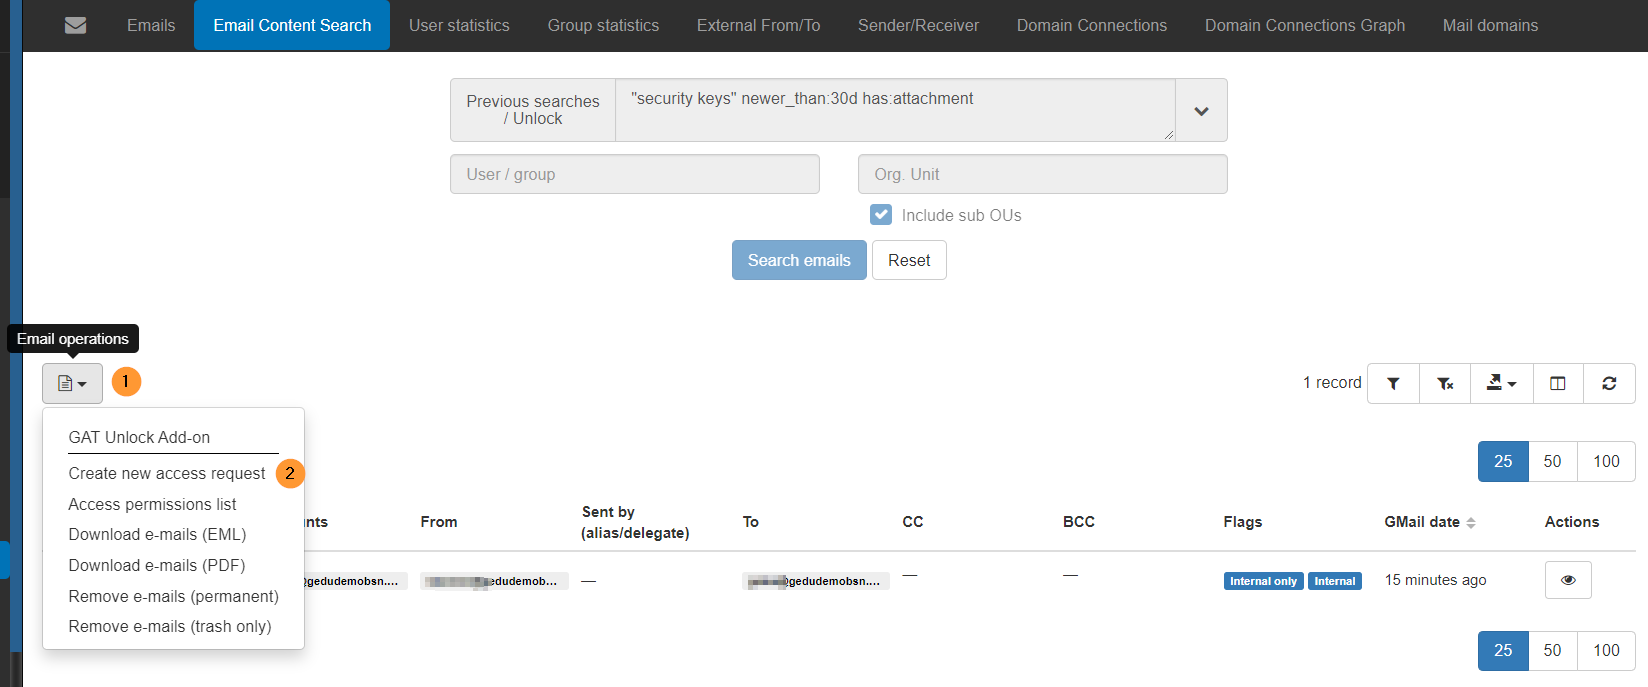
Clicking on Email Operation (2) will show a small pop-up menu.
From the list:
- Select Create a new request (2) to request access to the email content
A new menu called Request new access will be displayed.
Fill in the details
- Request access until – select the date until when the request will be available to view the content of the specified Email.
- Message (optional) – leave an internal message to the Security Officer – perhaps a reason for this request
- Additional permissions – enable or disable an option allowing you as Admin (requester) to delete (remove) the email from the user’s Inbox
- When ready click on Send request

All listed Security Officers will receive an email detailing the access request being made.
Preapproval #
Note: If you have pre-approval enabled no email request for approval will be sent.
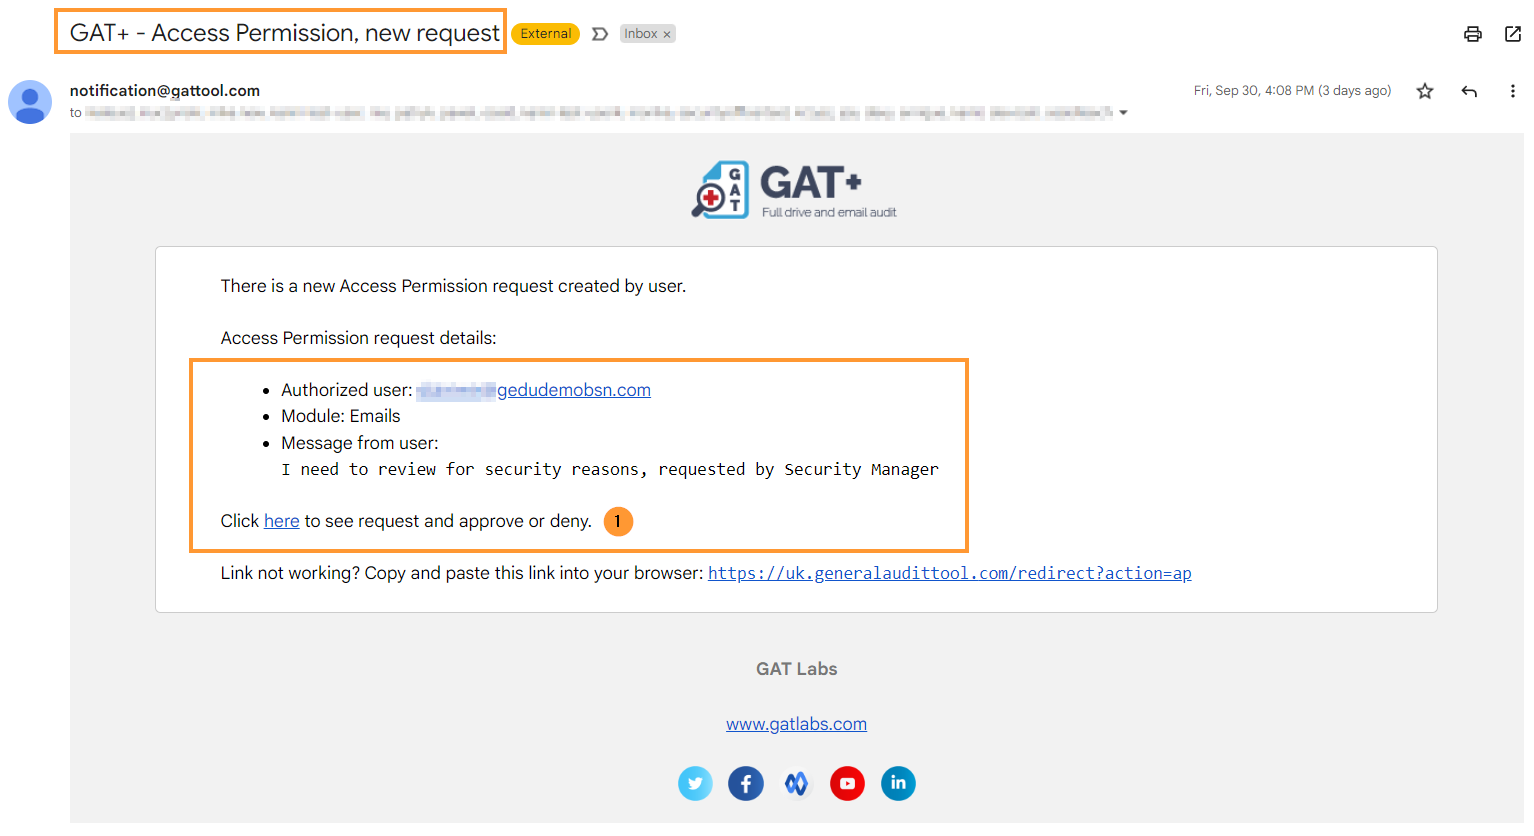
When approved the Super Admin will receive an email in return notifying them of the Security Officer’s decision: (Approved or Denied).
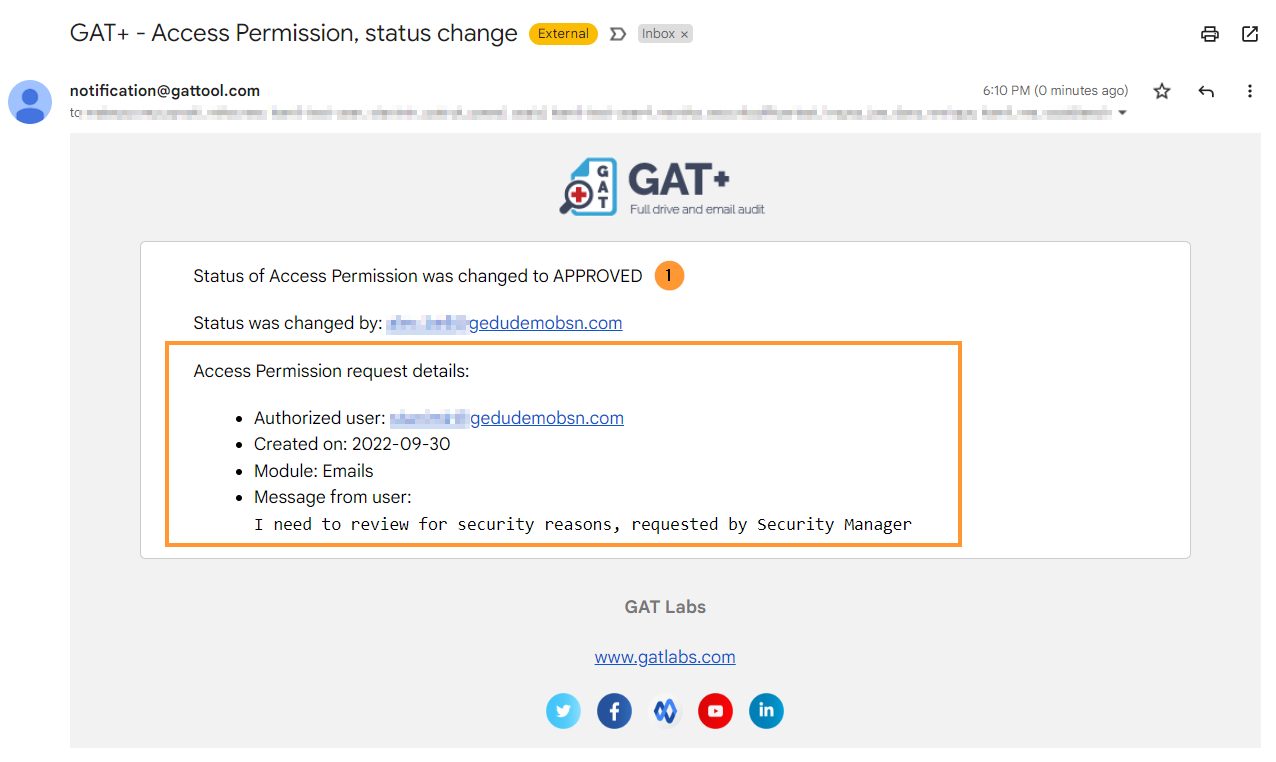
When the request has been approved the Admin will have access to the email to view and download its contents.
Access the email content #
In the “Email Content Search” tab
- Click on the “Previous searches (Unlock) button (2)
- In the pop-up window find the previous searches and select the one for which Unlock was required
- Under “Status” – you will view the Active Unlock Request text
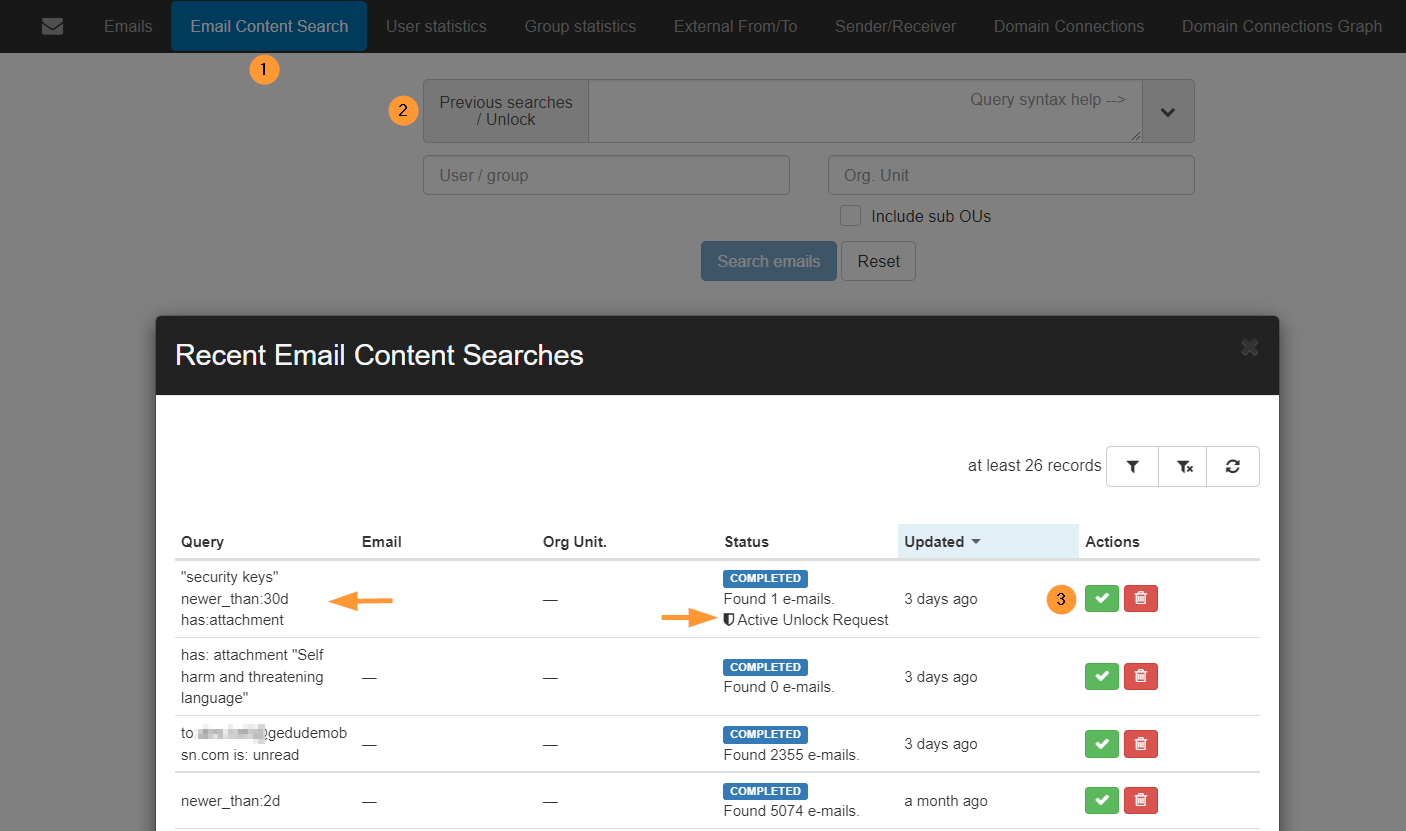
- Click on the green checkmark (3) to show the result
Activating GAT Unlock Privilege on Approved Emails #
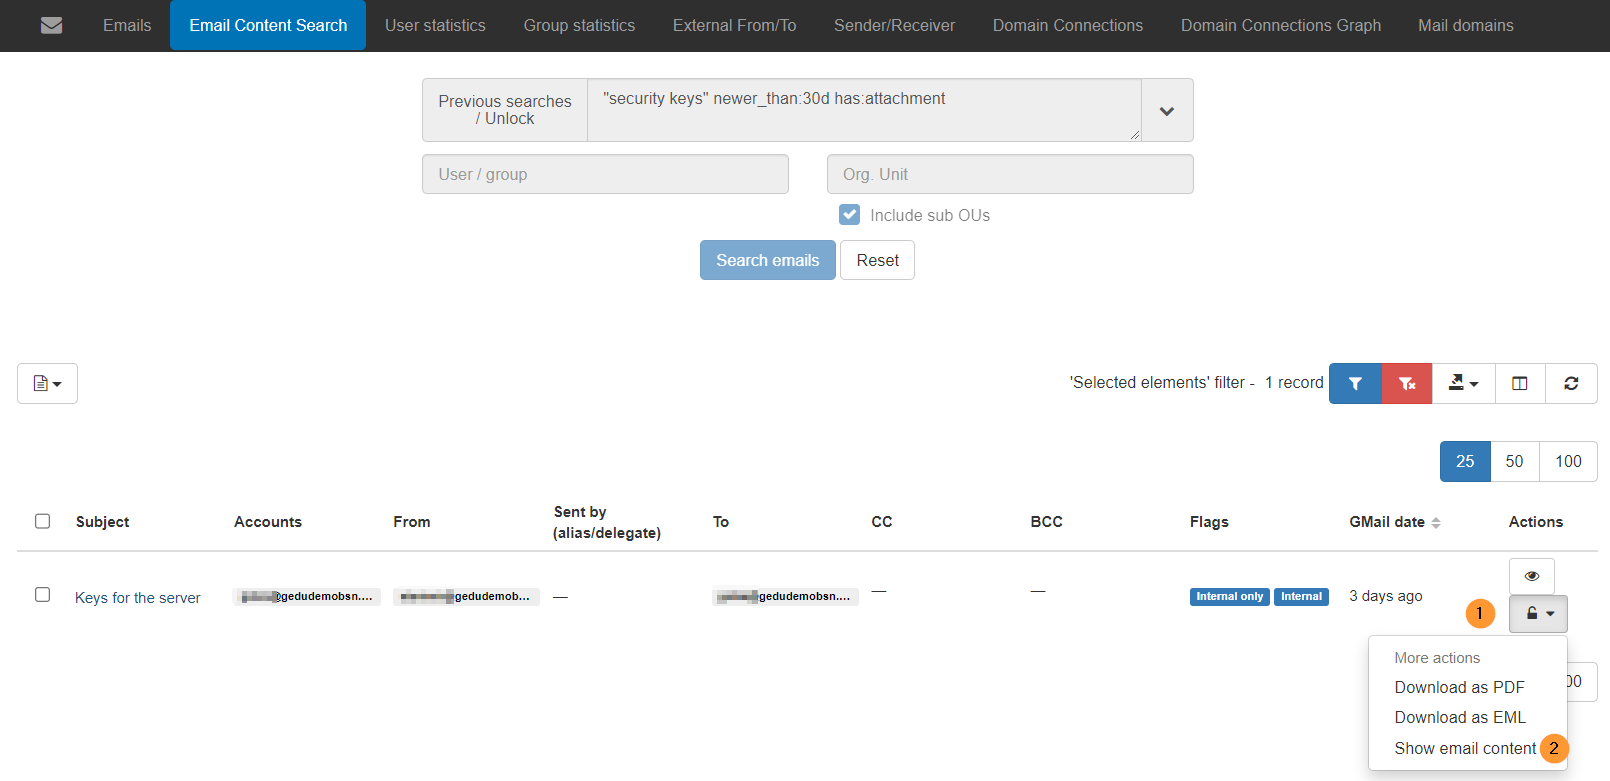
For emails that have GAT Unlock requests approved for content review, you should see a lock icon under Actions (1)

If you don’t see it that means you need to enforce the permission.
To do this, once email metadata appears on the page, click on the Email Operations (1) menu then enter the Access Permissions List (2) menu.

Find the list of approved security officer requests.
It could be many requests where unlock was used.
Select the one we previously applied – click on the checkmark under Actions (1).

This will show only the emails found by the search and to whom the unlock is enabled.
Note: If you don’t see a lock icon next to the emails, then Log-out of GAT+ and Log back in.
A Lock icon means you have access to the contents of the email and not just access to view metadata.
Individual action per email #
On the right side under Actions – pick any of the actions.
- Download as PDF
- Download as EML
- Show email content
Result of view email content #
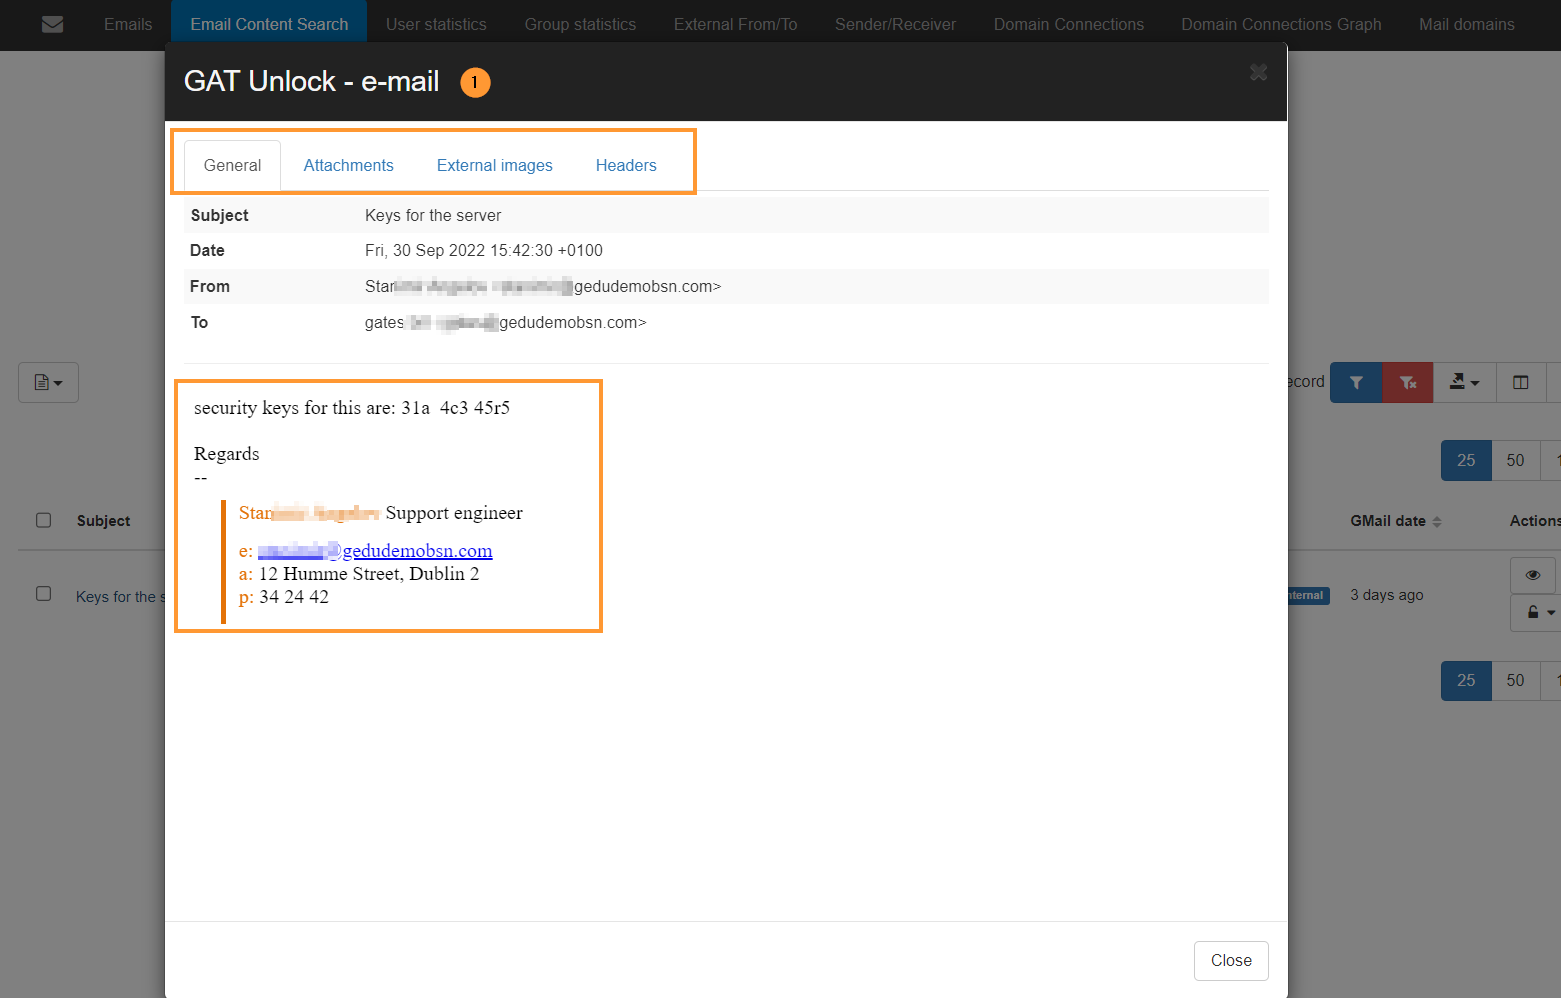
Show email content opens this viewport, to view the Email and its content.
- General – show the email content
- Subject – show the Subject, Date, From, and To.
- Attachments – view the attachments if any on the email
- External images – view the external if any images
- Headers – view the headers of the emails
Bulk action on many emails #
On the left side under the Email operations menu, more options will be available to take bulk actions
- Select all emails needed by clicking on the checkmark button
- Click on the top checkmark beside the subject will select all emails found as a result
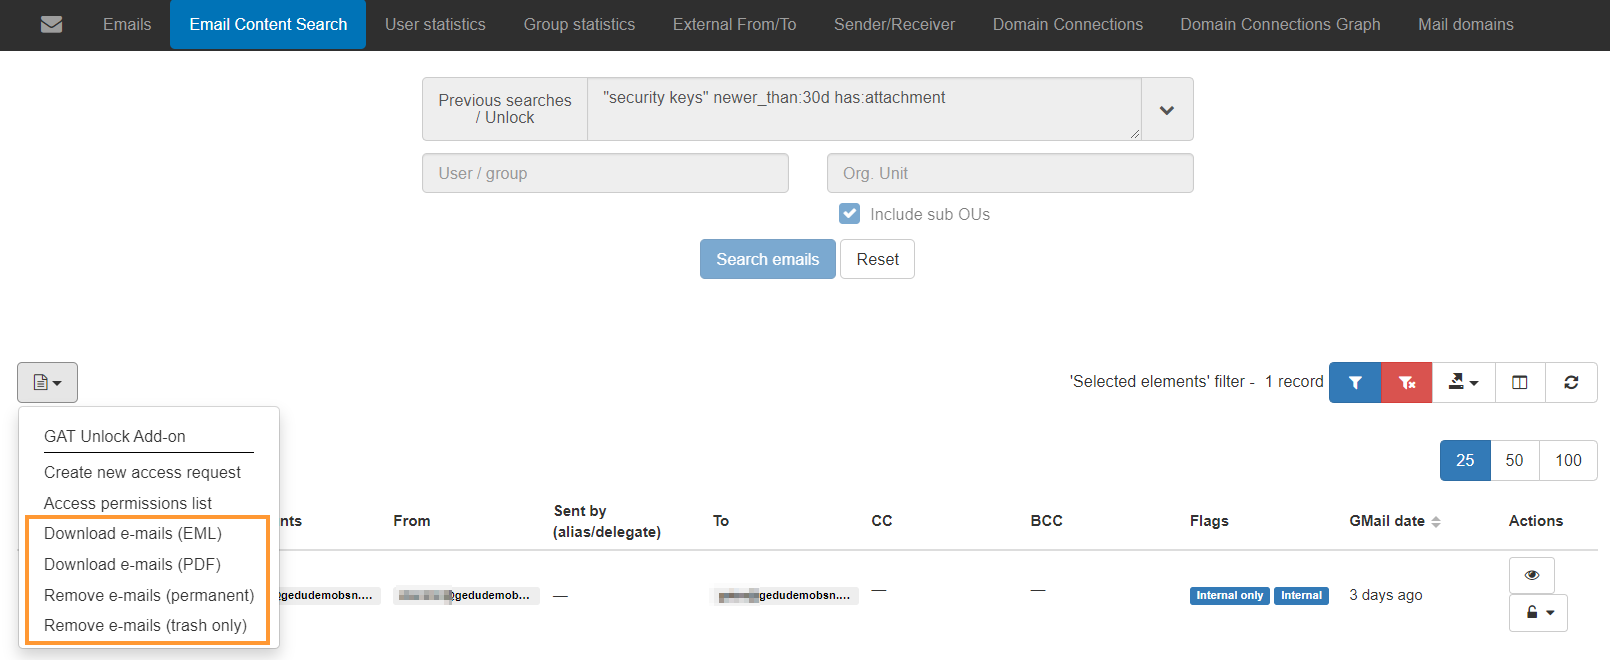
The bulk actions that are available are:
You must select the checkmarks of each email or “select all items on every page” by selecting the checkmark beside the “Subject” (1)

- Download e-mails (EML) – selected emails
- Download e-mails (PDF) – selected emails
- Remove e-mails (permanent) – selected emails
- Remove e-mails (trash only) – selected emails
Download emails #
Download emails action:
- Select the email needed – checkmark beside the subject (1)
- Click on the Email operations (2) button then click on Download e-mails (EML/PDF) (3)
A new window will be displayed giving you additional details.

Click on the “Proceed” button.
The requester (Admin) will receive an email with details about the download.
The details for the download will be shown.
Click on link (2) to download the emails.
Copy and use the password (1) to access the downloaded emails.
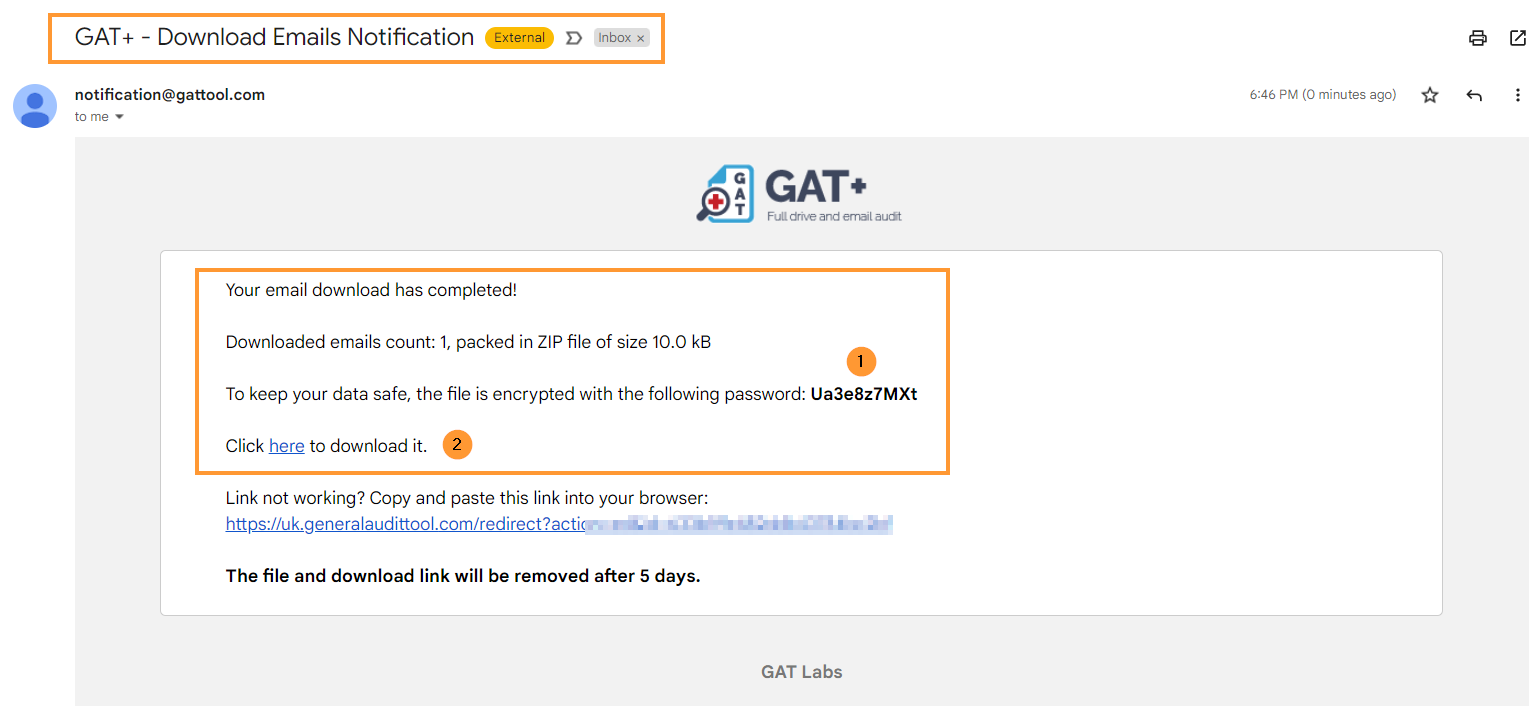
The emails will be set up and downloaded as a ZIP file.

Open the Emails #
Click and open the ZIP file.
Use the password provided in the email above.

Admin log #
Alternatively, you can download it from GAT+ > Configuration > Admin log

The view process is as above.
Open the ZIP file using the password provided.


