
Actions Available when OffBoarding Users #
Using GAT Flow allows the admin to use multiple Actions when offboarding a user. Those actions can all be added and used simultaneously alongside removing, suspending or archiving the user(s).
Below are the steps required for Offboarding a user and a list of all the additional actions that can be taken.
Open GAT+ (1) and select Flow (2) from the the pop-up menu.
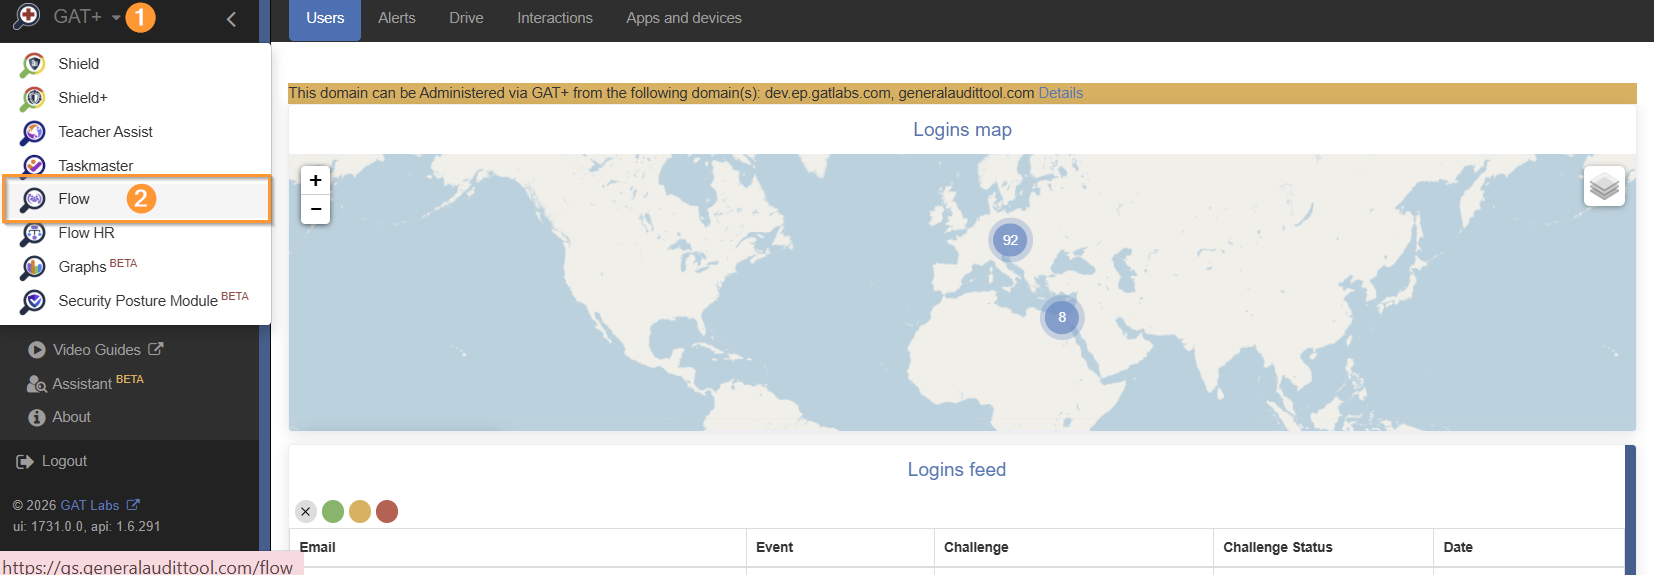
A new Flow tab will be opened on your browser.
Create Workflow Type #
From the menu on the left click on Create workflow.
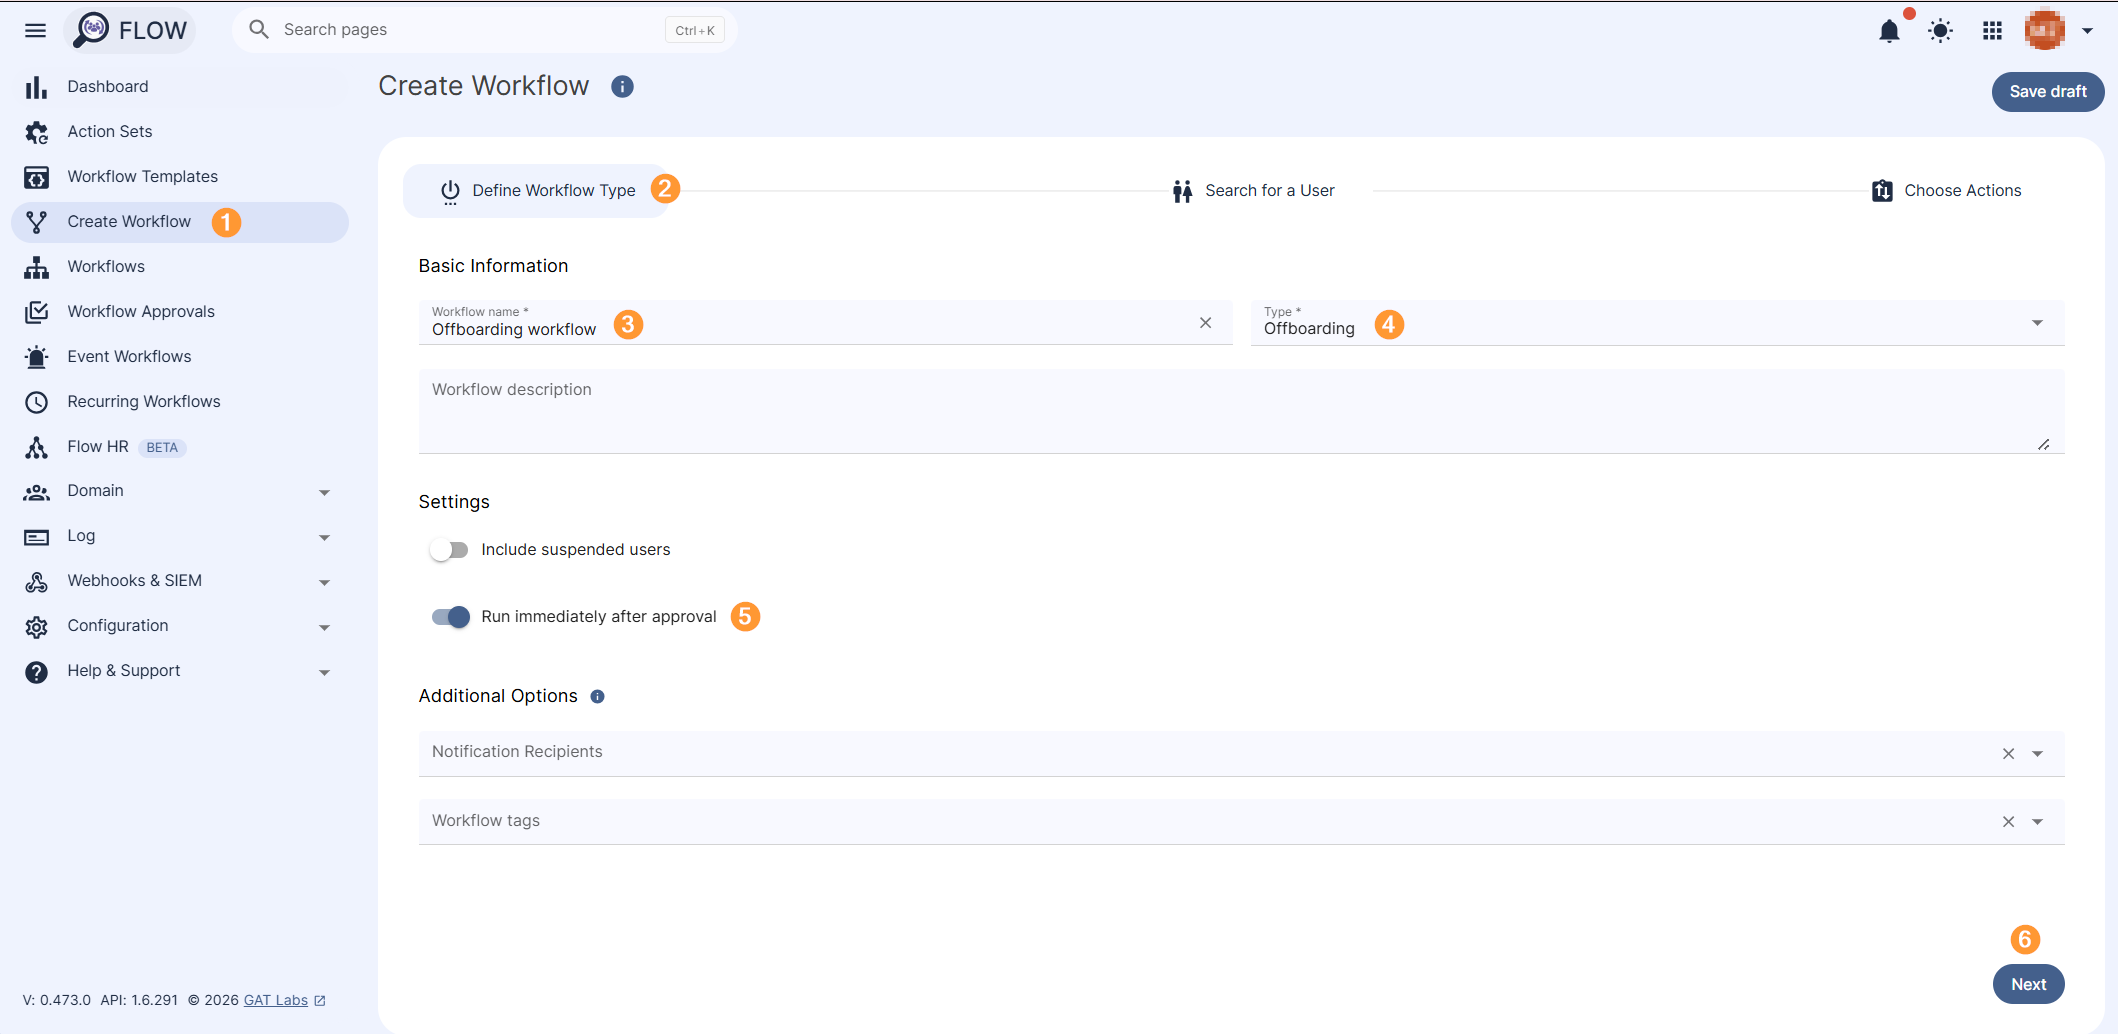
Create workflow window will be displayed. Under Define Workflow Type section, enter the workflow Basic Information as follows:
- Workflow name – enter a name for the workflow
- Workflow description (optional)- enter a description of the workflow
- Type – select the workflow type
- Offboarding – Offboard users
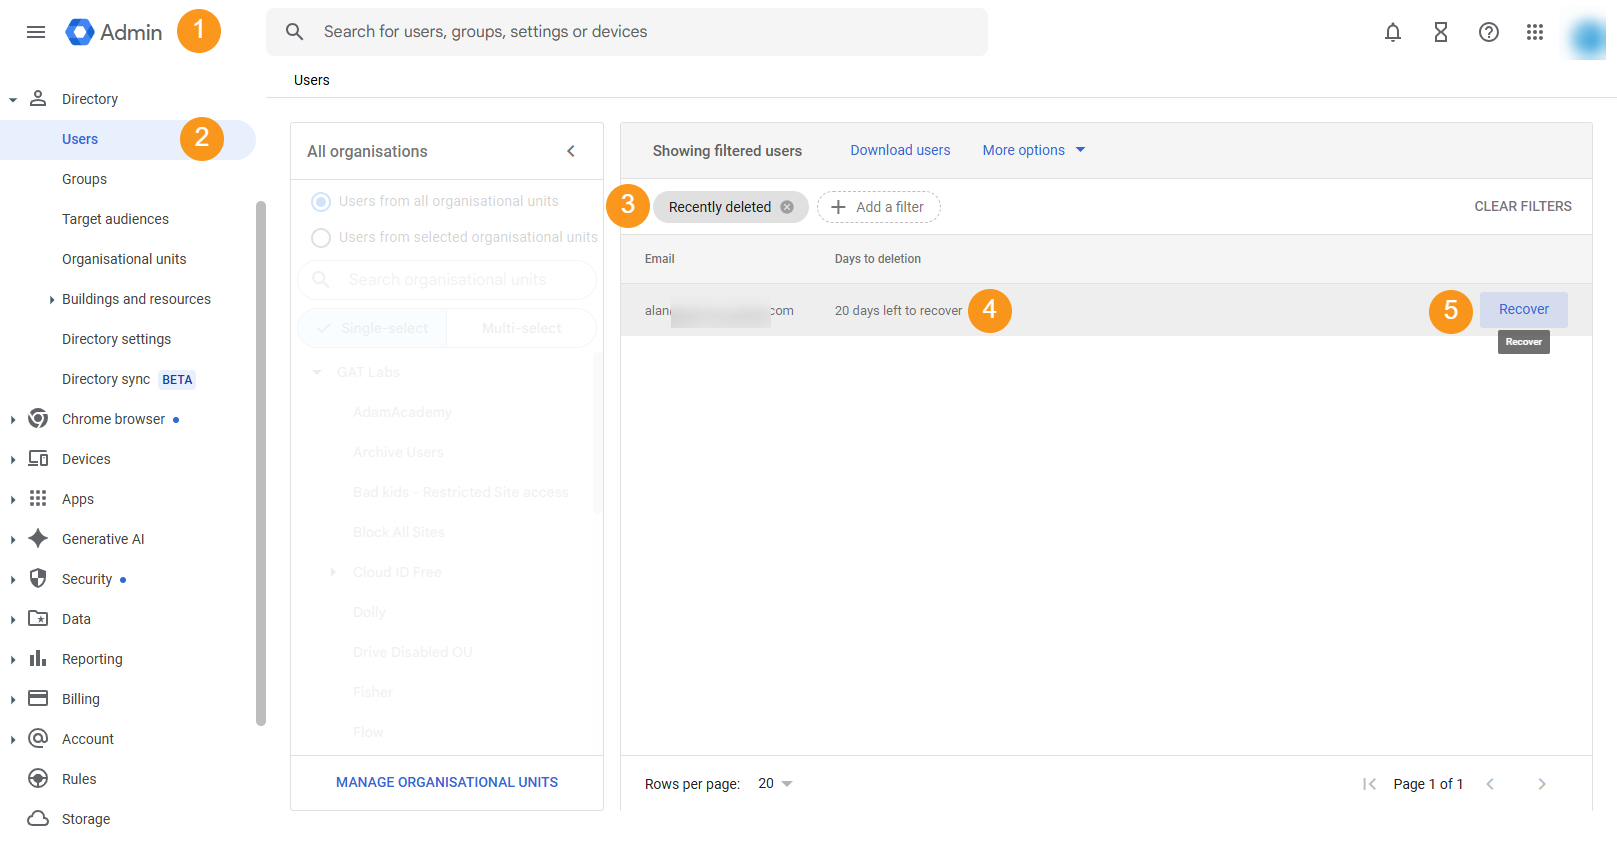
IMPORTANT: This action cannot be undone. Selected accounts will be deleted if workflow ends with success. All emails and files once removed can be restored within 20 days using the G Suite Admin Console otherwise they will be gone forever.
- Run immediately after approval (selected by default) – pick up a date when the workflow is to run if applicable. More details here
- Next – click on the button to proceed
Search for a User #
Search for a User – select the users to be added to the workflow. Under the Add user section there are the following options to use:
Select user by:
- User – Search and select individual user(s)
- Group – Search and select a Group of users
- Org. unit – Search and select Org. Unit of users
- Classroom – Search and select Classroom
- Import users – add users through import
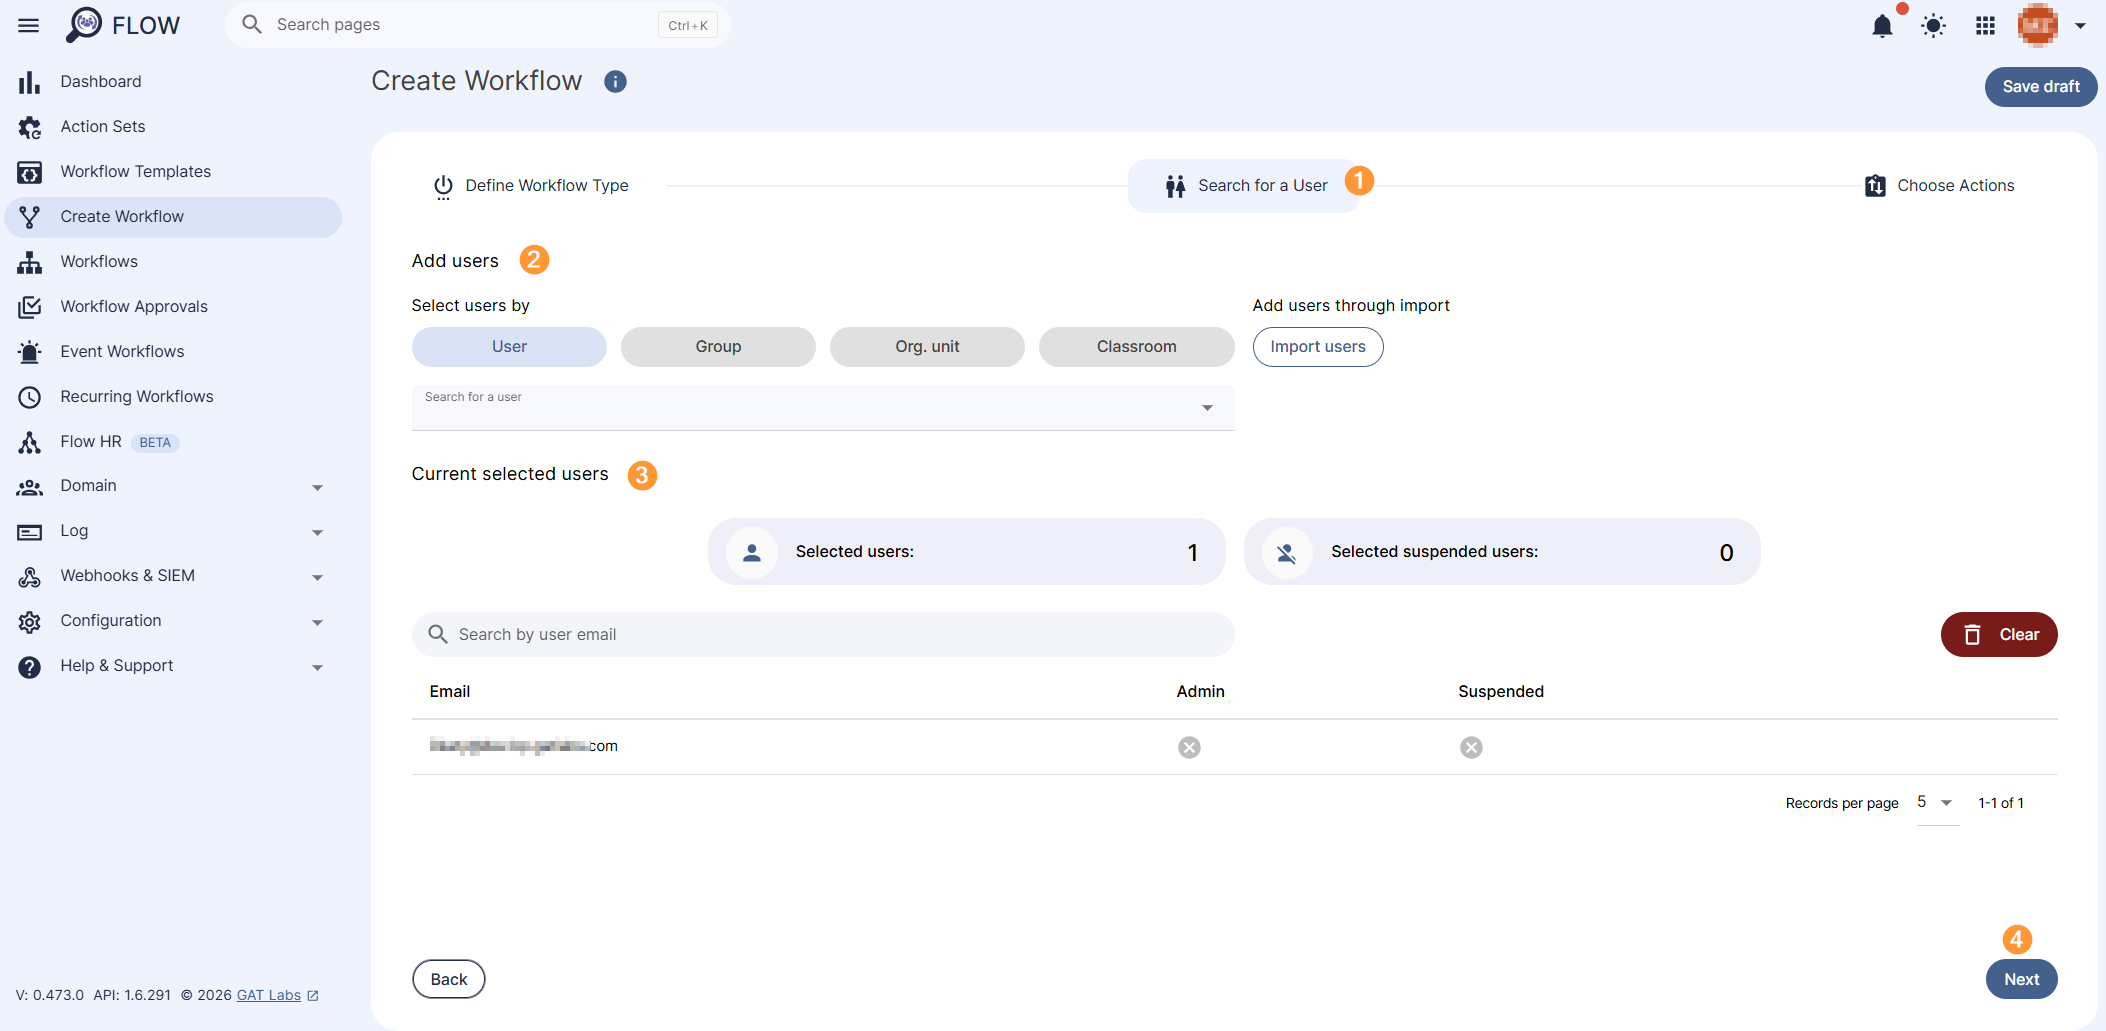
When the users are added click on Next.
Choose Actions #
Under Choose Actions you will see a list of different actions that can be taken for the Offboarding workflow.
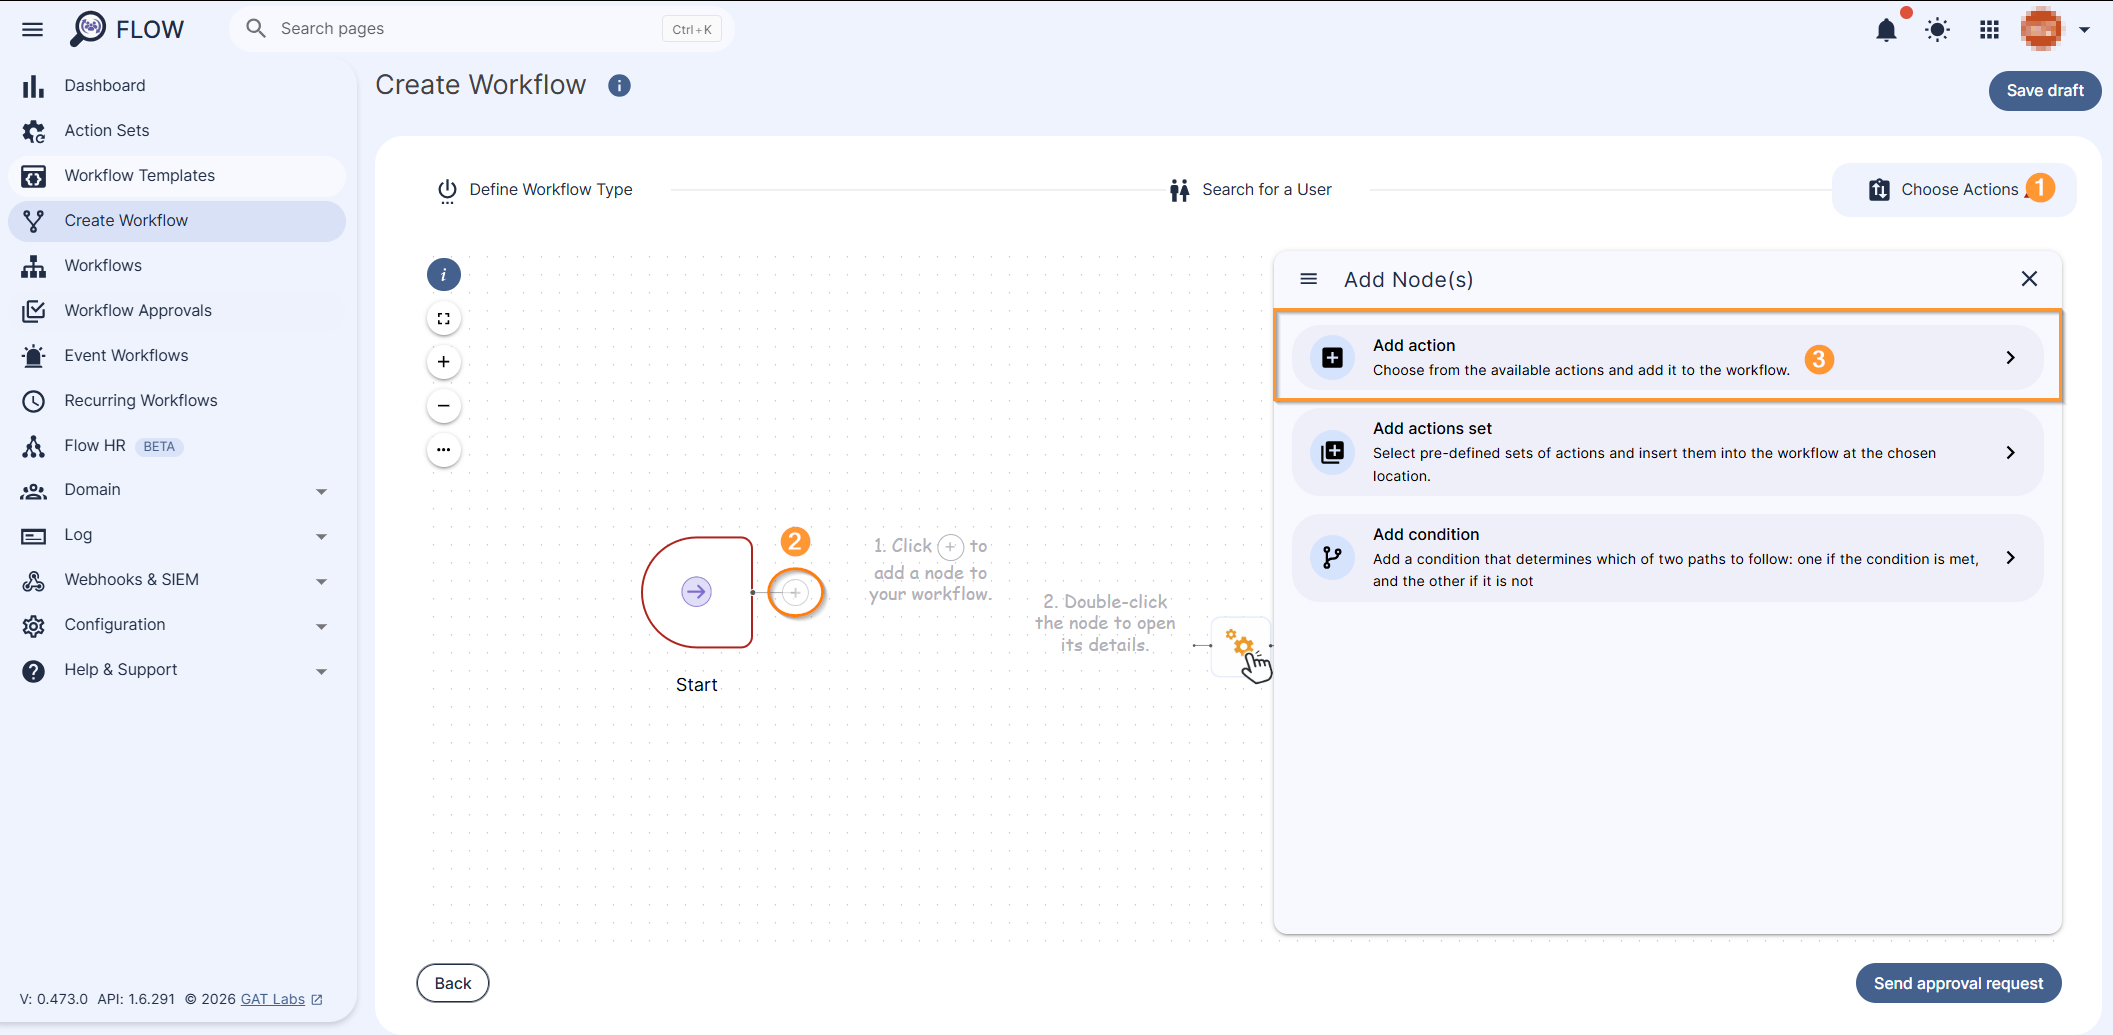
Set up the workflow actions by clicking on the “+” button (2) displayed in the workflow diagram and Add action (3).
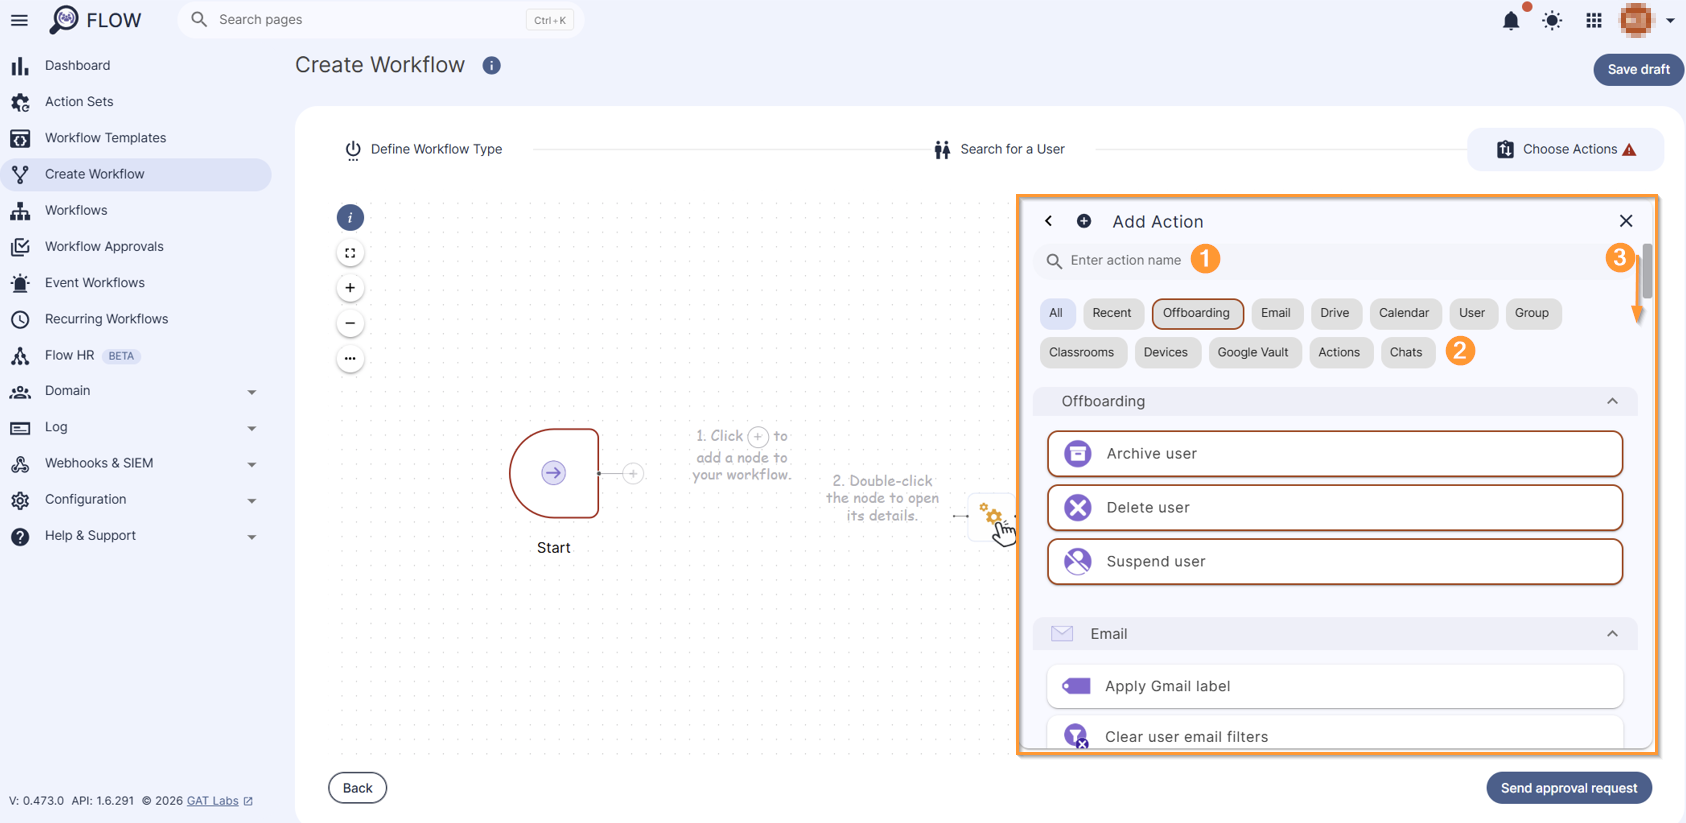
All available actions will be displayed, which can be searched (1) and categorized (2) for faster searching. You can also scroll down the list of actions (3).
List of Offboard actions #
The list of actions that can be taken while offboarding is as follows:
- Offboarding final actions:
- Archive user
- Delete user
- Suspend user
- Email – actions for Google Email
- Apply Gmail label
- Clear user email filters
- Create email filter
- Migrate emails
- Move email delegation
- Remove Gmail labels
- Remove email delegation
- Remove all – remove all existing email delegations
- Delegates to remove – remove email delegation from a specific users’ accounts
- Remove email forwarding
- Send email
- Set email auto forwarding
- Set up auto reply
- Drive – actions for Google Drive
- Folder, Shared Drive permission change
- Calendar – actions for Google Calendar
- Add user to calendars
- Delete user calendar events
- Remove user from calendars
- Transfer calendar events
- Unshare user calendar
- Wipe user calendar
- User – actions for users
- Add user email alias
- Archive user
- Change global directory visibility
- Change user email
- Change user organizational unit
- Change user password
- Change user’s employee information
- Clear recovery data
- Clear user aliases
- Clear user email Send as
- Delete 2-step verification backup codes
- Delete app-specific passwords
- Delete user
- Delete user profile picture
- Disable 2-Step Verification
- Force sign out
- Google application data transfer
- Make YouTube videos unlisted
- Manage Flow user delegation
- Migrate Google Keep
- Migrate user drive
- Remove suspended users from contacts
- Remove user access to files and folders
- Remove user from Google Sites
- Remove user from all calendars
- Remove user manager
- Remove user role
- Revoke apps tokens
- Set as super admin
- Set email signature
- Set user custom attribute
- Suspend user
- Unarchive user
- Unshare owned files
- Unsuspend user
- Group – actions for groups
- Add user to groups
- Change group member subscription
- Delete user from Google groups
- Delete from all groups
- Delete from all groups with some exclusions (‘Don’t remove from’)
- Delete only from specific groups
- Classroom – actions for Google classrooms
- Change Classrooms owner
- Remove student(s) from Classrooms
- Remove teacher(s) from Classrooms
- Devices – actions for devices
- Change chrome OS device status
- Change google license assignment
- Wipe devices
- Wipe mobile devices – Choose the action that will be done on user’s mobile devices:
- Delete – Removes a mobile device.
- Block – Blocks access to G Suite data (mail, calendar, and contacts) on the device. The user can still access their mail, calendar, and contacts from a desktop computer or mobile browser.
- Remote wipe – Remotely wipes all data on the device. See the administration help center for more information.
- Wipe account – Remotely wipes only G Suite data from the device. See the administration help center for more information.
- Google Vault – take actions for Gogle Vault
- Create Google Vault export
- Remove user from hold
- Set Google Vault hold
- Actions – actions for workflow
- Approve workflow – extra layer of security (second verification enforcement); it will work even if pre-approval is already configured for the workflow requester.
- Broadcast flow event – an action that allows workflows connection
- Delay workflow – delay actions for the workflow to run the way an Admin arranges it timewise; this option is to be used when the jobs set don’t have to or shouldn’t run at the same time
- Send webhook call
- Chats – actions for Google Chat Spaces
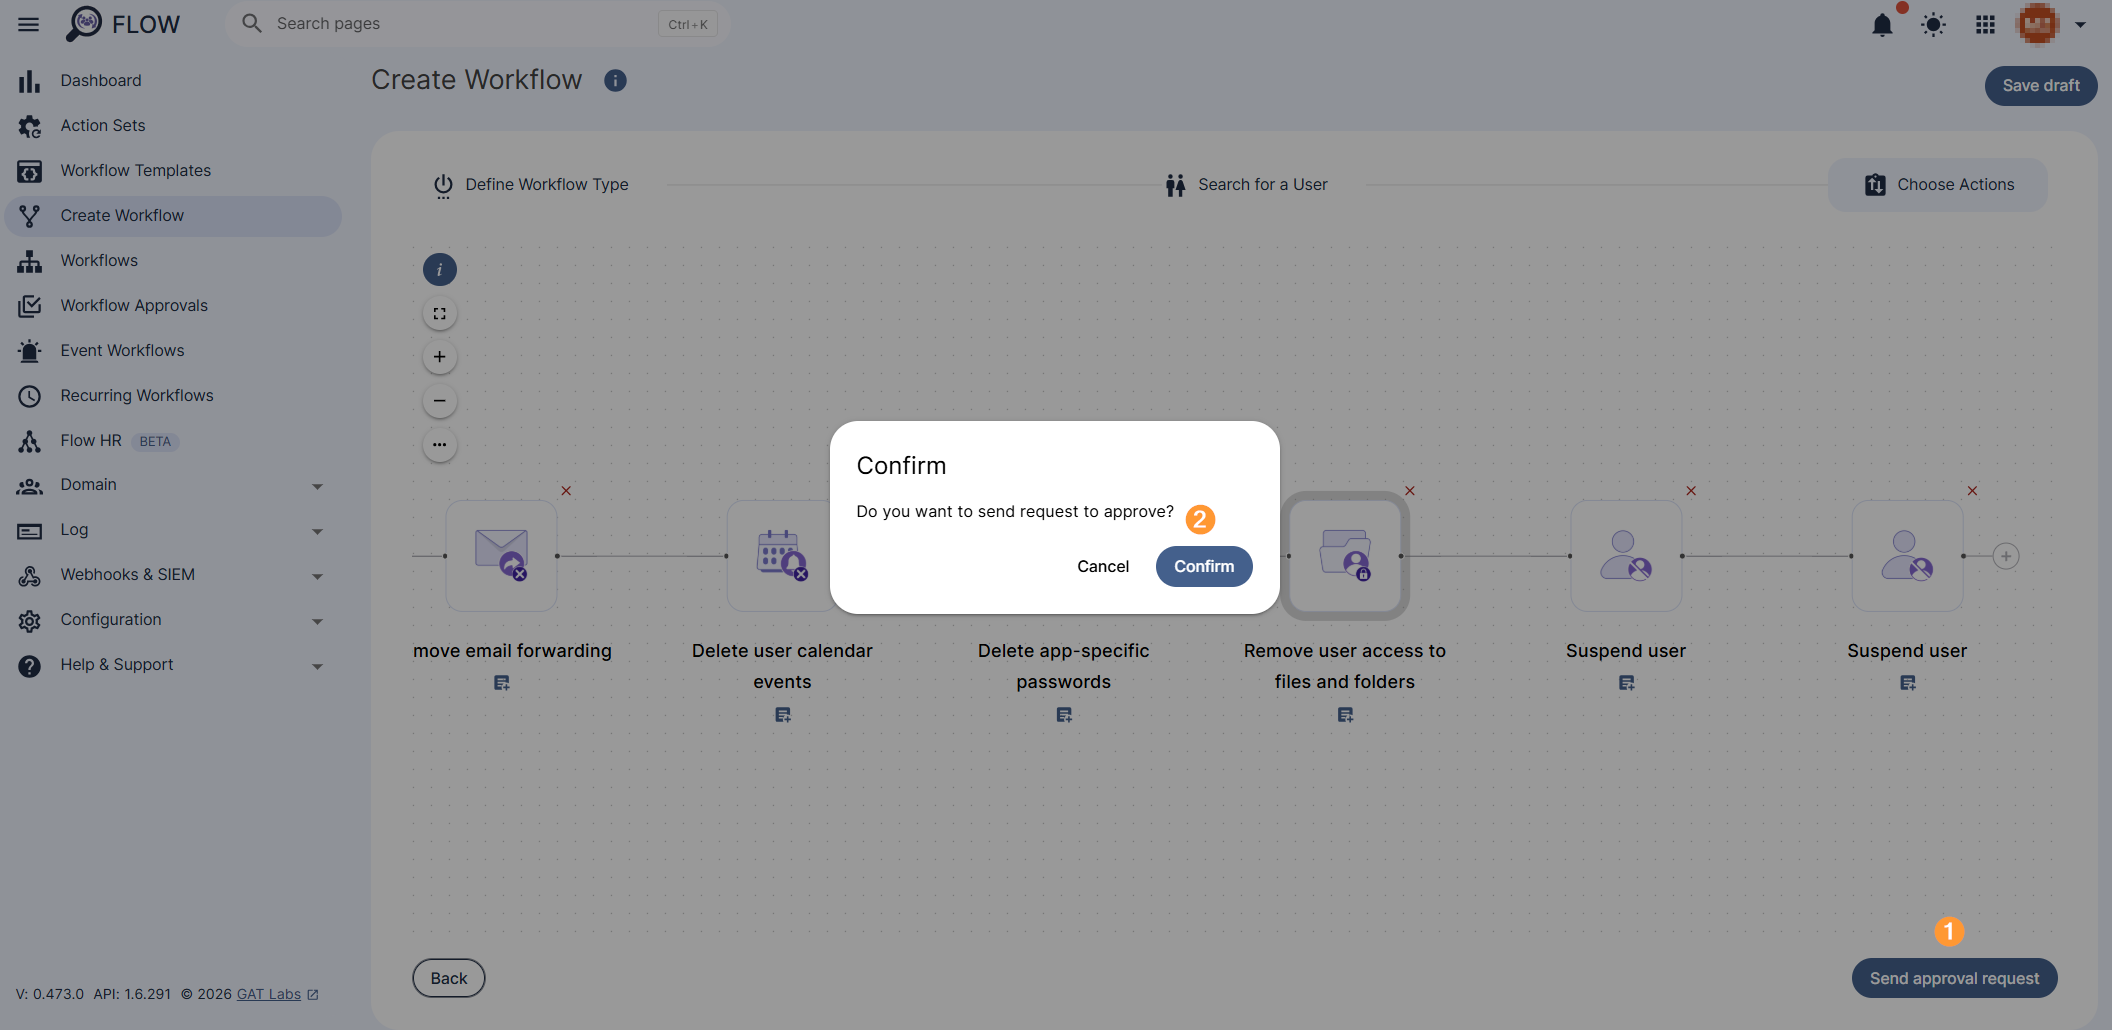
When the actions are selected and filled in, click on Send approval request (1). A pop-up window will be displayed where it can be confirmed to proceed with the request (2).
Note: If you have pre-approval enabled you can proceed without an approval email. More details can be found here
Once confirmed, the request will be sent to the Security Officer for approval.
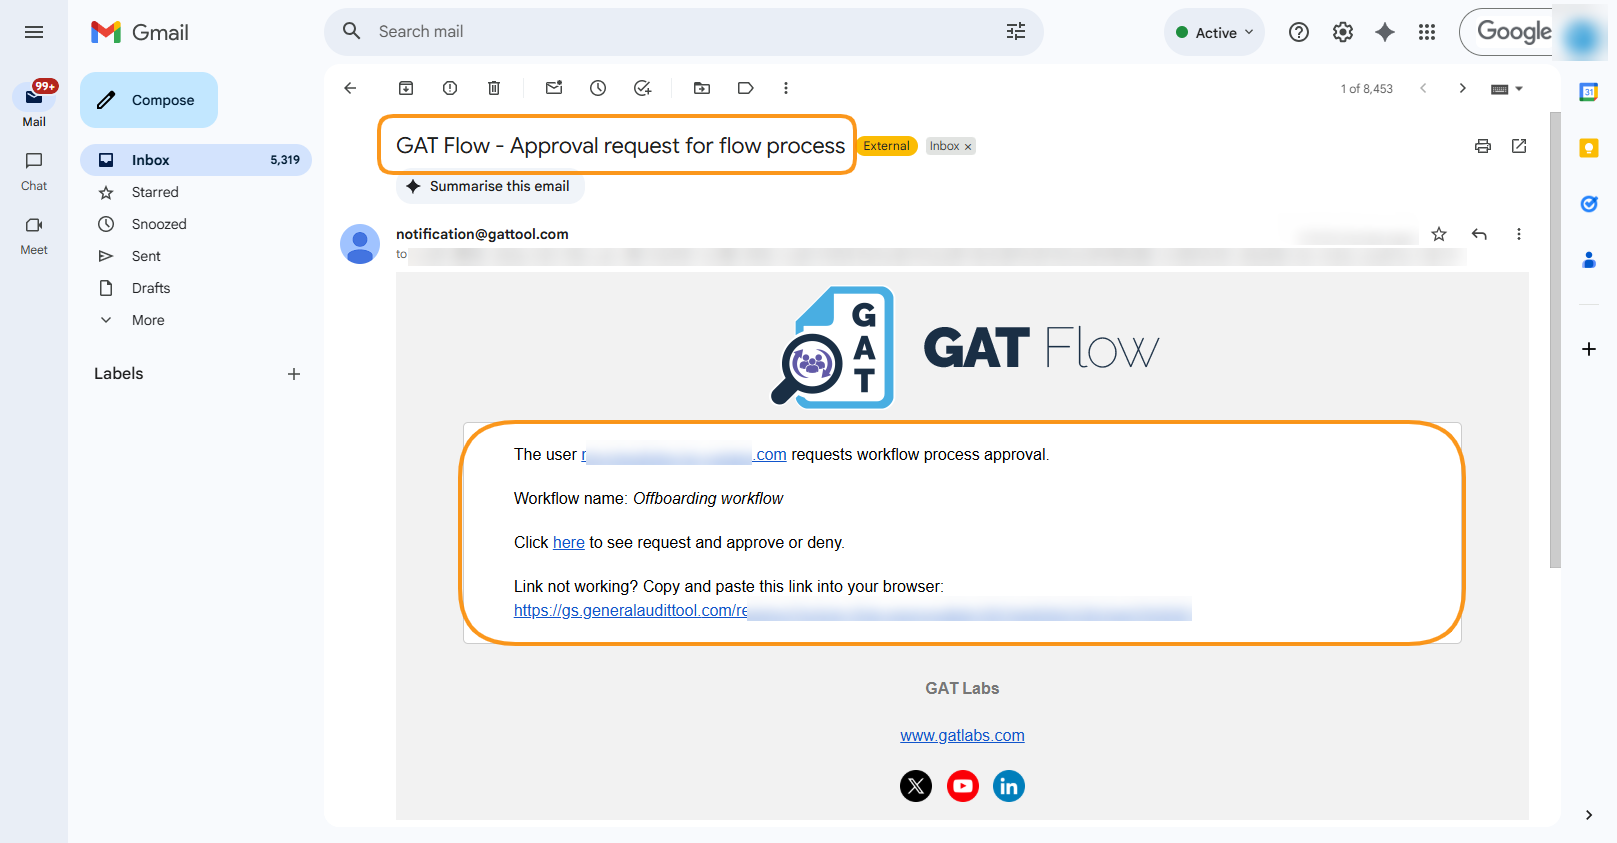
The Security Officer can review and approve or deny the workflow.
Result #
From the menu on the left click the Workflows tab to see all the details.
Workflow details
The Status of the request can be as follows:
- Requested – send to Security officer for approval
- Approved – the Security Officer has approved the request
- Job status – will show the status of the current workflow job
- Scheduled – when is set to run
- Done – when the workflow has been completed
- Partially done – when completed partially
- Detail icon – the icon on the right side will show all details for the Flow request
- Save as action set – save the Workflow as an action set for easy later use
- Edit – edit the workflow and apply changes
Workflow – view the state of the workflow and the details of the actual job that has happened.
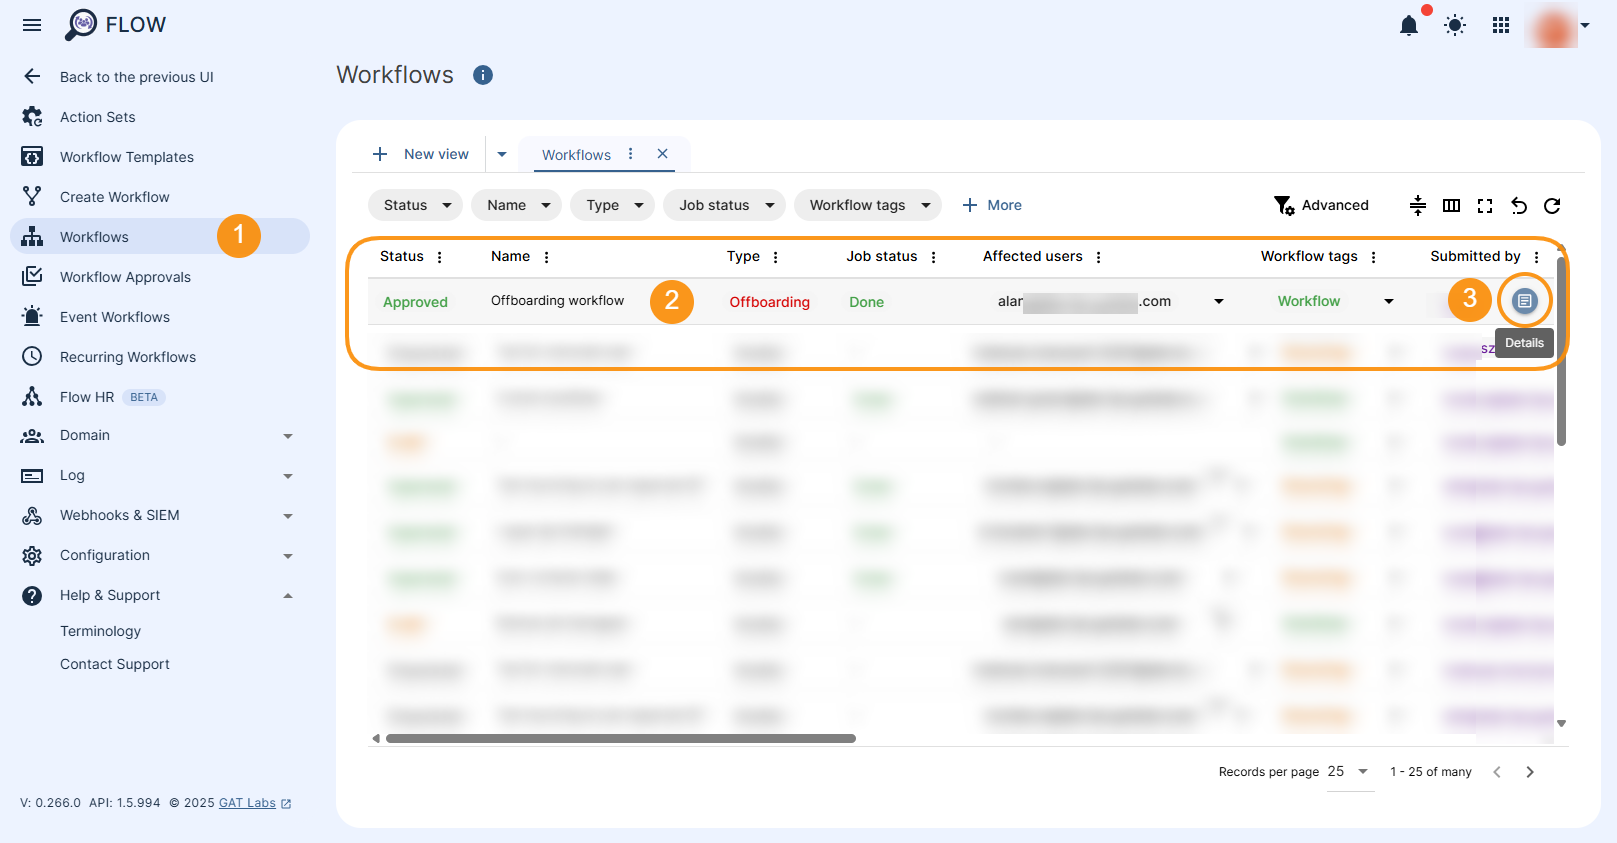
When selecting the Details icon the new window with more information about the workflow is displayed.
The Results examples are showing below:
- Delete user profile picture
- Remove user role
- Remove email delegation
- Remove user – resulting from Offboarded process (Offboarding type of workflow)
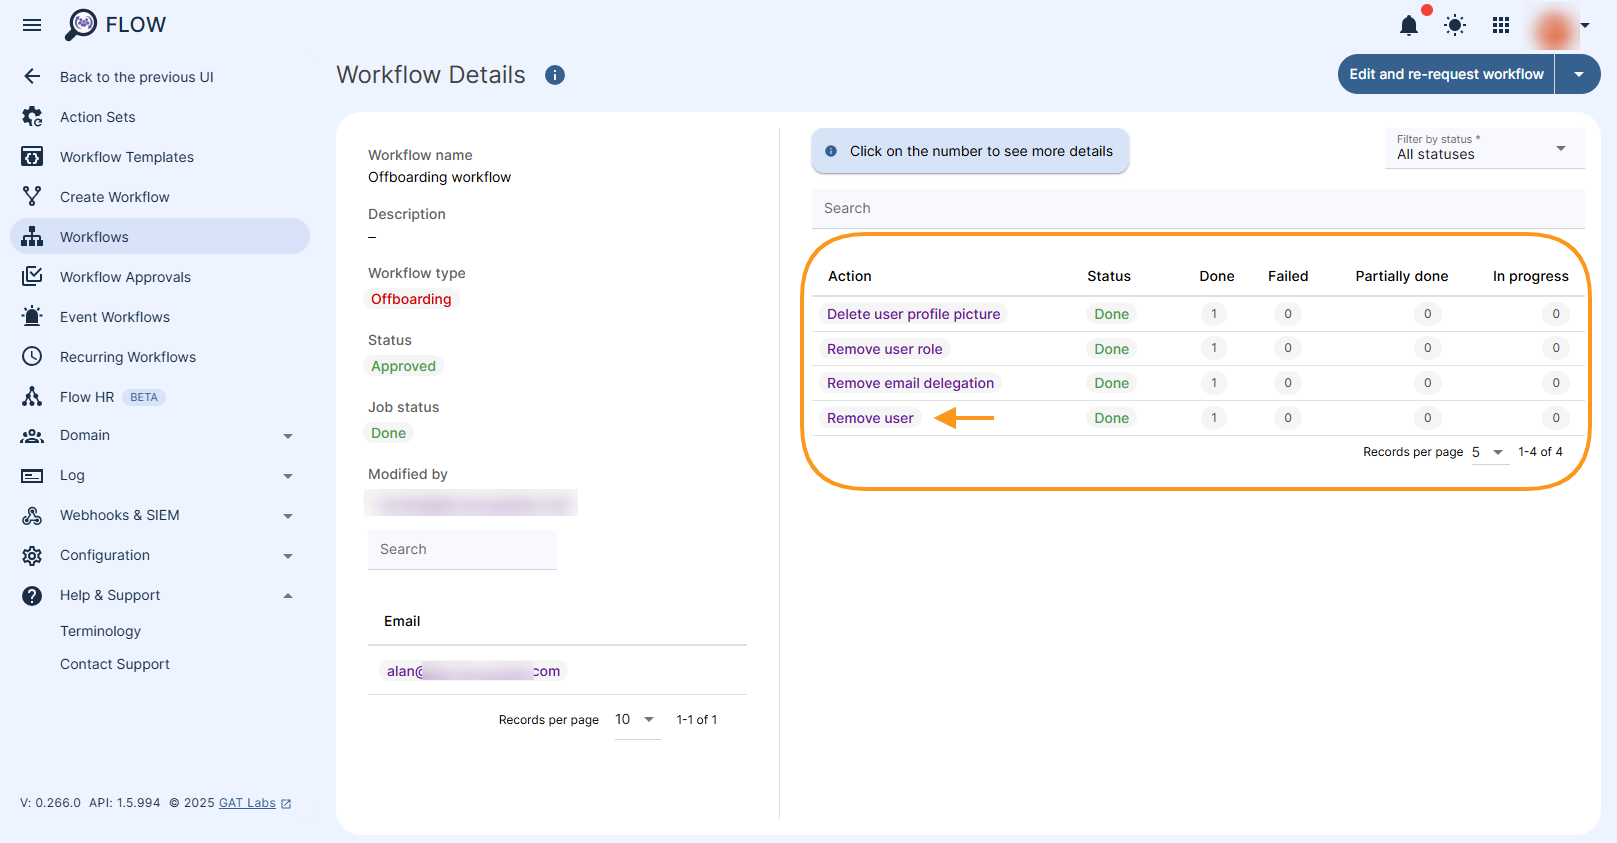
IMPORTANT: Removed user can be restored from the Google Admin console within 20 days