

Introduction #
GAT Shield provides an extensive way to alert admins and delegated auditors to certain behaviors in their domain and web activity.
By deploying the extension to the web browser, GAT Shield can monitor the browser, report back, and take action on any alerts configured by the Super Admin of the domain.
Alert Rules #
There are a number of different types of alerts available. Below is a list of all Alert rules that can be created in GAT Shield.
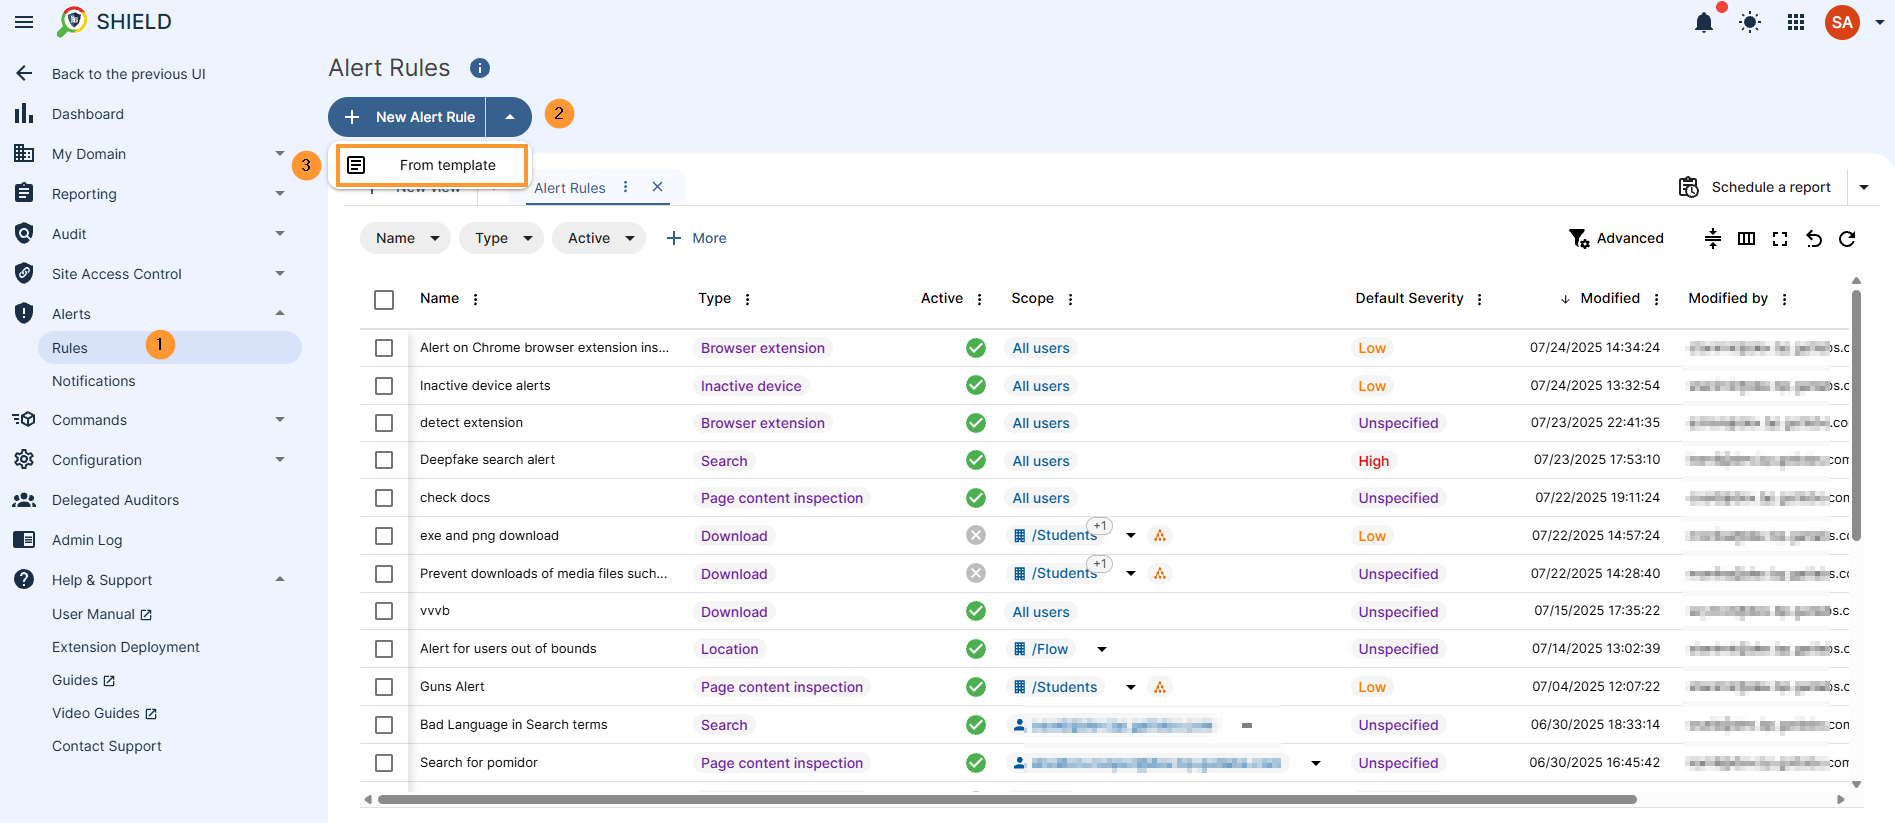
All the different alerts that can be set up by accessing it in GAT Shield > Alerts > Rules
Different types of alerts can be set up.
- Device
- Device user/owner mismatch
- Download
- Browser extension
- Inactive device
- Page content inspection
- IP address
- Location
- Search
- Upload
- Visit
All the alerts can be created in Alerts > Rules > + New Alert Rule
Click on the New Alert Rule.
A pop-up window will be displayed.
Under Type – select any of the drop-down menu of options for different alerts
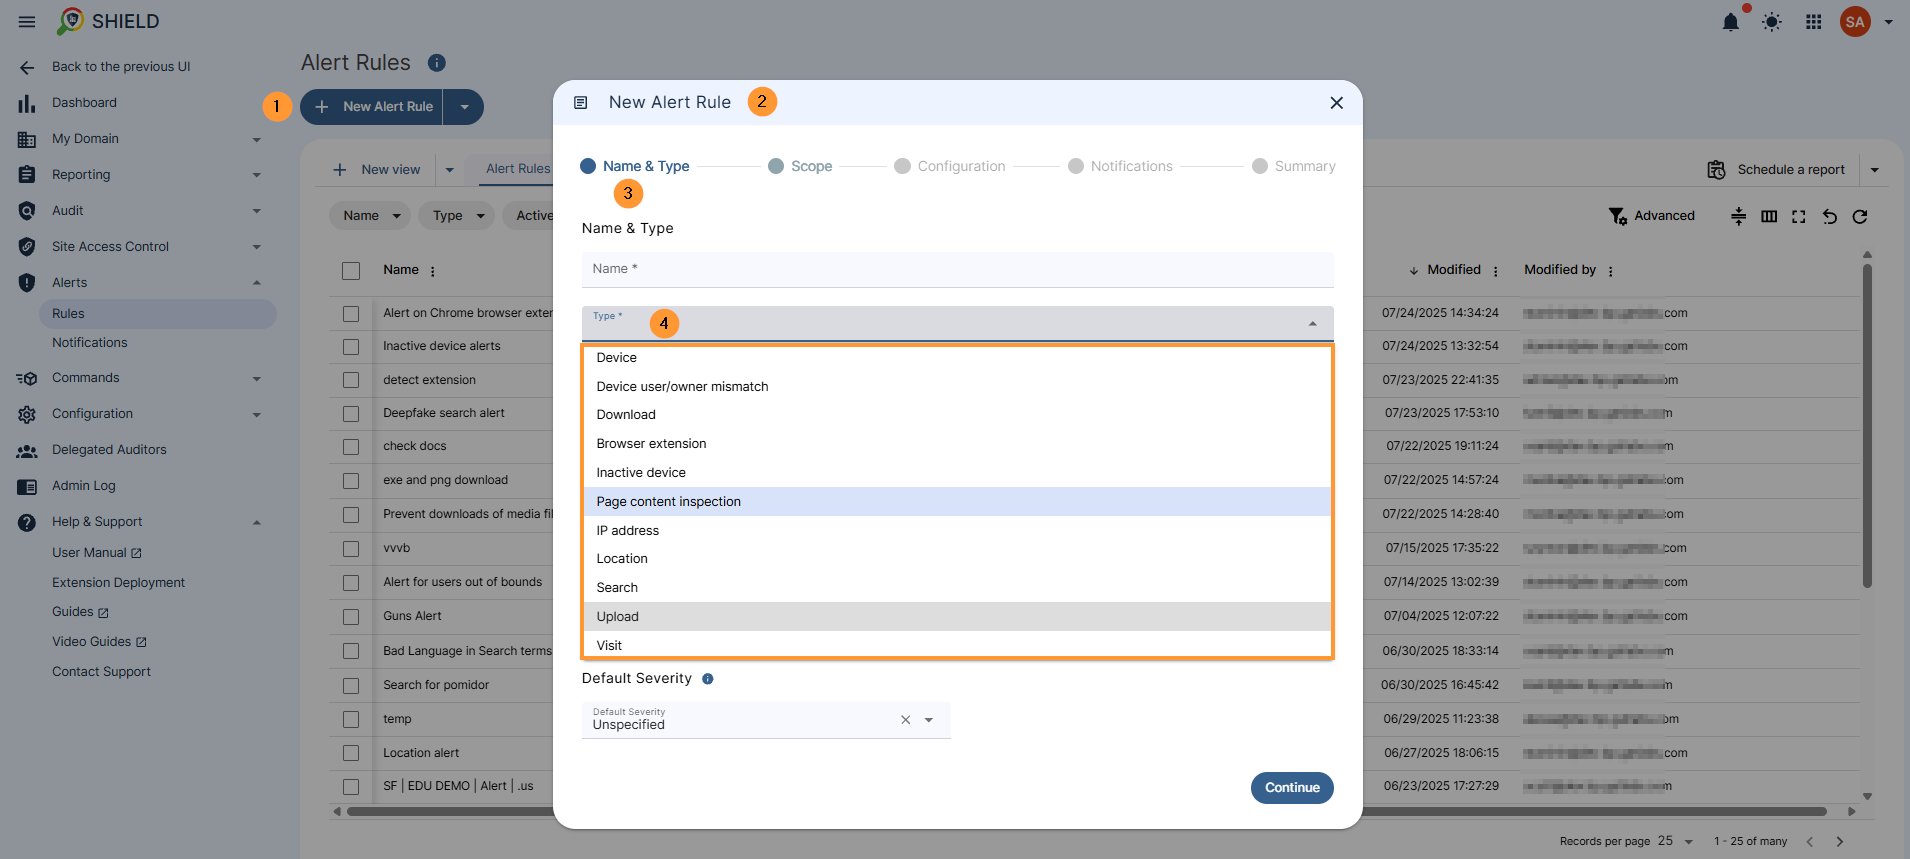
Additionally, you can add from a template.
Most of the options are the same for every alert rule, though some have a few minor differences, depending on the Type of rule you select.
Alert Rule Types #
This is the list of Alerts that can be set up in GAT Shield.
- Device
- Device user/owner mismatch
- Download
- Browser extension
- Inactive device
- Page content inspection
- IP address
- Location
- Search
- Upload
- Visit
Download #
This alert allows the Admin to get alerted about specific file download activity, with the option to cancel the download if desired.
To set up the rule, configure the options below. The alert rule wizard will guide you through the process step by step. Here’s what all the options mean. If you get stuck, you can click the (i) info button for more information on a specific heading.
The first modal in the wizard is the same for all alert rules.
Here you can specify:
- Alert rule name – You can change the name of the alert rule
- Action
- Show warning – Displays a warning message to the end user who violated the rule
- Close – Displays a warning message and closes the browsing tab.
- Close without warning – Close the browser tab without a message.
- Redirect – The end user who violated the rule will be redirected to another web page of your choosing. They will also receive a pop-up notification about what happened
- Redirect without warning – The end user who violated the rule will be redirected to another web page of your choosing.
- None – The end user will not be made aware that they violate your alert rule
- Default severity – Choose ‘High’, ‘Low’, or choose not to specify; this will be shown on the alert notification and also the email if you choose to send one later
When you are finished, click Continue, and the next page of the modal will be shown.
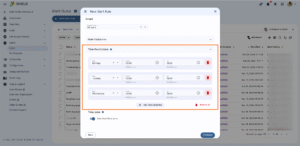
The second part of the modal is also the same for every type of alert rule. This is when you define the scope of users to be included in the alert rule.

Here you can specify:
- Scope – Account, group, or OU to run the alert on
- Rule Exclusions
- Excluded addresses – Exclude certain accounts from having the rule on them
- Excluded websites, URLs – Exclude certain sites from the rule.
- Active only on selected websites, URLs– Alert only when a user breaks the rule on some of the websites listed.
- Time Restrictions – Run the rule during specific days and times only
- Time Zone slider – If enabled, the local user’s timezone will be used for checking if they are within the time restriction. Otherwise, the timezone from the General configuration will be used.
Now, select which users from your domain the rule should run on, and exclude any user you would prefer that the rule not run on.
By default, the rule will be active while the users within the scope are on any website on the internet.
You have the option to decide if this rule should run on a particular set of sites only, or if you would like to exclude the rule from triggering while the users are on a particular site. You can come back to this section and amend the site exclusions later, if you find your rule is triggering on a site that you feel is not worthy of this alert.
You also have the option to run this rule within certain times of day only. Configure the time restrictions if you feel it is necessary. By default, if you choose not to set the time restrictions, the rule will run all the time.
When you are finished, click ‘Continue’ in the bottom right corner of the modal.
The configuration section will be different depending on he type of alert rule you selected.
First, select one of the ‘Mode’ options; the options available to change will differ, depending on your choice.
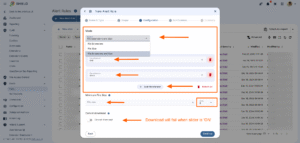
Here you can specify:
- Mode – Choose to have the alert trigger when
- A particular type of file is downloaded
- A file is over a particular size
- A file is both of a certain type and is greater than the defined size
- File extension – The type of file that you want to be alerted on by giving the ‘dot’ extension name – exe, doc, docx, html, PDF, XLS, XLSX etc ). Just enter the file extension without the dot beforehand
- File size – Minimum sizes of the file download, before the alert will trigger – you select your own unit type
- Cancel/delete download – Decide if, in addition to the alert being triggered, if the download itself should be cancelled for the user.
First, select one of the ‘Mode’ options; the options to select will differ, depending on your choice.
If your mode includes ‘File extensions’, you can add as many different file extensions as you wish; just click the ‘Add extensions’ button to add more. Don’t put them all in one field, or it won’t work. You can use the trash can icon to remove a file extension if you make a mistake and need to delete a field.
If your mode includes File Size, you will see the option to select the minimum file size that is downloaded is, before the alert triggers. You may choose what units you write the number in from the dropdown menu.
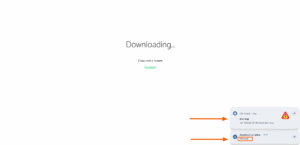
If the cancel download option is selected, the file will be removed automatically by GAT Shield, and the user will never have the file stored locally on their machine.
An example of the alert rule triggering, from the end user’s perspective, with the notification set to be shown to the user, and the cancel download slider enabled, is shown below.
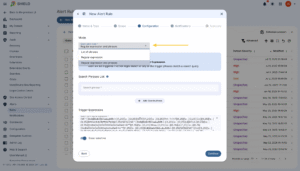
Page Content Inspection #
The Page Content Inspection alert notifies the admin if a user visits a page that contains certain words or phrases. The admin can also use a regular expression (regex) to detect a string of a certain format, so this alert can also be used to detect Personally Identifiable Information on a webpage such as a Social Security Number, a medical record, a credit card number, or anything else you can think of, where the string has a specific format (ask the GAT Team for help if you have a specific type of format that you want to match.
Here you can specify:
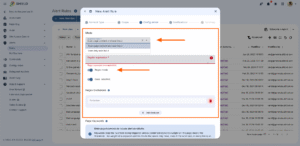
Mode
- Scan page content and user input – The alert triggers when the target word/phrase/string simply appears on a webpage that the user visits
- Scan only user input – A less aggressive mode, where the alert will only trigger when the target word/phrase/string appears on a page, and the user is also typing something on that same page.
Trigger Expression
Here you can decide on what the target word/phrase/string should be; you can use the ‘Add: New phrase’ button to include another alternative word/phrase/string that can also trigger this rule. You may continue to click the ‘Add: New phrase’ option to add as many as you like. There is no limit to the number of phrases you can add.
Regex mode
The regex mode slider changes the trigger phrase field to a regular expression (regex) field. You can learn more about the regular expressions here. If you used an alert rule template, you may not see the regex mode slider, as it is invisible while a regular expression is entered.
Case Sensitive
You can use the case-sensitive slider to make the regex pattern only trigger when the exact case is matched.
Regex Exclusions
You can stop the alert from triggering if there are words on the page that would make the regex less worthy of an alert. Consider adding some exclusions when you feel that your alert is triggering in the wrong context. You can add as many exclusion words as you like.
Page Keywords
You can use the Page Keywords section to reduce the trigger sensitivity of your alert. Page Keywords stop the rule from being triggered each time the trigger phrase is on the page the unless the weight or score of the defined keywords combined are on the page and that threshold is met the threshold. When Page Keywords are added, the alert will not trigger when the target word/phrase/string simply appears on a webpage; it will also need the keywords threshold score to trigger before it is met.
Visit #
This alert allows admins/auditors to trigger an alert on any websites visited that are configured in the alert rule.
To set up the rule, configure the options below,
- Alert rule name – Alert rule name.
- Active – Toggle to activate/deactivate rule.
- Check page URL proximity – Toggle to activate a trigger when any site visited is not matched with the site list. (for authenticity)
- Page URL regex -enter page URLs to trigger in a regex format.
- Report site name – Toggle to send the site name in the trigger notification.
- Time restriction – If enabled, the local user’s timezone will be used for checking. Otherwise, the timezone from General Configuration will be used.
- Notification interval – Time interval in minutes after which the notification about subsequent rule violations by the user will be sent. If empty, the default value will be used.
- Scope – Users’ email or Org. unit to be monitored.
- Scope exclusions – Users’ email or Org. unit to be excluded from the rule.
- End-user action,
- Display warning message.
- Display a warning message and close the browsing tab.
- Display warning message and redirect.
- Close the browser tab without a message.
- Redirect without a message.
- None.
- warning message – warning message to display
- Alert recipients – Recipients for the alert in place. This can be a user or group email.
- Screen capture – Screenshot of the screen where the alert triggered.
- Webcam capture – the capture of the webcam on the device (access must be pre-configured in the admin console).
Search #
This alert allows admins/auditors to trigger an alert on any search words input on any webpage.
To set up the rule, configure the options below,
- Alert rule name – Alert rule name.
- Active – Toggle to activate/deactivate rule.
- Search term – Enter search words to trigger.
- Search term regex -enter search words to trigger in a regex format.
- Distinct uppercase and lowercase letters – toggle to activate.
- Report site name – Toggle to send the site name in the trigger notification.
- Time restriction – If enabled, the local user’s timezone will be used for checking. Otherwise, the timezone from General Configuration will be used.
- Notification interval – Time interval in minutes after which the notification about subsequent rule violations by the user will be sent. If empty, the default value will be used.
- Monitor on the following sites only
- Site exclusions -Sites to be excluded from the rule.
- Scope – Users’ email or Org. unit to be monitored.
- Scope exclusions – Users’ email or Org. unit to be excluded from the rule.
- End-user action,
- Display warning message.
- Display a warning message and close the browsing tab.
- Display warning message and redirect.
- Close the browser tab without a message.
- Redirect without a message.
- None.
- Warning message – warning message to display
- Alert recipients – Recipients for the alert in place. This can be a user or group email.
- Screen capture – Screenshot of the screen where the alert triggered.
- Webcam capture – the capture of the webcam on the device (access must be pre-configured in the Admin console).
Upload #
Device #
This alert allows admins/auditors to receive an alert if a device appears to be active again, particularly useful for missing devices.
To set up the rule, configure the options below,
- Alert rule name – Alert rule name.
- Active – Toggle to activate/deactivate rule.
- User OR device – Users or devices to cover with this rule.
- Notification interval – Time interval in minutes after which the notification about subsequent rule violations by the user will be sent. If empty, the default value will be used.
- End-user action,
- Display warning message.
- Display a warning message and close the browsing tab.
- Display warning message and redirect.
- Close the browser tab without a message.
- Redirect without a message.
- None.
- Warning message – warning message to display
- Alert recipients – Recipients for the alert are in place. This can be a user or group email.
- Screen capture – Screenshot of the screen where the alert triggered.
- Webcam capture – The capture of the webcam on the device. (access must be preconfigured in the admin console).
Location #
This alert allows Google Workspace Admins to trigger an alert if users are outside a specified location.
To set up the rule, configure the options below:
- Alert rule name – Alert rule name.
- Active – Toggle to activate/deactivate rule.
- Location Bounds – select an area on the map that will define the non-triggerable location.
- Time restriction – If enabled, the local user’s timezone will be used for checking. Otherwise, the timezone from General Configuration will be used.
- Notification interval – Time interval in minutes after which the notification about subsequent rule violations by the user will be sent. If empty, the default value will be used.
- Scope – Users’ email or Org. unit to be monitored.
- Scope exclusions – Users’ email or Org. unit to be excluded from the rule.
- End-user action,
- Display warning message.
- Display a warning message and close the browsing tab.
- Display warning message and redirect.
- Close the browser tab without a message.
- Redirect without a message.
- None.
- Warning message – warning message to display
- Alert recipients – Recipients for the alert are in place. This can be a user or group email.
- Screen capture – Screenshot of the screen where the alert triggered.
- Webcam capture – the capture of the webcam on the device. (access must be preconfigured in the admin console).
IP Address #
This alert allows Admins to trigger an alert if users either match the specified IP addresses or do not match.
To set up the rule, configure the options below:
- Alert rule name – Alert rule name.
- Active – Toggle to activate/deactivate rule.
- IP Addresses – IP addresses to be considered in the rule.
- Mode – Toggle for a match or no-match mode.
- Time restriction – If enabled, the local user’s timezone will be used for checking. Otherwise, the timezone from General Configuration will be used.
- Notification interval – Time interval in minutes after which the notification about subsequent rule violations by the user will be sent. If empty, the default value will be used.
- Scope – Users’ email or Org. unit to be monitored.
- Scope exclusions – Users’ email or Org. unit to be excluded from the rule.
- End-user action,
- Display a warning message.
- Display a warning message and close the browsing tab.
- Display warning message and redirect.
- Close the browser tab without a message.
- Redirect without a message.
- None.
- Warning message – warning message to display
- Alert recipients – Recipients for the alert are in place. This can be a user or group email.
- Screen capture – Screenshot of the screen where the alert triggered.
- Webcam capture – the capture of the webcam on the device. (access must be preconfigured in the admin console).
Device user/owner mismatch #
This alert rule allows Admins to trigger an alert whenever someone who is not the designated user of the device is using the device.
This feature uses a variety of information gathered from Shield to determine if the identity of the denoted user and the user using the device at hand match (particularly Chromebooks assigned to a certain user).
- Notification interval – Time interval in minutes after which the notification about subsequent rule violations by the user will be sent. If empty, the default value will be used.
- Site exclusions – Exclude certain sites from the rule.
- Scope exclusions – Users’ email or Org. unit to be excluded from the rule.
- Warning message – warning message to display.
- Alert recipients – Recipients for the alert are in place.
- Screen capture – Screenshot of the screen where the alert triggered.
- Webcam capture – the capture of the webcam on the device (access must be pre-configured in the admin console).
Browser extension #
This alert rule allows Admins to be notified and receive a notification whenever someone installs a new Browser Extension.
Follow and fill in the fields that need to be filled, and create the rule as you wish.


