

What is Shield+ #
Shield+ is a Chrome extension paired with the SaaS service. Built as an enhanced evolution of GAT Shield, Shield+ acts as a frontline defense and monitoring hub directly within the user’s browser. Powered by sophisticated Machine Learning (ML) models and continuous identity verification, it bridges the gap between traditional endpoint security and real-time user behavior analytics.
How it Works #
Once deployed across your domain via Google Workspace or Chrome Enterprise management, Shield+ runs seamlessly on the user’s Chrome browser. It works by continuously evaluating security telemetry without disrupting the user experience:
- Continuous Identity Verification (ActiveID): It analyzes the behavioral timing characteristics of a user’s typing patterns (never the actual words) to ensure the person behind the keyboard is the legitimate account owner.
- Proactive Policy Enforcement: It monitors device performance, blocks phishing attempts via localized browser banners, and regulates copy/paste behavior based on organizational compliance rules.
- Real-Time Visibility: It feeds live browser data, alerts, and system health metrics directly back to the admin dashboard, allowing for instant incident response and session management.
Dashboard #
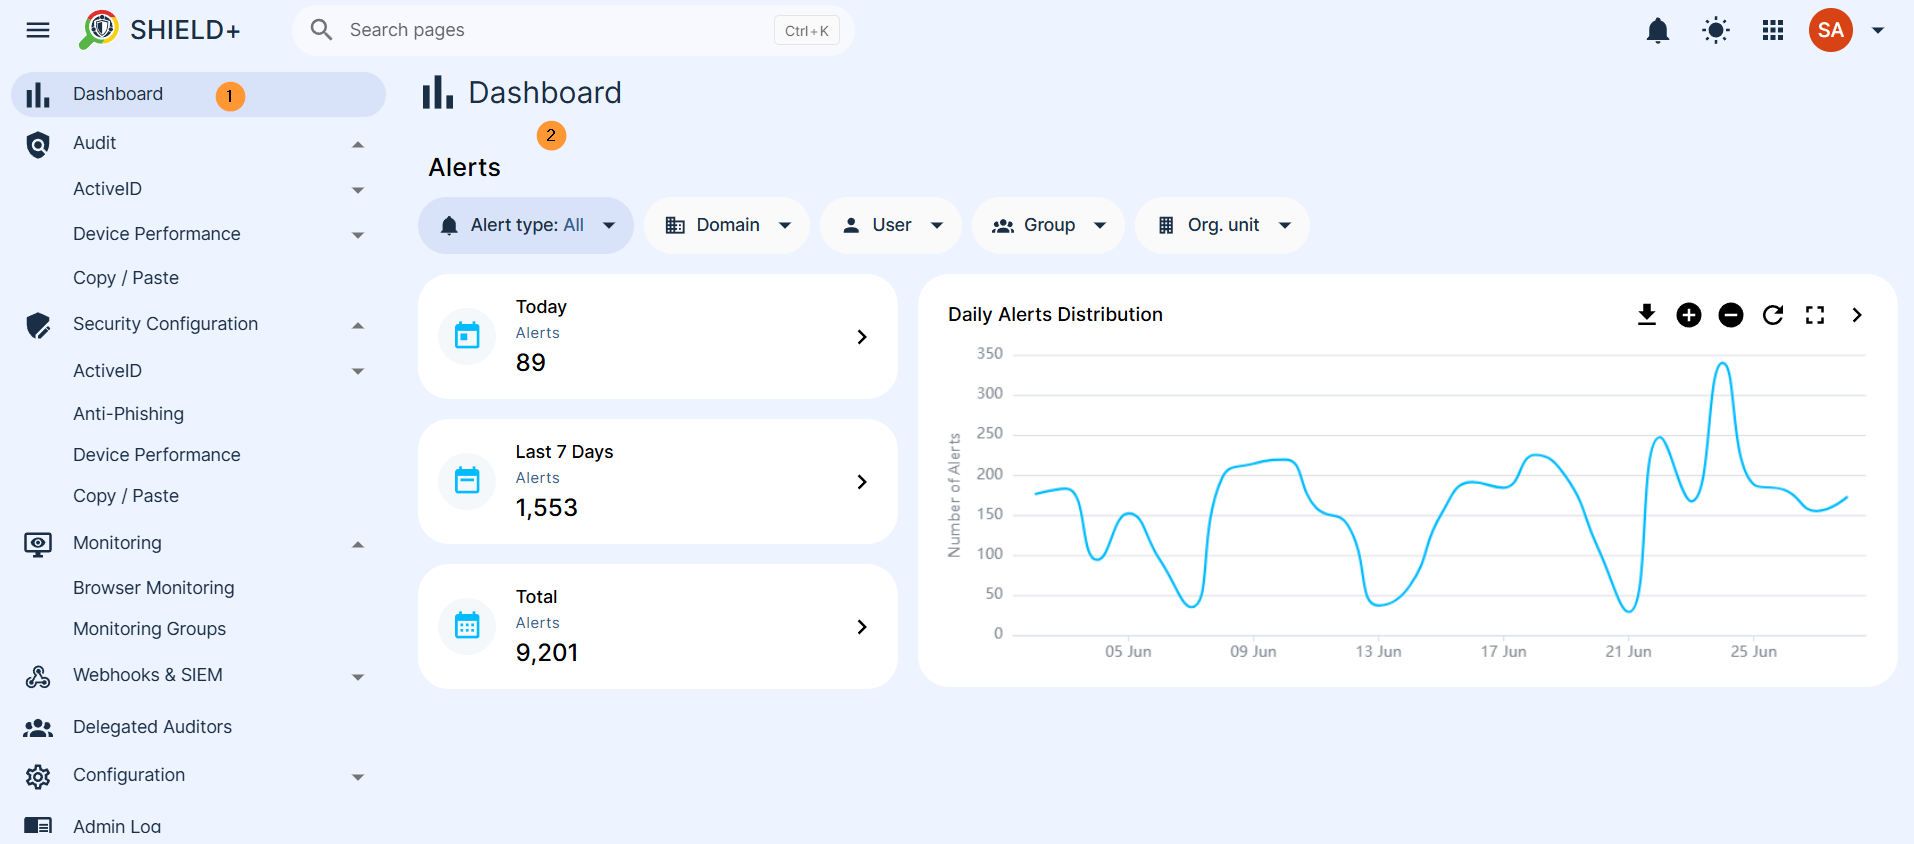
Navigate to Shield+ and click on Dashboard (the default view). It presents a summary of security alerts raised by the system’s Machine Learning models – the most important signal in the platform.
Time alerts – Three cards show alert counts for
- Today – alerts from today
- Last 7 Days – alerts from the last 7 days
- All Time (Total) – overall total alerts
Alert types – The alert types can be filtered for
- All – all types of alerts combined
- ActiveID/TypingID – alerts for ActiveID/TypingID only
- Inactivity Lock – Inactivity lock only
- Anti-Phishing – Anti-phishing alerts only
- Device Performance – Device performance alerts only
Scope #
The scope is used to select the users you want to view the dashboard for.
- Domain – select domain
- User – select a specific user
- Group – select a specific group
- Organization unit – select a specific org. unit
Daily Alerts Distribution #
The daily alert distribution line chart shows alert volume over the past 30 days.
Clicking any point on the chart navigates directly to the matching filtered alerts list. It can be expanded by zooming in/out as well as downloaded as PNG, JPEG, or CSV. It can also be expanded to full screen and downloaded as such
Navigate to Shield+ > Dashboard
Audit #
The Audit section is a read-only section for logs and alert tables for every detection module for ActiveID, Device performance, and Copy and Paste
The ActiveID has typing and inactivity alerts
- TypingID
- TypingID Alerts – A paginated table of every TypingID alert – events where the Machine Learning model determined, with confidence above the rule’s threshold, that the person typing is likely not the legitimate account owner. Each alert records the user, timestamp, confidence percentage, and current status.
- Severity can be updated, and alerts can be acknowledged individually or in bulk.
- Clicking an alert opens its details, which may include a screenshot, webcam capture, or the URL visited at the time, depending on the alert rule’s attachment configuration.
- TypingID Patterns – The raw typing patterns collected from users and processed by the AI models. This view lets admins monitor how actively patterns are being generated per user, which directly reflects how well each user’s identity model is trained.
- We collect 2 types of typing patterns. In this section, we present how many typing patterns were verified by our system on a daily basis.
- 1st type patterns – Full Typing Pattern – A detailed profile pattern of your typing style based on 100–150 keystrokes.
- View daily numbers – for the last 24 hrs
- View daily average – for the last 30 days
- 2nd type patterns – Key-Pair Pattern – faster profiles built from the timing of consecutive letter pairs like “TH” or “AE”)
- View daily numbers – for the last 24 hrs
- View daily average – for the last 30 days
- TypingID Alerts – A paginated table of every TypingID alert – events where the Machine Learning model determined, with confidence above the rule’s threshold, that the person typing is likely not the legitimate account owner. Each alert records the user, timestamp, confidence percentage, and current status.
- Filter by scope of users, domain, group, or org. unit.
-
- Users protected – successfully built model means that the user is being actively protected. AI model checks if the generated text matches the user’s previous typing behaviour
- Users without protection – list of users where this model is not built yet
-
Navigate to Shield+ > Aduit > ActiveID > TypingID > Alerts or Patterns

- Inactivity Lock
- Alerts are raised when an inactivity lock challenge is triggered, but the user failed to respond, responded incorrectly, or let the request time out. Each record shows the user, trigger time, and the specific failure reason (e.g., verification failed, timed out, credential not found).
- Device performance
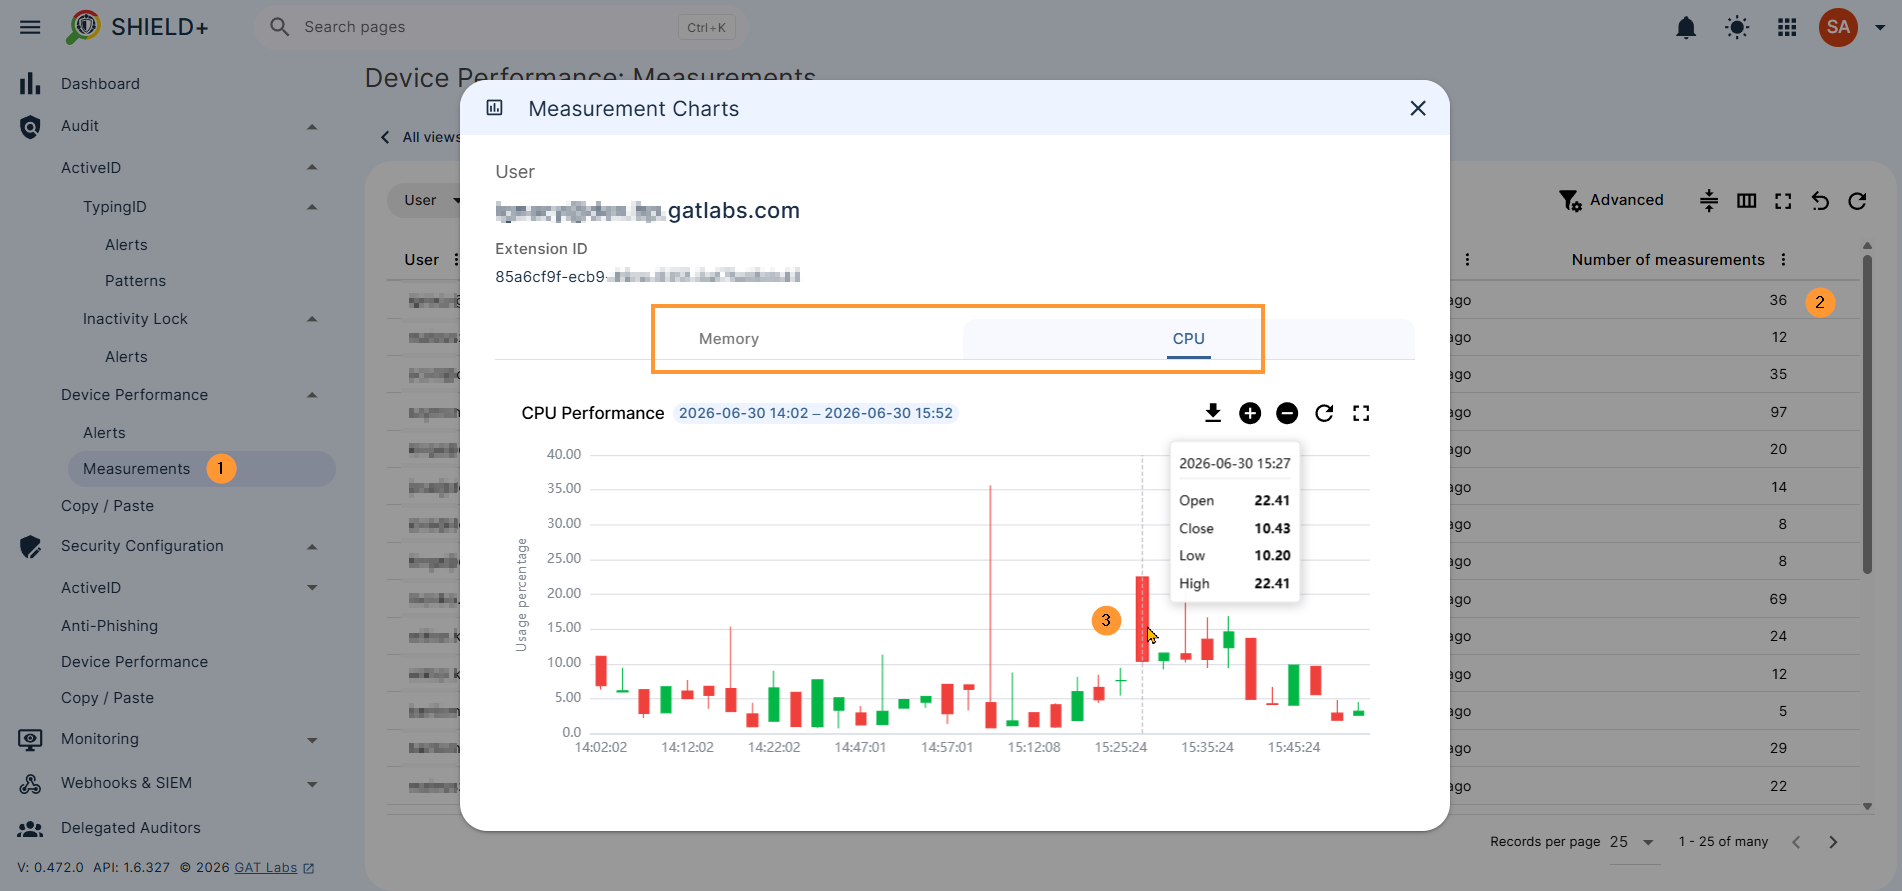
- Device performance is measured by the stats of alerts raised when a user’s device CPU or memory usage exceeded a configured threshold for a sustained period. Each alert records the affected user, the resource (CPU or Memory), the metric (Maximum or Average), and the duration.
- Alerts – Alerts are raised when a user’s device CPU or memory usage exceeds a configured threshold for a sustained period. Each alert records the affected user, the resource (CPU or Memory), the metric (Maximum or Average), and the duration.
- Measurements – Raw performance readings collected from user devices over time. Individual records can be expanded to view CPU and memory measurement charts for a detailed history of a device’s resource usage.
- Device performance is measured by the stats of alerts raised when a user’s device CPU or memory usage exceeded a configured threshold for a sustained period. Each alert records the affected user, the resource (CPU or Memory), the metric (Maximum or Average), and the duration.
Navigate to Shield+ > Audit > Device performance > Alerts or Measurements
Copy / Paste #
A log of all copy and paste events captured from users’ browsers.
Each entry shows the URL where the event occurred, the event type (Copy Allowed, Copy Blocked, Paste Allowed, Paste Blocked), and the user who triggered it.
Navigate to Shield+ > Audit > Copy/Paste
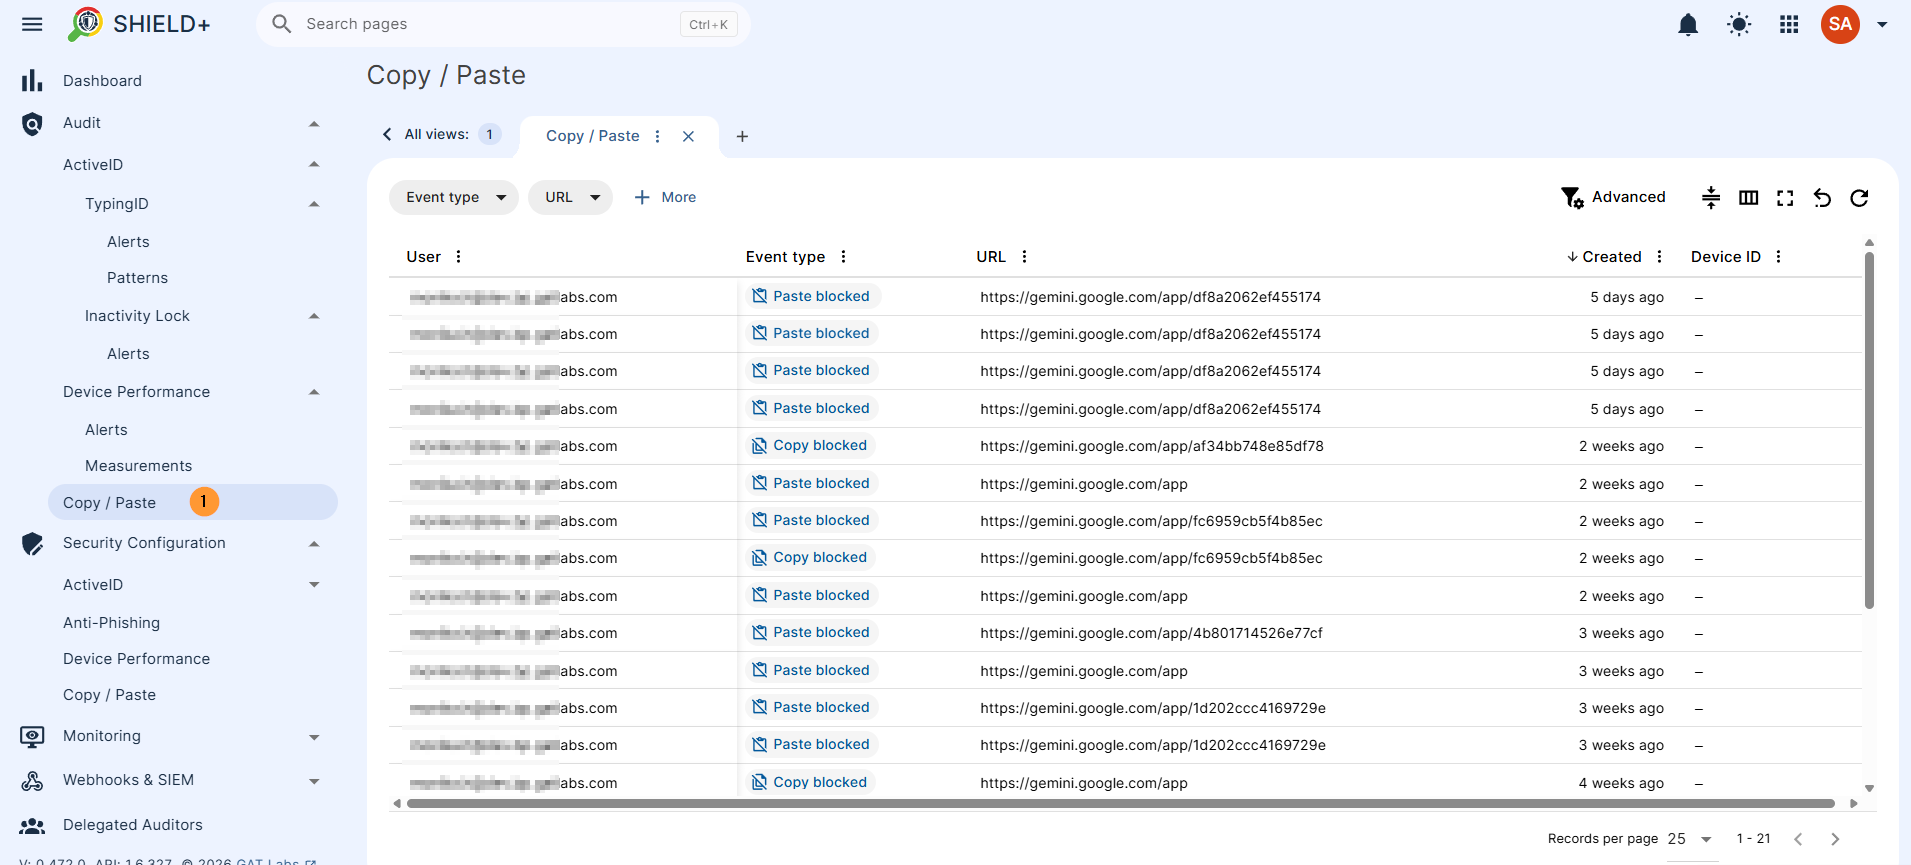
The Admins can review flagged events, inspect details, and acknowledge alerts from these views.
Security Configuration #
Where admins create and manage rules, policies, and lists that control how Shield+ detects threats and enforces actions. Changes here directly affect what gets flagged and what happens to users when a violation is detected.
ActiveID #
ActiveID is a feature of continuous typing verification. It creates a profile of a user based on typing characteristics. In order to create a profile, it will have to record the user’s typing patterns (but only timing characteristics, no actual words typed are recorded) for some time. Then it starts to verify every new pattern that comes to the app and decides whether it matches the profile or not. Based on the advanced logic of Machine Learning algorithms, it can decide whether the person who is typing is the actual user logged into their account or an imposter who gained unauthorised access to the account. In the latter case, the GAT Shield+ ActiveID feature will raise an alert, notifying the admin of the domain and (optionally) logging out the person who is typing from the account.
TypingID Rules #
Create and manage the alert rules that govern when TypingID alerts fire. Each rule defines: the scope (which users it applies to), the prediction threshold (confidence level above which an alert is triggered), alert recipients and notification settings, optional alert attachments (screenshot, webcam capture, visited URL), and the action on violation – either no session action, a Passkey challenge (screen locked until the user verifies their identity), or clearing browser cookies (effectively ending all active sessions). Rules can be activated or deactivated without deleting them.
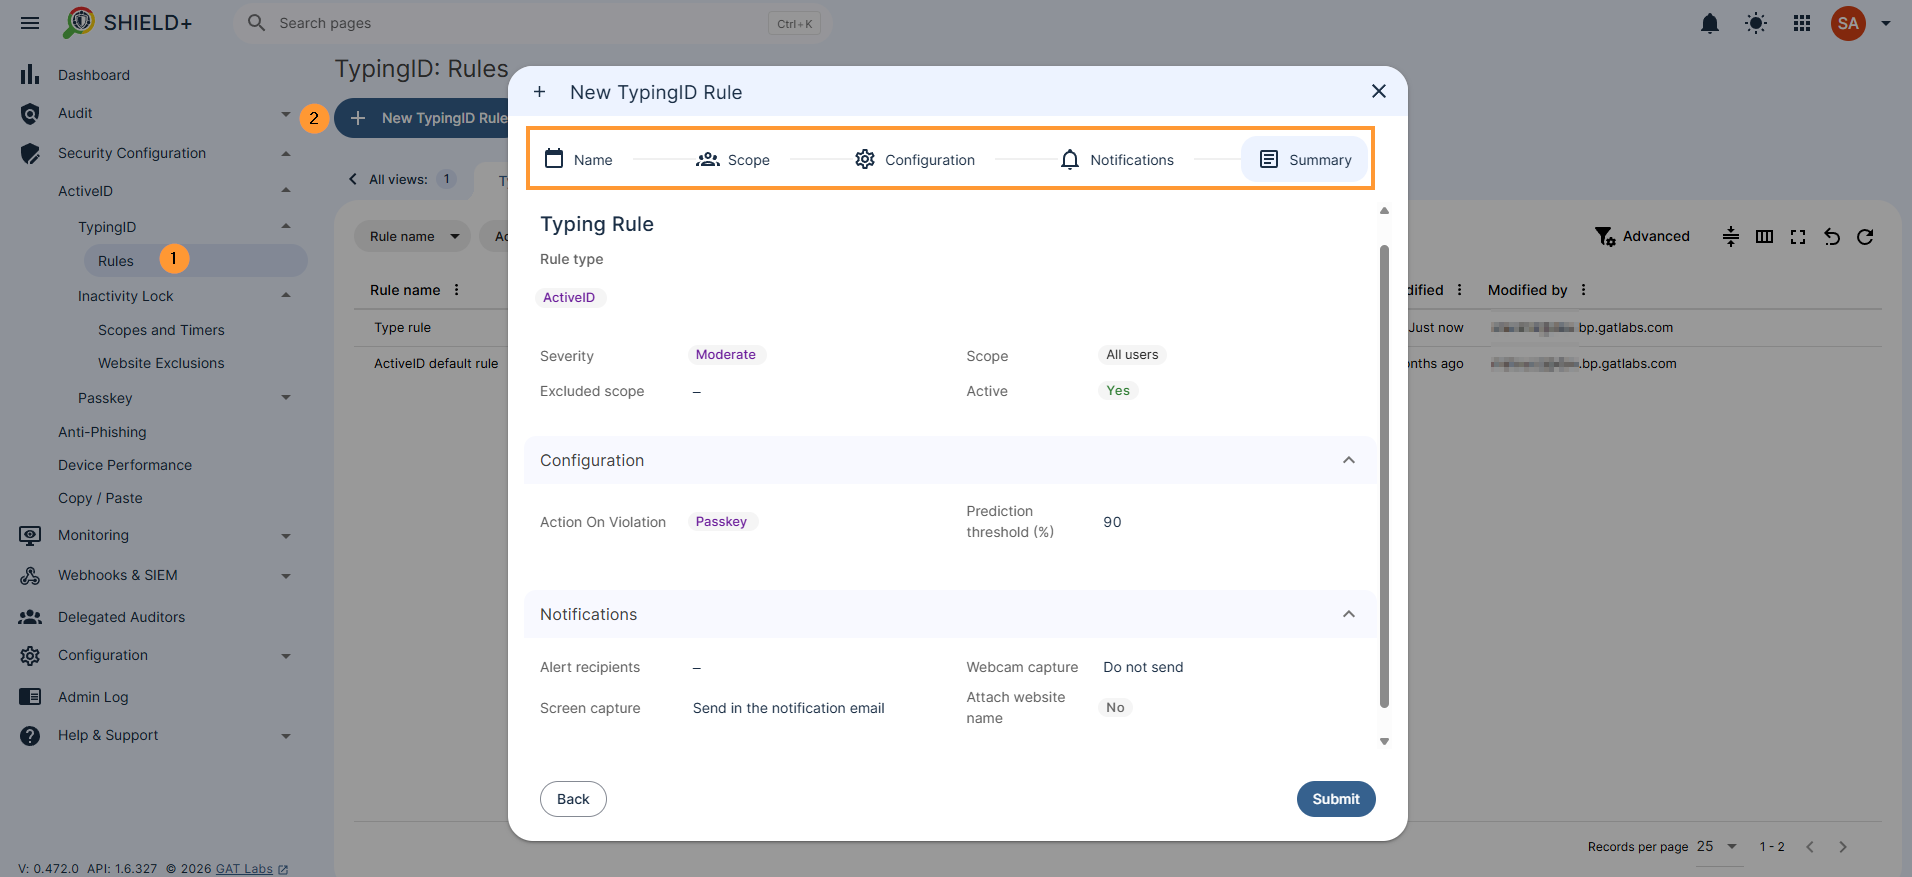
Create a typingID rule #
Navigate to Shield+ > Security configuration> ActiveID > TypingID > Rules > + New typingID rule
- Name – enter the name for the rule
- Default severity – select severity for the rule
- Unspecified
- Low
- Moderate
- High
- Critical
- Default severity – select severity for the rule
- Scope – pick and select the scope for the alert
- Pick user, group, or org. unit of users
- Excluded scope – Specify users, groups, or OUs that should be excluded from the scope of the defined rule.
- Add: excluded scope
- Excluded scope – Specify users, groups, or OUs that should be excluded from the scope of the defined rule.
- Pick user, group, or org. unit of users
- Configuration – Confidence level at which ActiveID will send an alert.
- Enter the prediction threshold (%) – add percentile
- Action on violation – Select one of the user logout actions to be executed when a role is violated:
- None – No user session action will be taken.
- Passkey -Locks the screen. Success resumes access; cancel or failure keeps the screen locked.
- Clear cookies -Clears browser cookies.
- Notifications – fill in the details
- Alert recipients – enter alert recipients
- Webhooks & SIEM – select option
- Elastic Search
- Generic receiver
- Splunk
- Webcam capture – select option
- Do not send
- Send in the notification email
- Send in the notification email and save to the rule creator’s Drive
- Send in the notification email, save to the rule creator’s Drive, and share with other alert recipients
- Screen capture – select option
- Do not send
- Send in the notification email
- Send in the notification email and save to the rule creator’s Drive
- Send in the notification email, save to the rule creator’s Drive, and share with other alert recipients
- Attach website name – enable or disable the option
- Summary – view all the options that are selected
Inactivity Lock #
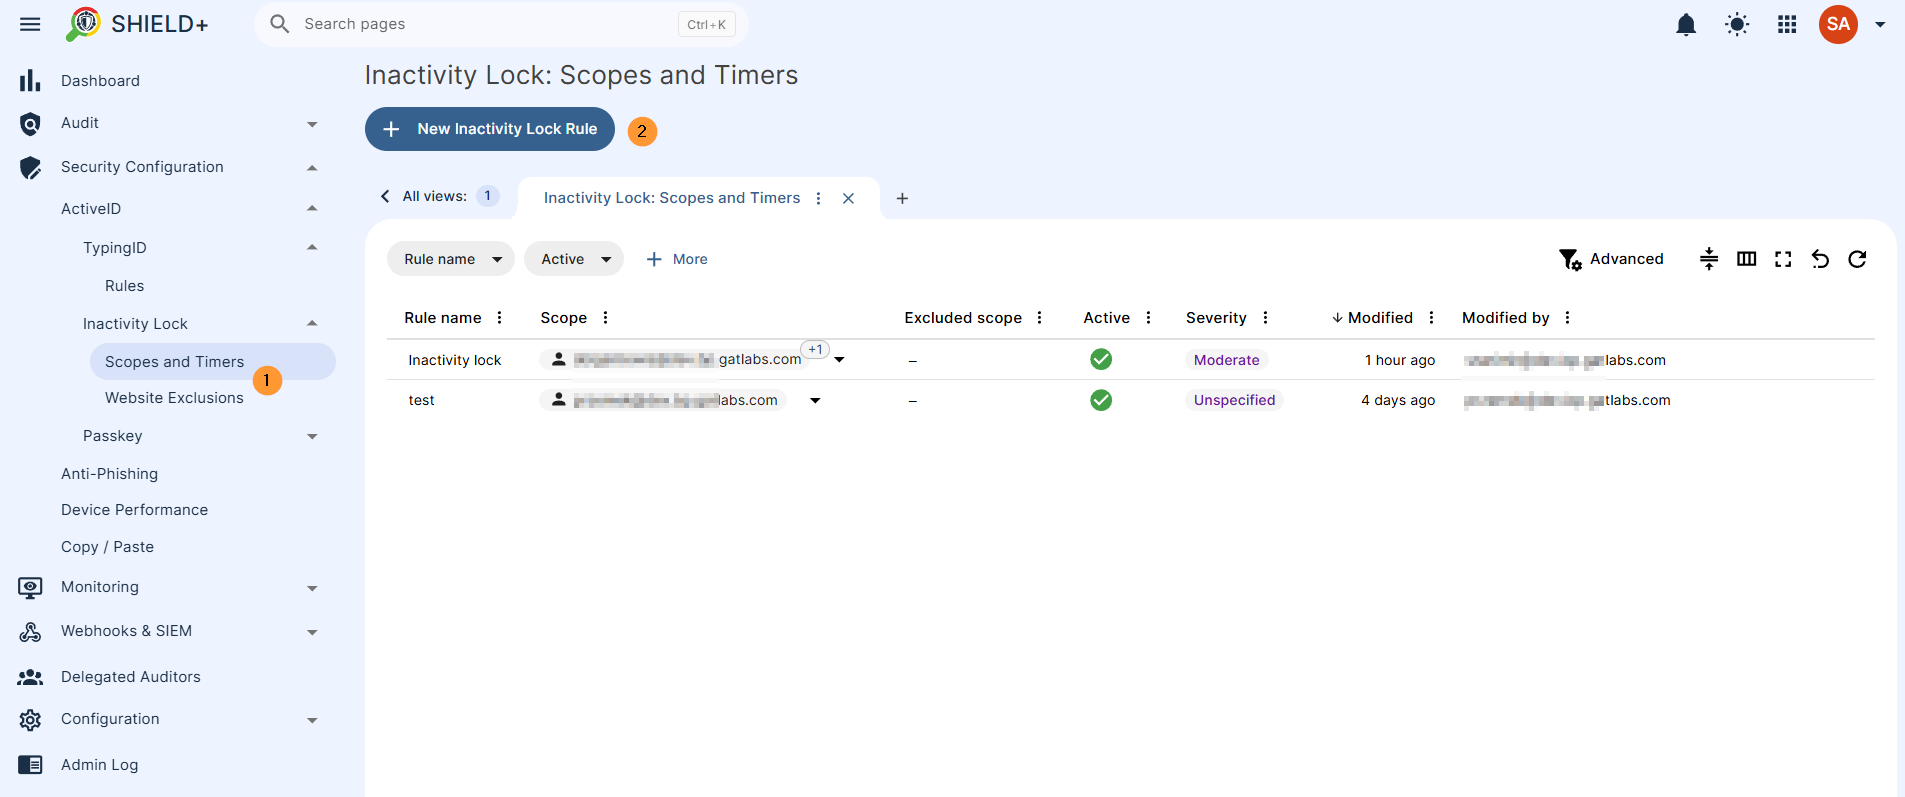
Scopes and Timers #
Configure policies that define how long a user must be inactive before an inactivity lock is applied. Each policy specifies the inactivity period in minutes and the scope of users it covers. Can be configured to trigger either a screen lock or a Passkey verification challenge.
Navigate to Shield+ > Security configuration > ActiveID > Inactivity Lock > Scopes and Timers
- Name – enter the name for the rule
- Default severity – select severity for the rule
- Unspecified
- Low
- Moderate
- High
- Critical
- Default severity – select severity for the rule
- Scope – pick and select the scope for the alert
- Pick user, group, or org. unit of users
- Excluded scope – Specify users, groups, or OUs that should be excluded from the scope of the defined rule.
- Add: excluded scope
- Excluded scope – Specify users, groups, or OUs that should be excluded from the scope of the defined rule.
- Pick user, group, or org. unit of users
- Configuration – Triggers an inactivity lock in the browser after a set period of user inactivity, such as 30 minutes away from the device. Unlike fixed schedules, it adapts to real behavior and activates only when the laptop is truly unattended.
- Defines the time period (in minutes) of screen inactivity before the inactivity lock is applied
- Notifications – fill in the details
- Alert recipients – enter alert recipients
- Webhooks & SIEM – select option
- Elastic Search
- Generic receiver
- Splunk
- Webcam capture – select option
- Do not send
- Send in the notification email
- Send in the notification email and save to the rule creator’s Drive
- Send in the notification email, save to the rule creator’s Drive, and share with other alert recipients
- Screen capture – select option
- Do not send
- Send in the notification email
- Send in the notification email and save to the rule creator’s Drive
- Send in the notification email, save to the rule creator’s Drive, and share with other alert recipients
- Attach website name – enable or disable the option
- Summary – view all the options that are selected
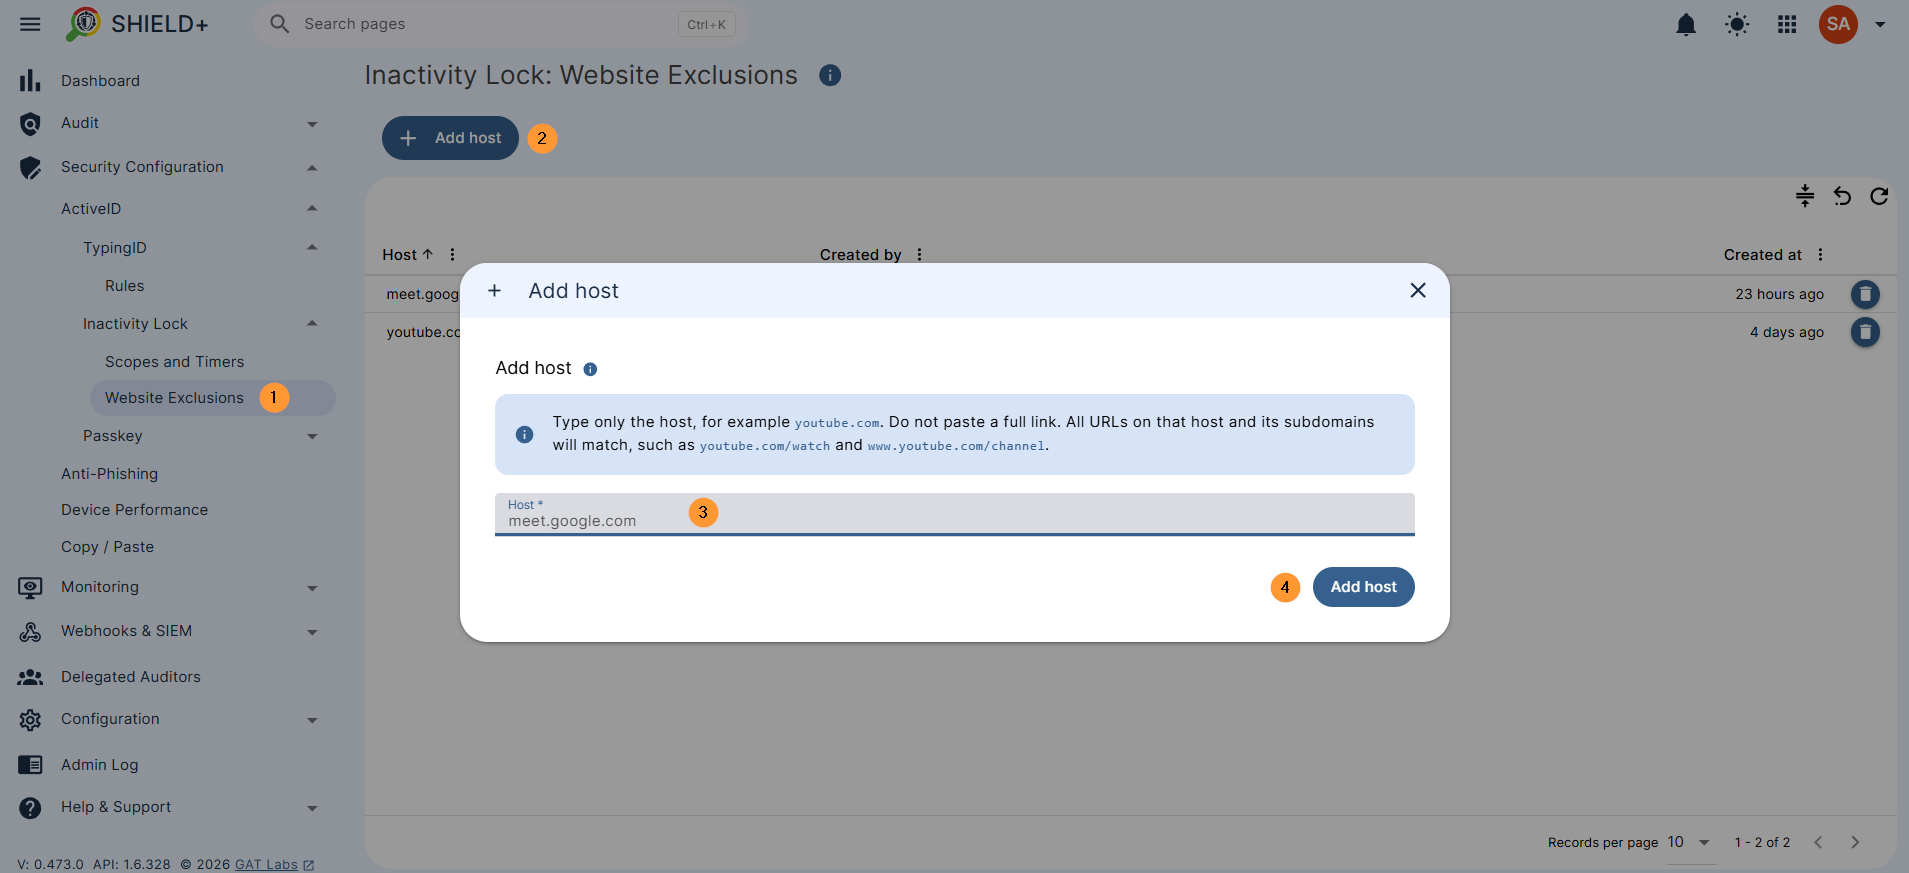
Website Exclusions #
A list of website hosts excluded from the inactivity lock – intended for sites like video meetings (e.g. meet.google.com) where users are present but not actively typing.
When a user on an excluded site reaches their inactivity period, Shield+ prompts them to confirm they’re still there instead of locking immediately. If confirmed, the lock is deferred for up to 30 minutes.
Navigate to Shield+ > Security configuration > ActiveID > Inactivity Lock > Website exclusions
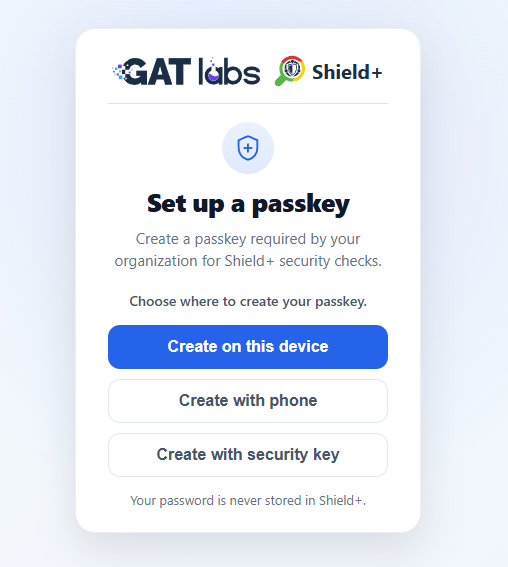
Passkey #
Credential management is an automated browser lock that prevents unauthorized users from accessing a device when it is left unattended.
The end-user creates a passkey required by your organization for Shield+ security checks. A pop-up window where the user must create a passkey to log in and use the Chrome browser.
Choose where to create your passkey for the Chrome extension.
- Created on this device
- Created with phone
- Created with security key.
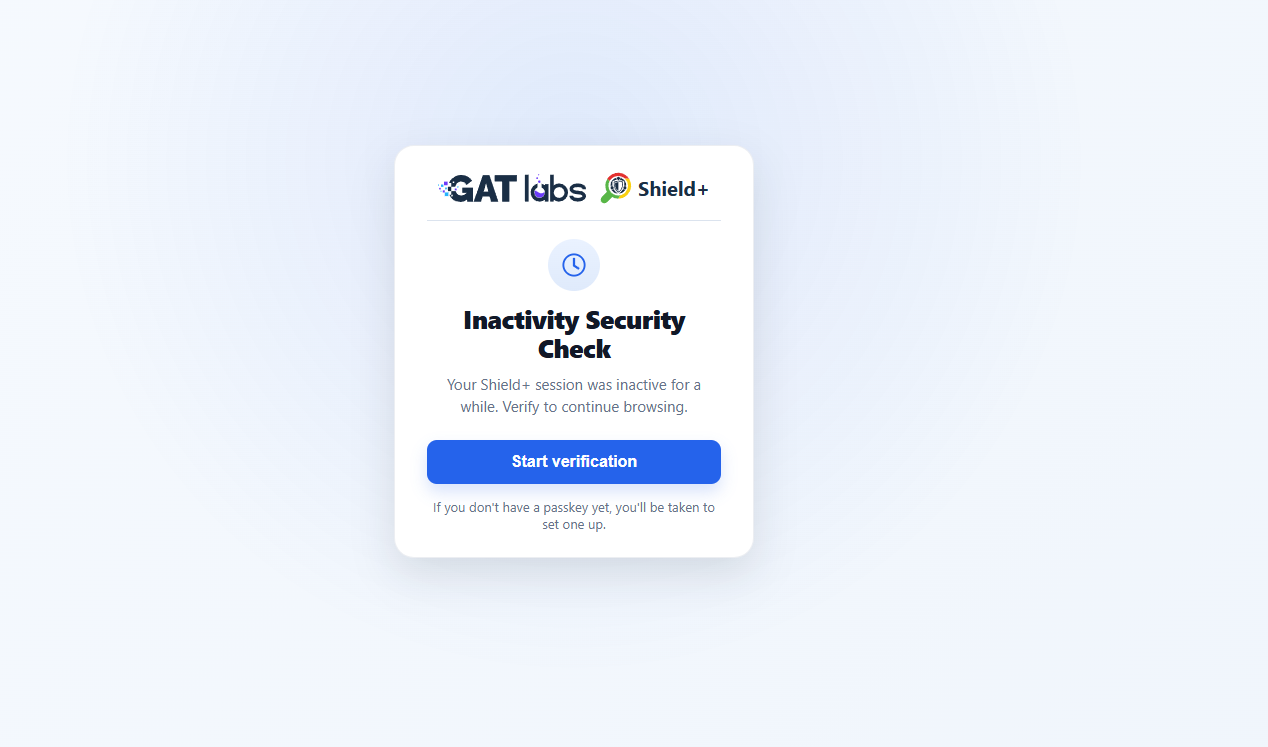
How it Works (The User Experience) #
- The Trigger: If a user steps away from their laptop and is inactive for a set period (for example, 15 minutes), Shield+ automatically locks down the browser.
- The Lock: All open web pages are hidden, and a pop-up window appears demanding a Passkey. The user cannot browse to any other website, open new tabs, or view current pages until they pass this challenge.
- The Unlock: Once the user enters their Passkey (or uses biometric verification like a fingerprint or face scan, or PIN code), the browser instantly unlocks, reloads their pages, and lets them pick up right where they left off.
What the Admin Controls #
From the admin console, you manage the passkeys.
- Visibility: You can see a list of all Passkeys registered by your users, along with exactly when they were last used to unlock a browser.
- Revoking Access: If a user loses a hardware key or if you suspect a security breach, you can instantly revoke an individual passkey or wipe all passkeys for that user.
Anti-Phishing #
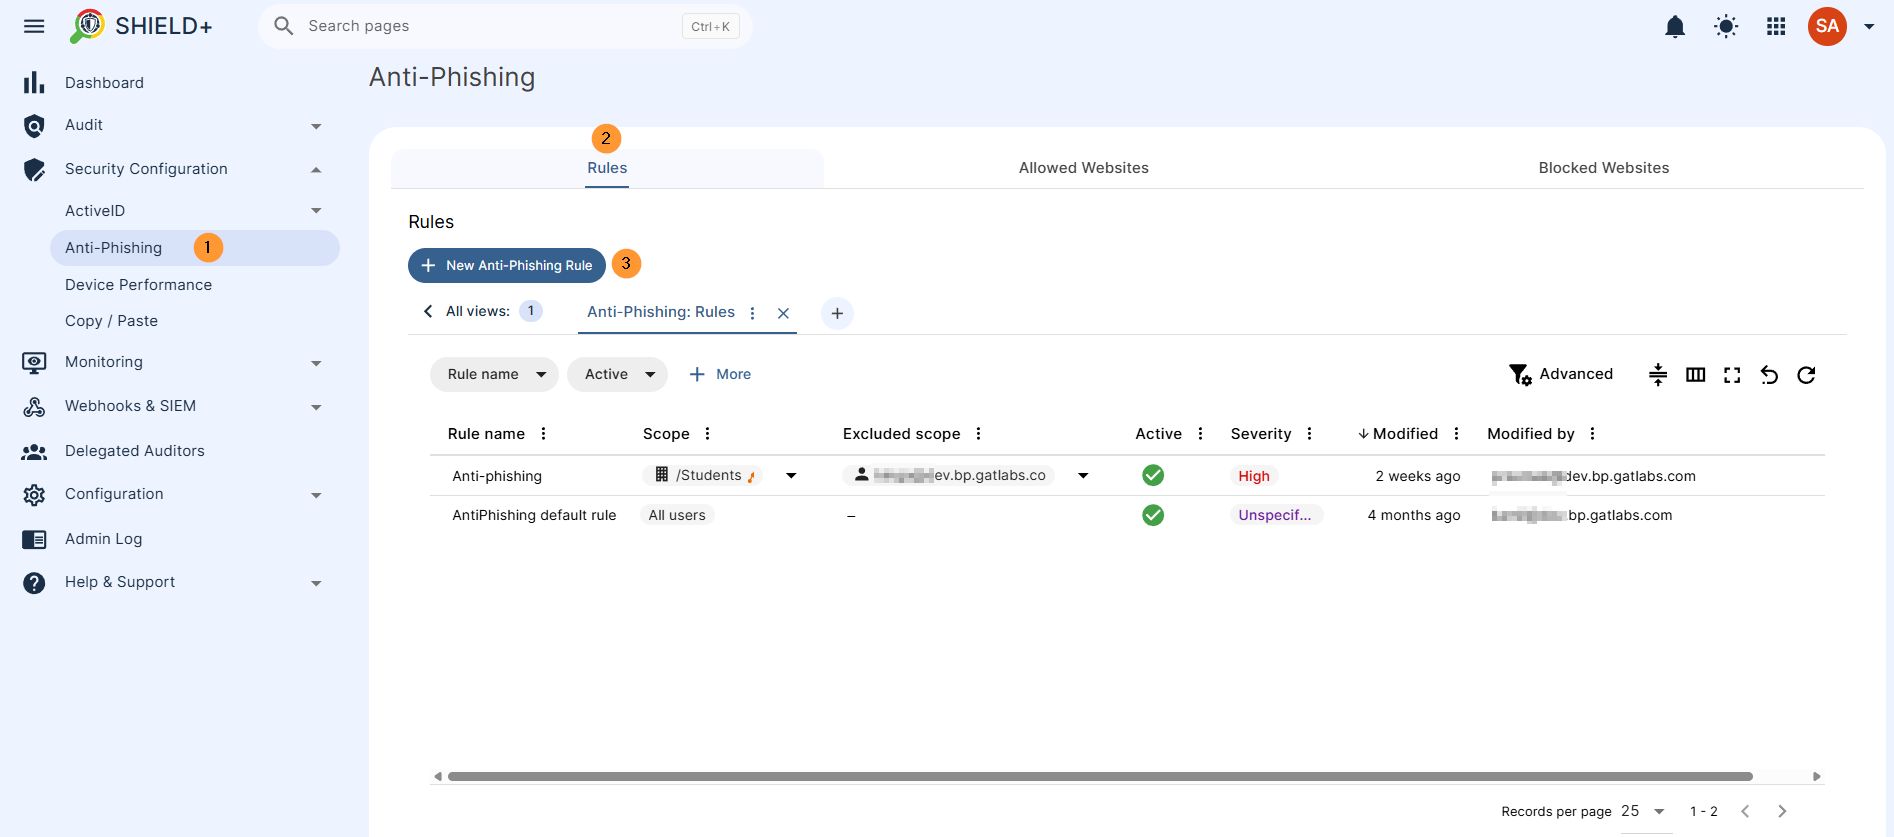
Rules – Define and create new anti-phishing rules.
Alert rules that fire when a phishing event occurs (site blocked, user override, or a managed-list change). Each rule defines the scope, notification recipients, and whether the site-blocking UI (an Alert Banner Message) is shown to the user. If the event severity is Critical, the site is blocked outright with no option to override; lower-severity events show the banner and allow the user to proceed.
Navigate to Shield+ > Security configuration > Anti-Phishing > New anti-phishing rule
- Name – enter the name for the rule
- Default severity – When the Alert Rule is triggered, a notification is created. The severity of the notification is decided by the software and indicates its level of importance. The values are Low, Moderate, High and Critical. “Alert Level Threshold” is the “notification threshold”. If you set the default severity to “Low,” it means that “all alerts with severity level Low and higher will be sent”.
- Unspecified
- Low
- Moderate
- High
- Critical
- Default severity – When the Alert Rule is triggered, a notification is created. The severity of the notification is decided by the software and indicates its level of importance. The values are Low, Moderate, High and Critical. “Alert Level Threshold” is the “notification threshold”. If you set the default severity to “Low,” it means that “all alerts with severity level Low and higher will be sent”.
- Scope – pick and select the scope for the alert
- Pick user, group, or org. unit of users
- Excluded scope – Specify users, groups, or OUs that should be excluded from the scope of the defined rule.
- Add: excluded scope
- Excluded scope – Specify users, groups, or OUs that should be excluded from the scope of the defined rule.
- Pick user, group, or org. unit of users
- Configuration – Admin will be alerted by default; in addition, Shield+ can block the site inside the user’s browser if the setting below is enabled.
- Alert banner message – When Alert Banner Message is enabled, the user will see a banner displayed at the top of the opened site, explaining why the site was considered suspicious and providing a button to proceed with the visit. If the severity of the event is Critical, then the site is blocked without the possibility of overriding. If severity is less (Low, Medium, High), the user can override.
- Notifications – fill in the details
- Alert recipients – enter alert recipients
- Webhooks & SIEM – select option
- Elastic Search
- Generic receiver
- Splunk
- Webcam capture – select option
- Do not send
- Send in the notification email
- Send in the notification email and save to the rule creator’s Drive
- Send in the notification email, save to the rule creator’s Drive, and share with other alert recipients
- Screen capture – select option
- Do not send
- Send in the notification email
- Send in the notification email and save to the rule creator’s Drive
- Send in the notification email, save to the rule creator’s Drive, and share with other alert recipients
- Attach website name – enable or disable the option
- Summary – view all the options that are selected
Allowed Websites / Blocked Websites #
Domains and URLs are manually added to the denylist/allowlist by admins. Shield+ also maintains an internal threat database updated daily from external sources; manually added entries supplement that list. Both entire domains and specific page paths can be blocked/allowed.
Allowed websites #
Add domains to allow through phishing protection. Use wildcards (*) to match multiple domains. Allowlisted domains bypass ALL phishing checks. Only add domains you absolutely trust. Overly broad patterns can compromise security.
example.com→ Exact domain (also matcheswww.example.com)*.example.com→ All subdomains (mail.,app.,login., etc.)trusted-*.com→ Domains starting withtrusted-in.comTLDcompany-*.net→ Domains starting withcompany-in.netTLD*.google.*→ All Google domains across all TLDs
Enter the allowed domain.
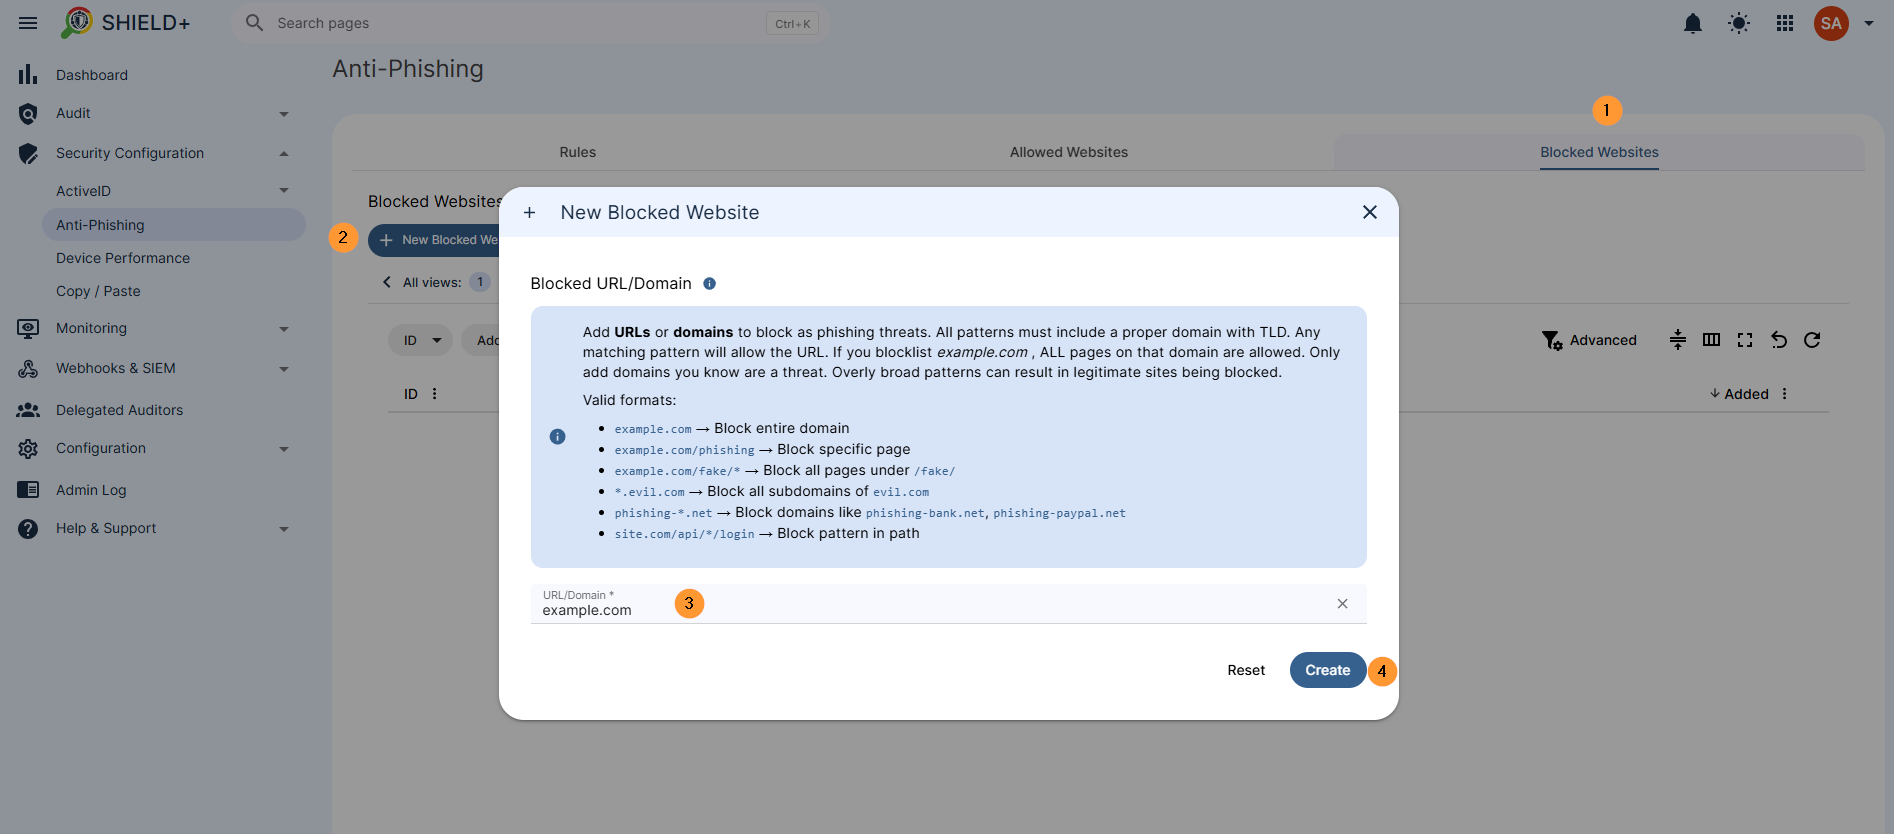
Blocked websites #
Add URLs or domains to block as phishing threats. All patterns must include a proper domain with a TLD. Any matching pattern will allow the URL. If you blocklist example.com, ALL pages on that domain are allowed. Only add domains you know are a threat. Overly broad patterns can result in legitimate sites being blocked.
example.com→ Block the entire domainexample.com/phishing→ Block specific pageexample.com/fake/*→ Block all pages under/fake/*.evil.com→ Block all subdomains ofevil.comphishing-*.net→ Block domains likephishing-bank.net,phishing-paypal.netsite.com/api/*/login→ Block pattern in path
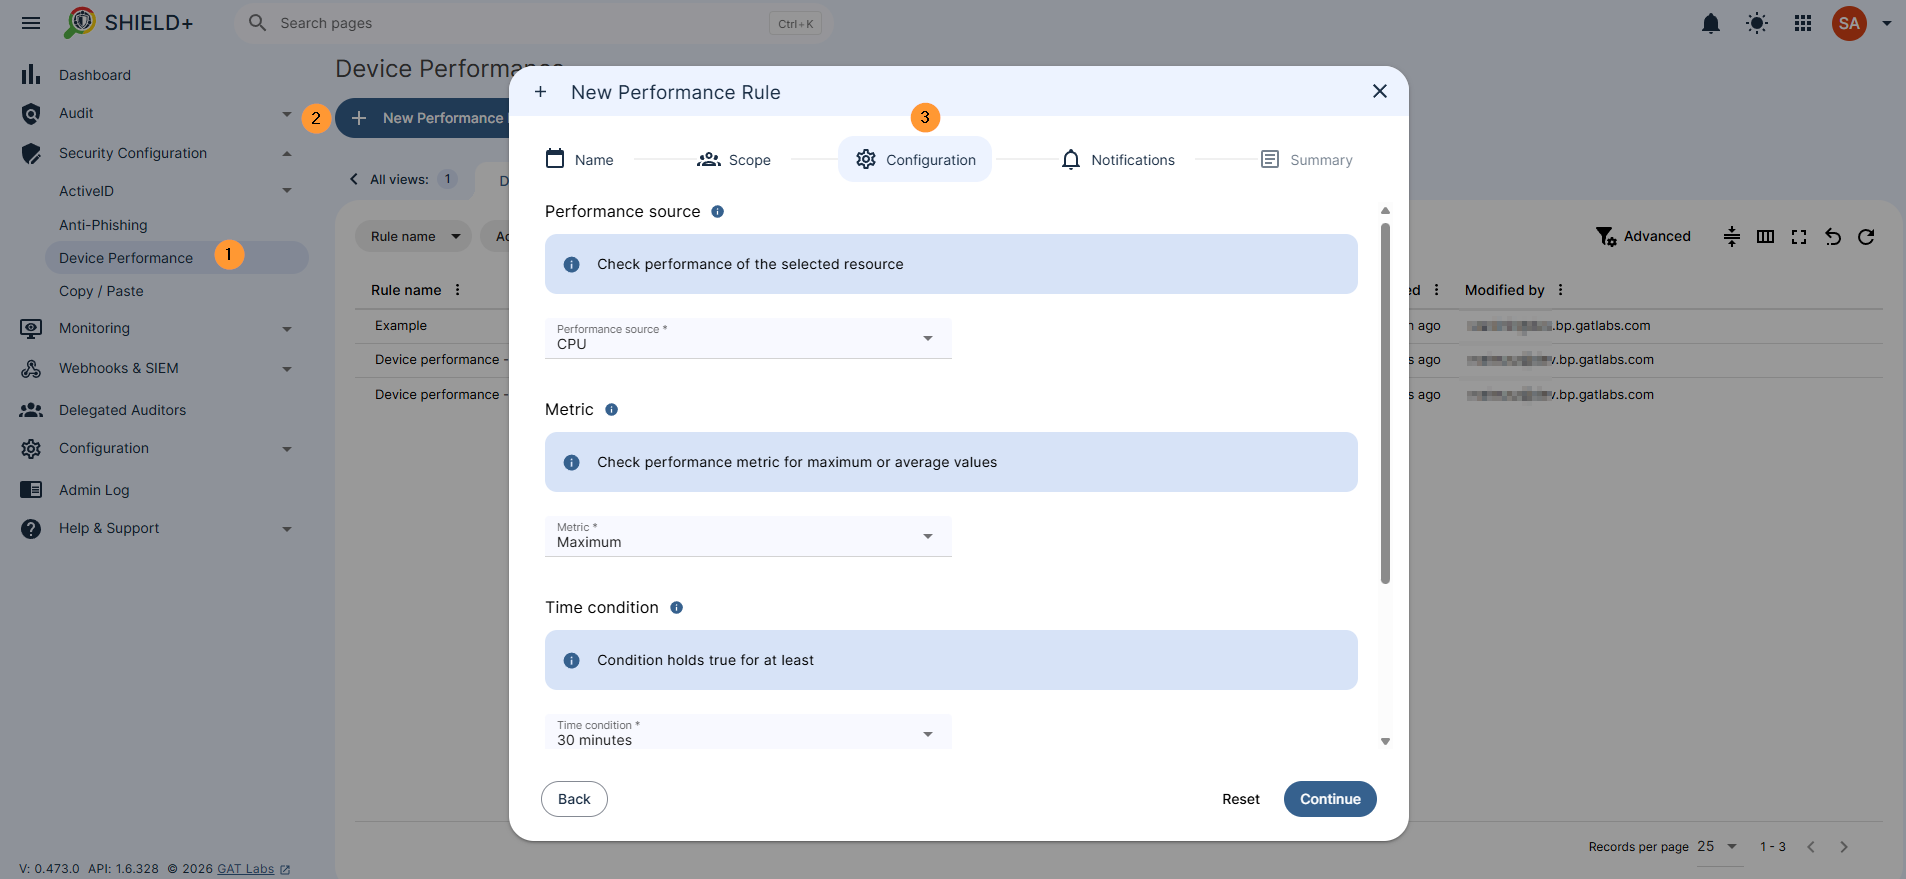
Device Performance – Performance Rules #
Set up a performance rule for the device resource monitoring. Each rule can specify a performance source; it can be CPU or Memory, the metric (Maximum or Average readings), the timeframe the condition must hold (15, 30, or 60 minutes), the threshold percentage, and notification recipients.
Navigate to Shield+ > Security configuration > Device performance > New perormance rule
Fill in the required details such as Source, Metric, and Time condition
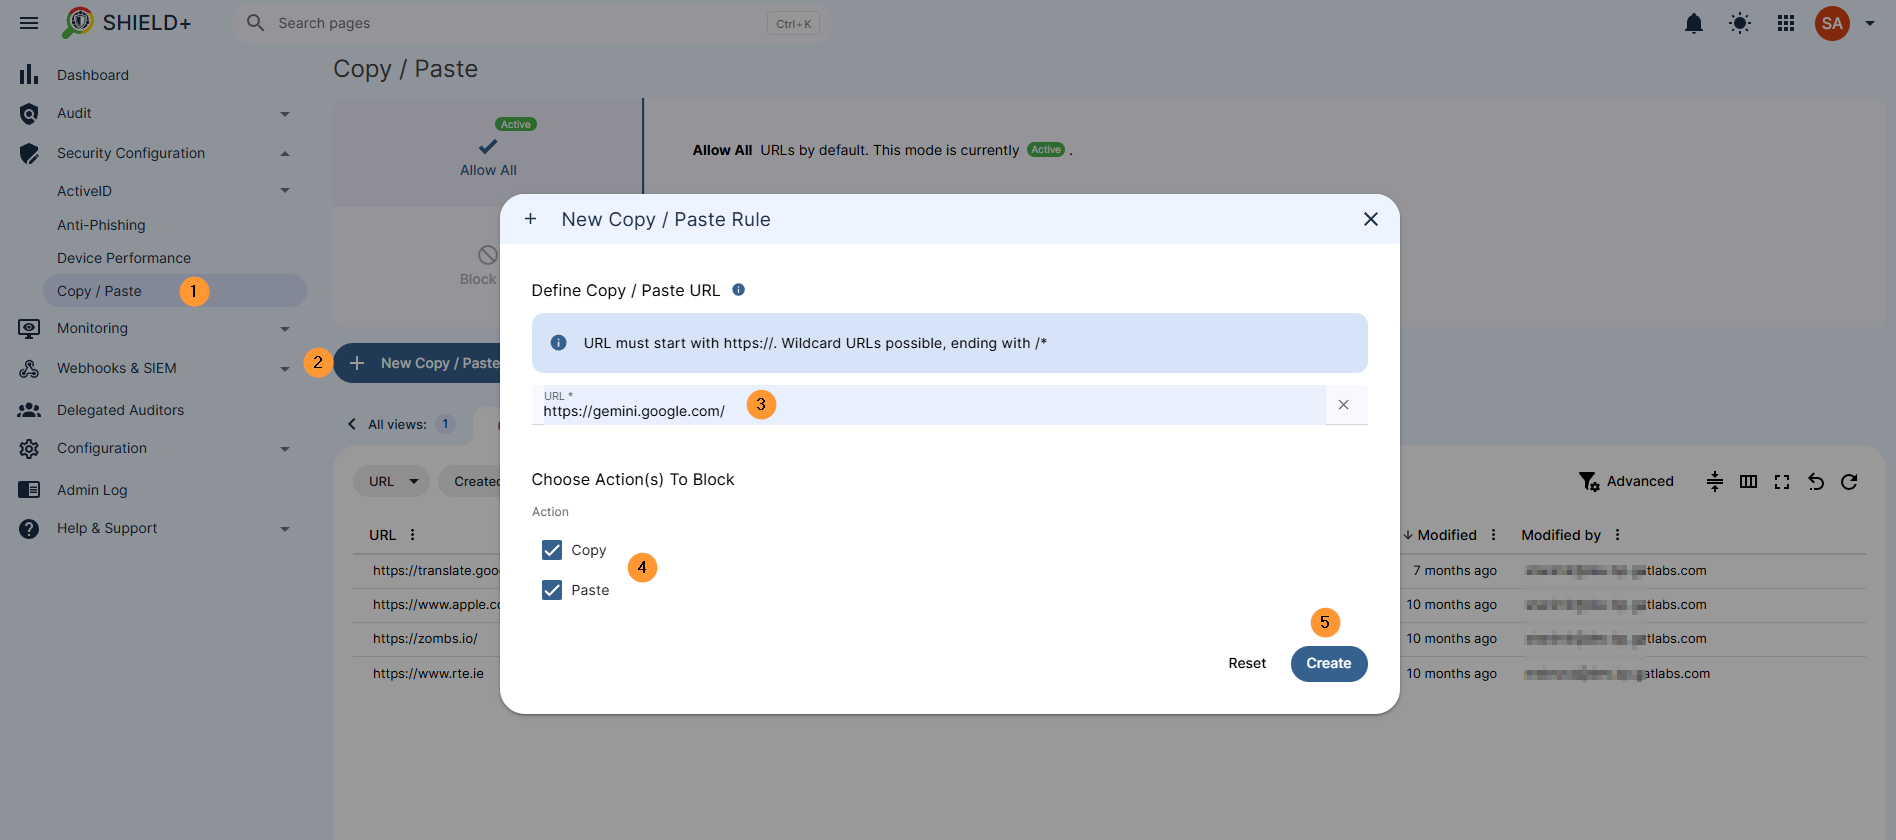
Copy / Paste #
Configure copy and paste restrictions across the domain.
Two modes: Allow All (copy/paste permitted everywhere by default – specific URLs can be added to block) or Block All (copy/paste denied everywhere by default – specific URLs can be added to allow).
URL entries support wildcards ending with `/*` to cover child paths.
Navigate to Shield+ > Security configuration > Copy / Paste > New copy/paste rule
- Allow all – by default, all URLs are allowed by default
- Add websites so the block of copy/paste is enabled only on those websites.
- Block all – you can block all and allow copy/paste on some sites
Monitoring #
Real-time visibility into users’ Chrome browser activity. The monitored user’s browser always displays a visible indicator that monitoring is active.
(Note, the user browser will indicate that it is being actively monitored.)
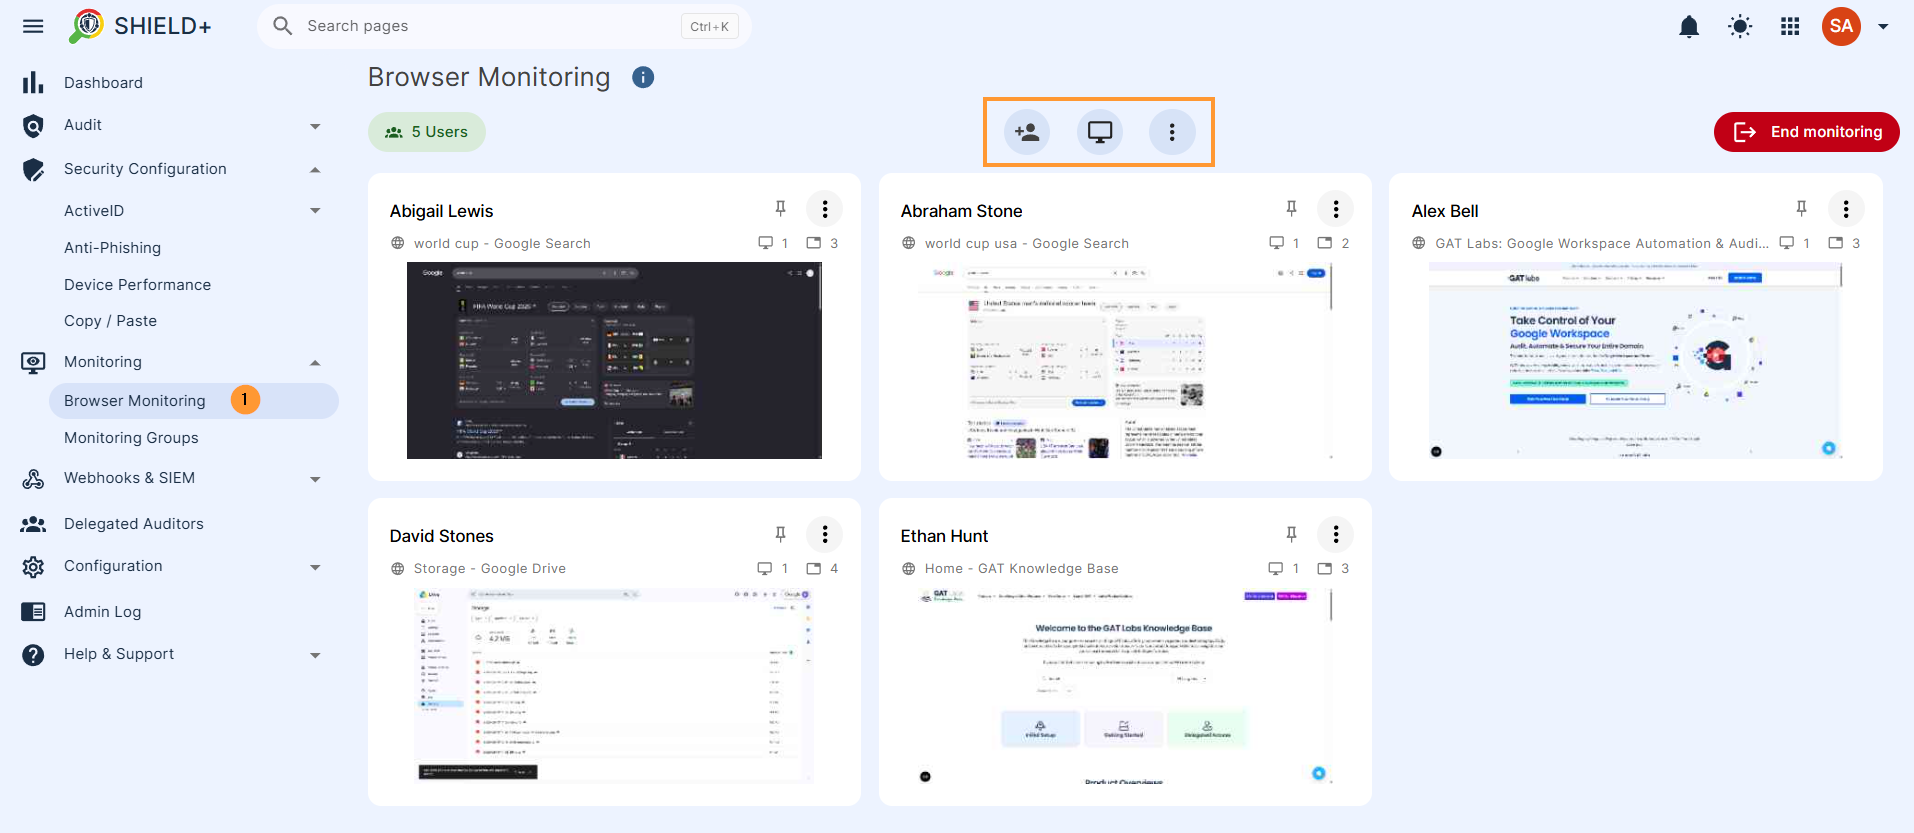
Browser Monitoring #
The Admin can view one or more users’ live browser screens in real time. After selecting a monitoring target (user, group, or OU), the admin sees thumbnails of all open tabs and windows. Available tab actions: switch the user to a specific tab, open a new tab for the user at a given URL, close a tab on the user’s behalf, or open a copy of the tab in the admin’s own browser.
Navigate to Shield+ > Monitoring > Browser monitoring > Scope – select the scope of users to monitor
Monitoring Groups #
Pre-configured groups that delegate browser monitoring authority to supervisors or managers without requiring admin involvement each time.
Each group defines Targets (users whose browsers can be monitored) and Auditors (people permitted to start monitoring sessions). Once a group is set up, any assigned auditor can initiate monitoring directly from the group’s page.
Navigate to Shield+ > Monitoring > Monitoring groups > New monitoring group

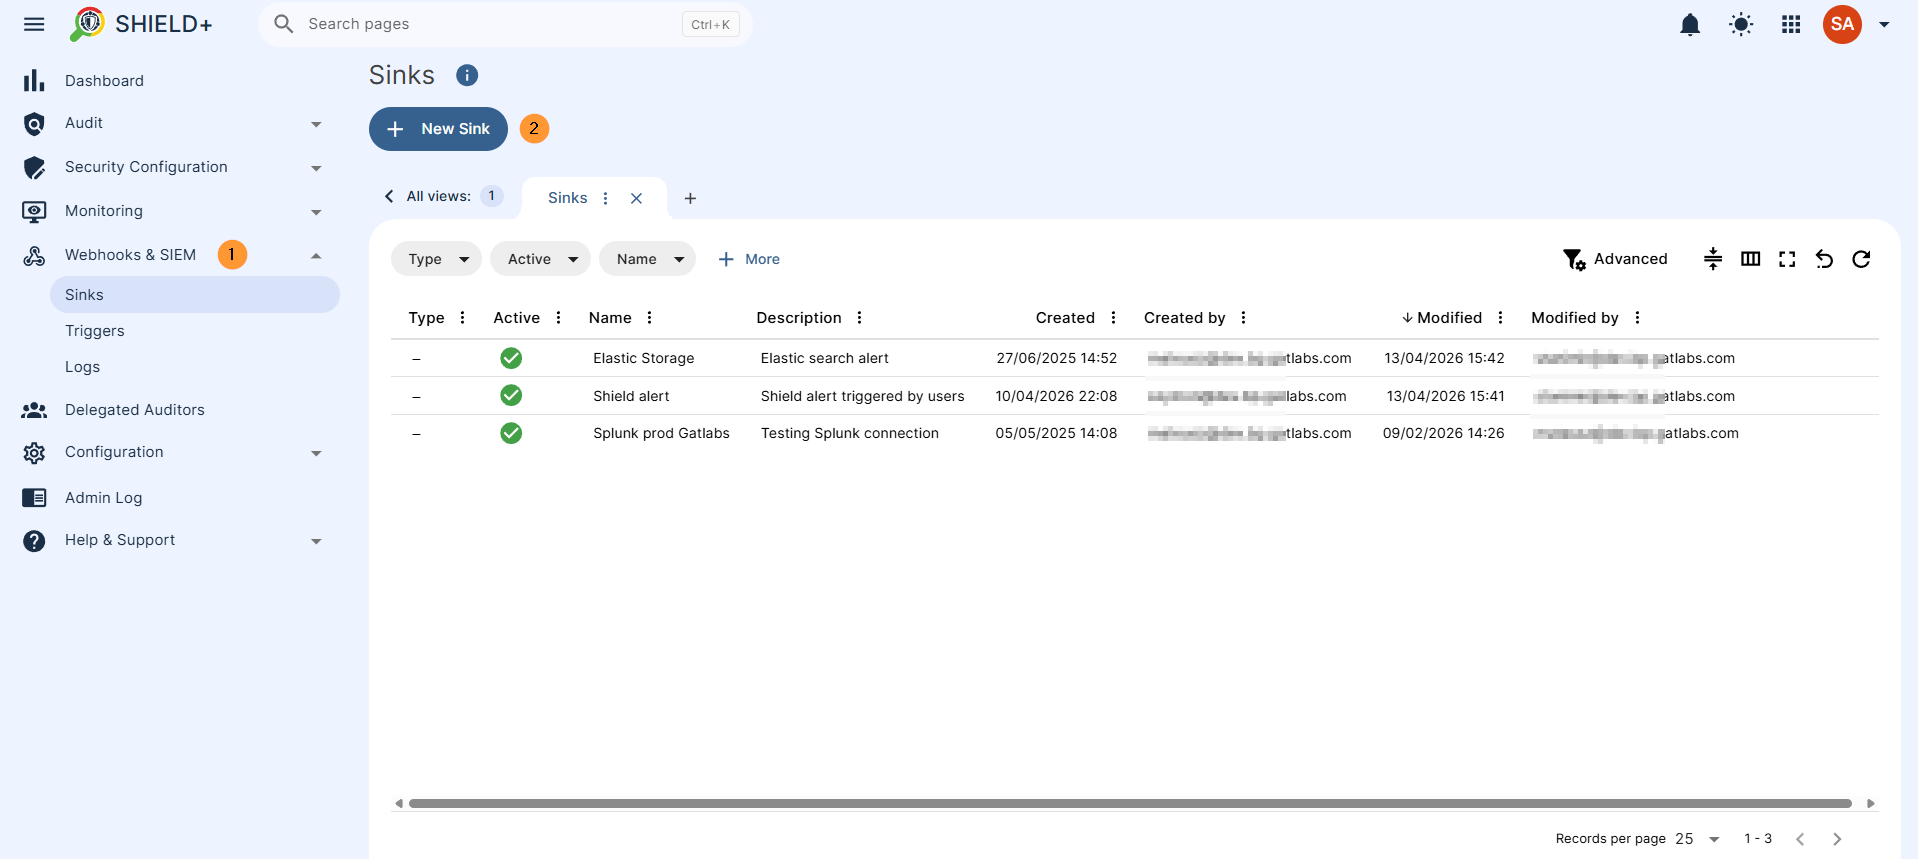
Webhooks & SIEM #
Forwards Shield+ security events to external systems such as SIEM platforms, log aggregators, or custom webhook endpoints.
- Sinks – Configure the outbound destinations where Shield+ delivers event payloads. A Sink is a named endpoint (webhook URL or SIEM receiver) that accepts incoming events.
- Triggers -Rules that map specific Shield+ event types (e.g., TypingID alert, anti-phishing block, inactivity lock) to specific Sinks. Controls which events get forwarded where.
- Logs – A delivery log of all outbound SIEM and webhook events: what was sent, the destination Sink, and the timestamp.
Navigate to Shield+ > Webhooks & SIEMs > New Sink > New Sink
Fill in the details. Choose the receiving Sink system (e.g., SIEM) and configure credentials. Depending on the type of the receiver system, you need to provide the full URL and either an authorization token or a set of HTTP headers to be included in every request.
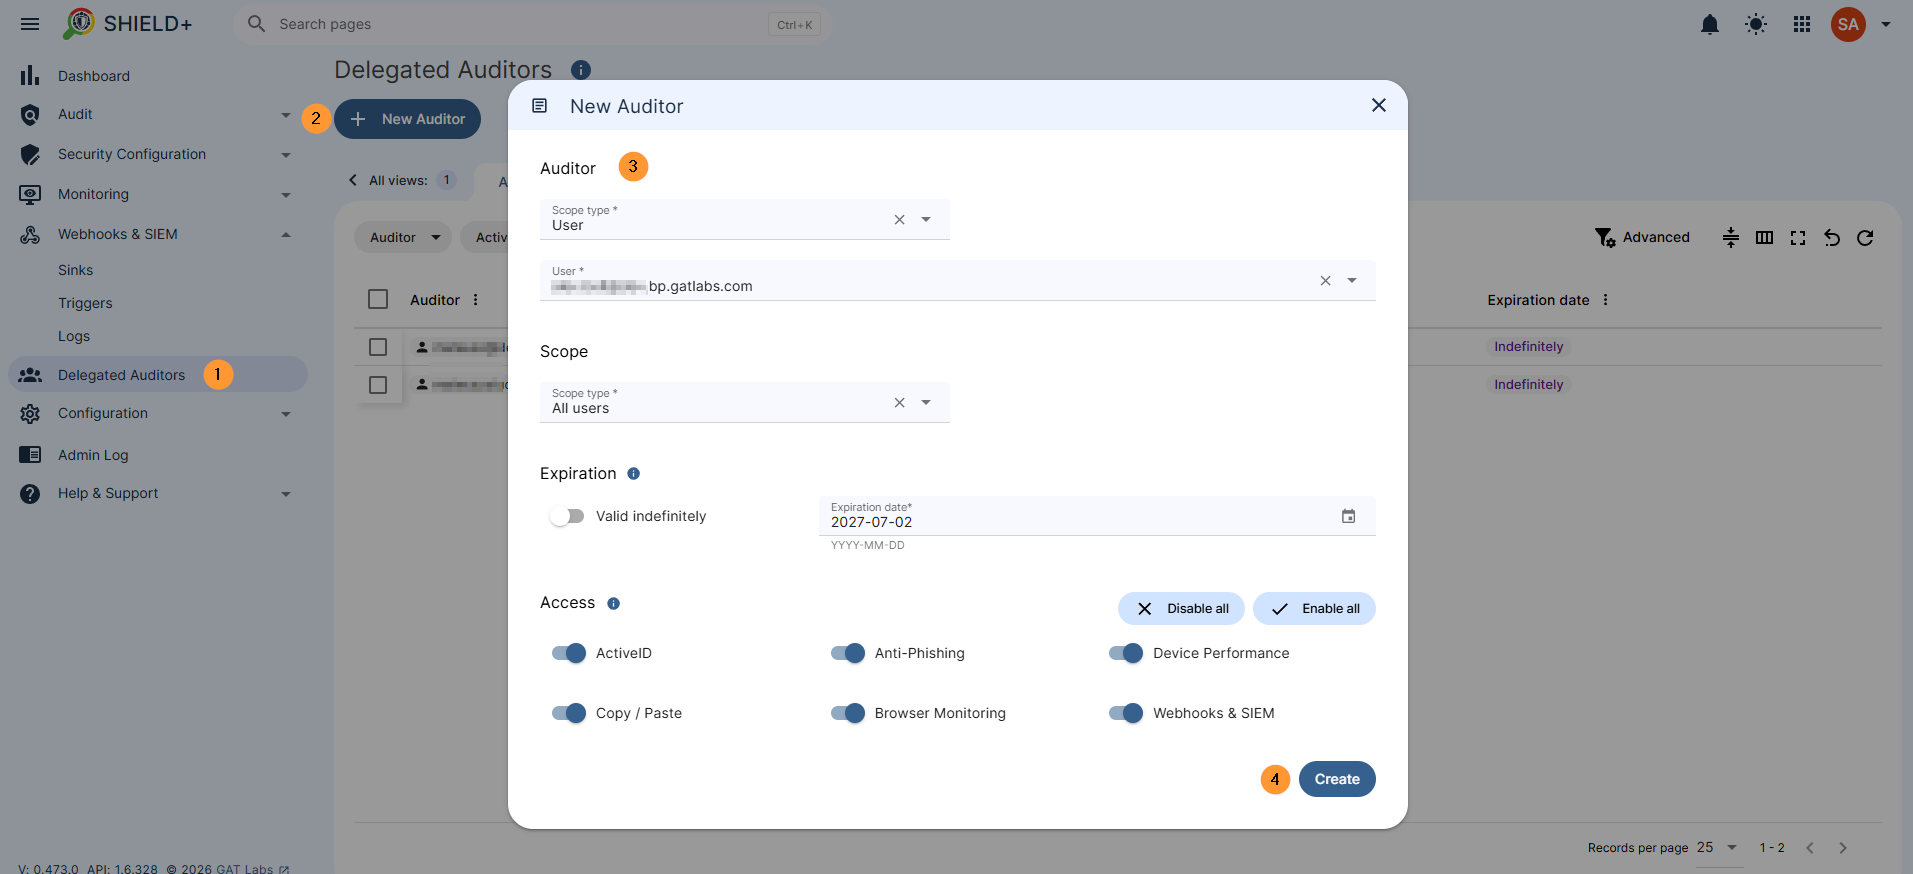
Delegated Auditors #
Delegate Shield+ audit access to users who are not domain administrators. Auditors can be granted access to specific feature areas – ActiveID, Anti-Phishing, Device Performance, Copy/Paste, Browser Monitoring, or Webhooks & SIEM – and optionally scoped to a specific set of users, groups, or organizational units, so each auditor sees only the data relevant to their team.
Navigate to Shield+ > Delegated auditor
Fill in the details, select the scope type, who will be the auditor, and the scope – what users will be monitored
Configuration #
Admin-only settings for the Shield+ deployment.
Manage the deployment of the Shield+ browser extension across the domain. The extension is installed on user machines and is the component that collects typing patterns, enforces copy/paste policies, enables browser monitoring, and displays anti-phishing blocking pages.
Admin Log #
A complete audit trail of all administrative actions taken within Shield+: logins, creation, update, and deletion of alert rules and policies, browser monitoring session starts and stops, configuration changes, and data exports.
Each entry records the responsible administrator, the timestamp, and the full details of every change, including before-and-after comparisons where applicable.
Conclusion: Why Shield+ is Essential for Your Enterprise #
Managing security across a distributed enterprise domain requires visibility that goes beyond static firewalls and standard login prompts. Shield+ delivers this exact layer of deep, behavioral protection right at the edge – inside the browser where your users spend their workday.
Key Benefits for Enterprise Admins #
- Zero-Trust Identity Protection: By utilizing Machine Learning to flag anomalous typing patterns and enforcing Passkey or session-termination challenges, Shield+ stops active session hijacking and insider threats in their tracks.
- Granular Data & Compliance Control: From blocking malicious URLs out-of-the-box to restricting copy/paste data leaks on sensitive websites, you have complete control over data movement.
- Operational Efficiency: The platform shifts your team from reactive auditing to proactive management. With real-time browser monitoring, automated alerts, delegated access for team managers, and seamless SIEM/Webhook integration (Splunk, Elastic Search, etc.), security incidents are localized, logged, and mitigated instantly.
By deploying Shield+, you aren’t just monitoring your enterprise domain; you are actively hardening it against the modern threat landscape while maintaining full visibility and administrative control.


