
Deploying the GAT Shield Chrome Extension #
In this document, we will cover the deployment steps of the GAT Shield extension.
To start navigating and logging in to the Google Admin console. (Jump to here if you are a Microsoft admin)
In the Admin Console click on Devices.
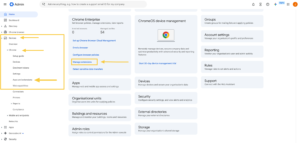
From the menu on the left, navigate down to Devices > Chrome > Apps & extensions or Choose the Manage extensions shortcut if you see it in your admin console.
The page below should be displayed. Select Users & browsers.
![Overview
Context / Application: Google Admin Console (admin.google.com).
Page View: Devices > Chrome > Apps & Extensions management section.
Purpose: Demonstrates the process of navigating to Chrome app/extension settings, selecting an organizational unit, and adding a new Chrome app/extension by its unique ID.
Annotated Workflow Callouts (Numbered Indicators)
Callout 1 (Yellow Box): Highlights the "Users and browsers" tab at the top of the main content section under Apps & Extensions.
Callout 2 (Yellow Arrow): Points to the target domain/Organizational Unit (OU) in the left sidebar tree menu: [domain].gatlabs.com.
Callout 3 (Yellow Arrow): Points to the primary Yellow Floating Action Button (+) located in the bottom-right corner of the window used to open the addition menu.
Callout 4 (Yellow Arrow): Points to the "Add the Chrome app or extension by ID" pop-up menu option (represented by a 3x3 grid icon) revealed when hovering over or expanding the + button.
Detailed Interface Breakdown
1. Top Navigation Bar
Left: "Admin" logo with menu button.
Center: Search bar with prompt text: "Ask me anything, e.g. how to create a support email ID for my company".
Right: Help icon, Notification bell, User profile avatar.
2. Far-Left Navigation Menu
Expanded section: Devices > Chrome
Menu items listed: Setup guide, Devices, Enrollment tokens, Settings, Apps and extensions (currently active, highlighted in blue), Web capabilities, Connectors, Printers, Reports.
Additional lower menu categories: Apps, Generative AI, Security, Data, Reporting, Billing, Account.
3. Sub-Navigation / Organizational Units Panel
Sections: Browsers, Users, Groups, Organisational units.
Organisational Units Tree:
Selected Root OU: [blurred].gatlabs.com
Sub-OUs listed below: Workspace Guests, Compromised account, Content Compliance Gmail, Endpoint Verification, Fisher, Flow, Kate, Leavers, Managers, Marketing, NoCalendar, Principals, Shield Enterprise.
4. Main Content Area (Apps & Extensions)
Header Tabs: Users and browsers (selected), Overview, User app settings, Kiosks, Requests.
Policy Banners:
Play Store: Allow all apps, admin manages blocklist
Chrome Web Store: Block all apps, admin manages allowlist, users may request extensions
Search / Filter Input: "Search or add a filter"
App List Table Columns: App, Installation policy, Version pinning
Table Entries (Sample Rows):
Google Vids Screen Recorder | ID: iklnmbgdcppplombfifiicjamgoeifm | Policy: Allow install
Awesome Screen Recorder & Screenshot | ID: nilcoenfblkpjkfkpfilicgkobligpmj | Policy: Allow install
Blurred App Name | Policy: Force install + pin
Helix Fruit Jump Arcade Game | ID: jhegmncopcbmnnmcdaobcepckamekoomb | Policy: Allow install
Blurred App Name | Policy: Force install + pin
Blurred App Name | Policy: Force install + pin
5. Action Menu (Bottom Right)
Stacked circular icons above the main yellow + button:
Box / Grid icon
Globe icon (Chrome Web Store)
3x3 Grid icon (Tooltip active: "Add the Chrome app or extension by ID")
YouTube icon
Play Store icon
Yellow + Action button at base](https://gatlabs.com/knowledge/wp-content/uploads/2022/07/screenshot-2026-08-14_13-23-52-2-300x144.png)
Install #
To install the GAT Shield extension, choose the root Org Unit or a sub-OU where you want to deploy Shield into.
On the bottom right side, click on the Yellow + button
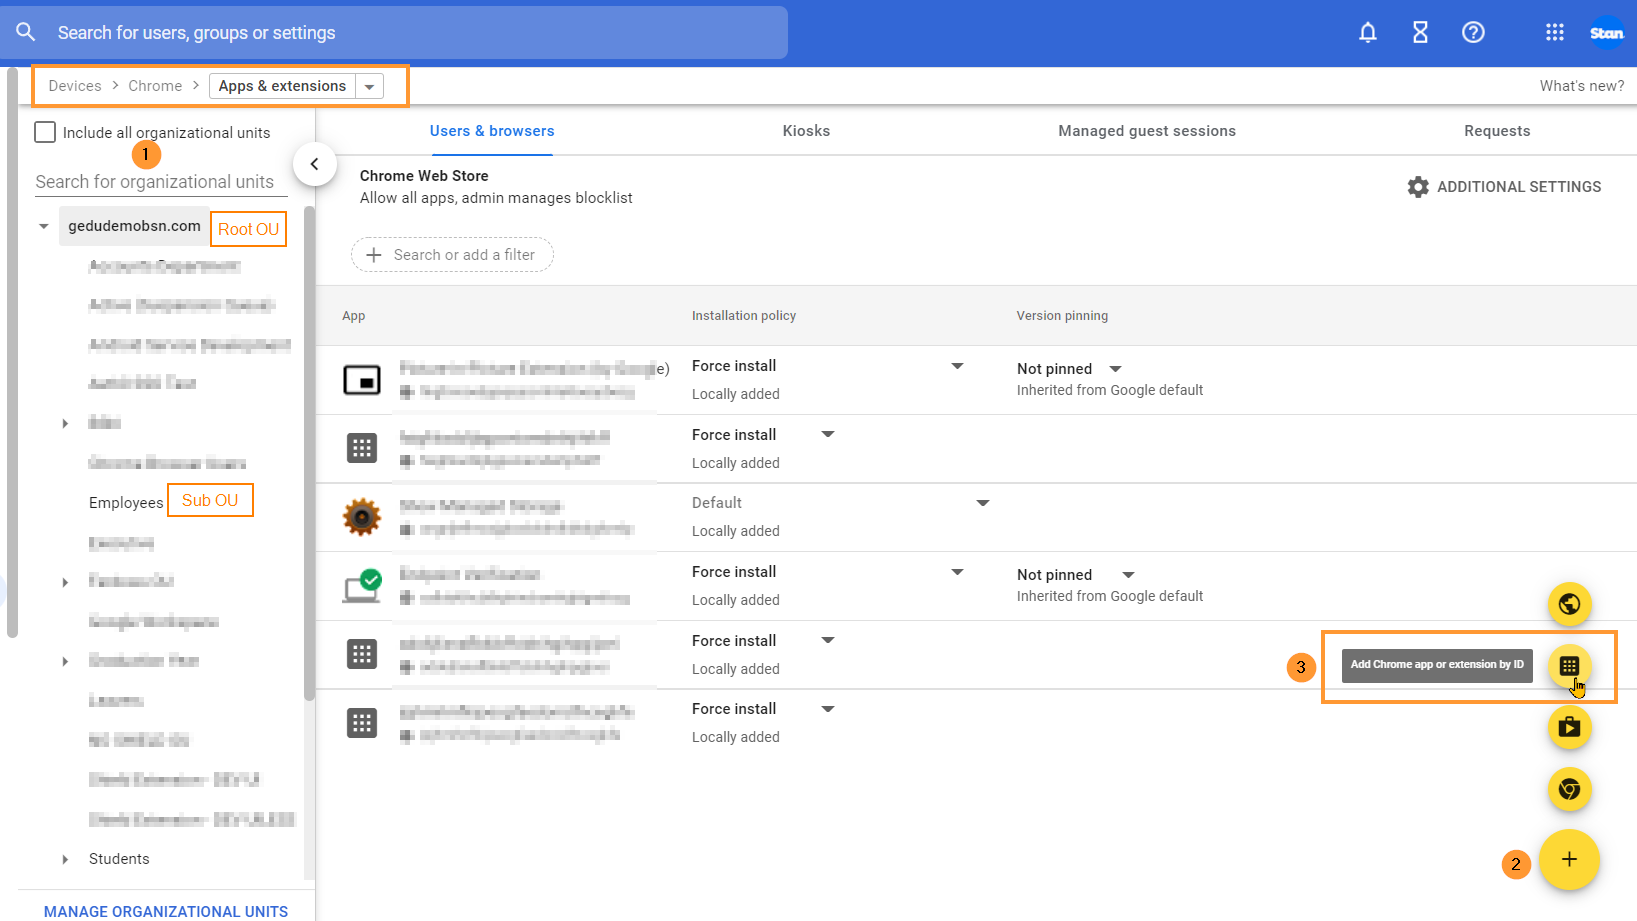
Select the Add the Chrome app or extension by ID option.
NOTE: A pop-up window will be displayed. Select the From a custom URL option.
You’ll find both the ID and the URL required for this step in the GAT Shield application under the Extension deployment section.
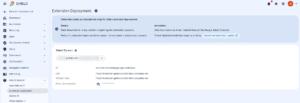
Enter the Extension ID and URL of the extension.
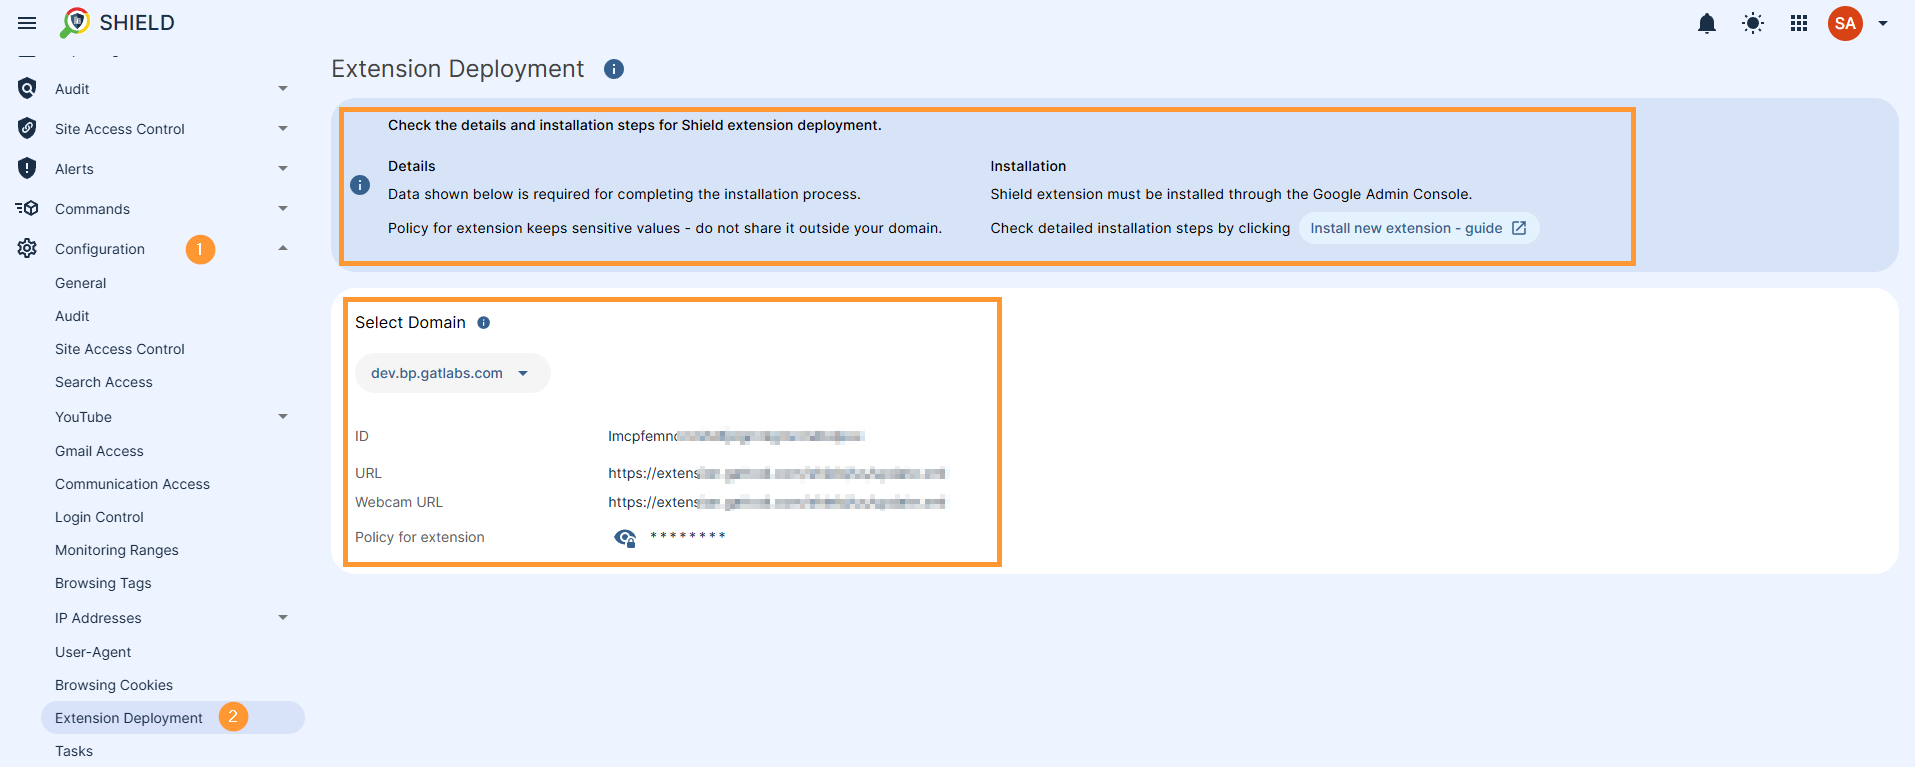
To access and view the Extension ID and URL, navigate to GAT Shield > Configuration > Extension deployment.

Click Save.
The Shield Extension is now installed.
Click on the newly installed extension. You will see a pop-up window on the side. In the Installation policy, click and select Force install.

Scroll down on the same window to the bottom of the page to find the Policy for extensions.

Enter the Secret key – taken from GAT Shield under Configuration – Extensions deployment.
Under the Permissions and URL access field, click on and select Allow all permissions (2).

After making all the changes, click the Save button on the top right.
Result #
Shield will be installed for the users of the selected Org. Unit. It would depend on Google when the extension will appear on the end-user accounts.
Given that the users are logged in on Chrome browser with their Google Account, it should take a few minutes to be propagated to the end users.
Recommended settings #
User & Browser settings
We recommend enabling some extra settings on the domain to prevent your users (particularly students if you’re a school admin) from interfering with Administrators extensions. You’ll find these all these settings in Devices > Chrome > Settings > Users & browsers

Some of these settings are mandatory.
Apps and Extensions #
On the above-selected page, scroll down and navigate to the Apps and Extensions area, find the Task Manager settings, and switch it to Block users from ending processes with the Chrome Task Manager.
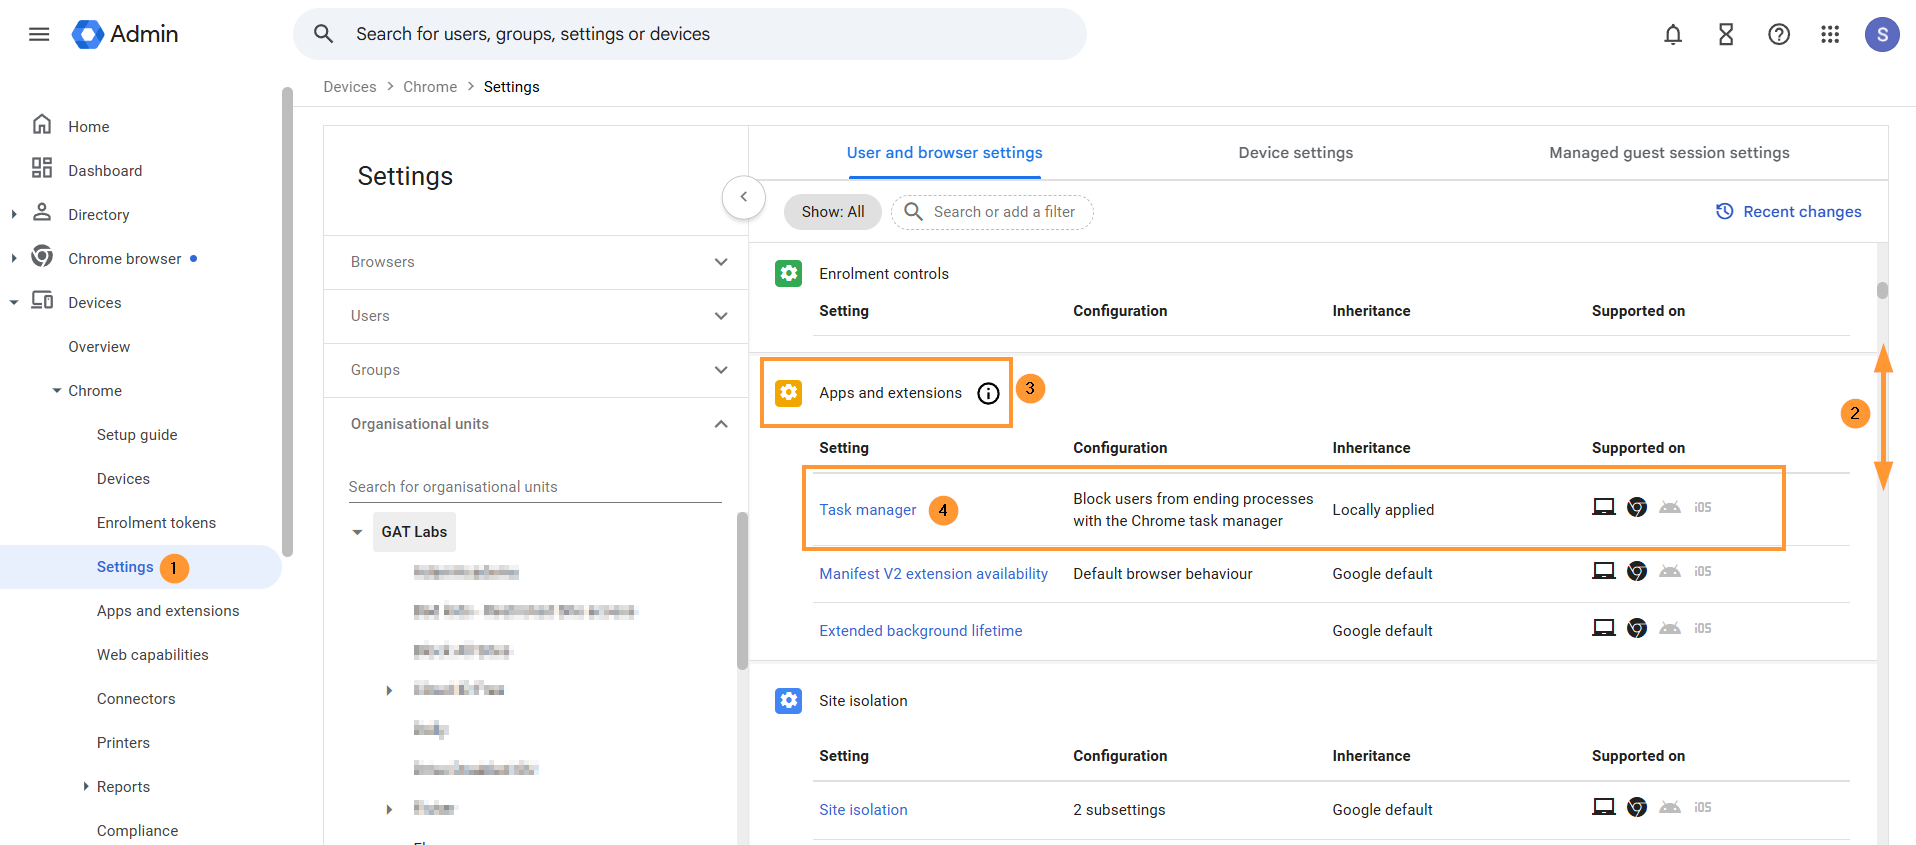
Description: Task Manager can be used to tamper with the Chrome browser’s normal operations.
User experience #
The following settings are highly recommended for schools using enrolled Chromebooks.
On the same page, scroll down to User Experience
User & Browser settings > User Experience
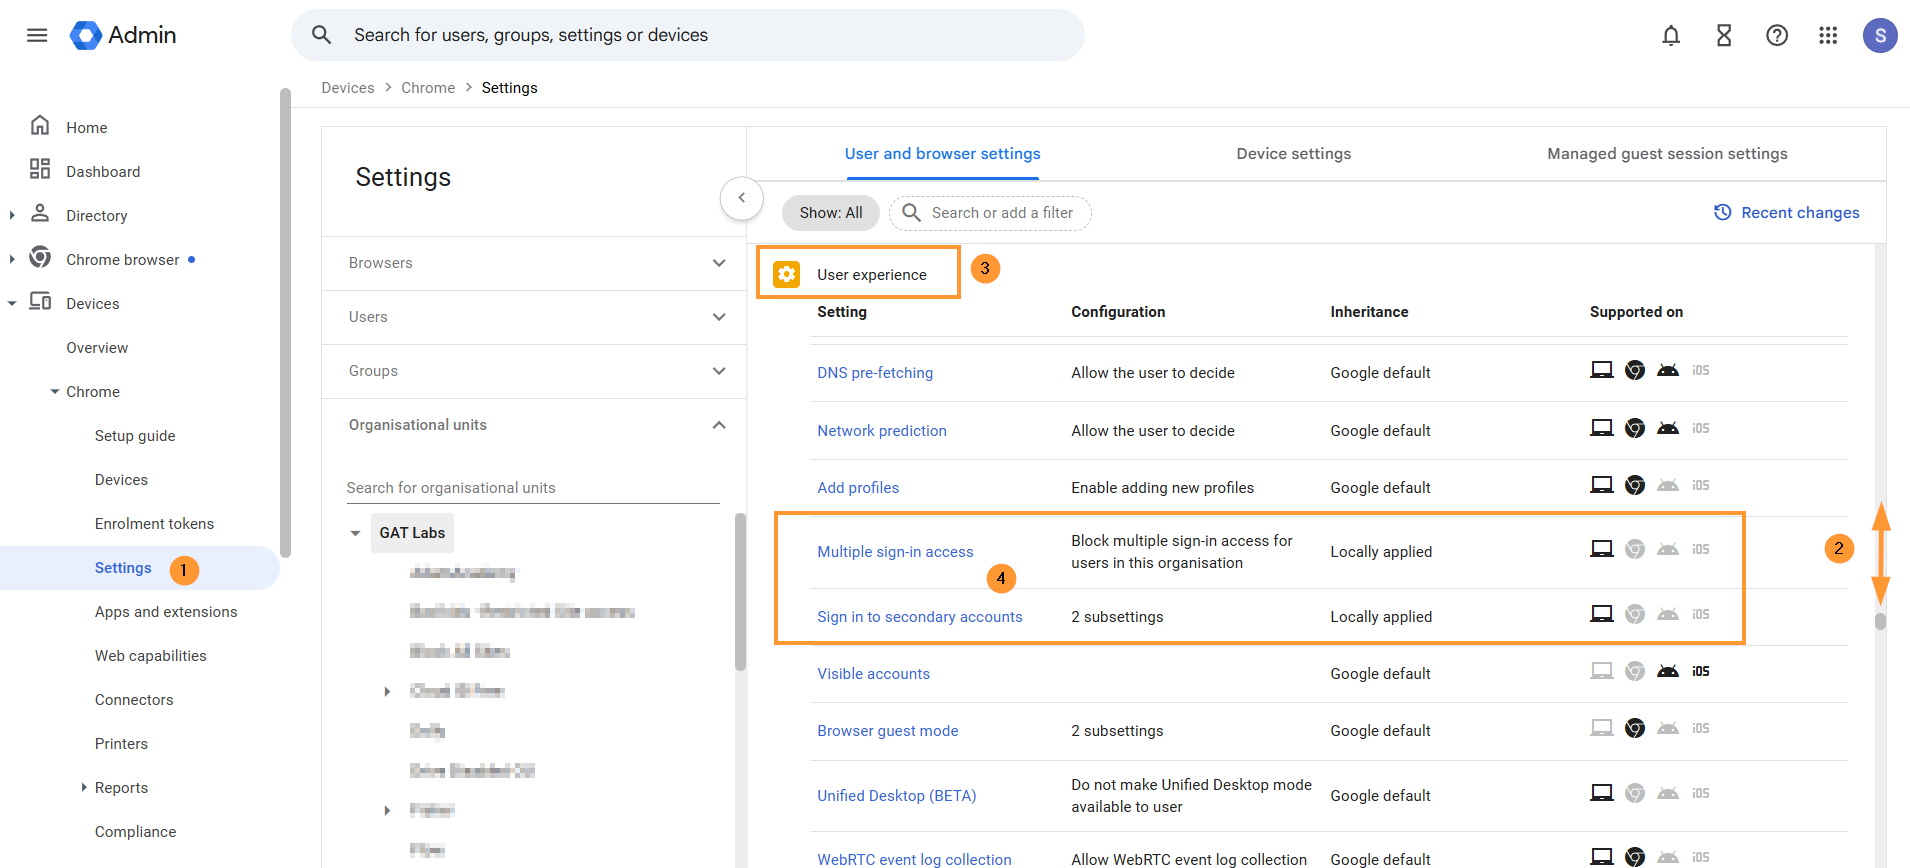
These settings prevent students from bypassing the network firewall and installing Android apps like VPNs and other web browsers on their Chromebooks.
- Multiple Sign-in access – Block multiple sign-in access for users in this organization
- Sign in to secondary accounts – Block users from signing in to or out of secondary Google accounts
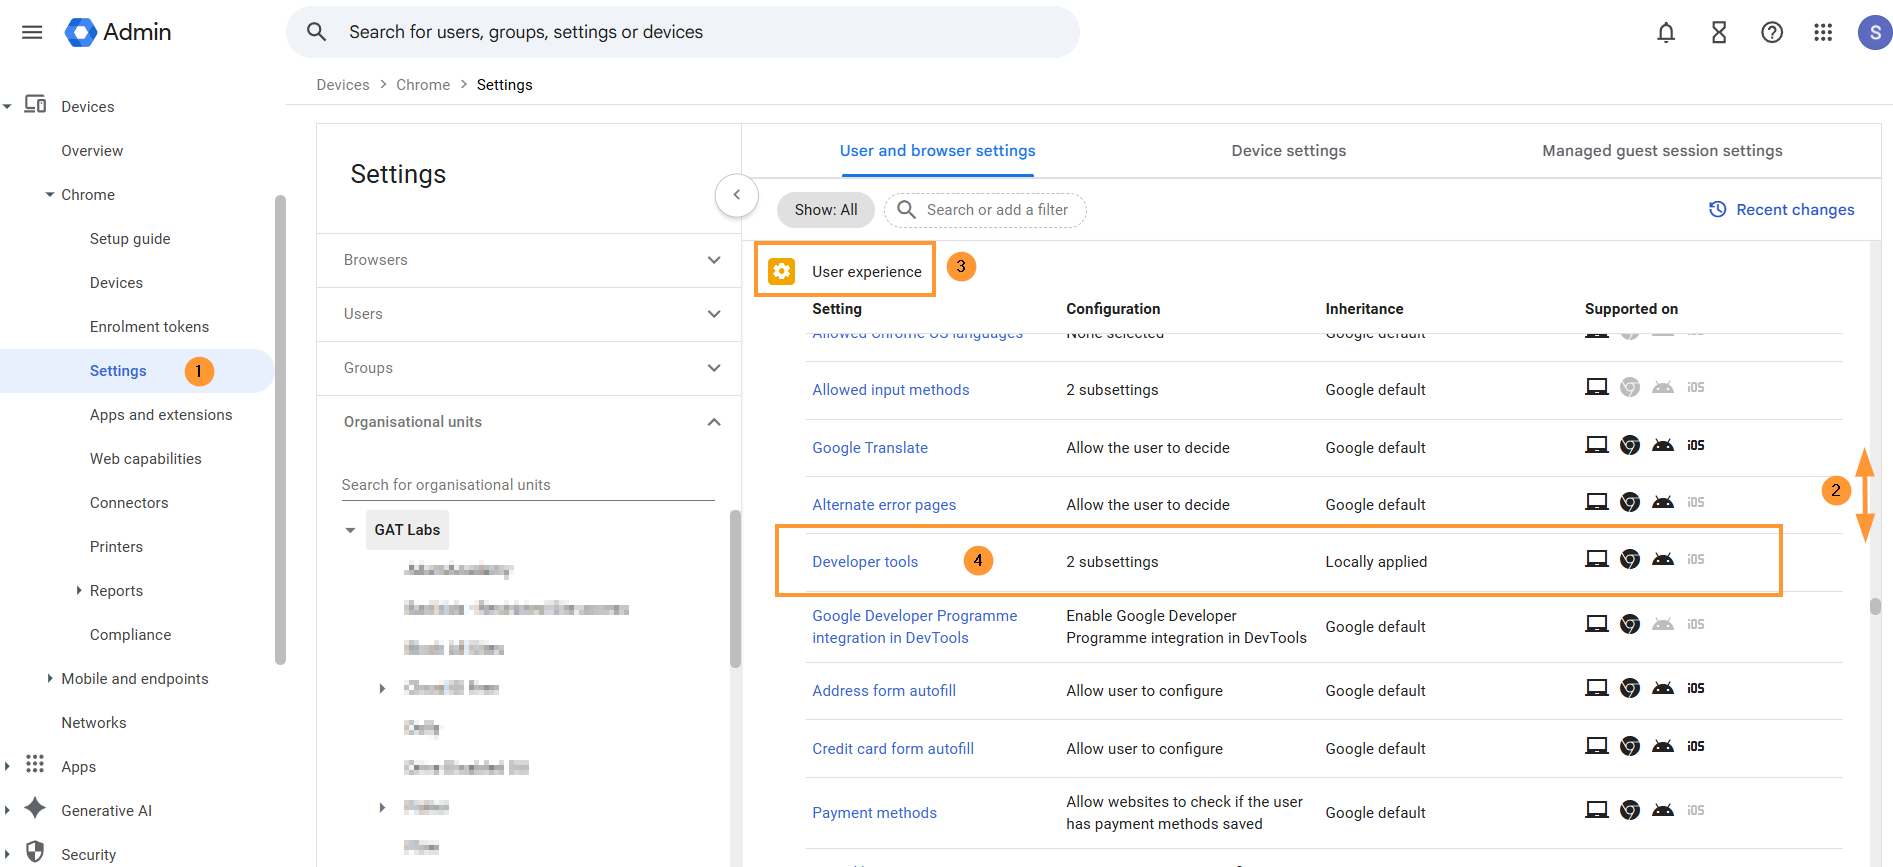
In User experience, scroll also to Developer tools.
In “Configuration“, set the option to “Not Allow”.
- Developer tools availability – never allow use of built-in developer tools
- Extensions page developer mode – Do not allow use of developer tools on the extensions page
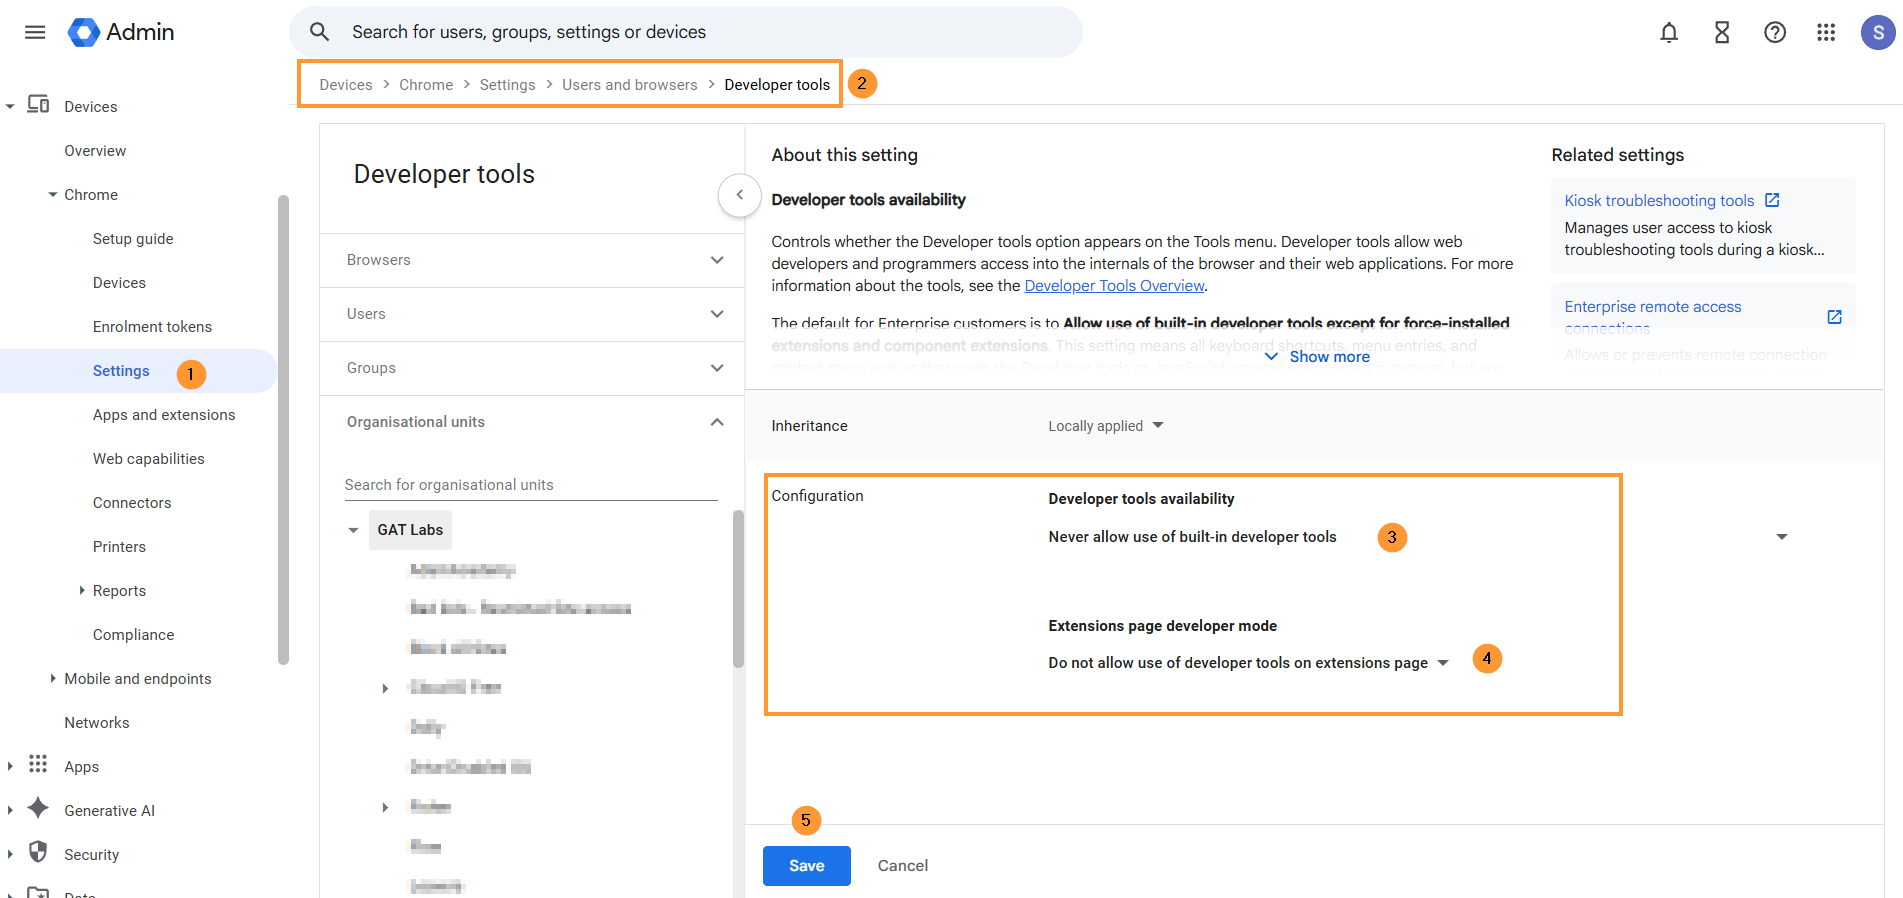
Description: Developer tools can be used to disable extensions. Google also recommends disabling these tools in most cases.
Security #
The following three options are recommended for schools with enrolled Chromebooks. These settings prevent students from bypassing or tampering with the GAT Shield extension.
Scroll down to the Security tab
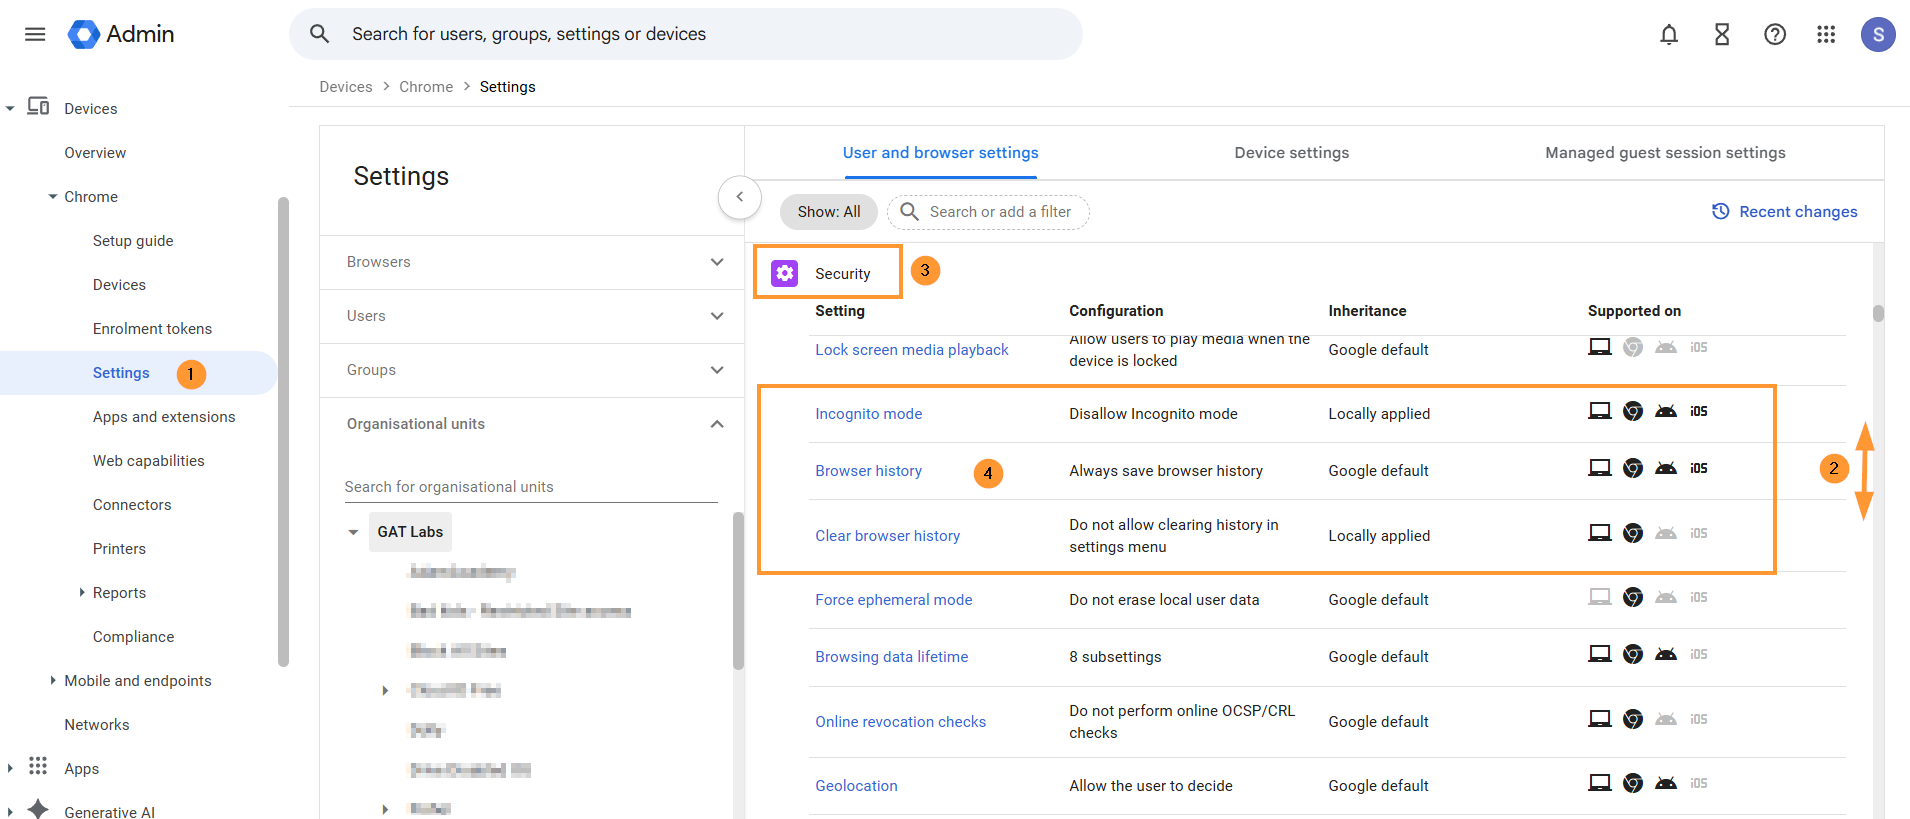
Find and apply the settings
- Incognito Mode – Disallow Incognito mode.
- Description: In incognito mode, the extensions do not work
- Browser history – Always save browser history.
- Description: Saving browser history is recommended so that when incidents occur, there is an audit trail that can be investigated by staff members.
- Clear Browser History – Do not allow clearing history in the settings menu.
- Description: The ability to clear browser history on the Chrome Browser may allow users to tamper with GAT Shield Browser reporting features.
Content #
Scroll down further to the Content tab
- Screenshot – set it to Allow users to take screenshots and video recordings
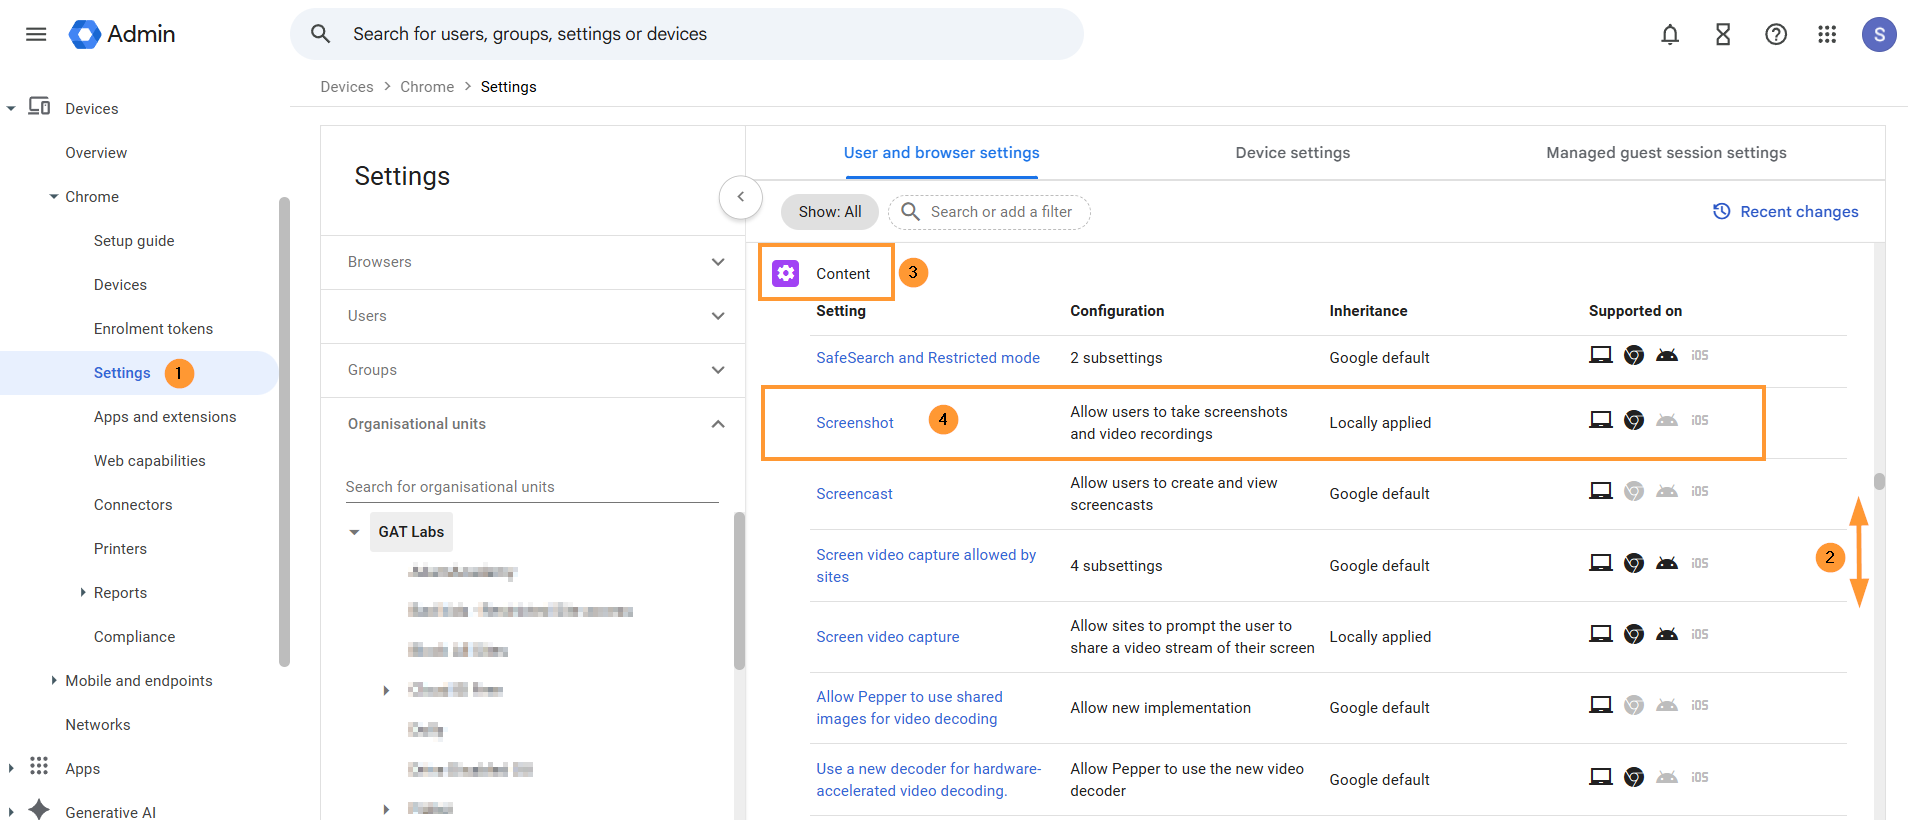
Description: Disabling screenshots will cause problems with the GAT Shield Alerting functionality.
Save settings #
When all the settings are adjusted and set up, click on the blue Save button on the bottom left.
Configure Device Settings #
We recommend that these options be configured on your domain for your Chrome devices. Not all are mandatory.
From the Google Admin console, navigate to Devices > Chrome > Settings > Device settings
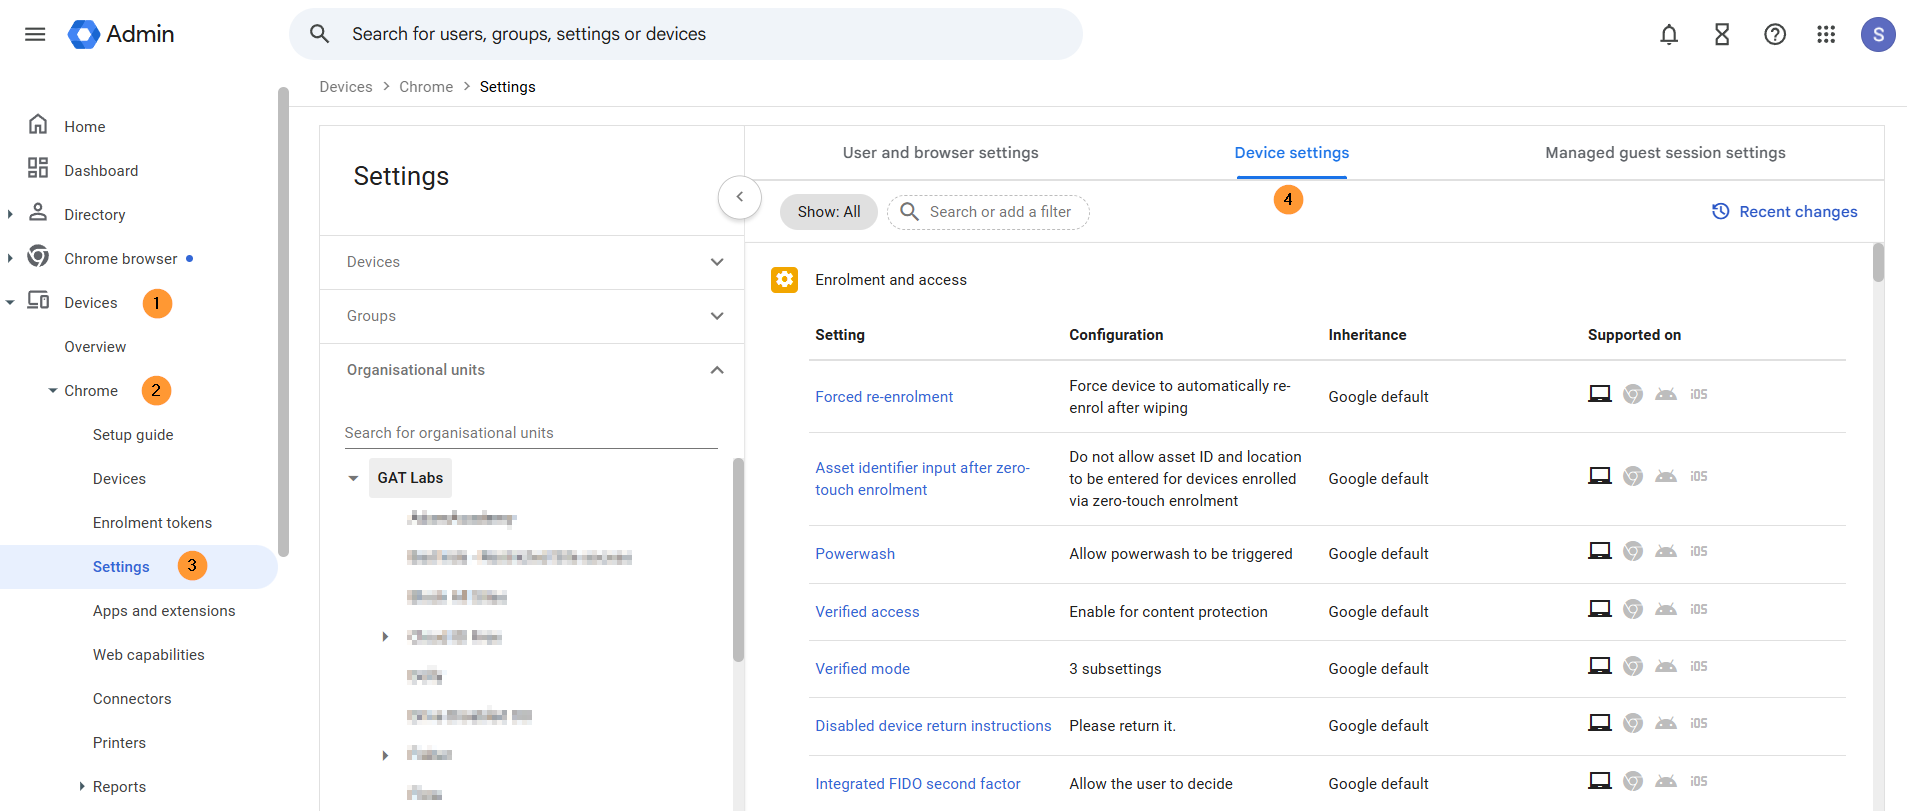
In the left sidebar, select the OU that contains your Chromebooks, then configure the following policies to match these values.
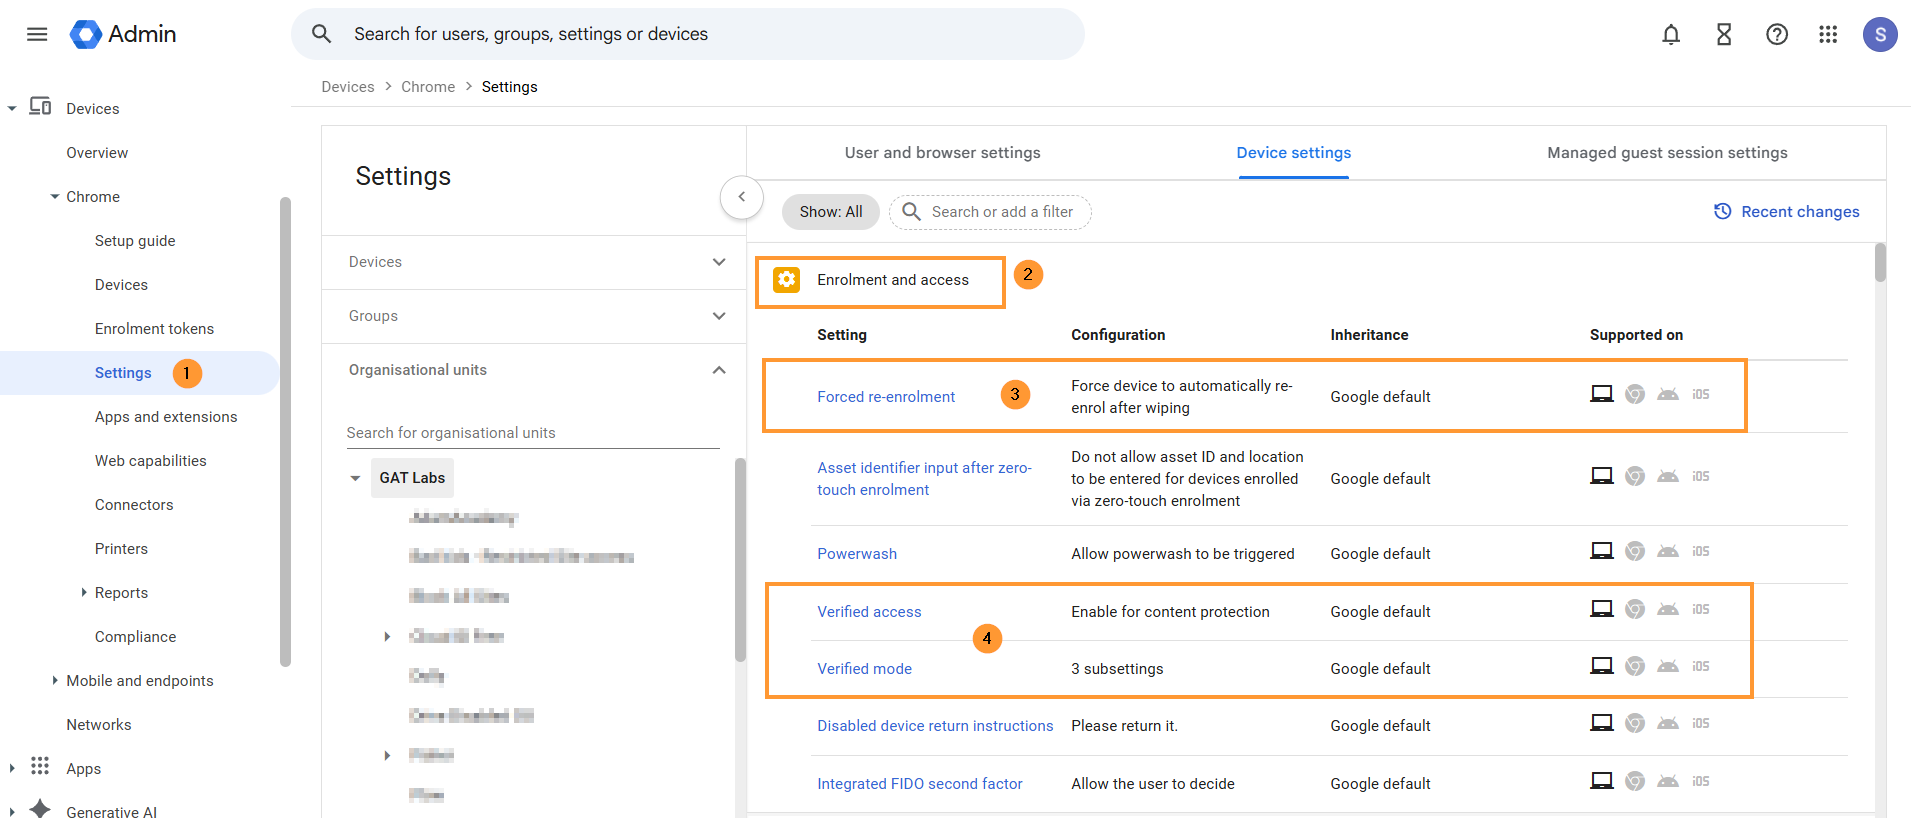
Enrollment and access #
In the Enrolment and access setting, configure the settings
- Forced re-enrolment – Force device to automatically re-enroll after wiping
- Verified access – Enable for content protection
- Verified mode – Set to require verified mode boot for verified access
Sign-in settings #
On the same page, scroll down to Sign-in settings
- Guest mode – Disable guest mode
- Sign-in restrictions – Restrict sign-in to a list of users
- Add an allowed list
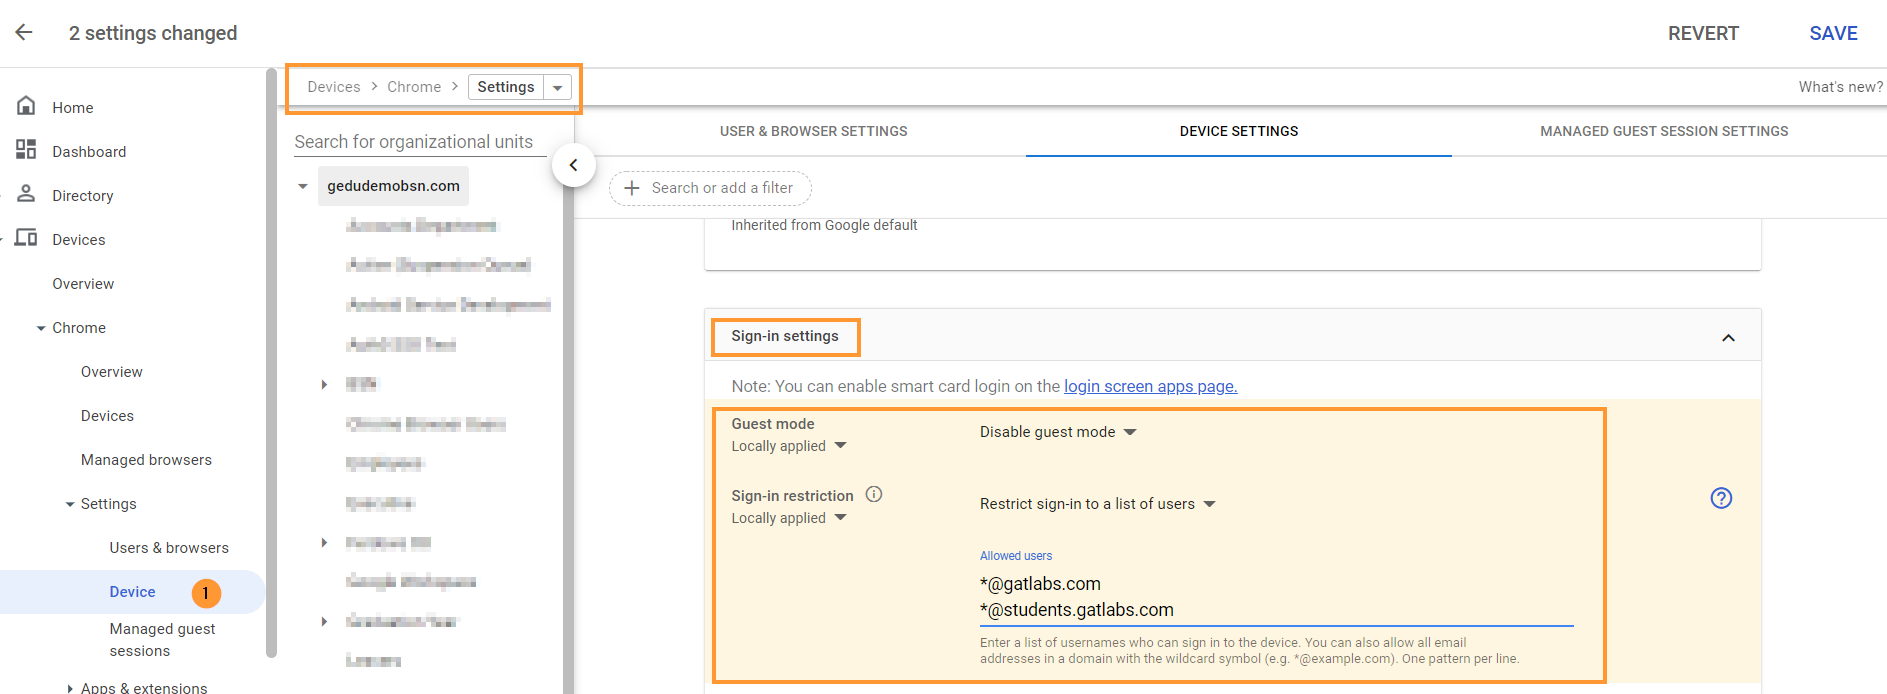
When done with the changes, click on the blue “Save” button on the bottom left.
Shield is deployed to all, but only ChromeOS devices are seen? #
It could be a case where Shield is deployed domain-wide to all users, and yet the data is only shown on ChromeOS devices. You can check this setting.
Adjust the settings for Chrome management for signed-in users
Navigate to Devices > Chrome > Settings > Users and browsers > Chrome management for signed-in users

Set it up to: Apply all user policies when users sign in to Chrome, and provide a managed Chrome experience.
Referring to: Manage user profiles on Chrome browser, and View and configure apps and extensions
When the Shield extension is deployed, every user who logs into their Chrome Browser with their domain credentials will have the extension automatically synchronized.
The Chrome user cannot override this setting.
WebCam capture – Extension URL #
If you wish to capture webcam images when Shield rules are triggered, then you will need to enable Video-input-allowed URLs and add the Shield URLs
This setting can be enabled in Devices > Chrome > Settings > Users & browsers
Then scroll down and navigate to Hardware, then to Video-input-allowed URLs

Add the WebCam URL, then click Save on the top right.
The unique ID and URLs are displayed in the GAT Shield Console – see below (GAT Shield extension ID and URL)
Remove the old WebCam extension #
The old Webcam extension is no longer needed. Please remove
- webcamID: lncmmomdcmcilmblgmnlinenbinjklgg
Find the extension above and remove
GAT Shield Extension ID and URL #
The GAT Shield extension ID and URL information are displayed in the GAT Shield Console that is launched from GAT+
See instructions below
Launch GAT+ on the top left, click on the GAT+ icon, a menu will be displayed – then select GAT Shield
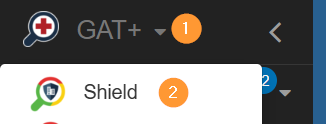
To access and view the Extension ID and URL, navigate to GAT Shield > Configuration > Extension deployment.
Allow GAT Shield Extension via Firewall #
Note: Depending on your Firewall setup, there might be restrictions set up and not allow traffic to Shield.
Please check your Firewall settings and allow the following URLs:
To install the extension, you need to whitelist the following domain: https://extension.gattool.com
Additionally need to whitelist domains based on region.
For US (Global) domains (no prefix) – US (default) region
- https://alert-shield.generalaudittool.com
- https://urlaccess-shield.generalaudittool.com
- https://activeid.generalaudittool.com
- https://shield.generalaudittool.com
For EU domains (eu-prefix) – EU region
- https://eu-alert-shield.generalaudittool.com
- https://eu-urlaccess-shield.generalaudittool.com
- https://eu-activeid.generalaudittool.com
- https://eu-shield.generalaudittool.com
Lastly, for UK domains (uk- prefix) – UK region
- https://uk-alert-shield.generalaudittool.com
- https://uk-urlaccess-shield.generalaudittool.com
- https://uk-activeid.generalaudittool.com
- https://uk-shield.generalaudittool.com
These URLs must be reachable and not blocked by the Firewall.
Force Install Extension Org Unit inheritance explained #
Note: If you install Shield on “sub.. ou”, make sure it is – ‘Force install Inherited from the domain‘.
You can click on the extension ID, select “Force install,” and Save.
When it is set up as ‘Default – Inherited from Google default‘, Shield might not be active on the selected OU.
Note: Displaying device Serial Numbers in the GAT Shield Console application is only possible when you have specifically added the device in the Google Admin console and have applied a managed device license.
Deploying GAT Shield Extension using Microsoft Group Policy Objects (GPO) #
First, apply the Chrome ADMX Group Policy using the steps found at this Google support article.
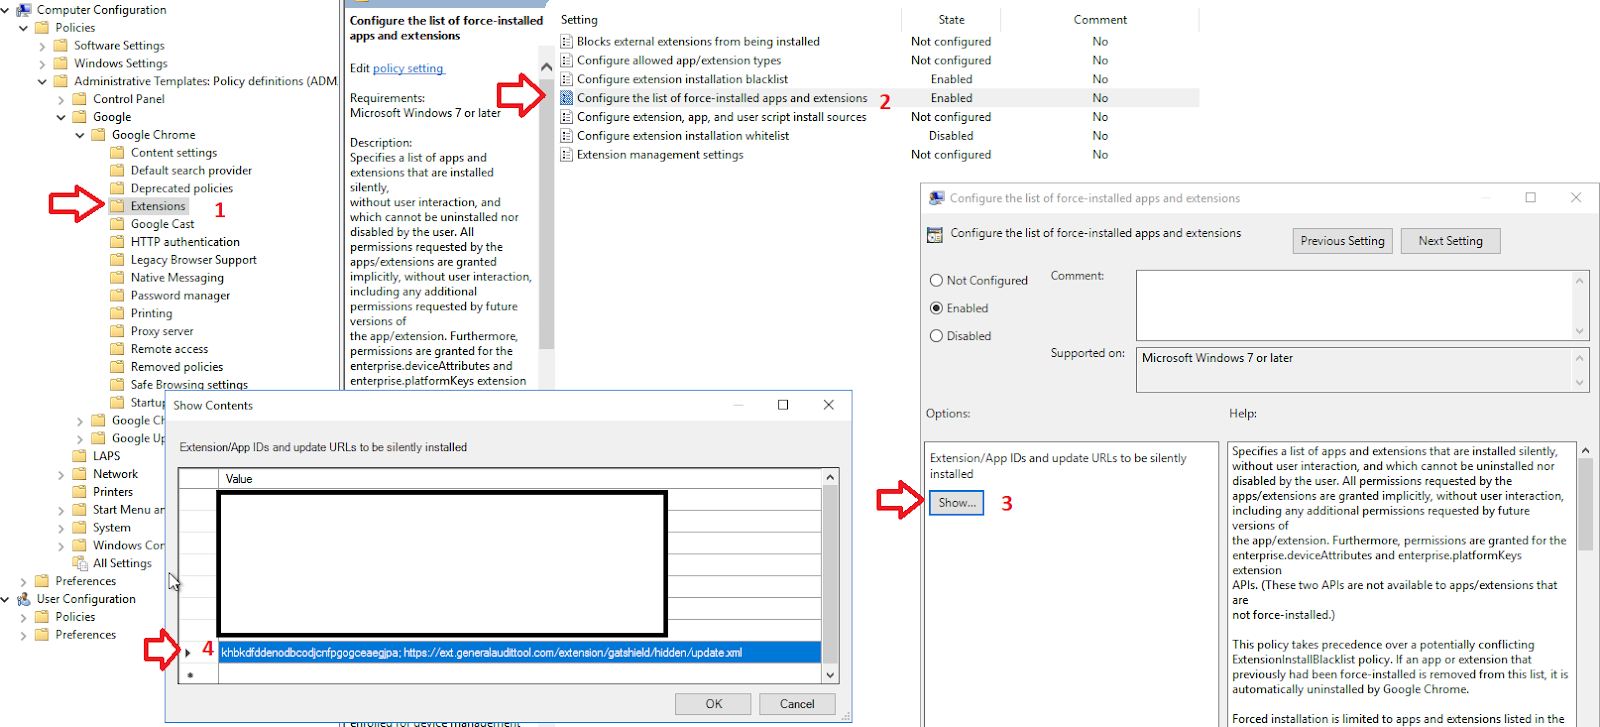
Navigate to Computer Configuration> Policies> Extension > Configure the list of force-installed apps and Extension
You are required to specify which Chrome extensions should be automatically installed (force-installed) for the users via Group Policy settings.
Next, you need to enter each extension ID and installation URL into the Group Policy setting.
You’ll find both the ID and the URL in the GAT Shield application under the Extension deployment section.
After you have configured the Chrome policy to force install the extension in Group Policy, you can assign this policy to particular groups of computers or users within your organization.